Showing posts with label onion. Show all posts

Friday, August 12, 2016

Spanish Omelet

Last year's post:  Cold Sesame Noodles with Cucumber
Two Years Ago:   Empanadas with Chicken, Corn and Zucchini

Although most people in the United States think of omelets as breakfast food, the Spanish omelet (or Spanish tortilla, not to be confused with Mexican tortillas) is a happy hour or dinner entree.  This omelet is one of the most common tapas items, found all over Spain.  A Spanish omelet closely resembles a frittata because it's cooked in a pan and then cut into wedges to serve.  Although it's typically fried in a fair amount of olive oil, then flipped and fried on the other side, this recipe is a lighter and simpler version.  It uses only the fat from the chorizo, and there's no flipping involved - it bakes in the oven, which makes it puff up beautifully.  It makes an easy, fast and delicious dinner.

One of my good friends in college spent a year studying in Spain.  When she returned, she made a traditional Spanish omelet for her buddies so we could try it out.  She fried potato slices and onions in a lot of olive oil, then added the eggs and let the bottom cook until brown.  She put an inverted plate over the frying pan with her hand on top, flipped the pan over so the omelet was on the plate, then slid the omelet back into the pan to brown the other side.  Impressive, but a little scary unless you don't care about your kitchen, which we didn't because we were in a college apartment, after all.

Anyway, as I mentioned this recipe has chorizo in addition to the potatoes, which really revs up the flavor. Make sure you buy Spanish chorizo - not Mexican chorizo - and take the paper casing off before slicing. If you do happen to buy Mexican chorizo by mistake (or can't find Spanish chorizo), just cook it and crumble it like Italian sausage and use it that way.  It'll taste a little different but will still be very good.

Shallots (a mild onion) are added to a parsley salad that goes on top of the omelet when served.  The lemon, shallots and parsley lend bright and tart notes that balance the omelet beautifully.


A brief discussion about pans - this recipe calls for a 7 or 8" nonstick ovenproof pan (or a larger pan if you're going to double the recipe to serve four).  I bought a cast iron skillet a few years ago to make cornbread, and it works perfectly for this recipe.  If you don't have one, consider buying one - they're cheap and they last forever.  Properly seasoned and cared for, they become perfectly non-stick.  All you have to do after making something is to rinse the pan with hot water (not soap) and scrub with a brush, then dry thoroughly and wipe with a drop of cooking oil.  I had absolutely no issue with taking the entire omelet out of the pan in one piece.  (Just don't use cooking spray, it becomes gummy and sticky and hard to remove.)

Spanish omelets are traditionally served either warm or at room temperature, so they're very versatile for parties (cut in small pieces) or family members who come home at different times.

printable recipe
Spanish Omelet
Serves 2

1 red potato, about 3-4” in diameter, scrubbed and cut into chunks
4 eggs
Salt and pepper
4 ounces Spanish chorizo, paper casing removed and sliced
2 sprigs fresh rosemary, leaves picked
1 shallot, peeled and very finely sliced
1 lemon, juiced
2 tablespoons olive oil
1 bunch fresh flat-leaf parsley, leaves picked

Preheat the oven to 500 degrees.

Put the potato chunks in a pan of boiling salted water and simmer until just cooked through but not falling apart, approximately 8 – 10 minutes.  Drain in a colander.  Beat the eggs with a fork in a mixing bowl, season with salt and pepper, and set aside.  Put the sliced shallot in a medium bowl with the lemon juice, some salt and pepper and the olive oil.  Stir and set aside for the shallots to soften while you make the omelet.

Heat a 7 or 8” nonstick (or cast iron) ovenproof frying pan over medium-high heat.  Add the chorizo slices and potatoes and cook until everything is lightly golden, 3-4 minutes.  Remove from the pan with a slotted spoon and set aside.  Sprinkle the rosemary leaves into the pan, then immediately pour on the egg mixture.  Add the chorizo and potatoes on top, spreading out evenly.  Place the pan in the preheated oven and bake until the omelet is puffed and golden, about 8 – 10 minutes.

Remove the omelet from the pan and cut into pieces.  Add the parsley to the shallots and toss to coat.  Serve the omelet with some of the parsley salad on top.

The omelet may be served warm or at room temperature.


Friday, April 17, 2015

Mustard Swordfish Kebabs

Last Year's Post: Prosciutto, Gruyere and Egg Toasts
Two Years Ago:  Cotswold Quiche

I'm surprised I haven't posted this recipe before.  I've had it for at least 20 years and have made it countless times, refining along the way.  The original recipe called for one big swordfish steak, which I modified to individual portions and finally to kebabs, all to get more of the great mustard marinade in every bite.  I also added red onion and zucchini to the kebabs because I'm a vegetable kind of person, but you can change them to any vegetables you like or leave them out entirely.

The kebabs are grilled or broiled so you can make them any time of the year, and they stay moist and juicy on the inside while becoming crusty on the outside with that great mustard flavor.

I knew it was time to make this recipe when I found some beautiful fresh wild swordfish on sale.  If you haven't had swordfish before, it's a mild yet meaty fish that's not oily.  Trim off the skin and the dark red portion before cutting it into chunks.


First you make the spicy mustard sauce, then you make the actual marinade.  The marinade doesn't use all the spicy mustard sauce, but it keeps beautifully and is really good on sandwiches or served with pork or poultry dishes.

The swordfish and vegetables marinate for 20-30 minutes while you preheat the grill or broiler, then you place them on separate skewers because they cook for different times.  I know it's prettier to alternate everything on the same skewer, but then some pieces are either under-cooked or over-cooked.  As a rule of thumb it's always best to put the meat and vegetables on separate skewers whenever you make kebabs.  The Lawyer likes to use two skewers rather than one because it makes the kebabs easier to turn without the individual pieces spinning around.


Served with couscous tossed with parsley and toasted pine nuts, the kebabs make a delicious, fast and healthy meal.


Mustard Swordfish Kebabs
Serves 4

Note: extra mustard sauce keeps well and is delicious on sandwiches or served with pork or poultry.

For the Spicy Mustard Sauce:
1/3 cup (1 ounce) Coleman’s dry mustard
¼ cup dry sherry
¼ cup Dijon mustard
¼ cup coarse-grained mustard

For the Kebabs
¼ cup extra-virgin olive oil
2 tablespoons fresh lemon juice
2 tablespoons Spicy Mustard Sauce (see above)
1 teaspoon kosher salt
1 teaspoon minced garlic
1 pound (1½ – 2” thick) swordfish, trimmed and cut into cubes
1 medium red onion, cut into 1” chunks
1 zucchini, sliced lengthwise and cut crosswise into 1/2” pieces
1 lemon, cut into 4 pieces

Wooden or metal skewers


If using wooden skewers, submerge in water weighted down with a plate for 30-60 minutes prior to assembly.

To prepare the spicy mustard sauce, place the dry mustard in a small bowl and gradually whisk in the sherry to form a smooth thick paste.  Whisk in the Dijon and coarse-grained mustards until well blended.  Store in a glass jar in the refrigerator for up to 2 months.

To prepare the kebabs: in a small bowl, combine the olive oil, lemon juice, 2 tablespoons of spicy mustard sauce, salt and garlic.  Divide evenly between two quart zip-top bags.  Place the swordfish in one bag and the onion and zucchini in the other.  Seal both bags and toss briefly to coat all ingredients evenly with marinade.  Set aside for 20-30 minutes to marinate.

Meanwhile, heat a grill or broiler on high heat.

After 20-30 minutes, remove the swordfish, onion and zucchini from the bags and place on the skewers.  The swordfish should be placed on skewers by itself and not crowded; the onion and zucchini can be placed on the skewers together.  Sprinkle the skewers with pepper.

Grill or broil the swordfish skewers for 3 minutes per side, turning once.  Grill or broil the vegetable skewers for 4-5 minutes per side, turning once.  

Serve kebabs immediately with lemon on the side.


Friday, October 25, 2013

Italian Tuna Sandwich (No Mayo)


Last Year's Post:  Cheese-Stuffed Meatloaf with Tomato Herb Sauce
Two Years Ago:  Pork Tenderloin with Port and Dried Cherry Sauce

I love a tuna sandwich with mayonnaise, but making it with heart-healthy olive oil is a better option and more authentically Mediterranean.  The Italian flavors continue in this sandwich with sun-dried tomatoes, chopped Kalamata olives, capers, lemon and fresh thyme. The lemon and thyme really shine through every bite, with the other ingredients adding pops of flavor.


It's very flavorful even without cheese, but I added some cheddar anyway because I love the taste of cheddar in a tuna sandwich.  You can choose to keep it in or leave it out according to your taste.


An advantage of substituting olive oil for mayonnaise is that you can make the sandwich in advance and don't need to worry if it sits out for a little while at work or on a picnic, plus it's lower in calories. You could also serve the tuna salad in a hollowed-out tomato or over greens if you want to cut even more calories.

You've probably noticed that nearly all the canned tuna in the stores these days is packed in water.  The advantage is that it's cheaper and lower in calories and fat than oil-packed tuna; the disadvantage is that it has less flavor.  So, you decide what's most important for your particular meal - calories or flavor.  I wanted this sandwich to be special so I used an oil-packed tuna, but I often use water-packed tuna for other recipes.

As a direct result of making this particular meal I have one word of advice.  When you open your tuna cans (or any other cans, for that matter), carefully stick the lids back into the cans with no jagged edges protruding before you put the cans in the trash, preferably upside-down.  Not that I would ever fail to follow such a simple safety precaution.


printable recipe
Italian Tuna Sandwich
Serves 4

4 sun-dried tomatoes
¼ cup onion, minced
1 rib celery, chopped
¼ cup pitted Nicoise or Kalamata olives, chopped
1 tablespoon capers, rinsed
2 tablespoons extra-virgin olive oil
1 teaspoon finely grated lemon zest
Juice of ½ lemon
2 teaspoons chopped fresh thyme leaves
12 ounces solid white albacore tuna in water, drained
Salt and pepper
Leaf lettuce
4 slices Cheddar cheese (optional)
4 Kaiser or other sandwich rolls


Cover the sun-dried tomatoes with hot water in a bowl.  Set aside until soft, about 20 minutes, then drain, chop and place in a medium bowl.  To mellow the minced onion, soak in cold water for 10 minutes, then drain well, pat dry, and add to the tomatoes.

Add the celery, olives, capers, olive oil, lemon zest and juice, and thyme leaves to the bowl and mix well.  Add the tuna, breaking it into chunks with a fork, then toss everything together gently so you don’t break up the tuna chunks.  Season to taste with salt and pepper.  To serve, place a leaf of lettuce on each sandwich roll bottom and top with tuna salad, optional cheddar cheese, and the sandwich top.  Squeeze the sandwich together gently.  If not eating immediately, wrap in plastic wrap and refrigerate.


Friday, October 4, 2013

Arroz Con Pollo

Last Year's Post: Spicy Homemade Peanut Butter
Two Years Ago:  Gingered Turkey and Spinach Salad

Arroz Con Pollo (air-oz cohn poy-oh) is a traditional dish from Latin America and the Caribbean.  The translation from Spanish is "chicken with rice" but that's not nearly as fun to say.  Although there are many variations, chicken, rice, saffron, tomatoes and olives are standard.  This particular recipe also has peas and I switched out bone-in skin-on chicken pieces in favor of boneless skinless chicken thighs, which are healthier and easier to eat.

The taste reminds me somewhat of paella because both dishes have rice and saffron, but paella traditionally is seafood-based.  Another difference is the addition of the citrus juices used to marinate the chicken, a technique common in Latin America.  Although I don't consider this dish to be particularly fancy, it's very flavorful and a departure from your everyday chicken recipes, plus the fragrance from the saffron is wonderful.


It's not at all difficult but including the marinating time, this dish takes a little over two hours to prepare so if you need to have dinner on the table fast after work you might want to either make this in advance or plan to serve it on a weekend.  It reheats perfectly by the way, and leftovers make great work lunches. I love having leftovers for lunch - they're usually much healthier and more interesting than whatever you'll find in your cafeteria or the nearest fast food place, plus it's a lot cheaper.


click here for a printable recipe

Arroz Con Pollo
Serves 6-8

For chicken
3 large garlic cloves, coarsely chopped
2 tablespoons fresh orange juice
2 tablespoons fresh lime juice
1 1/2 teaspoons salt
3/4 teaspoon black pepper
8 boneless skinless chicken thighs
1 tablespoon vegetable oil
1 tablespoon unsalted butter

For rice
1 lb onions, chopped (2 1/2 cups)
2 green bell peppers, chopped
3 large garlic cloves, minced
1/4 teaspoon crumbled saffron threads
1/4 cup dry white wine
2 teaspoons ground cumin
2 teaspoons salt
1 Turkish or 1/2 California bay leaf
1 (14- to 15-oz) can diced tomatoes, including juice
1 1/2 cups low-sodium chicken broth (12 fl oz)
1 1/2 cups water
2 cups long-grain white rice (3/4 lb)
1 cup frozen baby peas (not thawed; 5 oz)
1/2 cup small or medium pimiento-stuffed green olives (2 oz), halved crosswise
1/4 cup drained chopped bottled pimientos (2 oz), rinsed

Prepare chicken:
Purée garlic, orange juice, lime juice, salt, and pepper in a blender until smooth. Put chicken pieces in a large bowl and pour purée over them, turning to coat. Marinate chicken, covered and chilled, turning occasionally, 1 hour.  Transfer chicken, letting excess marinade drip back into bowl, to paper towels, then pat dry. Reserve marinade.  Heat oil and butter in 6- to 7-quart pot over moderately high heat until foam subsides, then brown chicken in 2 or 3 batches, without crowding, turning occasionally, about 6 minutes per batch. Transfer chicken as browned to a plate, reserving fat in pot.

Prepare rice and bake arroz con pollo:
Put oven rack in middle position and preheat to 350°F.

Sauté onions, bell peppers, and garlic in fat in pot over moderately high heat, stirring occasionally and scraping up brown bits from chicken, until vegetables are softened, 6 to 8 minutes.

While vegetables cook, heat saffron in a dry small skillet over low heat, shaking skillet, until fragrant, about 30 seconds. Add wine and bring to a simmer, then remove from heat.

Add cumin and salt to vegetables and cook over moderately high heat, stirring, 2 minutes. Stir in saffron mixture, bay leaf, tomatoes (including juice), broth, water, and reserved marinade and bring to a boil. Add all chicken pieces and gently simmer, covered, over low heat 10 minutes. Stir in rice, then return to a simmer. Cover pot tightly, then transfer to oven and bake until rice is tender and most of liquid is absorbed, about 20 minutes.

Scatter peas, olives, and pimientos over rice and chicken (do not stir) and let stand, pot covered with a kitchen towel, until peas are heated through and any remaining liquid is absorbed by rice, about 5 minutes. Discard bay leaf.

Friday, August 23, 2013

Pinchos Morunos

Last Year's Post: Gazpacho
Two Years Ago:  Pork with Thai Peanut Sauce

Color is Important
I grew up in an era where mothers regarded cooking as a necessity and their primary goal was to get food on the table that their family would eat.  Much of that food was beige.  Presentation and garnish were not concepts most moms thought about.  But times have changed, and cooking is now a conscious choice rather than a necessity since there are so many prepared foods and casual restaurants that are available.  There are many reasons to make the choice to cook - including good health, nutrition, dietary needs, or just plain fun - but as long as you made the effort to cook your food, why not make it look pretty?

Color plays a big part in making food pretty, which is why I chose multi-colored mini-peppers for this dish.  I could have used one big red pepper which would have added some color, but the multi-colored peppers are even better.


I've posted recipes in the past that were relatively colorless (Italian Sausage and Wild Mushroom Risotto ) because they are just that good, but it's a lot more impressive when they have all kinds of vibrant colors ( Seafood Cobb Salad ).  In particular, meat tends to be fairly brown so think about livening it up with a colorful sauce, relish, or accompanying vegetables.  Even a fresh parsley garnish on top of soup or rice helps to add color.  I once read about a chef who said he garnishes every meal he makes even if it's just for himself alone, because he felt it made that much difference to the overall eating experience.

Pinchos Morunos is Spanish in origin and is commonly found in tapas bars.  This particular recipe version converts it into a main dish by adding onion and peppers, but the pork by itself on small skewers would be a classic addition to a tapas party served with just a drizzle of lemon olive oil.  What makes it Spanish is the combination of spices on the pork, in particular the saffron.  I love the distinctive taste of saffron.  The pork is spiced but not very spicy in terms of heat, and it's what makes this dish special.  The spice mix colors the pork as it marinates before grilling.


I decided to halve the small peppers so they would fit better on the skewers plus it made them easier to seed, but I decided to leave the stems on for presentation and color.


I think I've mentioned somewhere previously that it's a good idea to separate your meats and vegetables on different skewers because they have different cook times.  If you alternate everything on each skewer your cook times become a compromise between ingredients, although for some reason that's the way skewers are most often shown.  In this case the meat was going to cook faster than the vegetables but the peppers and onions needed about the same amount of time.


One last note - although the recipe calls for marinating the meat for a few hours, it's very flexible.  I've grilled it without any marinating time at all, or you could let it marinate overnight so don't let that stop you from using this as a weeknight meal.  Served with rice or couscous, it's a fast, delicious and very healthy meal.


printable recipe
Pinchos Morunos
Serves 4

¼ cup chopped fresh parsley
1 tablespoon sweet paprika
2 tablespoons olive oil
1 teaspoon dried oregano
1 teaspoon ground cumin
1 teaspoon ground coriander
¾ teaspoon salt
¼ teaspoon saffron threads, crushed
¼ teaspoon ground red pepper
2 garlic cloves, minced
1 (1 pound) pork tenderloin, trimmed and cut into 1” cubes
1 red onion, cut into 6 wedges
8 multi-colored mini-peppers, cut in half lengthwise and seeded
8 (12”) wooden skewers
Cooking spray

Combine the first 10 ingredients in a zip top bag and toss to distribute spices.  Add the pork tenderloin cubes and toss to coat evenly.  Refrigerate for 1-2 hours.

Soak skewers in a water for 30 minutes prior to grilling to prevent burning.

Prepare a grill for direct cooking over medium heat. 

Separate each onion wedge into two pieces.  Thread meat pieces on four skewers; alternate onion and pepper pieces on the other four.

Grill over medium heat for 5 minutes per side for the meat, and 6 minutes per side for the vegetables, flipping once.


Friday, December 28, 2012

Chorizo and Mushroom Fideua


Last year's post: Tiny Pizzas

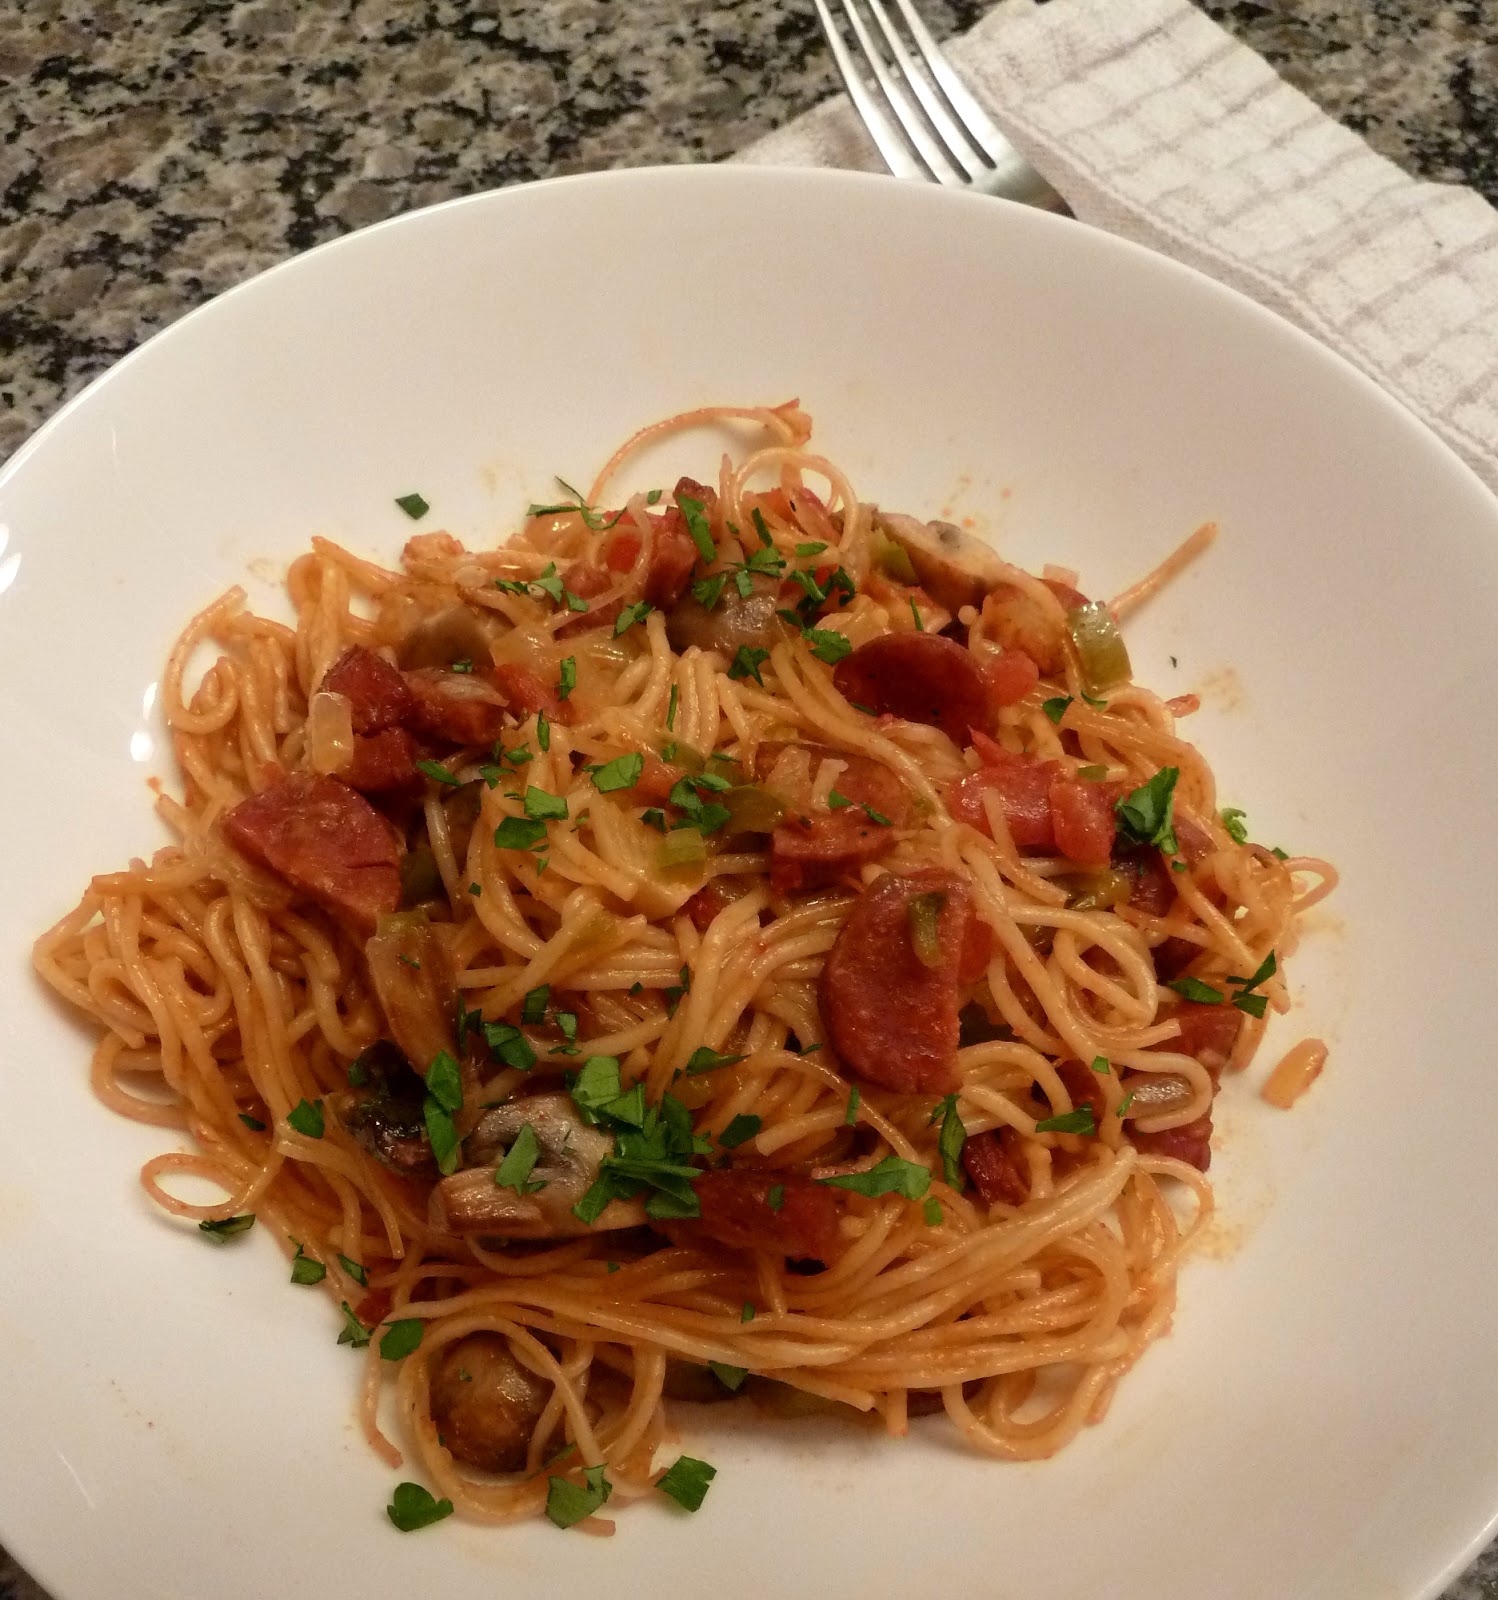
Fideua (FID-u-wah) is a pasta dish from Valencia, Spain that's somewhat similar to paella.  It typically contains seafood, paprika, tomatoes, onions, and peppers although this version contains Spanish chorizo and mushrooms in place of the seafood.  If you like paella and pasta, you'll like this dish.

It's very easy to make - you just keep throwing ingredients into a single pan and cooking until everything is done.  The pasta cooks in the broth mixture rather than separately, which infuses it with flavor.


By the end of the baking time all the liquid has been absorbed into the pasta but the dish is not at all dry.

 
A couple of thoughts about the ingredients - the recipe doesn't specify the type of paprika to use, so I use sweet paprika.  If you prefer, you could substitute half of the sweet with either half-sharp or smoked paprika.  And about chorizo - I've mentioned it before but it bears repeating, Spanish chorizo is not the same as Mexican chorizo.  Spanish chorizo is a dry, cured meat that looks a lot like pepperoni.


You can find it in most markets these days.  It comes in regular and hot (caliente) versions.  We prefer the hot (it's not really all that hot) which is why I use regular paprika instead of half-sharp.  It has a paper covering that needs to be removed before slicing.  I mention that specifically because the paper is pretty much the same color as the chorizo so it's not all that obvious until you start slicing, at which point it's a bigger hassle to remove from each little piece.

One last thought - I'm still slightly nervous about any recipe which you first cook on the stovetop, then put the pan in the oven to finish cooking ever since I took a skillet out of a 450d oven, turned away to do something else, then turned back and automatically grabbed the metal handle with my bare hand.  One quick trip to the emergency room later I had a rather spectacular bandage covering four fingers and my palm.  (The Lawyer drove me to the hospital because I was pretty convinced my hand was going to need some sort of dramatic procedure. Turns out it was just antiseptic ointment and lots of bandages.) Be sure to keep those oven mitts on!

* * click here for a printable recipe version * *

Chorizo and Mushroom Fideua
Serves 4 to 6

Note: because the angel hair pasta is cooked in the pan rather than boiled in water, it takes longer than stated on the package.


2 tablespoons olive oil
1 medium onion, chopped
2 large garlic cloves, minced
½ lb mushrooms, quartered
2 teaspoons paprika
Pinch of cayenne pepper
2 medium tomatoes, peeled, seeded and chopped
1 large green bell pepper, diced
3 cups low-salt chicken broth
½ cup dry white wine
5 ounces Spanish chorizo, paper casing removed
¾ lb angel hair pasta
Minced fresh parsley


Preheat the oven to 400d. Cut the Spanish chorizo lengthwise, then crosswise into half-moon slices. Heat the olive oil in a heavy deep paella pan or oven-proof sauté pan over medium heat. Add the onions and garlic and cook until tender, stirring frequently, about 5 minutes. Add mushrooms and sauté 4 minutes. Add paprika and cayenne and stir just until fragrant, about 30 seconds. Add tomatoes and green peppers and sauté 2 minutes. Add chicken broth, wine and chorizo. Bring mixture to a simmer. Break pasta in half and add to pan. Cook until pasta is tender, stirring occasionally, about 7 minutes. Set pan in oven and bake until all liquid is absorbed and pasta is crusty, about 25 minutes. Sprinkle with parsley.


Friday, October 26, 2012

Artisan Meatloaf


Meatloaf is very trendy right now - don't be surprised to find it on restaurant menus.  They typically will give it their own special twist, like this recipe.  I know the term "artisan" is over-used but it's the best term I can think of to describe this meatloaf.  It's the best meatloaf I've ever tasted and definitely worthy of company.  What makes it so special?  For one thing, the amazing variety of ingredients - everything from spinach to rosemary to parmesan.  For another thing, it uses a mixture of mild bison and spicy Italian sausage as the meat base.  It's stuffed with mild creamy fontina cheese and finished with a homemade tomato herb sauce.  The combination of flavors is absolutely irresistible.  It cuts beautifully and the leftovers make great sandwiches.

So let's talk about bison.  That probably gave some of you pause when you read it in the sentence up above, but it shouldn't.  Bison is a very mild meat that tastes almost identical to beef but it's better for you.  The animals eat grass for food, spend almost no time in feedlots, and are not given drugs, chemicals or hormones.  Bison is higher in iron and vitamin B-12 than beef but has much less fat, cholesterol and calories.  It's even lower in fat and calories than chicken!  Check out this handy little chart that I found online.  I knew bison was lean but I didn't know it was THAT lean.


I don't eat beef but I love (and eat) bison. We often use it as a substitute for beef in recipes. This particular recipe is made even healthier by substituting turkey Italian sausage for pork sausage. Even though the proteins are lean, the result is still very moist because of all the other ingredients that are added to the meatloaf.  If you're still not convinced, you could certainly make this recipe with ground beef but I would still save the fat and calories in the Italian sausage by using turkey sausage.  You can find spicy turkey Italian sausage links with the other turkey products in your grocer's meat case, and you can find ground bison next to beef in almost every meat case these days.  It costs a little more than ground beef but I really think it's worth it.
 
If you have leftovers and plan to make sandwiches, think about adding something crispy or crunchy for texture variation since the meatloaf is relatively soft.  I had tomato slices and fresh spinach in addition to the meatloaf so I added texture by grilling the Italian roll until crispy.  You could also add crunch by layering sliced radishes or fresh zucchini into the sandwich.


Tip of the day: next time you're at the grocery store pick up a package of plastic gloves like the ones that  doctors use - they're usually by the cleaning products. They come in handy for recipes like this where you need to mix raw ingredients by hand.  That way you know you aren't contaminating the ingredients or vice versa, espcially if you happen to have a cut or scratch on your hands.  Plus they protect your manicure.  Very important.


Cheese-Stuffed Meatloaf with Tomato Herb Sauce
Makes 4-6 servings

Like all good meatloaves, the leftovers make great sandwiches, especially in a French or Italian roll.

Meatloaf
2 tablespoons olive oil
1 1/3 cups chopped onion
1 ½ tablespoons finely chopped garlic
2/3 cup fresh bread crumbs (not dried or packaged)
1/3 cup milk
1 lb ground bison
1/3 lb spicy turkey Italian sausage, removed from casings
2 eggs, beaten
10 oz frozen chopped spinach, thawed and moisture squeezed out
2/3 cup shredded parmesan cheese
1/3 teaspoon ground fennel seed
1 teaspoon salt
½ teaspoon black pepper
1 ½ teaspoons fresh rosemary, chopped
5 ounces mild fontina or provolone cheese, cut into 3” long, ½” by ½” strips

Tomato Herb Sauce
2 tablespoons olive oil
¼ cup carrots, finely chopped
¼ cup celery, finely chopped
¼ cup shallots, finely chopped
1 teaspoon minced garlic
2 cups Italian-style diced canned tomatoes
1 tablespoon fresh basil
Salt and pepper

For meatloaf: Preheat the oven to 350d. Heat oil in a small skillet over medium-low heat. Add onions and cook 5 minutes until soft. Stir in garlic and cook 1 minute. Spoon mixture into a large mixing bowl and set aside to cool.

Combine bread crumbs and milk in a small bowl, and soak 5 minutes. Squeeze any excess milk from bread and discard. Add bread to mixing bowl along with all the remaining meatloaf ingredients except the fontina cheese. Using clean hands, mix until well blended.

Line a large rimmed baking sheet with parchment paper. Spread half of the meatloaf mixture onto the paper to form a rectangle 4 to 5 inches wide and approximately 9 to 10 inches long. Lay the cheese in 1 or 2 rows down the center of the rectangle, leaving a 1 inch border on all sides. Cover rectangle with remaining meat mixture, ensuring edges are well sealed. 


Plump up loaf with your hands to be 3 to 4 inches thick. Bake 60 to 75 minutes until the internal temperature reaches 150d.

Meanwhile, make the sauce while the meatloaf bakes. Heat oil in a medium saucepan over medium-low heat and add carrot, celery, shallots, and garlic. Turn down to low, cover and cook for 10 minutes, stirring occasionally. Add tomatoes, cover and simmer 30 minutes. Chop basil and add to the sauce; simmer 5 minutes. Season with salt and pepper. Cool 10 minutes. Puree in a blender or food processor, adding water if too thick.

Remove meatloaf from oven and let rest 10 minutes. Cut into ½” thick slices and serve with sauce.


Friday, October 12, 2012

Lentil Soup with Spicy Italian Sausage


This soup is just perfect for a cool fall day - it's warming and hearty with rich lentils, spicy Italian sausage and a wonderful mixture of vegetables.  Serve it with some crusty bread and you have a rustic feast that will warm you from the inside out.

It's easy, it makes a lot and freezes beautifully, and it's very healthy besides being completely delicious - you can see why it's one of my favorite soups.  Be sure to use spicy Italian turkey sausage because it really makes a difference.  Regarding the lentils, I actually used the remnants of three different packages when I made it this time (I collect lentils) so the specific type doesn't really matter.  If you can find the small green french lentils called "lentils du puy" I would suggest adding some for a quarter or third of the total amount of lentils.  They retain a nice firmness that adds texture to the soup but used exclusively they won't thicken the soup properly.  If you can't find them or don't want to buy two different varieties, don't worry about it.  The soup will be perfectly delicious anyway.

Although it doesn't take all that long to make, I like to make soup on the weekend and have it ready for that worst day of the week when you know you're going to come home brain dead.  Even on that day you should be able to manage heating soup and bread, right?

It certainly came in handy recently as we returned from a trip to Africa and had no idea where we were or day it was.  To show you my mental state, the morning after we returned I woke up and heard a noise outside the window and thought to myself, "it must be the baboons".  These are the days when you need soup.


* * click here for a printable recipe * *

Lentil Soup with Spicy Italian Sausage
9 main course servings

2 tablespoons olive oil
1 lb spicy Italian turkey sausage, removed from casings
1 large onion, chopped (about 3 cups)
2 large carrots, peeled, chopped (about 1 ¾ cups)
2 large parsnips, peeled, chopped (about 1 ¾ cups)
1 large celery stalk, chopped (about 1 cup)
2 ½ teaspoons dried Italian seasoning
1 lb brown or green lentils, rinsed
3 quarts (or more) low-sodium chicken broth
1 5-ounce package baby spinach
Shredded parmesan, optional


Heat oil in a large pot over medium-high heat. Add sausage and cook until browned, crumbling as it cooks, about 5 minutes. Using slotted spoon, transfer sausage to a bowl. Add onion, carrots, parsnips, celery, and Italian seasoning to drippings in the pot; cook until onion is translucent and vegetables begin to soften, stirring often, 7 to 8 minutes. Add lentils; stir to coat. Add 3 quarts broth. Bring to a boil; reduce heat to medium and simmer until lentils are tender, stirring occasionally and adding more broth by ¼ cupfuls if soup is too thick, 20 minutes.

Add sausage to soup and simmer until vegetables are tender and flavors blend, 10 to 12 minutes. Season to taste with salt and pepper. Stir in spinach. Cook until spinach is wilted, about 3 minutes.

Serve topped with shredded parmesan, optional.

Sunday, September 16, 2012

Apple, Bacon and Fontina Stuffed Acorn Squash


It's squash time of the year!  Acorn squash is one of my favorite varieties both for its flavor and because it's the perfect size to stuff for a meal.  I posted a stuffed squash recipe last fall that included rice, spicy sausage, parmesan, and mushrooms.  If you're interested in that recipe, click here or check the archives at left for September, 2011.

I thought that this fall I'd post a variation that's more fruity with fresh apples, dried cranberries, pecans, couscous and fontina cheese in addition to bacon.  This is my own ingredient combination. I initially thought about adding Brie cheese because it has a mild flavor that I thought would complement the apples, bacon and pecans. The problem with Brie is that it's so soft that I figured it would melt away completely as the squash bakes. My solution was to substitute fontina, which is also mild but firmer than Brie. Ask the person at the cheese counter for a mild fontina since they can range from very mild to quite a bit stronger in flavor. You can always change up other ingredients by adding raisins or currants rather than the cranberries, or by substituting walnuts or pine nuts for the pecans.

The basic concept is to cook the squash first because it takes a long time to get tender, then you stuff the squash and bake some more until the squash is very tender and the filling is hot.  Pretty easy.  All the stuffing prep can easily be done while the squash cooks the first time.  If you're pressed for time, prepare everything in advance and refrigerate the stuffed squash, then just bake until everything is hot again.

* * click here for a printable recipe * *

Apple, Bacon and Fontina Stuffed Acorn Squash
4 servings

2 small acorn squash
3 tablespoons butter, divided
3 slices of bacon, cooked and crumbled
½ cup couscous
¼ cup onion, finely chopped
¼ cup celery, finely chopped
1 firm apple, cored and chopped
1/3 cup dried cranberries
1/3 cup pecans, toasted and coarsely chopped
1/3 cup fontina cut in small cubes
1 tablespoon chopped parsley

Preheat oven to 400 degrees. Cut a thin slice off each end of the squash, then cut in half crosswise. Carefully scoop out seeds and fibers. Line a baking dish with parchment. Place squash halves in the baking dish and rub the cut surfaces and the interior of each with 1 tablespoon butter. Place a small amount of butter in the bottom of each half. Season with salt and pepper. Roast at 400d for 60 minutes.


While the squash is roasting, cook the couscous according to directions and set aside to cool. Preheat a large skillet over medium-high heat and add the remaining tablespoon of butter, then sauté the onion and celery for 4 minutes, stirring frequently. Add the chopped apples and sauté for two more minutes. In a large bowl, combine the couscous, apple mixture, bacon and pecans. When completely cool, add the fontina and parsley and mix thoroughly. At the end of 60 minutes, remove the squash halves from the oven and fill each until mounded. 


If you have stuffing left over, it makes a great lunch the next day. Cover the baking dish with foil. (At this point the squash halves can be refrigerated for baking later. If refrigerated, add 10 minutes or so to the baking time.) Place the squash halves back in the oven for an additional 30 minutes, until the filling is hot. Uncover and serve immediately.


Friday, August 10, 2012

The Best Salsa Ever


If you would also like to see last year's post regarding how to roast and freeze tomatoes, click here or check the archive at left for August, 2011.

OK, I know I'm sticking my neck out a little to claim this is the best salsa ever, but let me tell you why.  Some of you have heard me talk about our community garden adventure and the fact that we grew 28 different varieties of tomatoes.  What I haven't mentioned is that we grew two plants for each variety in the event that one was broken in the wind or otherwise croaked.  So we had 56 tomato plants.  What started as a bunch of cute little plants in spring turned into a veritable tomato tsunami in late summer that washed from the garden into our kitchen.  In addition to roasting tomatoes, eating tomatoes and giving tomatoes away, we tried probably 5 or 6 different salsa recipes over the years.  Most of them involved canning, which has the advantage of making lots of salsa at a time but it also involves specialized equipment and mass quantities of boiling water and steam at the hottest time of the year.

We chose our favorite recipe for a typical salsa and made it several years in a row.  But then I discovered this recipe, which I think came from celebrity chef Rick Bayless.  The flavor is entirely different from a typical salsa because all the ingredients are roasted until charred and then pureed, which gives it a smoky depth of flavor.  It's not watery like some homemade salsas, and it's not too thick like some of the popular store brands - it's just right.  (Sorry for the Goldilocks moment.)  An added bonus for the cilantro-haters out there is that it doesn't have any.  For the cilantro-lovers (like me), just put some cilantro in whatever you're serving with the salsa (like the quesadillas we're having tonight).  I would call the heat factor relatively mild, especially when served with chips or food.  Sampled by itself it will taste somewhat spicy but this is by no means a hot salsa.  It's meant to be smoky and warm, not hot.

The flavor is delicious and there's no canning involved - you just put the salsa into clean containers and freeze it.  It only takes about 30 minutes to make, and it's made in manageable quantities.  Here's all you need to make one batch, which makes about two cups of salsa.


 If you decide you really like it and want to make larger quantities, my suggestion is to make several batches rather than one big batch because if you crowd the broiler pan too much the vegetables will steam instead of charring properly, which is what gives them the smoky flavor.  (Not to mention that if you put more than one batch in the blender at a time you risk a salsa explosion all over your kitchen.)

 We make this every year now.  If you've never made salsa or even if you already have a favorite recipe, try this one and see what you think.  The ingredients are readily available at the farmers market or at the store and it's so easy to make it's almost foolproof.  Just be sure to tuck the garlic under the other ingredients before broiling so the garlic doesn't blacken along with everything else and turn bitter.  When it's hidden under something it steams and roasts and becomes mellow and sweet instead.

Not everything will char at the same rate.  At this point the jalapenos and garlic were ready to take out but the onion and tomatoes needed more time.


After a few more minutes under the broiler the onion and tomatoes were ready.


At some point during this process you will probably become deeply skeptical that it's going to work.  You'll look at that blackened mess and think there's no way it will ever turn into anything edible.

 Oh, ye of little faith.  Just add some water and turn on the blender.  You end up with a beautiful salsa with cool little charred specks.  It's magic.  And delicious!


* * click here for a printable recipe * *

Roasted Tomato Salsa
Yield: 2 cups

5 Roma (plum) tomatoes
8 garlic cloves, peeled
2 jalapeno peppers, stemmed and seeded
½ medium yellow onion, peeled and cut in half (2 quarters)
½ cup water
½ - 1 teaspoon salt
Freshly ground black pepper


Preheat the broiler with a rack at the highest position possible without having the food touch the heating elements. Place the tomatoes, garlic, chiles and onion on a baking tray lined with foil. Tuck garlic under other vegetables to avoid blackening (they’re easiest to tuck under the jalapeno halves). Broil, turning frequently until well charred, about 15-20 minutes. You may need to take some of the vegetables out earlier than others for all to achieve the right amount of charring. Set aside to cool.

Core the tomatoes. With a rubber spatula, scrape the roasted ingredients and their juices (including the blackened skins) into a food processor or blender and puree with the water until smooth.

Season with salt and pepper and serve.

Keep refrigerated or may be frozen.