Friday, December 28, 2012

Chorizo and Mushroom Fideua


Last year's post: Tiny Pizzas

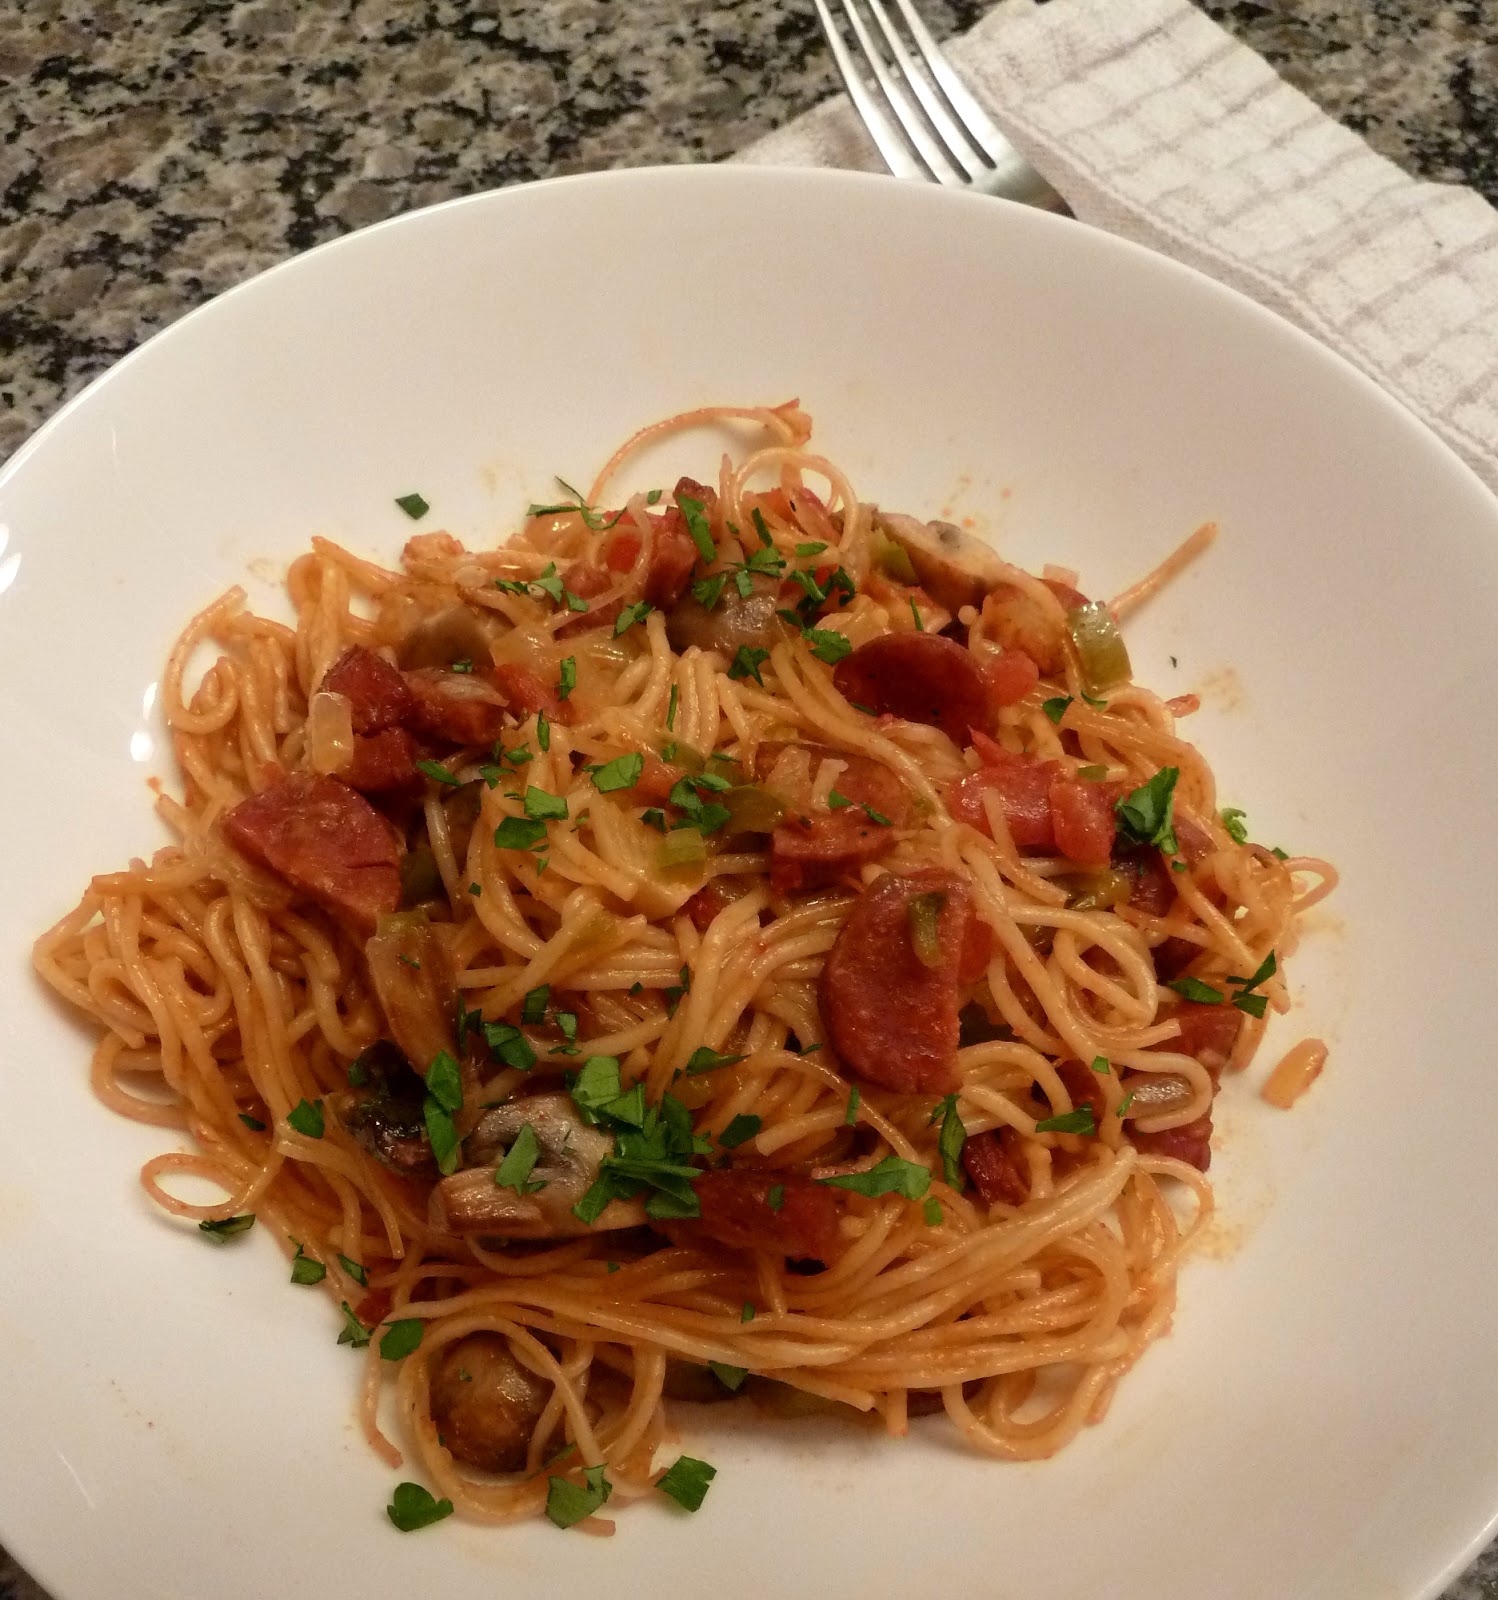
Fideua (FID-u-wah) is a pasta dish from Valencia, Spain that's somewhat similar to paella.  It typically contains seafood, paprika, tomatoes, onions, and peppers although this version contains Spanish chorizo and mushrooms in place of the seafood.  If you like paella and pasta, you'll like this dish.

It's very easy to make - you just keep throwing ingredients into a single pan and cooking until everything is done.  The pasta cooks in the broth mixture rather than separately, which infuses it with flavor.


By the end of the baking time all the liquid has been absorbed into the pasta but the dish is not at all dry.

 
A couple of thoughts about the ingredients - the recipe doesn't specify the type of paprika to use, so I use sweet paprika.  If you prefer, you could substitute half of the sweet with either half-sharp or smoked paprika.  And about chorizo - I've mentioned it before but it bears repeating, Spanish chorizo is not the same as Mexican chorizo.  Spanish chorizo is a dry, cured meat that looks a lot like pepperoni.


You can find it in most markets these days.  It comes in regular and hot (caliente) versions.  We prefer the hot (it's not really all that hot) which is why I use regular paprika instead of half-sharp.  It has a paper covering that needs to be removed before slicing.  I mention that specifically because the paper is pretty much the same color as the chorizo so it's not all that obvious until you start slicing, at which point it's a bigger hassle to remove from each little piece.

One last thought - I'm still slightly nervous about any recipe which you first cook on the stovetop, then put the pan in the oven to finish cooking ever since I took a skillet out of a 450d oven, turned away to do something else, then turned back and automatically grabbed the metal handle with my bare hand.  One quick trip to the emergency room later I had a rather spectacular bandage covering four fingers and my palm.  (The Lawyer drove me to the hospital because I was pretty convinced my hand was going to need some sort of dramatic procedure. Turns out it was just antiseptic ointment and lots of bandages.) Be sure to keep those oven mitts on!

* * click here for a printable recipe version * *

Chorizo and Mushroom Fideua
Serves 4 to 6

Note: because the angel hair pasta is cooked in the pan rather than boiled in water, it takes longer than stated on the package.


2 tablespoons olive oil
1 medium onion, chopped
2 large garlic cloves, minced
½ lb mushrooms, quartered
2 teaspoons paprika
Pinch of cayenne pepper
2 medium tomatoes, peeled, seeded and chopped
1 large green bell pepper, diced
3 cups low-salt chicken broth
½ cup dry white wine
5 ounces Spanish chorizo, paper casing removed
¾ lb angel hair pasta
Minced fresh parsley


Preheat the oven to 400d. Cut the Spanish chorizo lengthwise, then crosswise into half-moon slices. Heat the olive oil in a heavy deep paella pan or oven-proof sauté pan over medium heat. Add the onions and garlic and cook until tender, stirring frequently, about 5 minutes. Add mushrooms and sauté 4 minutes. Add paprika and cayenne and stir just until fragrant, about 30 seconds. Add tomatoes and green peppers and sauté 2 minutes. Add chicken broth, wine and chorizo. Bring mixture to a simmer. Break pasta in half and add to pan. Cook until pasta is tender, stirring occasionally, about 7 minutes. Set pan in oven and bake until all liquid is absorbed and pasta is crusty, about 25 minutes. Sprinkle with parsley.


Friday, December 21, 2012

Fondue

Last year's post: homemade chicken noodle soup

Being the planner/organizer that I am, I've already got Christmas dinner pretty well figured out and have moved on to New Year's Eve.  The Lawyer and I make a point of not going out on New Year's Eve for two reasons.  First, it seems kind of odd that some people think the best way to welcome a new year is to drink too much, act silly and wake up feeling terrible.  Even if you avoid the clubs and go out for a nice dinner, your entree choices are more limited, the service is worse, and the prices are higher than any other day of the year.  It just seems more fun and relaxed to stay home, whether you choose a romantic dinner for two or a small party for close friends.  Fondue is the perfect choice either way.  It's unique, it's fun, it's casual and it's easy.  If you have a fireplace, put a coffee table in front of it and serve the fondue on the coffee table with everyone sitting on the floor.  No fireplace?  Try some candles or flowers for fun.  (Fondue also makes a great Valentine's Day romantic dinner!)

For a while I couldn't figure out how to make cheese fondue fit as a food category - it seemed too substantial for an appetizer, but too uni-dimensional as a meal.  I mean, there's only so much bread and cheese a person can eat.  It finally clicked for me when I read a suggestion to add veggies, apples, pears, dried apricots, cooked sausages, even olives, pickles and mustard to a fondue meal to round it out.  It makes it more like a picnic.  You don't have to dip the pickles in the cheese, they just add variety.  Same with the mustard - use it as a condiment for a piece of sausage in between things dunked in the cheese.  The sharp pickle and mustard flavors cut through all that cheesiness and the veggies and fruit round out the meal nutritionally.  Plus, the fondue will feed more people when there are other things to eat.  This platter had apples, bread, red pepper, olives, peppadews, pickles and cooked Italian sausages plus whole-grain mustard on the side.

There are many different cheese fondue recipes (I actually have a small cookbook of nothing but 125 fondue recipes), but I'm sharing the classic made with wine, Emmentaler (or other good Swiss cheese) and Gruyere.  I think it goes better with a wide variety of foods than, say, a chorizo fondue or a crab fondue.  Regardless of the recipe, most will tell you to toss the grated cheeses with flour or cornstarch prior to putting them in the fondue pot.  Why?  Because it helps prevent clumping.  How?  I have no idea.

If you're new to fondue, there are a couple of things you should know.  First, it's a good idea to actually make the fondue in a saucepan on the stove instead of in the fondue pot.  The reason is logistics - if you make it in the pot, that means the fire is already burning and you have to transport hot cheese and live fire from your kitchen to wherever you're going to eat.  Or equally bad, you have to make the fondue in your eating location and hope you don't make a mess.  If you make it in a saucepan, you simply add the finished fondue to the fondue pot, take it to the table, and then light the fire underneath it.  Much safer.

The second thing to know is that you should stir the cheese occasionally while it's in the fondue pot so the bottom doesn't burn.  The final thing is to provide everyone with a plate and table fork in addition to their fondue fork.   The fondue fork is used to spear the food and dunk it in the cheese, then the food is placed on the plate.  The other fork is used to pop it in your mouth.  For obvious reasons you don't want the same fondue forks repeatedly going from cheese to mouths and back into the cheese again.  Oh - one additional thing I just thought of - if you go out and buy a fondue set, check the instructions for what to use in the little burner.  I originally thought they all took a small candle, only to find out that mine wants a gelled fuel made specially for fondue sets.  That would not be a good thing to discover on New Year's Eve night 30 minutes before you want to eat.

I hope everyone has a happy and safe holiday, and think about giving fondue a try for New Year's Eve!

click here for a printable recipe

Cheese Fondue
serve 4-5

For the fondue:
1 cup dry white wine
½ lb shredded Emmentaler (or other good Swiss cheese)
½ lb shredded Gruyere
2 tablespoons all-purpose flour
¼ teaspoon garlic powder
¼ teaspoon salt
¼ teaspoon ground nutmeg

Accompaniments:
cubed French bread
cooked sausages
apples, pears, dried apricots, figs
broccoli, bell pepper, zucchini
pickles, hot peppers, olives
mustard


Prepare the bread, fruits, vegetables, sausages and condiments of your choice and arrange on a platter prior to starting the fondue.

Thoroughly toss the cheeses and flour together in a large bowl.  Bring the wine to a simmer in a large saucepan, then add the cheese/flour mixture ¼ pound at a time, stirring constantly until the cheese is melted before adding more.  When add the cheese has melted, stir in the garlic powder, salt and nutmeg.  Transfer to the fondue pot and carry to the table.  Light the fire and place the fondue pot over it.  Stir occasionally while eating.


Friday, December 14, 2012

Greek Phyllo Wraps with Tzatziki

Last year's post: Cuban Paella

These phyllo wraps are a twist on a traditional Greek meat pie that usually contains lamb or beef called Kreatopita.   The wraps are a fun individualized version made fancy by adding herbs between the phyllo layers.  I learned this herb-layering technique years ago and also use it in a chicken recipe where the chicken breast is stuffed with cheese and wrapped with phyllo before baking.  (My Gourmet Club buddies still talk about that one occasionally.)  Anyway, it looks fancy but it's actually easy to do. 

The phyllo wraps have a delicious filling of ground turkey, onion, red bell pepper, lemon, feta, green onions, and an interesting combination of spices: oregano, cinnamon, nutmeg, salt and pepper.  (You could also substitute ground lamb or beef if you prefer.)  The wraps are very good but what makes them really great is the tzatziki (tah-zee-kee) sauce - a yogurt-based sauce with cucumber, garlic, and mint.  Don't skip the sauce.

Although the recipe takes some time to prepare the filling and assemble the wraps, the great news is that you can freeze the unbaked wraps and them bake them directly from frozen for a fast and easy weeknight meal.  If you haven't worked with phyllo before, don't worry.  The key is to keep the layers moist by covering them with a damp towel until you use each sheet, then brushing them with oil so they don't dry out and crumble.  Even if you wreck a couple of sheets, it's no big deal because a box has two bags of about 10 million sheets each. (And by the time they're all wrapped up no one can tell whether a corner split a little here or there.) You'll find phyllo in the freezer case at the grocery store. 


I've usually seen it spelled phyllo but on this particular brand they spell it fillo and then right underneath in small letters it says phyllo pastry sheets, apparently just to confuse us.  Anyway, it's pronounced fee-loh.

As I mentioned, each box has two bags of rolled-up phyllo sheets.  You certainly won't need more than one bag.  Just be aware that the phyllo needs to thaw overnight or for two hours at room temperature before using, so take one bag out and put the other one back in the freezer for another time.

Once the phyllo has thawed, slide the sheets out of the bag and gently unroll them on a cutting board.  Carefully remove one sheet and cover the remaining sheets with a damp towel.  Gently brush the phyllo sheet with olive oil, then place a dill sprig in the top middle of the sheet.  (Notice the operative terms here are gently and carefully. You'll still probably wreck a few but who cares.)

  
Remove another sheet from the pile (be sure to put the towel back) and place it over the first sheet, then brush with olive oil again.  Place the cooked and cooled filling centered on the bottom of the phyllo, leaving a 1" margin on the bottom and sides.


Start to roll up the wrap by covering the filling.
Then fold in the 1" side margins before rolling the wrap up entirely.

Place seam side down on a baking sheet and gently brush with olive oil, which keeps them from drying out and helps them brown in addition to showing off the herbs underneath.

Now all you do is bake the wraps or freeze them for later.  One last thought - this recipe makes 8 wraps.  If you have big eaters you can serve two per person, but I think one per person is perfectly fine (they're pretty big) along with a salad.  That's why the recipe states the number of wraps it makes rather than the number of servings. 

click here for a printable recipe

Greek Phyllo Wraps with Tzatziki
Makes 8 wraps

Note:  to freeze for later, assemble wraps and freeze, then place in a resealable bag.  To bake, place frozen wraps on a baking sheet lined with foil and bake in a preheated 375d oven for 30-35 minutes until golden brown.

For the wraps:
3 tablespoons olive oil
1 cup onion, diced
2 teaspoons garlic, minced
1.25 pounds ground turkey
½ cup red bell pepper, diced
2 tablespoons fresh lemon juice
1 tablespoon dried oregano
½ teaspoon kosher salt
½ teaspoon ground cinnamon
½ teaspoon ground nutmeg
½ teaspoon black pepper
¼ green onions, chopped
4 ounces feta cheese, crumbled
16 sheets (9”x14”) phyllo pastry
Olive oil for brushing
Dill sprigs

 For the tzatziki sauce:
1.5 cups plain Greek yogurt
1 medium cucumber, peeled, seeded and diced
2 teaspoons minced fresh mint
1 teaspoon garlic, minced
½ teaspoon salt
¼ teaspoon black pepper

 
Stir all tzatziki sauce ingredients together and refrigerate to allow flavors to meld while making the phyllo wraps.

Begin the wraps by making the filling (can be made in advance and refrigerated).  Heat 3 tablespoons olive oil in a large nonstick skillet over medium heat; sauté onion 3 minutes.  Add garlic, sauté 1 minute.  Stir in turkey, breaking up with a spoon, and cook 5 minutes or until brown.  Add bell pepper, lemon juice, and seasonings; cook 1 minute.  Remove from heat and allow to cool completely.  Stir in green onions and feta.

Preheat oven to 425d.

Brush 1 phyllo sheet with oil, keeping the remaining sheets covered with a damp towel.  Add a dill sprig in the upper center of the sheet.  Top with a second phyllo sheet; brush with oil.  Spoon ½ cup turkey mixture on the lower part of the sheet leaving a 1” margin on the bottom and sides. Fold the phyllo from the bottom up over the filling, then fold in 1” on both sides and roll up completely.  Place wrap seam side down on a baking sheet lined with foil; brush with oil.  Repeat with the remaining filling, phyllo sheets and oil.

Bake for 15 minutes or until golden brown.  Let stand 5 minutes to cool.  Serve with tzatziki sauce.

Friday, December 7, 2012

Rum Cake


It's Holiday Treat Day at The Lawyer's office today.  He always gets requests from his co-workers to bring rum cake, one of his signature recipes.  He also gets requests from relatives and friends for rum cake at this time of the year, which tells you just how good it is.  We found this recipe many years ago, and I remember that it was posted by flight attendant who collected plates from everywhere she traveled to use in giving rum cakes as gifts at holiday time.  The reason I remember the story is that her final warning was to bake only one cake at a time in the oven or you risk an explosion due to the alcohol.  It sounded impressive but I was doubtful that it would ever actually happen until a certain Gourmet Club incident involving peaches and brandy that produced a pretty healthy ka-bang.  Luckily the oven survived (although it did blow the door open) and it makes for a great story.

Anyway, back to rum cake.  Think about this for your office party, book club get-together, Christmas Eve dinner, or holiday open house where you've been requested to bring something.  It will make you famous.

It's really easy but you do need a 12 cup tube pan, the simpler the better since the pecans would hide an intricate design anyway.  Did you know that Bundt cakes have become trendy again?  I attended a cooking demonstration at our state fair last summer that was all about Bundt cakes.  (Yes it was the state fair but the demo was given by professional bakers.) And be sure to use dark rum rather than light rum - that's what gives it the distinctive flavor.

Glazing the cake is the most interesting part of the process, since it takes place in stages to allow the cake to absorb the glaze gradually.  Don't dump all of the glaze on right away or most of it will just run off.  Put a light layer on and allow it to absorb, then apply more layers over time until all the glaze is used up.


Rum Cake
Makes 1 large cake

1 cup chopped toasted pecans
1 (18.5 oz) package yellow cake mix (Duncan Hines recommended)
1 (3.4 oz) package vanilla or French vanilla instant pudding
½ cup cold water
½ cup vegetable oil
1 cup dark rum, divided
4 eggs

Glaze:
½ cup butter
¼ cup water
1 cup sugar

Preheat oven to 325d.  Grease and flour a 12 cup tube pan.  Sprinkle pecans over the bottom of the pan and set aside.

To make the cake, in a large mixing bowl combine cake mix, instant pudding, eggs, the ½ cup cold water, oil, and ½ cup rum.  Beat at medium speed 3 minutes, scraping down the bowl after 1 ½ minutes.

Pour batter over pecans in pan.  Bake cake until toothpick inserted into cake comes out clean, 50 to 55 minutes.  Remove cake from the oven and let cool in the pan 20 minutes.

Meanwhile, make the glaze:  in a saucepan over medium heat, melt the butter.  Stir in the ¼ cup water and sugar; bring to boil.  Boil 5 minutes, stirring constantly.  Remove saucepan from heat and stir in remaining ½ cup rum.

Invert the cake onto serving plate.  Poke all over with a wooden skewer or toothpick, being careful not to dislodge the pecans.  Spoon hot glaze over the pecans and use a pastry brush to apply the glaze evenly to the rest of the cake.  Allow cake to absorb the glaze for 5 minutes.  Repeat spooning and brushing glaze and letting cake absorb the glaze until all the glaze has been brushed onto the cake; this takes about 40 minutes.

Wipe the edges of the serving plate before serving.


Friday, November 30, 2012

Brandied Cranberries


Last year's post: chicken chow mein
 
My friend Terry gave me a jar of these brandied cranberries a few years ago and they were delicious as well as beautiful.  Her mother Charline makes them every year when fresh cranberries are available, and she very graciously gave me the recipe as well as permission to publish it.  Thank you Charline!!  The cranberries are excellent on toast or English muffins as well as mixed with yogurt or spooned onto pancakes.  Think of them as sort of like cranberry jam, except with whole fruit.  Cranberries are full of antioxidants and early research results show that they may even increase good cholesterol and decrease bad cholesterol, although I'm not sure how that translates to cranberries cooked with sugar.  Plus, you gotta love any recipe that has only three ingredients and one is brandy.


This would make a great gift during the holiday season if you're looking to give something homemade.  The recipe is very easy and makes about 3 small jars with no hot water canning required. (I followed food safety practices by washing the jars on the high temperature cycle of my dishwasher and filling the hot jars with hot cranberries before sealing and letting them cool on the counter.) If you want to make more as gifts I would suggest making several batches as opposed to one large batch because the foil pouch of hot cranberries could become pretty unwieldy.  I've never personally been burned by hot cranberries but somehow I don't think it would be fun. 

I used to work in a pizza parlor in another life and I can tell you from direct experience that melted cheese on a pizza straight out of an 700 degree oven can give you one heck of a burn, especially when you stick your thumb directly into it (by accident).  The cranberries sort of seem similar for some reason.  I received a larger and even more impressive burn by backing into the red-hot muffler of a motorcycle with my bare leg one time in Hawaii (in yet another life) but that doesn't seem quite as similar.  Yes, I am a klutz.

click here for a printable recipe

Brandied Cranberries
Makes 3 half-pint jars

1 (16 oz) package raw fresh cranberries
2 cups white sugar
6 tablespoons brandy
Heavy duty aluminum foil
Clean glass half-pint jars
 
Preheat oven to 300 degrees.  Rinse and drain cranberries.  Put cranberries in a large bowl and toss with the sugar.
 
 
Layer two large sheets of heavy duty aluminum foil on a large rimmed baking sheet and spoon the sugar and cranberries in the middle of the foil.  Fold all sides up and seal tightly.


 Bake on a center rack for 1 hour.  Open carefully and pour in the brandy, then stir gently with a spoon until all sugar is dissolved and brandy is mixed in thoroughly. 
 
 
Place in jars and let cool, then store in the refrigerator for up to two months.


Friday, November 23, 2012

Turkey and Gruyere French Dip


French Dip Au Jus is a classic sandwich normally made with beef.  This is a twist on the classic that has melted Gruyere and spinach in addition to tender turkey served with a delicious onion dipping sauce.

Although the recipe starts by cooking a turkey breast in a slow cooker, I'm publishing this post now because many of you probably have leftover turkey in your refrigerator at the moment.  This is a great way to use some of the turkey - just buy and prepare a packet of french onion soup as the dipping sauce.  Or make it even easier by buying a container of french onion soup at a local soup and salad bar.  I love turkey enough that I make this any time of the year and the slow cooker method ensures the turkey is moist and tender every time.  (Another recipe idea for leftover turkey: Wild Rice Salad )

As with many classic recipes, it's the combination of flavors and textures that makes a French Dip great - crisp french roll, rich meat, and flavorful dipping sauce that infuses everything with onion flavor.  This version is just that much better with the cheese and spinach.  Cheese makes pretty much anything better in my opinion. The baguette is briefly toasted under the broiler to melt the cheese, which also makes the bread nice and crisp. You could also certainly make this recipe by substituting leftover thin sliced roast beef or pork.

For those of you who didn't take high school French, you might not know that "au jus" actually means with juices.  Don't ask me why the name French Dip au Jus is half English and half French.  I decided to simplify and leave the au jus part off altogether.

Not only did I take French for a few years in high school, I took two ill-fated semesters of Russian in college (the second semester is the only class I've ever actually dropped out of) and a couple years of Spanish to complete my college language requirement.  All I remember as a sum total of all those years is Si, Da, Nyet, Oui, and Au Jus.   Augh.

 click here for a printable recipe

Turkey and Gruyere French Dip
Serves 6

Note:  if using leftover roast turkey, just purchase French onion soup as the dipping sauce.

 For the turkey:
3 tablespoons unsalted butter, softened
1 tablespoon fresh thyme leaves, chopped
1 tablespoon chopped fresh rosemary
Kosher salt and freshly cracked black pepper
1 large onion, roughly chopped
1 cup low-sodium chicken broth
3 tablespoons Worcestershire sauce
1 (3-pound) bone-in turkey breast

For the sandwiches:
6 individual (demi) French baguettes, sliced in half lengthwise
2-3 cups fresh baby spinach
3 tablespoons unsalted butter, softened
12 slices Gruyere cheese


For the turkey: in a small mixing bowl, mix together the softened butter and fresh herbs.  Season with salt and pepper and set aside.  Spread the chopped onions over the bottom of a slow cooker.  Pour the chicken stock and Worcestershire sauce into the slow cooker.  Sprinkle the turkey with salt and pepper, then slather it with herb butter, spreading half under the skin.  Place the turkey on top of the onions, breast side up.  Cover and cook on high for 4-6 hours, checking the temperature after 4 hours. Once the internal temperature reaches 170d, remove the turkey from the slow cooker, transfer to a cutting board and tent loosely with foil.  Allow to rest for 10 minutes before removing the skin and slicing thinly.

Remove the juices and onions from the slow cooker and keep warm as a dipping sauce.

For the sandwiches:  preheat the broiler.  Brush each cut side of the baguettes with softened butter and place on a baking sheet, buttered side up.  Top one side of each baguette with 2 cheese slices.  Place under the broiler until the cheese melts.  Remove from the oven and place a layer of spinach and turkey on the other half of each baguette.  Close the sandwich and serve with dipping sauce on the side.

Friday, November 16, 2012

Holiday Breakfast Strata


It's fun to make something special for a holiday morning.  This strata (basically a layered baked casserole) is perfect for several reasons: you make it the night before so all you have to do the next morning is bake it, you can scale it up or down for the number of people in your hungry horde, and it's hearty enough to keep the horde satisfied until the big meal later on. Oh, and it makes your house smell great while it's baking. All you need to complete the breakfast is some fruit, coffee and juice.  Think about this recipe for Thanksgiving or Christmas morning, or if you're going to have houseguests over the holiday season or plan to host a brunch.

I'm a big fan of stratas and have tried many over the years.  I like the combination of ingredients in this one - sausage, red bell pepper, asparagus, sun-dried tomatoes and mushrooms - because it's colorful and it tastes great.  But stratas are a lot like pizzas (everyone has their own favorite ingredients) so feel free to vary the specifics to suit the tastes of your group. You can vary the meat by substituting ham or turkey or bacon instead of Italian sausage, you can vary the cheese by substituting cheddar for Gouda, and you can choose any combination of vegetables.  Just be sure to choose at least one or two vegetables with bright colors (peppers, broccoli, etc.) for visual appeal. It's a great way to use up leftover ingredients in your refrigerator too.  I used a combination of shiitake and cremini mushrooms because that's what I had on hand; ditto the half and half combo of hot and sweet Italian turkey sausage.

The basic idea of a strata is to combine a bunch of  tasty ingredients with bread cubes, cheese, and a milk/egg custard.  The custard soaks into the bread overnight and the whole thing becomes solid when baked so it cuts easily. 

A note about mushrooms:  they're mostly water so cooking them in a pan until they release their water and are browned will intensify their flavor significantly.  I often carmelize them in this way prior to putting them a cooked dish to bring out their flavor.  Check out the "before" and "after" pictures below and you'll see how much they shrink as they release water.

Before
After
Don't just cook them until they're soft - continue cooking for a few minutes after all the water has evaporated so they have a chance to brown.  That's where the flavor comes from.  For this recipe I started cooking the mushrooms first to carmelize them prior to putting the other vegetables in for just a few minutes so they wouldn't get too soft.  Remember they'll cook some in the oven also.


While the vegetables are cooking you can shred the cheese, cut up the bread, and mix the eggs, milk and seasonings.


Then you assemble the strata and refrigerate it overnight.  I decided to make a small version since The Lawyer and I were going to have it for dinner (it's equally good for breakfast or dinner).  If you have a bigger crowd you can double the recipe and put it in a 9x13 pan.  Then all you have to do the next day is bake it while you make coffee and get some fruit ready.


Sausage, Asparagus & Wild Mushroom Strata
Serves 6

 Note: this recipe may be doubled and put in a 9x13” pan.

2 tablespoons butter
8 ounces asparagus, trimmed, cut diagonally into 1” pieces
3 green onions, sliced
1/3 cup diced red bell pepper
1/3 cup sun-dried tomatoes, chopped
6-8 ounces wild mushrooms (shiitake or cremini), trimmed and sliced
12 ounces turkey Italian sausage (sweet, hot, or a 50/50 blend), removed from casings
½ loaf sourdough bread, cut into 1” cubes
1 ½ cups shredded Gouda cheese
6 eggs, slightly beaten
1 ¾ cups milk
¼ teaspoon dried thyme, crumbled
¼ teaspoon salt
¼ teaspoon pepper

In a large skillet over medium heat, melt 1 tablespoon butter and add mushrooms.  Cook and stir until the moisture has evaporated and the mushrooms begin to brown, about 5 minutes.  Add the asparagus and red bell pepper and sauté for 2 more minutes.  Put the vegetable mixture in a medium bowl with the green onions and sun-dried tomatoes.

Melt the remaining 1 tablespoon butter in a skillet and add the Italian sausage, breaking it up with a spoon as it cooks until it begins to brown and is no longer pink inside.  Add the sausage to the vegetable bowl.

While the sausage cooks, whisk the eggs and milk with the thyme, salt and pepper.

Spray a 9x9” or 9x11” pan with cooking spray.  Arrange half the bread cubes in the baking dish, then layer half the sausage and vegetable mixture.  Sprinkle with half the shredded cheese.  Add the remaining bread cubes and top with the remaining sausage and vegetables.  Pour the egg mixture evenly over the strata.  Use a fork to press the sausage mixture and bread into the milk mixture until all the bread is moist.  Cover with foil and refrigerate overnight, reserving the remaining cheese.

To bake, preheat the oven to 350 degrees.  Bake uncovered for 60 minutes, then sprinkle with the reserved cheese and bake an additional 5 minutes until the cheese melts.  Let stand 10 minutes before cutting to serve.


Friday, November 2, 2012

Greek Shrimp and Orzo


The weather has definitely turned to fall lately, mostly on on the cloudy, rainy and cold side.  Personally I'd rather be lounging on a Greek Island so it's time to make this Greek Shrimp and Orzo dish and pretend.  I first made this dish many years ago when my friend Susie came over for dinner.  The reason I still remember it is because Mike the Irish Wolfhound was laying between the kitchen and dining room and Susie had to step over him.  If you're not familiar with Irish Wolfhounds, they're the tallest dog breed in the world.  Mike weighed 160 pounds and measured 8 feet from nose to tail.  Just as Susie started to step over him, Mikey decided to stand up and Susie kind of ended up riding him around the kitchen.  Pretty amusing.  Anyway, it made the evening stand out in my memory, including the fabulous baked shrimp dish.  I'm pretty sure Susie still remembers that night also. 

I have a rating system for recipes from 1 to 5 stars and never keep anything rated less than 4.5 stars (yes, I give half stars in a pinch).  My note from that night on the recipe is not only 5 stars, but I also added the comment "very excellent". Any time I add a comment like that it means I wish I could have given it even more stars.  If you like Greek food you really should try it.  Not familiar with orzo?  It's actually a small pasta shaped like rice and it's quite common in Greek cooking.  You'll find it with the other pastas in the grocery aisle.


What makes this dish great is the combination of tender shrimp, rich tomatoes, salty feta and meaty olives.  It's easy to make and it's great for entertaining or for a family meal.  It serves four so double the recipe for entertaining.  Well, unless your entertaining involves four people, of course.  :-)  Go easy on the salt because feta and kalamata olives are both salty - you can always add more at the table.

Making this dinner was a great excuse to go out and buy a pretty new gratin baking dish, which I've wanted for some time.  I debated over the color and finally chose red over blue, only to figure out that you can't even see the color in the pictures because it's only on the outside of the dish.  But I still like it, especially the oval shape.  If you don't happen to have a cool oval baking dish, just use whatever baking dish you have on hand.


click here for a printable recipe


Greek Shrimp and Orzo
Serves 4

½ medium onion, finely chopped
2 garlic cloves, minced
¼ teaspoon dried oregano, crumbled
¼ teaspoon red pepper flakes
2 tablespoons olive oil
¼ dry white wine
1 (14-15 ounce) can crushed tomatoes
¼ teaspoon salt
¾ lb large shrimp, shelled and deveined
8 ounces dried orzo (pasta)
1/3 cup kalamata olives, pitted and coarsely chopped
8 ounces feta, patted dry and crumbled
Lemon wedges for garnish


Preheat oven to 425d.

Cook onion, garlic, oregano and red pepper flakes in 1 tablespoon oil in a large heavy pot over moderately high heat, stirring until onion is softened, about 3 minutes.  Add wine and boil until reduced by half, about 3 minutes.  Stir in tomatoes and salt, then reduce heat and simmer, stirring frequently, until slightly thickened, about 8 minutes.  Stir shrimp into sauce and simmer, stirring occasionally, until shrimp are barely cooked through, about 3 minutes.

Meanwhile, cook orzo in a pot of boiling water according to package directions. Reserve ¼ cup cooking water, then drain orzo in a sieve.  Return orzo to the pot and toss with remaining tablespoon olive oil.  Stir in sauce with shrimp and reserved cooking water, then add olives and salt and pepper to taste.

Spray a baking dish with cooking spray (or use oil).  Spoon half of the pasta into the dish, then sprinkle with half of feta.  Top with remaining pasta and feta, then bake uncovered in the middle of the oven for approximately 15 minutes until the pasta is heated through and the cheese is slightly melted.

Garnish each serving with a lemon wedge.


Friday, October 26, 2012

Artisan Meatloaf


Meatloaf is very trendy right now - don't be surprised to find it on restaurant menus.  They typically will give it their own special twist, like this recipe.  I know the term "artisan" is over-used but it's the best term I can think of to describe this meatloaf.  It's the best meatloaf I've ever tasted and definitely worthy of company.  What makes it so special?  For one thing, the amazing variety of ingredients - everything from spinach to rosemary to parmesan.  For another thing, it uses a mixture of mild bison and spicy Italian sausage as the meat base.  It's stuffed with mild creamy fontina cheese and finished with a homemade tomato herb sauce.  The combination of flavors is absolutely irresistible.  It cuts beautifully and the leftovers make great sandwiches.

So let's talk about bison.  That probably gave some of you pause when you read it in the sentence up above, but it shouldn't.  Bison is a very mild meat that tastes almost identical to beef but it's better for you.  The animals eat grass for food, spend almost no time in feedlots, and are not given drugs, chemicals or hormones.  Bison is higher in iron and vitamin B-12 than beef but has much less fat, cholesterol and calories.  It's even lower in fat and calories than chicken!  Check out this handy little chart that I found online.  I knew bison was lean but I didn't know it was THAT lean.


I don't eat beef but I love (and eat) bison. We often use it as a substitute for beef in recipes. This particular recipe is made even healthier by substituting turkey Italian sausage for pork sausage. Even though the proteins are lean, the result is still very moist because of all the other ingredients that are added to the meatloaf.  If you're still not convinced, you could certainly make this recipe with ground beef but I would still save the fat and calories in the Italian sausage by using turkey sausage.  You can find spicy turkey Italian sausage links with the other turkey products in your grocer's meat case, and you can find ground bison next to beef in almost every meat case these days.  It costs a little more than ground beef but I really think it's worth it.
 
If you have leftovers and plan to make sandwiches, think about adding something crispy or crunchy for texture variation since the meatloaf is relatively soft.  I had tomato slices and fresh spinach in addition to the meatloaf so I added texture by grilling the Italian roll until crispy.  You could also add crunch by layering sliced radishes or fresh zucchini into the sandwich.


Tip of the day: next time you're at the grocery store pick up a package of plastic gloves like the ones that  doctors use - they're usually by the cleaning products. They come in handy for recipes like this where you need to mix raw ingredients by hand.  That way you know you aren't contaminating the ingredients or vice versa, espcially if you happen to have a cut or scratch on your hands.  Plus they protect your manicure.  Very important.


Cheese-Stuffed Meatloaf with Tomato Herb Sauce
Makes 4-6 servings

Like all good meatloaves, the leftovers make great sandwiches, especially in a French or Italian roll.

Meatloaf
2 tablespoons olive oil
1 1/3 cups chopped onion
1 ½ tablespoons finely chopped garlic
2/3 cup fresh bread crumbs (not dried or packaged)
1/3 cup milk
1 lb ground bison
1/3 lb spicy turkey Italian sausage, removed from casings
2 eggs, beaten
10 oz frozen chopped spinach, thawed and moisture squeezed out
2/3 cup shredded parmesan cheese
1/3 teaspoon ground fennel seed
1 teaspoon salt
½ teaspoon black pepper
1 ½ teaspoons fresh rosemary, chopped
5 ounces mild fontina or provolone cheese, cut into 3” long, ½” by ½” strips

Tomato Herb Sauce
2 tablespoons olive oil
¼ cup carrots, finely chopped
¼ cup celery, finely chopped
¼ cup shallots, finely chopped
1 teaspoon minced garlic
2 cups Italian-style diced canned tomatoes
1 tablespoon fresh basil
Salt and pepper

For meatloaf: Preheat the oven to 350d. Heat oil in a small skillet over medium-low heat. Add onions and cook 5 minutes until soft. Stir in garlic and cook 1 minute. Spoon mixture into a large mixing bowl and set aside to cool.

Combine bread crumbs and milk in a small bowl, and soak 5 minutes. Squeeze any excess milk from bread and discard. Add bread to mixing bowl along with all the remaining meatloaf ingredients except the fontina cheese. Using clean hands, mix until well blended.

Line a large rimmed baking sheet with parchment paper. Spread half of the meatloaf mixture onto the paper to form a rectangle 4 to 5 inches wide and approximately 9 to 10 inches long. Lay the cheese in 1 or 2 rows down the center of the rectangle, leaving a 1 inch border on all sides. Cover rectangle with remaining meat mixture, ensuring edges are well sealed. 


Plump up loaf with your hands to be 3 to 4 inches thick. Bake 60 to 75 minutes until the internal temperature reaches 150d.

Meanwhile, make the sauce while the meatloaf bakes. Heat oil in a medium saucepan over medium-low heat and add carrot, celery, shallots, and garlic. Turn down to low, cover and cook for 10 minutes, stirring occasionally. Add tomatoes, cover and simmer 30 minutes. Chop basil and add to the sauce; simmer 5 minutes. Season with salt and pepper. Cool 10 minutes. Puree in a blender or food processor, adding water if too thick.

Remove meatloaf from oven and let rest 10 minutes. Cut into ½” thick slices and serve with sauce.