Showing posts with label basil. Show all posts

Thursday, April 4, 2019

Walnut Pesto Pasta


It's finally spring!  That calls for something light and fresh for dinner even though it's not quite salad weather yet in most places.  This vegetarian pasta fits the bill perfectly with hints of lemon, fresh basil and toasty walnuts. I actually like the walnut pesto better than regular pesto because the walnuts (and walnut oil) give it a depth of flavor.  I encourage you to buy the walnut oil rather than using regular olive oil because it does make a difference.  You should be able to find it with the other oils in most grocery stores. I like it in salad dressings as well - particularly if the salad will have some nuts - because it's so aromatic and delicious and will echo the nut flavor.

This pasta dish is very easy to make, and very fast.  Serve with a green salad and crusty bread and you've got a great vegetarian meal.

print

Walnut Pesto Pasta
Serves 6

2 cloves garlic, roughly chopped
2 cups firmly packed fresh basil
1/2 teaspoon fine sea salt, plus more to taste
Ground black pepper, to taste
1 teaspoon lemon zest
1/2 cup lightly toasted walnuts, plus finely chopped walnuts for garnish
6 tablespoons walnut oil
2 tablespoons extra-virgin olive oil
1/2 cup grated Parmigiano Reggiano or Pecorino Romano cheese, plus more for garnish
1 pound fresh fettuccine or linguine


Top of Form
Bottom of Form
Combine garlic, basil, salt, pepper, lemon zest and walnuts in a food processor and pulse until combined, scraping down sides of food processor bowl as needed. Slowly add walnut oil and olive oil, pulsing until combined. Add cheese and process briefly. Do not over process or pesto will have very little texture. Taste and adjust the seasoning, keeping in mind that cheese adds salt, so additional salt may not be needed.

Bring a large pot of salted water to a boil. Add pasta and cook until al dente, about 3 minutes. Drain, reserving 1/4 cup cooking water. Thin pesto with 1 to 2 tablespoons of the reserved pasta cooking water to achieve a sauce that will coat pasta. Drizzle pesto over pasta and toss to combine. Garnish with chopped walnuts and grated cheese.


Friday, May 1, 2015

Toasted Couscous Salad

Last Year's Post:  Coconut Lime Grilled Shrimp with Pineapple Rice
Two Years Ago:    Jewels of Spring

This is a delicious salad that could be either a great side for grilled meats, a stand-alone vegetarian entree, or a more substantial main-dish salad with the addition of some cooked turkey, chicken or shrimp.  The original recipe that came from Giada de Laurentiis called for cooking the couscous first, then frying it in olive oil.  I like the idea of adding some toastiness to the couscous, but frying?  Seriously, I doubt Giada eats anything fried because she looks like she weighs about 90 pounds sopping wet.  I modified the recipe to toast the couscous in a dry skillet before cooking it and was very happy with the result.  It's probably not quite as crunchy as fried couscous, but I just can't imagine all that oil in a nice healthy salad.  Just be careful when you're toasting the dry couscous, because it can go from toasted to burned in about 2 seconds.  Don't take your eyes off it, and stir almost continuously until it's a nice medium golden brown.


In addition to the toasted couscous, the salad contains sun-dried tomatoes, cucumbers, basil, and ricotta salata (or feta) cheese.  Ricotta salata is basically the Italian version of feta - a firm, mild and salty cheese.  Ricotta salata can be hard to find, so a block of feta is an easy substitute.  This is a nice refreshing salad on its own, but you could also add nuts, olives, or anything else you want.


You can use dry or oil-packed sun-dried tomatoes, whichever you prefer.  I tried working with the dry version but I find them a little too chewy for my preference, so I use oil-packed.  If you use oil-packed tomatoes,  don't throw away the oil!  It's full of flavor and can be used for vinaigrettes, cooking eggs, drizzled on sandwiches, making paella, or any manner of other dishes.  For this recipe, I used half and half regular olive oil and sun-dried tomato oil for the vinaigrette to give a little more tomato flavor without it becoming overwhelming.


This is a good salad for serving outdoors because it doesn't contain anything like mayonnaise that could spoil.  Think about it for your next grilling party or picnic.


print recipe
Toasted Couscous Salad
Serves 4-6

1 ¼ cups low-sodium chicken broth
1 ¼ cups couscous
4 ounces feta or ricotta salata cheese, cut into ½” pieces
½ English cucumber, seeds removed and cut into ½” pieces
¼ cup sun-dried tomatoes, chopped
¼ cup grated Parmesan
¼ cup chopped fresh basil leaves

Vinaigrette:
¼ cup extra-virgin olive oil (may substitute half from jar of oil-packed tomatoes)
Zest and juice of ½ large lemon
½ teaspoon kosher salt
¼ teaspoon freshly ground pepper


In a non-stick skillet, toast the couscous 3-5 minutes until browned, watching very closely and stirring almost constantly to avoid burning the couscous.  Add the broth and stir, cook one minute, cover and place off the heat for 5 minutes.

After 5 minutes, place the couscous in a medium bowl and add the Parmesan, toss to combine.  Let cool.

While the couscous is cooling, make the vinaigrette by whisking together all the ingredients.


When the couscous is cooled, and the feta or ricotta salata, cucumber, tomatoes, and fresh basil.  Pour the vinaigrette over and toss to combine everything.

Saturday, June 21, 2014

Chicken with Fresh Cherry Salsa

Last Year's Post: Farro, Kale & Smoked Mozzarella Salad
Two Years Ago:  Strawberry-Basil Lemonade

Who doesn't love cherries?  I was happy to see them back in the grocery stores (the season lasts from May to August) and immediately bought a big bag.


They're great for snacking, of course, but I wanted to find a new and different use for some of them beyond the normal ice cream topping or coffee cake.  This recipe for Chicken with Fresh Cherry Salsa was really delicious, fast, easy and healthy which rates as a total winner in my book.  If you don't happen to own a cherry pitter (the mark of a true cherry lover) you can cut the cherries in half and take out the pit like an avocado, or you could simply cut the cherry flesh off each of the four sides leaving just the pit and stem.


After that, all you have to do in combine the salsa ingredients and cook the chicken however you want - the recipe calls for a quick pan saute but you could also grill or broil the chicken.  Serve with rice pilaf tossed with some toasted pecans and green onions for an impressive dinner any night of the week.


If you're interested in a salad recipe using cherries, check out wild rice salad with fresh cherries.

printable recipe
Chicken with Fresh Cherry Salsa
Serves 4

Note:  the chicken and cherry salsa is excellent served with rice pilaf tossed with toasted pecans and green onions.

1 pound fresh cherries, pitted and roughly chopped
½ cup minced red onion
2 tablespoons fresh lemon juice
2 tablespoons chopped fresh basil
1 tablespoon balsamic vinegar
2 teaspoons honey
¼ teaspoon salt
2 large chicken breasts, cut horizontally into 4 cutlets
1 tablespoon olive oil
Salt and pepper

Combine cherries, red onion, lemon juice, basil, balsamic vinegar, honey and salt in a bowl.  Set aside.

Heat a large skillet over medium-high heat; add the olive oil.  Season the chicken cutlets with salt and pepper, then sauté in the skillet for 3-4 minutes on the first side until lightly golden.  Flip, reduce heat to medium, cover and cook on the second side until cooked through, approximately 3 minutes.  Remove from the pan and let rest for a minute or two.

Serve chicken cutlets with salsa spooned over the top.


Friday, June 21, 2013

Farro, Kale & Smoked Mozzarella Salad

Last Year's Post: Easy and Elegant Summer Salad with Cheese, Fruit and Nuts

I was having a bad day a few weeks ago and stopped at the deli counter of my local grocer to pick up dinner (yes, even food bloggers do it).  They had a new farro salad that looked interesting so I tried it and really liked it - so much that I emailed them (ever so politely) and asked for the recipe.  They replied (ever so politely) that unfortunately they could not supply the recipe "because it was not scaled for consumer use".  Right.  Guess what - send me the big version and together with my calculator we can figure out the consumer version.  Actually, I didn't send them that reply (although I wanted to) because I knew it was pointless.  Grrrr.  Now aggravated, I decided to come up with my own version.  That would show them!  I printed out 4 or 5 different farro salad ideas before creating this one.  I like the mix of ingredients but of course you can always substitute your favorites.

The three most important ingredients are farro, kale and smoked mozzarella (you probably figured that out from the title, right?). Farro and kale may be new to you. Farro (fahr-oh) has become very popular lately in the United States, but it's an ancient grain believed to have once been consumed by the Roman legions and eaten in Italy ever since. Farro is not wheat, but a plant and grain all its own. A grain of farro looks and tastes somewhat like a lighter brown rice with a chewy (not soft) texture. It has a complex, nutty taste with undertones of oats and barley. Due to its chewy texture, farro is quite filling.  You can find farro in some upscale grocery stores or in natural food stores.  If you don't feel like trying farro, you could always substitute brown rice or barley.

cooked farro
Kale is a leafy green with more vitamins and antioxidants than even spinach, which explains why it's become so popular.  When raw, it's a tough and bitter green but when blanched for a brief period it becomes softer and the bitterness disappears. You strip the leaves off the tough stems, chop them up, boil the leaves for about a minute, then drain. The bright green color is attractive in salads and the health benefits are great.  If you don't want to try kale, substitute raw baby spinach instead.


In addition to farro and kale, the salad contains cherry tomatoes, cucumber, green onions, herbs and smoked mozzarella.
I found these cute little multi-colored cherry tomatoes at Trader Joe's


It's a healthy summer alternative to heavier foods and an opportunity to try new ingredients.  Of course you could serve it as a side salad to grilled meats and it also makes a great salad for a potluck picnic because it doesn't wilt, but we like to eat it on its own - there's plenty of fiber and protein to keep you satisfied.  It also makes a great lunch for work the next day.

printable recipe
Farro, Kale & Smoked Mozzarella Salad
Serves 6 to 8

Note:  to seed a cucumber, cut it in half lengthwise and use a small spoon to scoop out the seeds down its length.

For the dressing:
2 tablespoons red wine vinegar
¼ cup olive oil
1 tablespoon minced shallots
Salt and pepper

For the salad:
12 oz farro, rinsed
½ head kale, leaves stripped off steams and chopped into bite-sized pieces
6 oz smoked mozzarella, cubed
1 pint cherry tomatoes, halved
6 green onions, finely chopped
½ cucumber (or 1/3 English cucumber), unpeeled, seeded and chopped
½ cup chopped chives
¼ cup chopped fresh basil

 Place the red wine vinegar in a small bowl.  Gradually whisk in oil.  Add the shallots and salt and pepper, then set aside.

Place the farro in a large pot and cover with water by about 3 inches.  Set over high heat and bring to a boil.  Reduce the heat, cover, and simmer until the farro is tender, 15-18 minutes.  Drain, rinse, and drain again.  Set aside to cool.

Bring a large pot of water to a boil.  Add the kale pieces and boil 60-90 seconds until bright green.  Drain and immediately place the kale pieces in an ice water bath to stop the cooking process.  Drain thoroughly and pat dry.

Put the farro in a large bowl; add the kale, mozzarella, green onions, and cucumber and toss.  Add the dressing and toss again.  Just before serving, add the chives and fresh basil.  Taste and adjust salt and pepper as needed.

Serve room temperature or cold.


Friday, May 3, 2013

Venetian Shrimp and Scallops

Last Year's Post: Chicken Salad with Fruits and Peppadews

This dish has a tomato-saffron sauce that is absolutely delicious with the tender scallops and shrimp.  (Be sure to serve it with lots of crusty bread for mopping up the sauce.)  It's very light, fresh and healthy with fragrant lemon zest and fresh basil, making it a perfect spring or summer seafood dinner. I can usually pretty well envision how a dish will taste just from reading the recipe, but I must say this one surprised me by just how insanely good it was the first time I made it.  It's become a regular repeater at our house, which only happens to the very best recipes since we like to try new ones so often.  If you like seafood you really should try it.

Saffron is a key ingredient in the flavor profile and the recipe won't be the same without it (ditto the lemon and fresh basil).  Crumble the saffron threads as you put them in the sauce for more flavor and more even distribution.  Someone gave me a teeny-tiny mortar and pestle for that very purpose several years ago.  I think it's hilarious because it's so small but I must admit it works great.  I've never seen them in any store and have no idea where it came from.  Don't you just love it?


I typically cut the scallops in half horizontally for this recipe, for a couple of reasons.  First of all, scallops should not be over-cooked or they get tough.  Since sea scallops are often really big, it's harder to be sure they're cooked all the way through without over-cooking them.  Cutting them in half results in a faster cook time, plus they're easier to eat and you have more of them in the dish.  I think five or six thinner scallops look much more attractive and plentiful (along with the shrimp) then two or three giant ones.  Searing them gives an attractive color, a nice caramelized crust, and additional flavor.


One thought about the diced tomatoes - I almost always use fire-roasted tomatoes because I think it adds a little more flavor and I like the little black flecks.  It's strictly a personal preference, but I would suggest checking the sodium content of whatever brand you choose because canned tomato products are notoriously high in sodium.  Same thing for the chicken broth.

This is a fast and easy meal to prepare so it's perfect for any night of the week, although I think it's certainly impressive enough to serve to company.


printable recipe
Venetian Shrimp and Scallops
Serves 4

¾ lb sea scallops, cut in half horizontally
¼ cup flour, seasoned with salt and pepper
1 tablespoon olive oil
2 tablespoons butter
2 garlic cloves, minced
1 large shallot, finely chopped
¼ teaspoon crushed red pepper flakes
1 cup dry white wine
1 cup low-sodium chicken broth
1 (14 oz) can diced tomatoes with juice
¼ teaspoon saffron threads, crumbled
¾ lb large shrimp, peeled and deveined
12 leaves fresh basil, shredded or torn
1 lemon, zested
Hot crusty bread

Lightly coat the sea scallops in the seasoned flour.  Preheat a large skillet over medium-high heat and add the olive oil and butter.  When the butter has melted, add the scallops and brown for 1 minute on each side.  Remove.

Add a little more olive oil to the pan if necessary, then add the garlic, shallots, and crushed red pepper flakes.  Reduce heat and sauté 2 minutes, stirring constantly.  Add wine to the pan and scrape up any pan drippings.  Reduce wine 1 minute, then add chicken broth, tomatoes with their juice, and crumbled saffron.  When liquids come to a bubble, add shrimp and cook 3 minutes.  Return scallops to the pan and cook everything together for 2 minutes longer.  Transfer shrimp, scallops and sauce to individual shallow bowls and top with basil and lemon zest.

Pass with bread for mopping up the juices.


Friday, April 26, 2013

Pasta Primavera

Last Year's Post: Special Brunch - Egg Strudel

Pasta Primavera literally means "spring pasta" and it's one of the first dishes I think of in spring.  It's characterized by light and fresh flavors, aromatic herbs, and beautiful, colorful vegetables.  Although many versions have a heavy cream sauce, somehow that doesn't seem like such a great idea when swimsuit season is around the corner.  This version is originally from Cooking Light magazine and although the sauce tastes very luxurious, it's great to know that it fits within a healthy lifestyle.  The sauce contains a small of amount of cream and white wine which both add to the rich flavor without adding a lot of calories or fat. Lemon juice, garlic, grated fresh Parmesan and lots of parsley and basil make the sauce incredibly flavorful and fresh-tasting.   Some pasta primavera versions also add shrimp or chicken, but the traditional version is meatless.  Feel free to add either if you want a more substantial meal, but I like it just as it is.


Since vegetables are the focus, it's important that they're beautiful and perfectly fresh.  Baby vegetables are particularly appropriate in this dish, such as the tiny asparagus tips and miniature bell peppers that I found.  If you can find tiny carrots or pattypan squash they would be great also,  or feel free to substitute your favorite vegetables for any of the ones listed in the recipe.


Along the same lines, feel free to substitute your favorite type of the pasta for the bow ties - I just thought they looked festive.  The pasta, vegetables and sauce are tossed together for a minute or so over medium heat to allow the sauce to coat everything well, and the dish is served warm or at room temperature - perfect for a spring dinner.

printable recipe

Pasta Primavera
Serves 4

Note:  any combination of your favorite vegetables may be used – baby carrots, sugar snap peas, baby pattypan squash, zucchini, and yellow squash all work well.  Cooked chicken or shrimp may be added also.

8 ounces bow tie pasta (or penne or cavatappi)
3/4 cup frozen peas (not thawed)
1 ½ cups small asparagus tips
2 teaspoons olive oil
1 cup seeded and sliced multi-colored bell peppers
½ teaspoon salt
¼ teaspoon freshly ground pepper
2 garlic cloves, minced
¼ cup dry white wine
1/3 cup whipping cream
1 tablespoon fresh lemon juice
¼ cup grated fresh Parmesan cheese
¼ cup thinly sliced fresh basil
¼ cup chopped fresh parsley
Lemon slices or quarters for garnish (optional)


Bring a large pot of water to boil and add pasta; cook according to package directions.  During the last minute of cooking, add the peas and asparagus tips to the pasta water (if the asparagus tips are medium to large, increase cooking time but still add the peas during the last minute).  Drain and return to the cooking pot.

While the pasta is cooking, heat oil in a medium non-stick skillet over medium-high heat.  Add peppers; sauté 1 minute.  Add salt, pepper and garlic; sauté 2 minutes.  Stir in wine, then add cream and juice and cook 1 minute.  Pour the sauce over the hot pasta vegetable mixture; add cheese and toss for a minute or so over medium heat to allow the sauce to coat all.  Remove from heat; stir in basil and parsley.

Serve in shallow bowls garnished with lemon (optional).

Friday, October 26, 2012

Artisan Meatloaf


Meatloaf is very trendy right now - don't be surprised to find it on restaurant menus.  They typically will give it their own special twist, like this recipe.  I know the term "artisan" is over-used but it's the best term I can think of to describe this meatloaf.  It's the best meatloaf I've ever tasted and definitely worthy of company.  What makes it so special?  For one thing, the amazing variety of ingredients - everything from spinach to rosemary to parmesan.  For another thing, it uses a mixture of mild bison and spicy Italian sausage as the meat base.  It's stuffed with mild creamy fontina cheese and finished with a homemade tomato herb sauce.  The combination of flavors is absolutely irresistible.  It cuts beautifully and the leftovers make great sandwiches.

So let's talk about bison.  That probably gave some of you pause when you read it in the sentence up above, but it shouldn't.  Bison is a very mild meat that tastes almost identical to beef but it's better for you.  The animals eat grass for food, spend almost no time in feedlots, and are not given drugs, chemicals or hormones.  Bison is higher in iron and vitamin B-12 than beef but has much less fat, cholesterol and calories.  It's even lower in fat and calories than chicken!  Check out this handy little chart that I found online.  I knew bison was lean but I didn't know it was THAT lean.


I don't eat beef but I love (and eat) bison. We often use it as a substitute for beef in recipes. This particular recipe is made even healthier by substituting turkey Italian sausage for pork sausage. Even though the proteins are lean, the result is still very moist because of all the other ingredients that are added to the meatloaf.  If you're still not convinced, you could certainly make this recipe with ground beef but I would still save the fat and calories in the Italian sausage by using turkey sausage.  You can find spicy turkey Italian sausage links with the other turkey products in your grocer's meat case, and you can find ground bison next to beef in almost every meat case these days.  It costs a little more than ground beef but I really think it's worth it.
 
If you have leftovers and plan to make sandwiches, think about adding something crispy or crunchy for texture variation since the meatloaf is relatively soft.  I had tomato slices and fresh spinach in addition to the meatloaf so I added texture by grilling the Italian roll until crispy.  You could also add crunch by layering sliced radishes or fresh zucchini into the sandwich.


Tip of the day: next time you're at the grocery store pick up a package of plastic gloves like the ones that  doctors use - they're usually by the cleaning products. They come in handy for recipes like this where you need to mix raw ingredients by hand.  That way you know you aren't contaminating the ingredients or vice versa, espcially if you happen to have a cut or scratch on your hands.  Plus they protect your manicure.  Very important.


Cheese-Stuffed Meatloaf with Tomato Herb Sauce
Makes 4-6 servings

Like all good meatloaves, the leftovers make great sandwiches, especially in a French or Italian roll.

Meatloaf
2 tablespoons olive oil
1 1/3 cups chopped onion
1 ½ tablespoons finely chopped garlic
2/3 cup fresh bread crumbs (not dried or packaged)
1/3 cup milk
1 lb ground bison
1/3 lb spicy turkey Italian sausage, removed from casings
2 eggs, beaten
10 oz frozen chopped spinach, thawed and moisture squeezed out
2/3 cup shredded parmesan cheese
1/3 teaspoon ground fennel seed
1 teaspoon salt
½ teaspoon black pepper
1 ½ teaspoons fresh rosemary, chopped
5 ounces mild fontina or provolone cheese, cut into 3” long, ½” by ½” strips

Tomato Herb Sauce
2 tablespoons olive oil
¼ cup carrots, finely chopped
¼ cup celery, finely chopped
¼ cup shallots, finely chopped
1 teaspoon minced garlic
2 cups Italian-style diced canned tomatoes
1 tablespoon fresh basil
Salt and pepper

For meatloaf: Preheat the oven to 350d. Heat oil in a small skillet over medium-low heat. Add onions and cook 5 minutes until soft. Stir in garlic and cook 1 minute. Spoon mixture into a large mixing bowl and set aside to cool.

Combine bread crumbs and milk in a small bowl, and soak 5 minutes. Squeeze any excess milk from bread and discard. Add bread to mixing bowl along with all the remaining meatloaf ingredients except the fontina cheese. Using clean hands, mix until well blended.

Line a large rimmed baking sheet with parchment paper. Spread half of the meatloaf mixture onto the paper to form a rectangle 4 to 5 inches wide and approximately 9 to 10 inches long. Lay the cheese in 1 or 2 rows down the center of the rectangle, leaving a 1 inch border on all sides. Cover rectangle with remaining meat mixture, ensuring edges are well sealed. 


Plump up loaf with your hands to be 3 to 4 inches thick. Bake 60 to 75 minutes until the internal temperature reaches 150d.

Meanwhile, make the sauce while the meatloaf bakes. Heat oil in a medium saucepan over medium-low heat and add carrot, celery, shallots, and garlic. Turn down to low, cover and cook for 10 minutes, stirring occasionally. Add tomatoes, cover and simmer 30 minutes. Chop basil and add to the sauce; simmer 5 minutes. Season with salt and pepper. Cool 10 minutes. Puree in a blender or food processor, adding water if too thick.

Remove meatloaf from oven and let rest 10 minutes. Cut into ½” thick slices and serve with sauce.


Friday, July 20, 2012

Farm Stand Salad


I've read quite a bit recently about the importance of "rebalancing your plate" to eat primarily plants and grains.  Animal proteins are supposed to play a lesser role.  That doesn't mean we all have to become vegetarians and eat tofu, but health advocates often suggest eating meatless one day per week as part of a healthy lifestyle.  If not totally meatless, it's a good idea to cut down on the amount of meat in a meal.  Summer is a perfect time to adjust your diet a little with the abundance of fresh fruits and vegetables that are available.  This salad is an example of a healthy summer meal with plenty of market-fresh veggies and a sprinkling of bacon.  If you're feeling particularly inspired you could leave the bacon out completely but it does add a nice counterpoint to the tangy goat cheese dressing and we all know how well bacon goes with fresh lettuce and juicy tomatoes.  Other major flavor components of the salad include fresh sweet corn, toasted walnuts, red onion, and fresh basil.  The overall flavor profile is very bright, bold and satisfying.

Growing up in the midwest I never really realized that midwesterners are the fortunate few who can eat sweet corn picked fresh that morning and sold at a roadside stand.  At the start of the corn season the ears have tiny, tender kernels that are bursting with sugar.  At that point you can literally cut the kernels off the cob and put them in a fabulous black bean and corn salad without cooking them at all. Of course, if you do cook them, it's only for a minute or two to heat them up enough to cover them with butter and salt until they drip all over your plate (and chin) as you gobble the entire cob, rows upon rows of sweet buttery salty heaven.  Once picked, the sugars in corn quickly turn to starch so corn that's been transported never has that heavenly taste.  And later in the season the corn tends to have starchier, tougher kernels as well.  But oh, those first fleeting days of corn season!  If you've never had that type of fresh corn all I can tell you is that it's a revelation.   A local farmer told me it has something to do with the rich soils and temperature/rain balance in the midwest.  Whatever, all I know is that sweet corn ranks right up there in my food memories with the tomatoes of my youth.  At the beginning of the harvest you can very easily make a meal of corn, tomatoes, and cucumbers and be extremely happy.  Plate rebalanced!

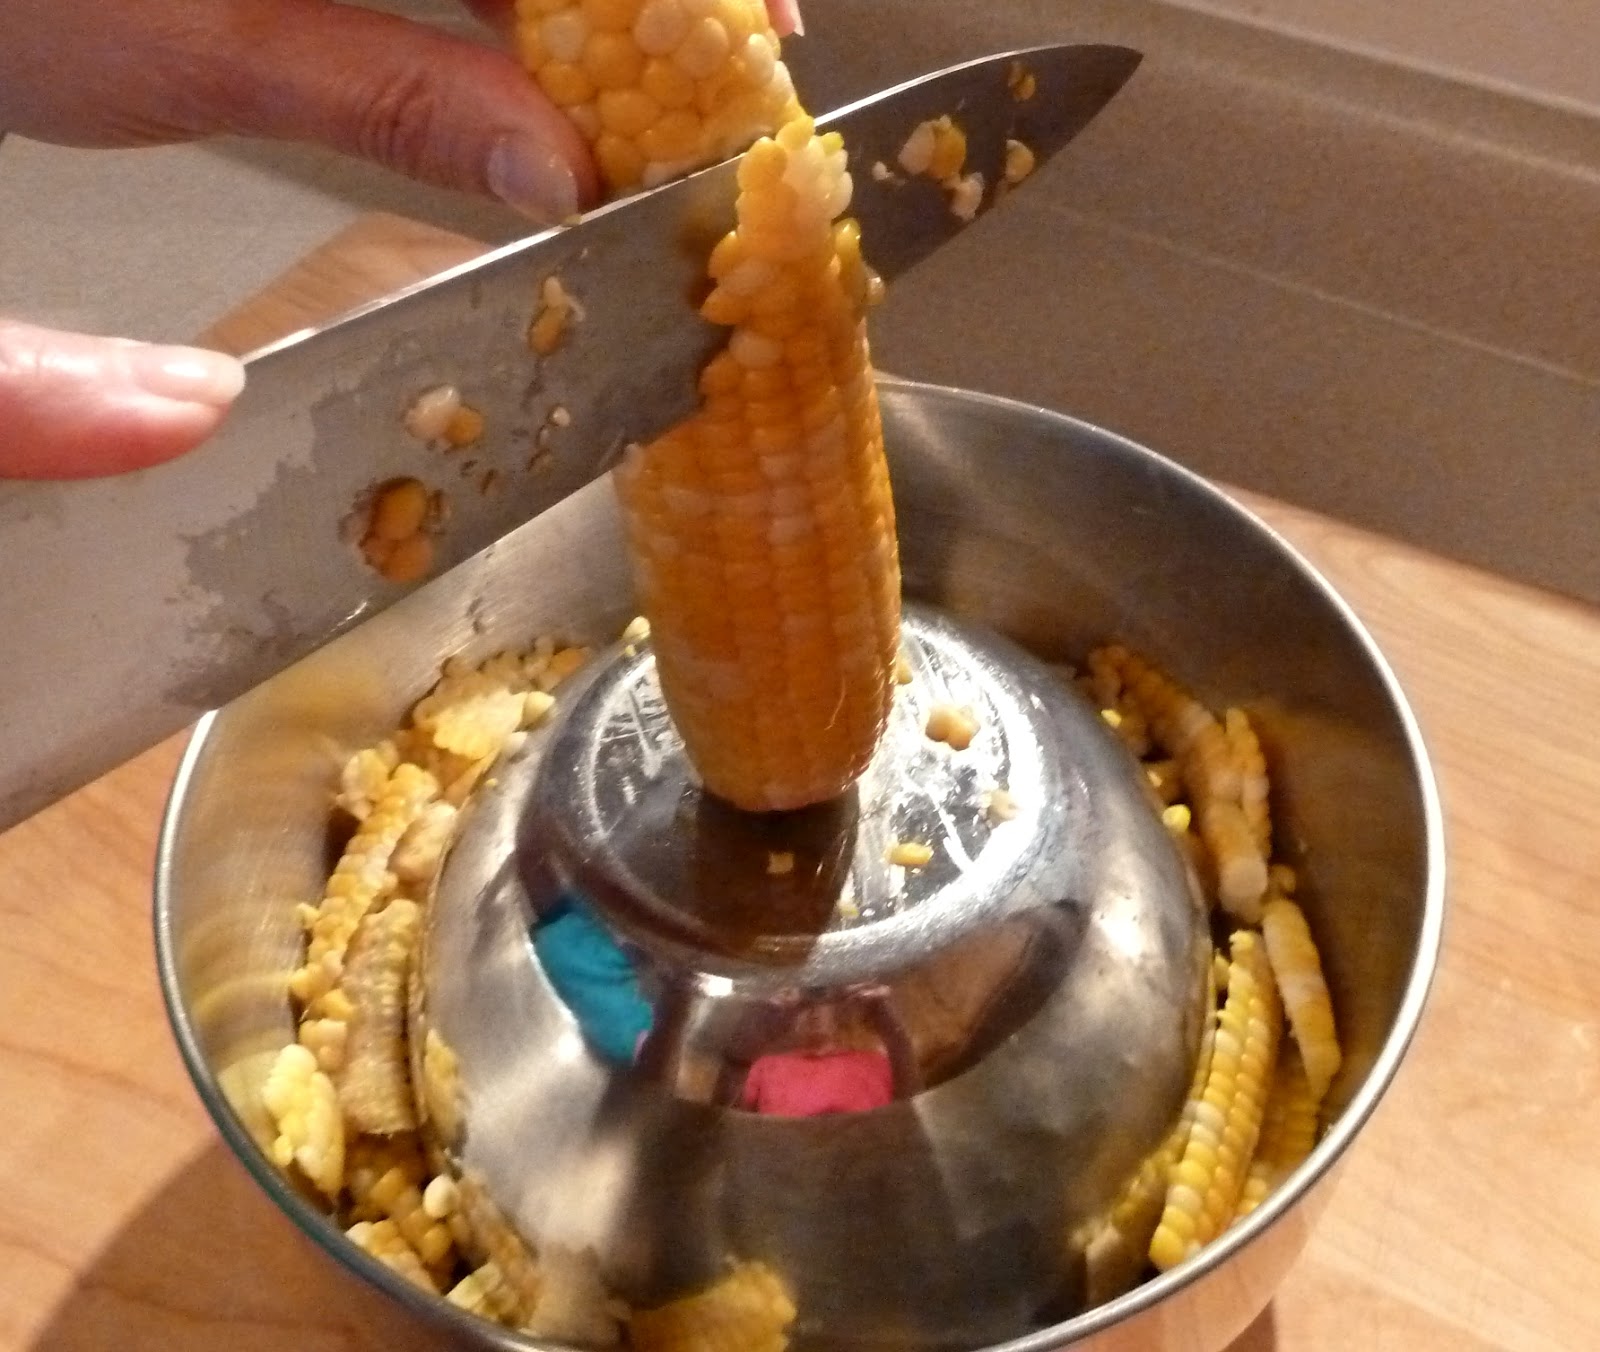
Even if you don't have access to that ephemeral corn, it's still worth it to buy fresh corn at your local market when it's available.  My tip of the day is how to cut corn off the cob without it ending up all over your kitchen.  Put a large bowl on the counter and place a smaller bowl (with a flat bottom) upside down inside it.  Balance the corn cob on top of the small bowl and when you cut down, the kernels fall neatly into the large bowl instead of all over your counter top.


I like to break the large chunks up just a little but not completely so everyone can see they came fresh off a cob when you serve your salad.

Cold crisp salads are perfect for hot summer days like we're all experiencing this year, don't you think?  Serve your salad with a fresh crusty baguette from your favorite bakery and have a (balanced) feast! 

* * click here for a printable recipe * *

Farm Stand Salad
Serves 4

4 pieces of cooked and crumbled bacon
2 ears fresh corn, husked
2 ripe tomatoes
¼ red onion, thin sliced
1 bag baby salad greens or 2 small heads of baby lettuces, rinsed, dried and cored
1/3 cup walnuts, toasted
½ cup olive oil
2 tablespoons cider vinegar
1 tablespoon lemon juice
½ cup soft cheese, such as feta or goat’s cheese, crumbled
2-3 tablespoons chopped fresh basil or cilantro
1/2 teaspoon salt
Pepper


Bring a large pan of water to a boil. Drop the corn in, cover, and cook for approximately 5 minutes. Remove from the water and let cool, then cut the kernels off the cob and set aside. Core the tomatoes and thin slice. Depending on the size of the tomatoes you may wish to cut the slices in half.

In a small bowl combine the oil, vinegar and lemon juice with a whisk. Add the crumbled cheese and whisk. Add the basil, salt and pepper and whisk briskly until creamy and well blended.

Combine the lettuce, onion and tomatoes in a large bowl. Pour half the dressing over the salad and toss. Divide among 4 plates and top with corn, bacon, and walnuts. Drizzle with remaining dressing and serve.


Friday, June 29, 2012

Strawberry-Basil Lemonade


Ahhh, summer. Time for 4th of July picnics and family reunions.  This recipe for strawberry-basil lemonade is just a little different and will suit everyone from kids to adults (turn it into an adult beverage with the addition of a little vodka) plus the color is so pretty.

I made this recipe for The Lawyer's parents' 70th (!) anniversary party this past weekend.  (The guys at the party were busy checking out the bikinis by the pool that you can see in the background.)  It makes about 3 quarts of lemonade so you'll need a pitcher to accommodate.  I found this one at Crate and Barrel -  especially love the shape (reminds me of Kool-Aid commercials from way back) and the fact that it's plastic so it's lightweight and unbreakable.  It's hard to tell high-quality plastic ware from glass these days until you pick it up.
 
I received the original recipe from my friend Terry (part of our Gourmet Club along with her husband, Hiram).  I think she had it at a friend's house and wanted to pass it along.  Thanks Terry!

Terry and Hiram

When I made the recipe I had really fresh, very fragrant basil straight from the farmer's market that morning.  I mean fresh enough that you could smell it all over the kitchen.  That may be why I thought the basil flavor was a little strong and reduced it in the version below.  The original recipe called for 3/4 cup tightly packed basil leaves and I reduced it to 1/4 cup.  Just something to keep in mind if you try it.  You can even leave the basil out entirely if it doesn't appeal to you and just serve it as Strawberry Lemonade. 

I also found strawberries at the farmers market (yeah!!!! farmers markets).  The stand that I stopped at was selling 1.5 lb (more or less) containers, which was exactly what I needed.  The berries in the photo below weren't even the most perfect ones, which I saved for the garnish.  Beautiful and delicious.


You cook the strawberries in simple syrup (sugar and water) to extract their flavor and color.  Why does hot water make broccoli greener but make strawberries lose their color?  Who knows.  Anyway, the color and flavor of the strawberries goes into the syrup to make a pretty red syrup.  Then you add the basil which imparts flavor but not color (don't ask) and strain the whole thing.  The syrup is cooled and added to fresh lemon juice and cold water to taste, which is great - you can make the lemonade as tart or sweet as you want.  Just note that it takes an hour or two to chill the syrup and lemon juice so you want to start this process at least few hours before serving.

Have a great holiday week and enjoy summer!


* * click here for a printable recipe * *

Strawberry-Basil Lemonade
Makes about 12 cups


1.5 cups granulated sugar
1 cup water
1.5 lbs strawberries, divided
¼ cup packed basil leaves
2 cups fresh lemon juice, chilled (8-9 juicy lemons)
8 cups cold water
Vodka (optional)
Additional basil leaves for garnish (optional)


Gently wash the strawberries. Hull the berries and slice ½” thick. Set aside ½ cup for garnish.


Place the sugar and 1 cup water in a medium saucepan over high heat and stir until the sugar dissolves and the mixture comes to a boil. Add the 1 cup of strawberries, reduce heat to low, and simmer until the strawberries have softened, about 10 minutes.


Remove from the heat, add the basil leaves, and stir. Cool for about 45 minutes, then strain through a fine-mesh strainer set over a medium bowl; discard the solids. Cover the syrup and refrigerate until chilled.

When ready to serve the lemonade, combine 2 cups of chilled lemon juice with 8 cups of cold water and 1.5 cups of strawberry-basil syrup in a 3-quart pitcher and stir to combine. Taste and add additional syrup as needed.


To serve: add ice and reserved strawberries (and optional basil leaves or vodka) to serving glasses and pour lemonade over.


Friday, May 11, 2012

Pan Bagnat


Sandwiches have always been one of my favorite foods.  They've become even more popular recently with the proliferation of food trucks serving a wide variety of hand-held foods from around the globe.   I've tried to broaden my horizons by trying  some of the great and famous sandwiches of the world.  As my first choice in a new occasional series of famous sandwiches, I chose the Pan Bagnat which is the specialty of Nice, France.  It incorporates many of the flavors of a Nicoise Salad (also a specialty of Nice) into a tuna sandwich that's completely different from your normal tuna/mayo mixture.  The Pan Bagnat has no mayo - it has an olive oil vinaigrette instead - and has lots of vegetables in addition to tuna and hard boiled eggs.  Everything is placed in crusty french rolls or baguettes and allowed sit for several hours before eating so the juices soak into and soften the bread, the onions can mellow and the flavors meld together.

I chose the Pan Bagnat for several reasons.  First, I love tuna sandwiches.  Second, this sandwich is actually pretty healthy with Omega 3's in the olive oil plus all the veggies.  Finally, it's picnic season and this sandwich is just perfect for picnics since it has no mayo and should be made well in advance of eating. (I just love a picnic dinner at a concert in the park.  If you're quiet about it you can even sneak in a bottle of wine to go with the sandwiches.) If you have a picnic for two, use individual french rolls or mini-baguettes as I did.  If you have more people, use a full-size baguette and cut into pieces prior to serving.


The only drawback to this sandwich is the name.  I took French in high school with limited results, but one thing I noticed was that French words sometimes have letters that are completely absent in the pronunciation.  For example, you pronounce Pan Bagnat as pahn bahn-yah.  So what happend to the "g" and the "t"?  French is sneaky that way.  If nothing else, you can impress people with your pronunciation the next time you order one in a bistro.

A note about the tuna - water pack or oil pack?  Yes, water pack tuna is lower in calories.  It also has less taste.  My personal preference is to use oil pack tuna for special recipes where tuna is a star and use water pack for everything else.  I used oil pack tuna here but the choice is up to you.

* * click here for a printable recipe version * *

Pan Bagnat
Makes 4 servings


Note: you may find it easier to place the ingredients in the top half of the bread rather than the bottom half because the top is typically deeper and will cradle them better.


1 teaspoon red wine vinegar
½ teaspoon Dijon mustard
½ teaspoon kosher salt
¼ teaspoon ground pepper
3 tablespoons olive oil
1 baguette or 4 french rolls
½ English cucumber, sliced
1 tomato, thinly sliced
½ small red onion, thinly sliced
12 ounces canned tuna packed in oil or water, drained and crumbled
8 basil leaves
4 hard-boiled eggs, sliced
½ cup pitted kalamata olives, sliced


Whisk together the red wine vinegar, mustard, salt and pepper. Gradually add the olive oil while whisking to form an emulsion. Add the cucumbers to the vinaigrette and toss to coat. Set aside.

Slice the baguette (or rolls) horizontally into 2 pieces. Tear out some of the soft bread in the center of each side, being careful not to tear the crust. Place the ingredients on one half of the bread in the following order: half the cucumbers, tomato, onion, tuna, basil, eggs, olives, then the other half of the cucumber slices. Drizzle the remaining vinaigrette over the vegetables, top with the second piece of bread, and wrap tightly in plastic wrap. Let stand at room temperature for 2 hours or refrigerate for up to 6 hours.
Cut the baguette into four pieces and serve.