Showing posts with label walnuts. Show all posts

Thursday, April 12, 2018

Oat Nut Bars

Last Year's Post: Slow Cooker Salsa Verde Chicken and Brown Rice Bowls
Two Years Ago:   Brazilian Burrito Bowls

The inspiration for this post started with golf, believe it or not.  I don't golf - I would actually pay money NOT to golf - but The Lawyer does.  He bought a giant box of Kirkland trail mix at Costco quite a while back to use as snacks while golfing, and he recently ran out.  Problem is, summer is coming up quickly and in Phoenix that means hot.  The trail mix contains M&Ms.  Can you say melted chocolate in the golf bag?  I had just watched a PBS show where Ellie Krieger, a noted nutritionist, made these power bars and said they were great for after a workout at the gym because you just throw a frozen one in your gym bag and it'll thaw by the time you're done.  That seemed perfect for golf in the summer.

This is a very healthy recipe with fiber, high-quality protein and natural sweeteners, but it's also delicious.  I made two tweaks to her recipe - I added some coconut, and I used a parchment cradle in the baking dish to make it easier to remove the bars.  All you do is put a piece of parchment in the bottom of the dish, with enough coming up two opposite sides that you can grasp it after baking to lift the bars out as one piece.  That makes it easier to cut them, but you could also cut them in the baking pan and take them out with a spatula if you don't want to do the parchment trick.

The bars are great for an after-school snack, a mid-morning or mid-afternoon boost at work, or after a workout.  And of course, golf.


print
Oat Nut Bars
Makes 12 bars

Note: wrap individual bars in foil or cling wrap, put them all in a gallon bag in the freezer, and take one out as needed.  They thaw in about two hours at room temperature.

1 cup rolled oats (not instant or quick-cooking oats)
¾ cup whole wheat flour
1 teaspoon ground cinnamon
¼ teaspoon salt
½ cup maple syrup
1/3 cup plain, unsweetened applesauce
¼ cup canola or safflower oil
1 large egg
½ cup chopped dried cranberries
½ cup finely chopped walnuts
½ cup finely chopped skin-on almonds
½ cup unsalted sunflower seeds (or finely chopped other nuts)
1/3 cup shredded sweetened coconut, optional

Preheat oven to 350d.  Spray an 8-inch square baking pan with cooking oil spray.  (Tip: cut a piece of parchment paper the width of the bottom of the pan and long enough that the ends go up and over the sides of the pan, forming a cradle.  Place the parchment in the baking pan and spray lightly with cooking spray.  This will help you get the bars out of the pan later.)

Whisk together the oats, whole wheat flour, cinnamon and salt in a medium bowl.

In a larger bowl, lightly beat the egg, then add the maple syrup, applesauce, and oil and whisk until combined.   Stir in the oat mixture, then add the dried cranberries, walnuts, almonds, sunflower seeds and coconut (optional) until evenly incorporated.

Spread the mixture in the pan; bake for about 30 minutes until a toothpick inserted in the center comes out clean.  Allow to cool completely.  If you used a parchment cradle, grasp the sides of the parchment and gently lift the bars out whole before cutting.  If not, cut into 12 equal-sized bars before removing from the pan.

Per bar (without coconut):  250 cal, 15g total fat (2g saturated fat), 15mg chol, 60mg sodium, 26g carb, 3g fiber, 6g protein


Friday, December 11, 2015

Sugar Snap Pea Salad

Last Year's Post: Bang Bang Turkey
Two Years Ago:  Sausage and Cheddar Breakfast Strata

I saw this interesting treatment for sugar snap peas on a food network show and just had to try it.  The original recipe was supposedly for a side salad but I made it heartier by adding Gruyere cheese and walnuts in addition to the pancetta and sugar snaps, which made a great and satisfying dinner.  You could certainly serve it as a side salad if you want and probably eliminate the pancetta and cheese.  (Or not.)  It would be particularly spectacular on a holiday buffet table, don't you think?  Don't make the mistake of thinking this is some wimpy food just because it's a salad based on a vegetable.  It has BIG flavor and BIG crunch.

The treatment for the sugar snaps is really easy - blanch in boiling water for 15 seconds to set the color, then shock in ice water to stop the cooking.  Remove, pat dry, and cut in half lengthwise.  The result is really pretty and some of the peas stay in the pods and some fall out, giving your salad some textural contrast.  I love it.


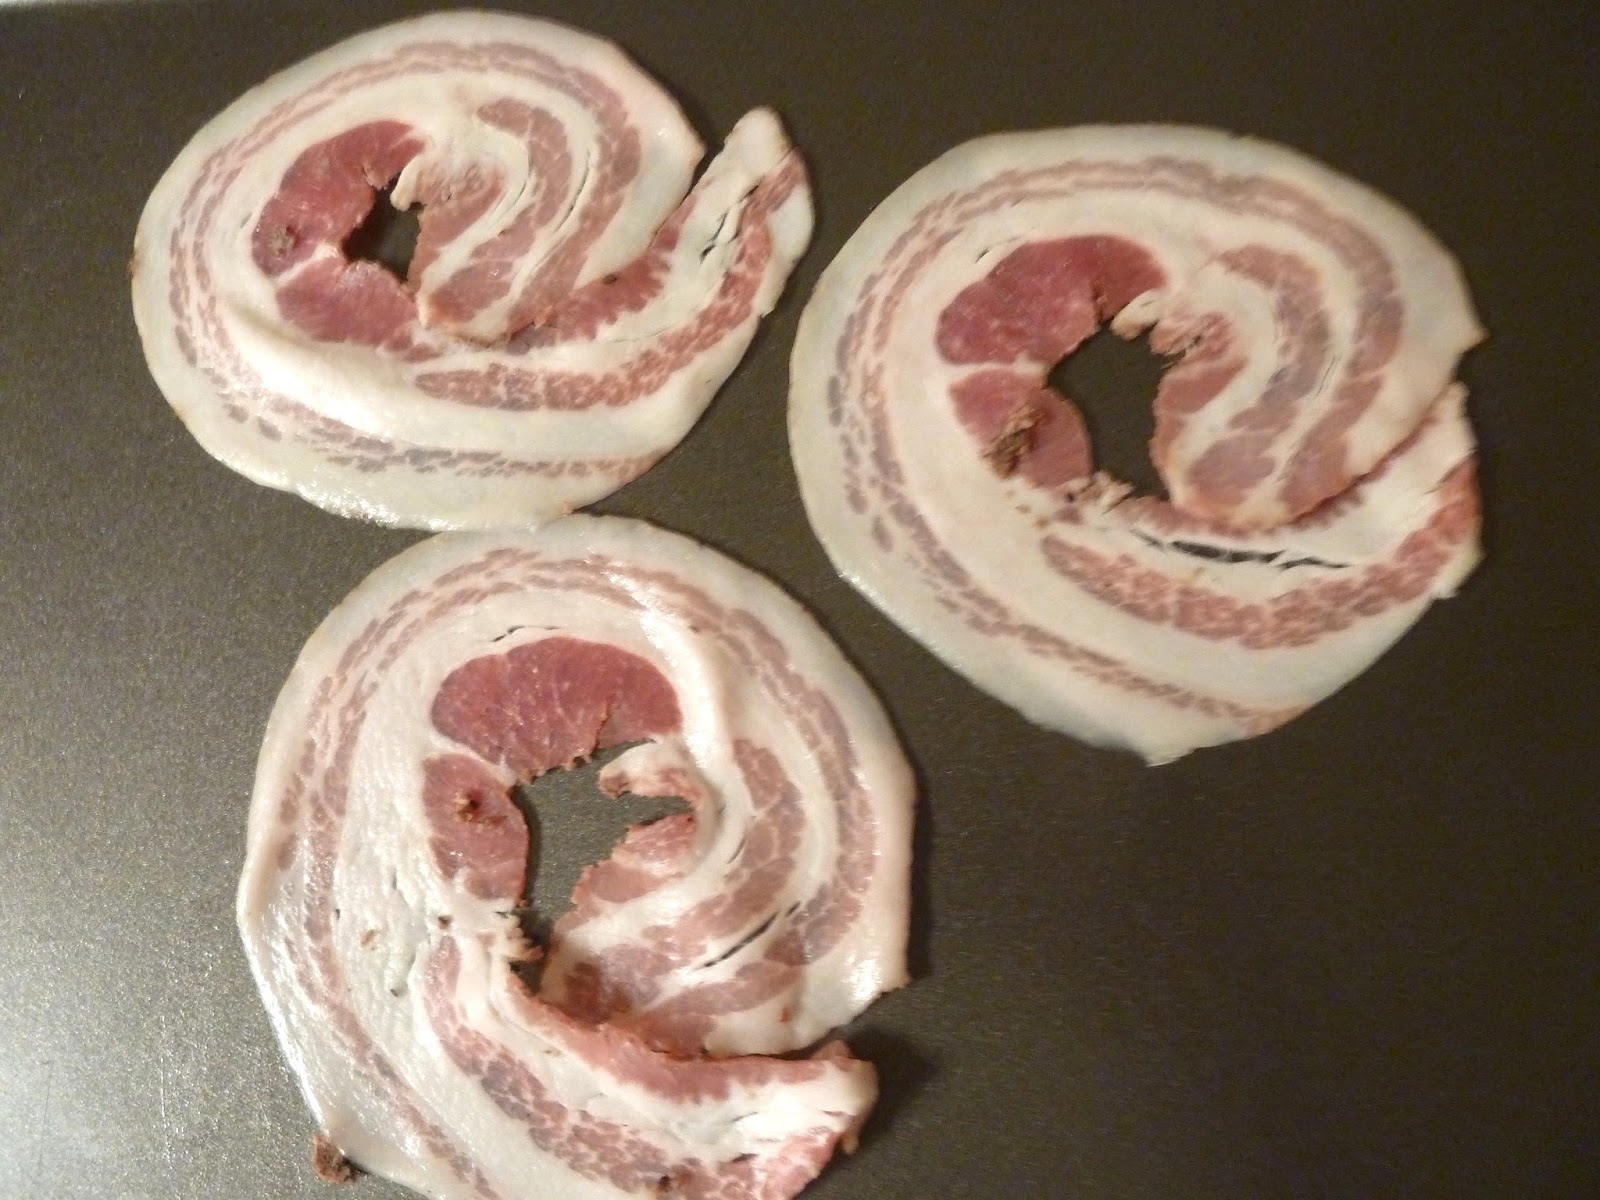
Pancetta is my new-found substitute for bacon because one of my pet peeves is how thick bacon has become. Why does everything have to be super-sized?  One of the great things about bacon is (was) its crispness.  When you have thick-cut bacon (or even worse, slab bacon) the best you can possibly hope for is chewy and greasy.  I once went to a new restaurant and was excited when they asked me whether I wanted my bacon medium or well done.  I should have known just by the question.  The bacon was definitely well done but it was so thick that the result was a literally inedible piece of bacon jerky.  Pancetta, on the other hand, is available in your deli aisle and is cut beautifully and elegantly thin.  The only downside is that it's so thin that it can go from perfect to burnt in about 2.3 seconds.  Mine was about 1 second away from being burnt but it was perfectly crisp and tasted just like great bacon.  The lesson here is keep an eye on your pancetta even though I reduced the roasting time in the recipe slightly when I re-wrote it.  I wandered away and was busy being entranced by the sugar snaps until the pancetta timer went off.  Do as I say, not as I do.


oof, that was close....
The Lawyer pronounced this salad "really, really good" so that's good enough for me.


print recipe
Sugar Snap Pea Salad
Serves 4 as a main dish, more as a side dish

¼ pound pancetta, thinly sliced
Kosher salt
1 pound sugar snap peas, trimmed
½ cup olive oil
2 tablespoons white wine vinegar
2 tablespoons fresh lemon juice
Freshly ground black pepper
¼ cup minced red onion
½ cup Gruyere cheese, cut into small cubes (or your favorite cheese)
½ cup walnuts, toasted and coarsely chopped


Preheat the oven to 450 degrees.

Place the pancetta slides on a baking pan and roast for 7-8 minutes until browned and crisp, watching closely so they don’t burn.  Remove from the oven and place the pancetta on paper towels to drain.

Meanwhile, bring 2-3 quarts of water to a boil in a large pot and add 1 teaspoon of salt.  Fill a large bowl with ice water and have a large sieve or colander ready in the sink.  Put the snap peas in the boiling water for 15 seconds, then immediately drain and put into the ice water.  Cool completely, drain and pat dry.  Cut each snap pea in half lengthwise and place in a large bowl.

To make the vinaigrette, whisk together the olive oil, vinegar, and lemon juice.  Season to taste with salt and pepper. 

Add the red onion, cheese and walnuts to the bowl with the snap peas and crumble the pancetta over the top.  Pour enough vinaigrette on the salad to moisten and toss well.


Saturday, September 20, 2014

Squash Ravioli with Sage Brown Butter Sauce


Last Year's Post: Lavash Chips, Za'atar, Hummus and Green Harissa
Two Years Ago:  Smoked Salmon with Farfalle and Edamame

So you would love to serve an earthy, fall-themed meal but you have absolutely no time in your schedule because of everything else going on in your life, right?  Well, believe me when I tell you that this pasta is ready to go - start to finish - in about twenty minutes.  All you have to do is boil some water for the ravioli, and melt some butter.  Add a green salad and some nice crisp bread sticks on the side and you're done.

Squash, sage, butter and walnuts go together like magic.  If you really really wanted to, you could add some crispy bacon or prosciutto, but you won't miss the meat because there are so many delicious flavors going on here.


Refrigerated or frozen squash ravioli or tortellini are readily available in most grocery stores - I found these triangular-shaped ravioli at Trader Joe's, for instance.  You could, of course, make your own using wonton wrappers or even your own homemade pasta dough, but that seemed like a bit much.  Simple, fast and delicious meals are not only welcome but a down-right necessity on many nights.  You could even pick up all the ingredients on your way home.

printable recipe
Squash Ravioli with Sage Brown Butter Sauce
Serves 4

1 pound fresh or frozen squash ravioli or tortellini
1 stick butter (1/2 cup)
2 tablespoons torn fresh sage leaves
1/3 cup walnuts, toasted and coarsely shopped
¼ teaspoon salt
¼ teaspoon freshly ground pepper
¼ cup grated Parmesan
¼ cup chopped fresh Italian parsley


Prepare the ravioli according to directions. 

Meanwhile, melt the butter in a skillet over medium heat.   Add the sage and walnuts and let cook until the butter starts to brown, about 3 minutes.  Turn the heat off and season with salt and pepper.


When the pasta has finished cooking, drain and place in shallow individual bowls.  Top with brown butter sauce, Parmesan and parsley.  

Saturday, September 13, 2014

Roast Pork, Fennel and Green Bean Salad

Last Year's Post: Smoked Turkey, Kale and Blue Cheese Sandwiches
Two Years Ago:   Pork with Fennel and Caper Sauce

As far as pork goes, the tenderloin tends to be my cut of choice because it doesn't dry out and become tough and chewy like larger pork roasts or pork chops often do.  Being a big fan of all things Costco, I particularly like their pork tenderloins because they're excellent quality, don't have any injected chemicals or liquids, and of course they're less expensive than anywhere else on the planet.  As a result, I tend to have several pork tenderloins in the freezer at any given time and am always on the lookout for new and interesting ways to use them.

Besides being delicious and healthy, this pork tenderloin salad has several other advantages: you can serve it cold or at room temperature (or theoretically hot, although that wasn't the original intent), you can prepare and serve it all in one day, or break the prep up into three days as I did.  If you're a planner/organizer, the three day approach works well because it's just a little bit of time each day and the pork is absolutely the best.  And this salad is all about the pork - the intensely aromatic garlic and herb seasoning gives the roast outstanding flavor, while roasting and refrigerating it afterwards ensure moist, perfect slices.  Although it makes a great entree salad, I could definitely see using it for a really outstanding sandwich. It's that good.


As I said, you can prepare the pork over three days by applying the rub on day one, roasting on day two, and slicing/eating on day three.  Or, you could condense it into one day by applying the rub in the morning and roasting at mid-day to refrigerate for a few hours before slicing.  It'll turn out great either way.

After the pork is ready, all you have to do is prep the beans and fennel, make a quick lemon salad dressing, and serve everything topped with walnuts and goat cheese.  (If you don't like goat cheese, feel free to substitute feta or blue cheese, or leave it out entirely.) For those who aren't all that familiar with how to trim, core and slice fennel, it's actually very easy.  Cut the skinny tops off the bulb, then cut the bulb in half.  Cut out the triangular hard core with a small knife, then place each half on its side and thinly slice it crosswise.


The beans and fennel add crunch and fresh vegetable-y flavor to the salad that contrasts nicely with the soft pork, creamy cheese and rich nuts.  And did I mention healthy?  A winner all around.

printable recipe
Cold Pork Roast, Fennel and Green Bean Salad
Serves 4

Note:  The pork should be seasoned at least a few hours in advance of cooking, or up to one day ahead.  After roasting, the pork should cool to room temperature before serving; it may be wrapped and refrigerated for up to 24 hours.

For the pork roast:
1 (approx 1.25 lb) boneless pork tenderloin
Kosher salt
3 large garlic cloves, minced
1.5 tablespoons roughly chopped fennel fronds, plus more for optional garnish
1 teaspoon fennel seed, crushed
½ teaspoon lemon zest
1 tablespoon roughly chopped rosemary
1 tablespoon roughly chopped sage
1 tablespoon roughly chopped marjoram
¼ teaspoon red pepper flakes
½ teaspoon coarsely ground black pepper
1 tablespoon olive oil

For the salad:
1 small garlic clove, minced
2 tablespoons lemon juice
Salt and pepper
3 tablespoons olive oil
8 ounces green beans, trimmed
2 small or 1 large head of fennel, trimmed, cored and thinly sliced
½ cup walnuts, toasted and coarsely chopped
½ cup crumbled goat cheese


Season the pork generously on all sides with salt.  In a small bowl, combine all the seasonings (garlic through olive oil) for the roast.  Pat and rub the mixture on all sides of the tenderloin, then wrap in plastic film and refrigerate for several hours, or preferably overnight. 

Preheat the oven to 400d.  Remove the pork from the refrigerator while the oven preheats.  Place a rack in a roasting pan.  Unwrap the pork, place on the rack, and roast for about 25 minutes until it registers 140d.  Let cool to room temperature before serving.  If desired, after cooling wrap and refrigerate the pork for up to 24 hours, then return to room temperature.

For the salad dressing, put garlic and lemon juice in a small bowl.  Add salt and pepper to taste and whisk in olive oil.

Blanch beans in boiling salted water for 2 minutes, then drain and place in an ice bath.  Drain again and pat dry.  Put beans and fennel in a bowl, season lightly with salt and toss with some of the dressing.  Let stand for a few minutes to slightly soften the fennel.

To serve, cut pork into ¼” slices.  Arrange pork, fennel and green beans on each plate; top with walnuts and goat cheese.  Pass remaining salad dressing at the table. 

Friday, March 21, 2014

Lentil Salad with Bacon and Walnuts

Last Year's Post: Asian Roast Pork with Broccoli Slaw and Pasta
Two Years Ago:  Rustic Egg Tart

I never used to like lentils, probably because they looked suspiciously like the split peas in split pea soup which is an unfortunate muddy brown-green color and (in turn) looks a lot like baby food. Amazing how long the food traumas of our youth can stick with us past all rational thought, isn't it?  Once I realized that there are different types of lentils and they aren't all muddy-colored I decided to try them.  Happily, I discovered that they taste great as well as being good for you.  I then embarked on a lentil discovery mission that at one point involving five different types of lentils sitting in my pantry.  Even I admit that's probably overkill.  I discovered that big lentils end up mushy and muddy-colored, and red and yellow lentils end up mushy also although their color is better.  Small green or black lentils retain their shape when cooked and have a very pleasant firm texture while being tender at the same time.

So having come full circle, I now use the small French green lentils called "Lentils du Puy". You can find them in some natural food stores like Whole Foods and high-end grocery stores.  They may also be labeled as "French lentils" in the bulk aisle - just be sure they're dark green and small.


I was recently watching an "America's Test Kitchen" episode on lentil salads (which inspired me to make this recipe), and they confirmed that Lentils du Puy are the best because they hold their shape when cooked and have the best flavor.  They also demonstrated a very interesting technique for brining and oven-baking the lentils, which I'd never heard of.  Apparently brining the uncooked lentils helps make the skin more flexible so they don't burst, and oven-cooking is more gentle and again helps the lentils cook evenly to a creamy tenderness without bursting.  (If you're not familiar with America's Test Kitchen, they try as many as hundreds of variations of a recipe to develop the perfect technique.  They're even more obsessive than I am.)  Anyway, of course I had to try it.

The lentils didn't burst, but it took a long time to soak them and then bake in the oven. I found it took a full 70 minutes of baking before they were tender, which in my opinion isn't worth it.  I've simmered French lentils before without any issues so I decided to compromise for this recipe by calling for brining (which can be done in advance) and then simmering on the stovetop for just 20 minutes, as most other recipes call for.

The reason why I like lentil salads is because they're so versatile and good for you. You can serve them for lunch or dinner, at room temperature or warm or cold, and you can vary the ingredients to suit your taste.  I added cooked egg and avocado in addition to the bacon and walnuts with a little bell pepper for color, but you can add whatever you like.  For example, your favorite cheese could substitute for the egg or avocado.  Even with the tender lentils, the texture of the salad is surprisingly crunchy and very satisfying with the addition of the peppers, bacon and walnuts and the avocado (or cheese) adds creaminess.

For some reason this recipe seems very French to me, probably because of the French lentils and walnuts.  I can just see it served for a light spring or summer dinner with a bottle of very dry Rose wine and some warm crusty bread.


printable recipe
Lentil Salad with Bacon and Walnuts
Serves 4

1 cup French green lentils (lentils du Puy), uncooked
Salt
2 cups low-sodium chicken broth
1 bay leaf
5 tablespoons olive oil
3 tablespoons sherry vinegar
1 minced shallot
1 teaspoon minced fresh thyme
Juice of half a lemon
1 avocado
3 hard-boiled eggs, cut into eighths
1 cup (loosely packed) baby spinach, chopped
3 slices of bacon, cooked and crumbled
1/3 cup walnuts, toasted and coarsely chopped
2/3 cup red bell pepper (or assorted colors), finely chopped


In a medium bowl, combine the lentils and 1 teaspoon salt.  Cover with 4 cups warm water and let stand for one hour.  Drain well.  (Drained lentils can be refrigerated for up to 2 days before cooking.)

Place the lentils in a large saucepan over medium-high heat with 2 cups of water, the chicken broth, bay leaf, and ½ teaspoon of salt.   Bring to boil; reduce heat and simmer until tender, about 20 minutes.  Taste to be sure the lentils are properly cooked.  Drain well.

While the lentils are cooking, combine the olive oil and sherry vinegar with ¼ teaspoon salt in a large bowl, whisking to blend.  Add the shallots and thyme. 

Place the lemon juice in a medium bowl. Cut the avocado in half and remove the pit.  Using a small knife, score each half in a diamond pattern all the way down to (but not through) the shell.  Use a large spoon to scoop the flesh from the avocado shell into the bowl with the lemon juice.   Toss gently to coat the avocado pieces with juice so they won’t discolor.

When the lentils are still somewhat warm, place them in the bowl with the vinaigrette and toss to combine.  Add the spinach, bell pepper and avocado and toss again.

Serve topped with eggs, bacon and walnuts.  May be served warm, room temperature, or cold.


Thursday, November 21, 2013

Turkey & Pomegranate Salad

Last Year's Post: Brandied Cranberries
Two Years Ago:  Essential Foodie Gifts Under $20

You'll probably have some leftover turkey in the very near future, so I wanted to publish a recipe for a healthy, beautiful and delicious salad to help you get back on track after the Thanksgiving Day.  This recipe is a variation on the wild rice salad I published a few years ago, with less wild rice and more greens plus the addition of pomegranate seeds.

In the pantheon of beautiful fruits, pomegranates are arguably the rock star.  Their beautiful color on the outside is exceeded only by the beautiful little jewel-like seeds, which have incredible health benefits and a great tangy-sweet flavor.


So why don't we eat them more often?  Speaking at least for myself, I've always been intimidated by how to get the seeds out.  Since pomegranates are in season and they feel very festive at the holidays I decided to man up and figure it out.  There are a bunch of videos online (just Google "how to seed a pomegranate") such as an underwater seeding technique or the far more interesting and dramatic whack the heck out of it technique.  For the second video you have to be patient because the guy likes to hear himself talk, but it's worth it.  He's so enthusiastic about whacking the pomegranate with a wooden spoon that I was laughing by the end.  I had to try it even though the underwater technique certainly seemed safer and less likely to result in an injury to one or more fingers.  What's life without a little excitement?  (OK, true confession, I actually recruited The Lawyer for this little experiment.)

You score the pomegranate with a knife, pry it apart, stretch each half a little, then turn it over on your hand and whack it with a wooden spoon all over until all the seeds fall out.  And you know what?  It actually worked!  You've gotta try it out for yourself.  We'll definitely be eating more pomegranates now that we've found this tip.

What I like about this salad is the balance of flavors and textures - slightly bitter greens, creamy feta, chewy wild rice, crunchy nuts, sweet-tart pomegranate seeds, and delicious roast turkey.  You could substitute kale for the spinach or arugula, and could substitute a different type of nut or meat to suit your preference - I think chicken, duck, pork and even leftover roast beef would work just as well.  You could also use goat cheese or blue cheese in place of the feta if you like.  The salad dressing also adds a bright note with fresh orange juice and rind that pair perfectly with the pomegranate seeds.

If you cook the wild rice in advance, the salad comes together in about 20 minutes including the pomegranate whacking.  And how entertaining will it be to recruit your holiday house guests to do the whacking?!  Think of it as having your very own little reality food TV show.  Starring your relatives.  That alone should be worth it.


printable recipe
Turkey & Pomegranate Salad
Serves 4

For the salad:
¾ cup uncooked wild rice
2 cups water or low-sodium chicken broth
4 cups loosely packed spinach, arugula or kale, chopped
The seeds of one pomegranate
1 cup toasted walnuts, chopped
1 cup good-quality feta, coarsely crumbled
2 cup shredded cooked turkey

For the vinaigrette:
¼ cup white wine vinegar
1 ½ tablespoons olive oil
2 teaspoons sugar
2 teaspoons fresh grated orange rind
1 tablespoon fresh orange juice
¼ teaspoon dried basil
1/8 teaspoon salt
1/8 teaspoon pepper

Rinse and drain the wild rice.  Bring water or chicken broth to a boil in a medium saucepan.  Add the wild rice; cover, reduce heat, and simmer 45 minutes.  Check to determine if grains are swollen and most are split.  If not, check again every 10 minutes until done (typically 55-60 minutes).  Remove from heat, drain, and set aside to cool.  (May be made a day or two in advance.  Keep covered and refrigerated.)

To prepare the vinaigrette, combine all ingredients in a bowl and whisk to combine, or shake in a jar.  Set aside.

To prepare the salad, decoratively arrange the wild rice, spinach, pomegranate seeds, walnuts, feta and turkey on plates and drizzle with vinaigrette.  Alternately, all ingredients may be tossed with the vinaigrette in a large bowl and then plated.

Friday, September 27, 2013

Forbidden Rice with Turkey, Roasted Squash and Walnuts

Last Year's Post: Smoked Salmon with Farfalle and Edamame
Two Years Ago:  Smoked Turkey Apple Panini

Inspiration can come from something as simple as peering in your cabinets to see what's lurking in there.  I discovered some forbidden rice in my pantry the other day and decided to create a fall-themed entree with it.  What, you are probably thinking, is forbidden rice and why do I have it if it's forbidden?  Basically it's black rice.  Supposedly it was considered the finest rice in ancient China and served only to the Emperor, so it became known as forbidden rice because it was forbidden to the general public.  I don't know if that's actually true or not but I like the story.  Anyway, I found this black rice at Whole Foods and thought it would be a great contrast to light-colored foods (think grilled halibut or salmon) or colorful foods such as the ingredients in this salad.  I always like to discover and try new ingredients that might be a little different than the norm to keep things interesting.

Forbidden rice tastes like brown or wild rice with a nice chewy texture as opposed to the softness of white rice.  If you can't find it at Whole Foods or other natural food stores, wild or brown rice would be a good substitute albeit not as pretty.  I'm all about pretty food whenever possible, and this deeply black rice is definitely pretty as well as dramatic.  In addition to its good looks, black rice is very high in antioxidants and iron so it's good for you as well.

So, to make it fall-ish I added roasted butternut squash, red pepper, sugar snaps, and toasted walnuts with a light vinaigrette.


In case you haven't cooked with butternut squash before, it's the pale-colored squash with the bulb at the end.  You probably won't need the entire squash (the smallest I found at the store was a 2 pounder, and you only need a pound) so plan to use the rest in another dish, or check the produce aisle for plastic cartons of already-peeled and cubed squash.  If you can't find it already prepared, peel the outside with a vegetable peeler, then cut in half.  Scoop out the seeds, then cut the remaining amount that you need into bite-sized (approximately 1" cubes).  Place on a foil-lined baking sheet, toss with olive oil, salt and pepper, and roast.


While the squash roasts you can cook the rice and make the vinaigrette.  The good news is that everything can be done in advance, or even the night before.  To make it a main dish I added cubed smoked turkey from the deli - one of my favorite meats for salads - but you could substitute literally any meat you want, such as chicken, duck, pork, beef, or bacon.  It seemed to want some creaminess so that's where the cheese comes in.  I used Manchego because I just so happened to have some in the refrigerator. You could, of course, substitute any cheese you like or just leave it out.

I'm calling it a salad because I don't know what else to call it, but you could serve it warm in which case it would seem to be more like a.........what?  Casserole?  Dinner entree? Who knows.  Anyway, whatever it is, it can be served warm, room temperature, or cold.  It holds well for several days so it would make a great dish for family gatherings or pot lucks.  And of course, you could eliminate the turkey and serve a nice piece of grilled chicken, fish, or pork on top of the rice mixture.  Same song, different verse.  I was trying to think of what I would call it in that event, but I finally gave up and just decided to call it dinner.


printable recipe
Forbidden Rice with Smoked Turkey, Roasted Squash, and Walnuts
Serves 4-5

Note:  The smallest butternut squashes typically available are about 2 lbs.  For that reason, look for peeled and already-cubed squash in your produce aisle, or plan to use the remaining squash in another use.

For the vinaigrette:
2 large garlic cloves, minced
1 tablespoon Dijon mustard
½ teaspoon salt
½ teaspoon sugar
¼ teaspoon freshly ground pepper
¼ cup rice vinegar
1/3 cup vegetable oil

For the salad:
1 pound butternut squash, peeled, seeded and cut into 1” chunks (see note)
Salt and pepper
2 tablespoons olive oil
1 cup black rice (preferably Forbidden Rice)
½ red bell pepper, seeded and chopped
15 sugar snap peas, trimmed and cut into thirds
3 scallions, white and green parts, sliced
½ cup diced hard cheese (Manchego, Cheddar, etc.)
8 ounces (sliced 1/2” thick) deli smoked turkey, chopped into cubes
½ cup walnuts, toasted and coarsely chopped

Preheat the oven to 400d.  Cover a large rimmed baking sheet with foil and place the squash cubes on foil.  Drizzle with oil, generously sprinkle with salt and pepper, and toss together with your hands. Spread the squash out in one layer and roast for 25 – 30 minutes, turning once with a spatula, until golden and tender.  Set aside to cool.

Meanwhile, place rice in a medium saucepan with 1 ¾ cups water and bring to a boil over high heat.  Turn the heat to low, cover and simmer for 30 minutes.  Let rest off the heat for a few minutes, then drain in a colander and let cool. 

While the squash and rice are cooling, make the vinaigrette by combining all ingredients in a food processor or shake in a jar.  Keep refrigerated until ready to serve.

When cooled, add the rice to a large bowl and add the red pepper, sugar snaps, scallions, cheese and turkey.  Toss to combine.  Add the vinaigrette and toss again.  Add the squash cubes and gently toss to avoid breaking up the squash. 

Serve in individual bowls garnished with walnuts.

May be made in advance and refrigerated.  Add the walnuts just before serving.

Friday, August 16, 2013

Ravioli with Peas, Bacon and Lemon Oil

Last Year's Post: Summer Pasta Salad with Fresh Tuna

Pet peeve #352:  thick-cut bacon.  Why all of a sudden is thick-cut bacon the hot trend?  You can hardly find regular bacon any more.  I was watching TV the other day and no less than celebrity chef Ina Garten was gushing about her thick-cut bacon adding a nice chew to her salad.  I don't know about you, but any time "chewy" and "meat" are in the same sentence I don't think that's a good thing.  I can't think of a single meat where "chewy" is the desired texture, particularly bacon. To add insult to injury, we were having breakfast at a new restaurant this weekend and the server asked me if I wanted my bacon crispy.  Yay, someone gets it!   In retrospect I should have known that if they have to ask, something is wrong.   I received a slab of bacon that was at least 1/2" thick and fried until it should no longer be called bacon.  Pork jerky or shoe leather would better describe the looks and taste.  After one or two bites I quit because I was afraid I was going to crack a tooth.  Moral of the story - bacon should thin and crisp, period.  OK, end of rant.  I feel better now.

Anyway, I like to try recipes that contain either an ingredient or a technique that's new to me, partly to expand my horizons but mostly just because I have an incurable curiosity streak.  This recipe contains a new ingredient that also involves a new technique:  lemon-infused olive oil.  While it's true that you can buy any number of olive oils infused with various flavors, there are several compelling reasons to make your own.  First, it will be much fresher.  Second, you can customize it to your taste.  And third, infused oils are very expensive to buy.  A bottle of infused oil will probably run somewhere around $10 if it's decent quality.  Using my Costco extra-virgin olive oil and one lemon, I made a cup of lemon oil for slightly over $1.  Not bad.

One thing you need to know is that you should start one day in advance because the oil needs to steep for 24 hours.  The other thing you should know is that it's important to remove the rinds after 24 hours and store the oil in your refrigerator for food safety reasons.  I once made a big batch of garlic oil and stored it in my pantry, only to read several weeks later that botulism can develop under those conditions.  I was sad to throw the entire batch out but happy that I hadn't tried it in the meantime.

The infused oil is very easy to make.  Remove the outer rind (no pith) of a lemon with a vegetable peeler,  then warm the olive oil and rind over low heat for ten minutes.  Cool and place the rind and oil in a clean glass covered container in the refrigerator for 24 hours.  Remove and strain out the rinds, then place the oil back in the container.  Kept refrigerated, the oil will keep for up to a month.


The lemon oil serves as the sauce for this easy and quick pasta dish.  You might not normally associate crunch with pasta, but there is definitely a crunch factor here from the (crisp!) bacon and the toasted pepitas.  If you can't find pepitas, toasted chopped walnuts would be equally good.

You'll have lemon oil left over after you make this dish, so here are some ideas for how to use it.
  • Drizzled over cooked vegetables
  • Salad dressings
  • Over any cooked or grilled fish
  • As a dipping sauce for bread (add any fresh or dried herbs you like)
  • Drizzled on top of hummus 
  • In cold pasta salads
This dish is very light and fresh-tasting and comes together in the time it takes to cook the pasta (assuming you made the lemon oil in advance), so it makes a great weeknight meal.

printable recipe
Ravioli with Peas, Bacon and Lemon Oil
Serves 2-3

3 slices of bacon
1 9 ounce package refrigerated cheese ravioli
½ cup frozen peas, thawed
1/3 cup daikon sprouts (or other sprouts or micro-greens)
Lemon-infused olive oil (see recipe below)
¼ cup roasted pepitas (pumpkin seeds)
Salt and freshly ground pepper


Chop the bacon into ½” wide pieces and fry in a skillet until golden and crisp.  Remove to paper towels to drain. 

Cook ravioli according to directions.  While the ravioli is cooking, cook the peas according to directions.

When the ravioli is done, drain in a colander and transfer to a medium bowl.  Toss with a tablespoon or two of lemon oil, then transfer to individual bowls. Top with peas, bacon, sprouts, and pepitas. Drizzle with a little additional lemon oil, then add salt and pepper to taste.

Lemon-Infused Olive Oil
1 lemon
1 cup good-quality extra-virgin olive oil

Scrub the lemon well under running water and dry thoroughly.  Using a vegetable peeler, peel the outer skin only (no white pith) of the lemon.  Place the lemon peel and olive oil in a small saucepan and heat slowly over low heat for 10 minutes, until the peel begins to sizzle.  Remove from the heat and let cool.

Transfer the olive oil and lemon peel to a clean glass container and cover tightly.  Refrigerate for 24 hours.  After 24 hours, strain out the lemon peel and return the lemon oil to the jar.  Refrigerate for up to a month.  When ready to use, remove the amount needed from the jar and allow to come to room temperature before using.

Friday, April 5, 2013

French Chicken Salad

Last Year's Post:  In Praise of Asparagus

Look For Beautiful Ingredients
Someone once said we eat with our eyes first, which is kind of an annoying phrase but true.  Never under-estimate the wow factor of a few beautiful ingredients like the french haricot verts (arh-ee-koh vair) and artisan lettuces I found at the store this week.  Haricot verts are simply a smaller and thinner version of regular green beans with really cool pointy ends.  Don't cut off the ends -they're part of the appeal.  The beans are very tender compared to larger green beans and don't take long to cook - you want them to be crisp-tender.

I've never seen such deep red lettuce before.  There was enough lettuce in this container for at least four huge salads and it was really fresh.  It all got a quick cold rinse and spin in the salad spinner, then off to the refrigerator wrapped in paper towels and sealed in a plastic bag to stay fresh.  If your lettuce is slightly wilted, this treatment will even refresh it back to crisp again.


I always keep my eye out for beautiful and unusual ingredients (especially produce) whenever I'm at the farmer's market or stores like Whole Foods, Trader Joe's or the local high-end grocery store.  I file any discovered treasures away in memory until I come across a recipe that would showcase them.  For example, I found the most fabulous teeny-tiny deep red carrots at the farmer's market last year that I plan to showcase in something when I find them again this summer.  (The Lawyer always asks me how I can remember stuff like that.  He, who can quote winners and scores from NCAA tournaments from 10 years ago.  Men.)

I like to save money on groceries as much as anyone, so when I plan meals for the week I buy as much as possible at the local discounter and then head to the higher-end store for a few special ingredients such as these.  You're still saving money compared to going to a restaurant, and eating a lot healthier too.  Speaking of healthier, warm weather is coming and so are shorts and swim suits.  Great time for salads, don't you think?

This type of salad is called a composed salad because it's, well, composed as opposed to tossed all together.  If you have great ingredients, taking the time to arrange them will make your salad look more beautiful.  Group ingredients side by side to make the most of contrasting colors.  Leaving ingredients whole (such as the haricot verts) also makes the salad more spectacular - the diners can cut everything up and toss it all together if they want (after they stop admiring it, of course).  I debated about leaving the walnuts whole also, but they're kind of difficult to chop up with a table knife and fork so I compromised by leaving them in large pieces instead.  Flying walnuts would undoubtedly be amusing but also messy.

Another tip about making pretty salads - wait until the meat is fully cooled (and preferably refrigerated for a few hours) before slicing for the most perfect slices.


Enough about making food pretty, it has to taste great too.  As with many other foods, one of the most attractive aspects of this salad is its interplay of textures and flavors - juicy chicken, crunchy walnuts, creamy cheese and crisp fresh beans all brought together with a tart lemon-Dijon dressing.  If you don't have the time or inclination to search out fancy ingredients the salad will certainly still taste just as good with regular green beans and a bag of salad greens. You can also use another kind of cheese if you prefer - I used Monterey Jack but Colby, goat cheese, Fontina or feta will also work well.

What makes this salad french?  The lemon-mustard dressing, fresh thyme, walnuts, green beans and chicken are all traditional french ingredients plus the emphasis on visual appeal is very french.  It tastes completely delicious and it's very healthy, plus you can prepare the walnuts, chicken, vinaigrette and beans in advance so all you have to do when you're ready to eat is arrange everything on the plate and drizzle with the vinaigrette.  Yum.  Salad never looked so classy.


printable recipe

French Chicken Salad
Serves 4

For the salad dressing:
1 tablespoon Dijon mustard
2 tablespoons red wine vinegar
¼ cup olive oil
1 tablespoon minced shallots
1 tablespoon minced fresh thyme, plus more for garnish

For the salad:
2 large boneless skinless chicken breasts
¼ cup soy sauce
¼ cup olive oil
Freshly ground pepper
16 oz haricot verts (French green beans)
1 1/3 cups Monterey Jack (or Fontina, Colby, or feta) cheese, cut into small cubes
1 cup walnuts, toasted and coarsely chopped
Red leaf lettuce
  
Make Ahead:
Preheat the oven to 450 degrees and line a baking pan with foil.  Place the chicken breasts in the pan, and brush both sides with soy sauce and olive oil.  Sprinkle both sides with pepper.  Roast to an internal temperature of 160 degrees (165 degrees after resting a few minutes), about 20 minutes.  Cool completely in the pan, then place the chicken breasts and pan drippings in a sealable plastic bag.  Shake the bag to coat the chicken breasts with drippings, then place in the refrigerator for an hour or two.

Combine the mustard and vinegar in a medium bowl.  Gradually whisk in oil.  Add shallots and thyme, then set aside.

Cook beans in large pot of boiling salted water until crisp-tender, about 4 minutes for haricot verts or 5 minutes for regular green beans.  Drain and immediately place in a bowl of ice water to stop the cooking process.  Drain again and pat dry.  (Can be prepared 1 day ahead.  Cover chicken and beans separately and refrigerate.)

Remove the chicken from the refrigerator and thinly slice crosswise.  Add a small amount of dressing to the beans and toss to coat.  Place the leaf lettuce on plates, then top with groupings of cheese cubes, beans, chicken slices and walnuts.  Drizzle the salad with additional dressing and top with the reserved thyme.

Friday, July 20, 2012

Farm Stand Salad


I've read quite a bit recently about the importance of "rebalancing your plate" to eat primarily plants and grains.  Animal proteins are supposed to play a lesser role.  That doesn't mean we all have to become vegetarians and eat tofu, but health advocates often suggest eating meatless one day per week as part of a healthy lifestyle.  If not totally meatless, it's a good idea to cut down on the amount of meat in a meal.  Summer is a perfect time to adjust your diet a little with the abundance of fresh fruits and vegetables that are available.  This salad is an example of a healthy summer meal with plenty of market-fresh veggies and a sprinkling of bacon.  If you're feeling particularly inspired you could leave the bacon out completely but it does add a nice counterpoint to the tangy goat cheese dressing and we all know how well bacon goes with fresh lettuce and juicy tomatoes.  Other major flavor components of the salad include fresh sweet corn, toasted walnuts, red onion, and fresh basil.  The overall flavor profile is very bright, bold and satisfying.

Growing up in the midwest I never really realized that midwesterners are the fortunate few who can eat sweet corn picked fresh that morning and sold at a roadside stand.  At the start of the corn season the ears have tiny, tender kernels that are bursting with sugar.  At that point you can literally cut the kernels off the cob and put them in a fabulous black bean and corn salad without cooking them at all. Of course, if you do cook them, it's only for a minute or two to heat them up enough to cover them with butter and salt until they drip all over your plate (and chin) as you gobble the entire cob, rows upon rows of sweet buttery salty heaven.  Once picked, the sugars in corn quickly turn to starch so corn that's been transported never has that heavenly taste.  And later in the season the corn tends to have starchier, tougher kernels as well.  But oh, those first fleeting days of corn season!  If you've never had that type of fresh corn all I can tell you is that it's a revelation.   A local farmer told me it has something to do with the rich soils and temperature/rain balance in the midwest.  Whatever, all I know is that sweet corn ranks right up there in my food memories with the tomatoes of my youth.  At the beginning of the harvest you can very easily make a meal of corn, tomatoes, and cucumbers and be extremely happy.  Plate rebalanced!

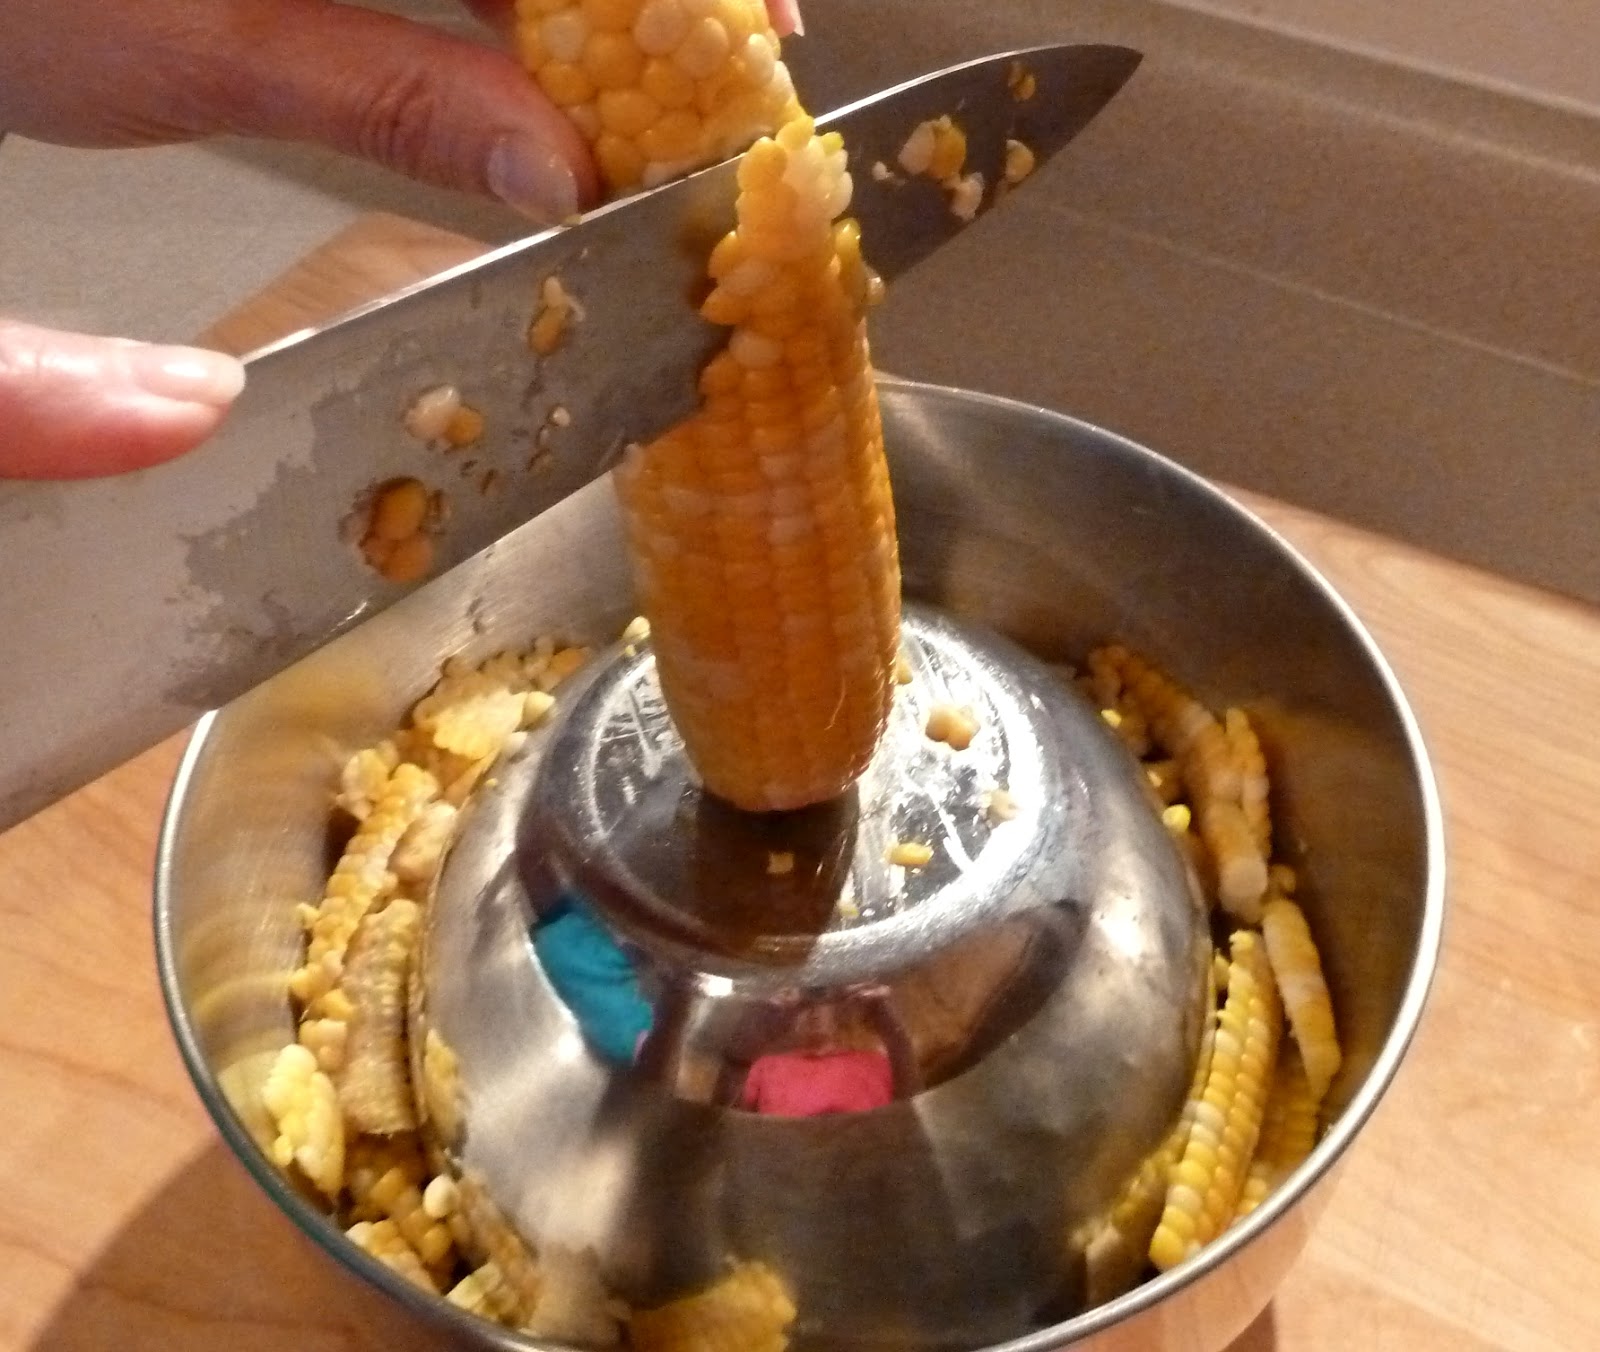
Even if you don't have access to that ephemeral corn, it's still worth it to buy fresh corn at your local market when it's available.  My tip of the day is how to cut corn off the cob without it ending up all over your kitchen.  Put a large bowl on the counter and place a smaller bowl (with a flat bottom) upside down inside it.  Balance the corn cob on top of the small bowl and when you cut down, the kernels fall neatly into the large bowl instead of all over your counter top.


I like to break the large chunks up just a little but not completely so everyone can see they came fresh off a cob when you serve your salad.

Cold crisp salads are perfect for hot summer days like we're all experiencing this year, don't you think?  Serve your salad with a fresh crusty baguette from your favorite bakery and have a (balanced) feast! 

* * click here for a printable recipe * *

Farm Stand Salad
Serves 4

4 pieces of cooked and crumbled bacon
2 ears fresh corn, husked
2 ripe tomatoes
¼ red onion, thin sliced
1 bag baby salad greens or 2 small heads of baby lettuces, rinsed, dried and cored
1/3 cup walnuts, toasted
½ cup olive oil
2 tablespoons cider vinegar
1 tablespoon lemon juice
½ cup soft cheese, such as feta or goat’s cheese, crumbled
2-3 tablespoons chopped fresh basil or cilantro
1/2 teaspoon salt
Pepper


Bring a large pan of water to a boil. Drop the corn in, cover, and cook for approximately 5 minutes. Remove from the water and let cool, then cut the kernels off the cob and set aside. Core the tomatoes and thin slice. Depending on the size of the tomatoes you may wish to cut the slices in half.

In a small bowl combine the oil, vinegar and lemon juice with a whisk. Add the crumbled cheese and whisk. Add the basil, salt and pepper and whisk briskly until creamy and well blended.

Combine the lettuce, onion and tomatoes in a large bowl. Pour half the dressing over the salad and toss. Divide among 4 plates and top with corn, bacon, and walnuts. Drizzle with remaining dressing and serve.