Showing posts with label chicken. Show all posts

Thursday, February 28, 2019

Ecuadorian Fried Rice (Chaulafan)


I first had Chaulafan at Cocina Latina restaurant in Minneapolis.  I was fascinated by the concept of Latin/Asian fusion represented by the dish - essentially fried rice (brought to South America by Chinese immigrants) with Latin influences such as cilantro, cumin and ancho chile powder.  It was so amazingly good that I had to re-create it at home, complete with the Colombian hot sauce that was served on the side.

There are quite a few ingredients but it comes together reasonably fast if you do some prep in advance - cook the rice, buy cooked chicken from the deli, and make the hot sauce.  (If you don't want to make the hot sauce you can use any bottled sauce but I've tested several and think the Colombian hot sauce is the best with this dish.) Having a helper also comes in handy for the chopping part.

I assume this is a fairly special-occasion dish since it contains not only bacon and shrimp but also chicken, eggs and even optional shredded pork.  Of course, you can eliminate one or more of the proteins if you want but I'd keep the bacon for flavor.

There are two ingredients that you may not have on hand - ancho chile powder and achiote powder.  Of the two, ancho chile is much easier to find and is important to the taste of the dish.  It's a mild but smokey chile that's really delicious.  Achiote powder is primarily a coloring agent and since the dish uses just 1/4 teaspoon you could eliminate it if you can't find it.

Leftovers heat up really well with the exception of the shrimp, which can get tough if you microwave them.  Leave them out while you reheat the rest of the rice and then stir them in after the rice is hot to gently rewarm them.

print
Chaulafan: Ecuadorian Fried Rice
Serves 3-4                           
 Note: To speed up meal prep, make the hot sauce and cook the rice in advance.

Rice
1 T oil
1 T white onion, diced
2 cups chicken broth
1 cup uncooked white rice
Salt to taste

Chaulafan
2 oz pancetta or diced bacon
4 raw very large shrimp, peeled, deveined, tails removed and cut in half lengthwise
2 eggs, beaten
Salt and pepper
 1 T vegetable oil
½ cup diced white onions
1 small carrot, diced 
2 garlic cloves, minced
3 T soy sauce, divided
1 T Worcestershire sauce, divided
3 T finely chopped cilantro, divided
2 tsp Ancho chile powder
1 tsp ground cumin
¼ tsp achiote powder
1/3 red and 1/3 green bell peppers, diced
½ cup frozen peas, thawed
1-1 ½ cups cooked shredded chicken (from the deli department)
½ - 1 cup cooked shredded pork, optional
4-5 green onions, finely chopped
Sliced red onion, for garnish
 Colombian hot sauce (see following recipe)

To cook the rice, heat the oil, add the onions and the rice, stir well. Then add the broth, season with salt to taste, bring to a boil, reduce heat to low, cover and simmer for about 20 minutes.  Cool.  May be made in advance and kept cooled and covered in the refrigerator.

Heat a large nonstick sauté pan over medium heat.  Add the pancetta or bacon and sauté, stirring occasionally, until crisp and brown.  Remove and drain on paper towels.  In the same pan, add the shrimp and sauté quickly (1-2 minutes) until barely cooked through.  Remove and set aside.  Add the beaten eggs to the pan, season with salt and pepper, and cooked until softly scrambled.  Remove, chop, and set aside.

Add the tablespoon of oil to the pan over medium heat, then add the remaining white onions, carrot, garlic, 1 tablespoon soy sauce, half the Worcestershire sauce, Ancho chile powder, cumin, and 1 tablespoon cilantro.  Cook for 5-8 minutes until the onions and carrots are cooked. 

Add the cooked rice (and optional pork), chicken, and bell pepper.  Stir well, taste and season with salt and pepper.  Cook over medium high heat for 5 minutes, stirring infrequently, allowing a brown crust to develop on the bottom.  Stir in the remaining soy sauce, Worcestershire sauce, cilantro, shrimp, eggs, peas and green onions and stir well.  Cover and heat through for about 3-4 minutes.

Serve garnished with sliced red onion and hot sauce on the side.

 Colombian Hot Sauce
½ cup water
½ cup white vinegar
2 habanero peppers, chopped and seeded
1 to 2 green onions, chopped
1 teaspoon sugar
2 tablespoons vegetable oil
1 tablespoon lime juice
½ teaspoon salt
½ cup cilantro, chopped
½ cup red bell pepper, chopped
1 medium tomato, peeled and seeded


Add water, vinegar, habanero peppers, onion, sugar, oil, lime juice and salt to a blender and blend well.  Add cilantro, red bell pepper and tomatoes.  Pulse once or twice to mix the ingredients without blending.  Use immediately or store, covered, in the refrigerator for up to a week.  Or, freeze in ice cubes trays for individual use later.

Friday, October 6, 2017

Broccolini Fried Rice

Last Year's Post:  Apple Strudel
Two Years Ago:    Smoked Salmon Cakes

I left any mention of meat out of the title of this recipe because you can make it with chicken, or any cooked leftover pork or steak, or go vegetarian with tofu or even just cashews.   It's very versatile.  The base recipe has rice, of course, with broccolini, eggs, snow peas, edamame and/or green peas and a very simple but flavorful sauce made from soy sauce, orange zest and orange juice.


Stir fries and fried rice are two different things.  Stir fries require that all the prep work is done in advance and then the actual cooking takes places very fast and at very high heat.  Fried rice also requires advance prep work and some fast cooking at the beginning.  But when the rice is added in the middle of the process, you press it down into the pan and then step back and leave it alone for a few minutes to crisp on the bottom.  After it's crisp, everything speeds up again.  It's important to the final texture of the dish not to rush the rice-crisping step, and it's also very important to use day-old rice because it dries out overnight and won't clump up plus it will crisp up and brown much better.


The prep work here takes 15-20 minutes, but the actual cooking goes fast so this is a good (and healthy) weeknight meal assuming you made the rice the day before.  I particularly like it served with a little chili oil mixed in for some heat, but others may prefer it with soy sauce for a milder dish.  Serve both at the table so everyone can choose for themselves.

print
Broccolini Fried Rice
4 servings

Cook’s Notes
If using meat that is already cooked or tofu or cashews, sauté the broccolini in the first step as listed (without the meat) and add the cooked meat with the snow peas, edamame and liquids at the end.
If you are preparing rice especially for this dish, you'll need to cook about 1 cup raw rice. Rinse the rice first to remove some of the starch so it's less sticky when it comes time to fry. Spread the cooked rice out on a rimmed baking sheet or plate to cool so the steam can evaporate, then transfer to a resealable container and chill.

1/4 cup vegetable oil, dividedEasy Fried Rice with Chicken and Broccolini Recipe / Photo by Chelsea Kyle, Food Styling by Rhoda Boone
4 green onions, sliced on the bias, divided
1 pound boneless skinless chicken, cut into 1/2" slices (OR cooked chicken, pork, beef, tofu or cashews)
1 1/4 teaspoon kosher salt, divided
1/2 teaspoon freshly ground black pepper
2 garlic cloves, finely grated or pressed
1 teaspoon finely grated ginger
1 bunch broccolini (about 6 ounces), ends trimmed, sliced in half lengthwise and cut into 2” pieces
4 cups cooked white rice (preferably day-old, long-or medium-grain)
3 large eggs, beaten to blend
1 cup snow peas, cut in half on a diagonal
1/2 cup frozen edamame or green peas
3 tablespoons low-sodium soy sauce or tamari
Zest of ½ orange
2 tablespoons fresh orange juice (from about 1/2 orange)
Chili oil and soy sauce for the table

Heat 1 tablespoon oil in a large nonstick or cast-iron skillet or wok over high. Reserve about 2 tablespoons sliced green onions; add remaining onions to oil and cook, tossing occasionally, about 1 minute. Add chicken, ½ teaspoon salt, and pepper and cook, stirring, about 2 minutes. Stir in garlic and ginger, then add broccolini and toss until incorporated. Cover and cook until chicken is cooked through and broccolini is tender, 2–3 minutes more. Transfer to a large bowl.

Heat remaining 3 tablespoons oil in skillet over high. Add rice and remaining 1/4 teaspoon salt, toss to coat, then press rice into a single layer, and cook, undisturbed, until crisped on the bottom, about 3-4 minutes. Lift a corner of the rice to see if it’s starting to turn a light golden color; if not, let it cook for a minute and check again.  When the bottom of the rice is lightly golden and crisp, stir and move it to one-half of skillet and add eggs to other half. Cook, stirring gently to form curds, until soft set and just cooked through, about 1 minute, then fold into rice.

Fold in snow peas, edamame, soy sauce, and orange juice. (This is where you should add cooked meat, tofu or cashews.) Cook, tossing, until warmed through, about 1-2 minutes. Add broccolini mixture and toss to combine. Divide among plates, then top with reserved scallions. Serve with chili oil and soy sauce at the table.


Friday, June 30, 2017

Spaghetti with Lemon and Walnuts

Last Year's Post: Grilled Lobster Tails
Two Years Ago:   Southwest Grilled Shrimp Salad

If spaghetti with marinara and meatballs is classic winter comfort food, then this is its summer cousin - spaghetti with a light but very flavorful sauce of lemon, garlic, parsley and walnuts. It's definitely an unusual combination for spaghetti, don't you think?  You can serve it either warm or at room temperature, making it even more appealing for warm summer months.  And of course you could add some grilled chicken or shrimp if you really want, but I find it very satisfying as a vegetarian entree.

I think of this recipe as being minimalist in concept but definitely not in taste.  Just because it doesn't have a long list of ingredients, don't be fooled.  Each ingredient plays an important part for big impact: fruity olive oil, fragrant lemon zest and bright juice, mellow garlic slices, grassy parsley, crunchy toasted walnuts, grated Parmesan, and freshly ground black pepper.  Because there are so few ingredients, be sure to use the best you can find.

The original recipe called for adding the parmesan into the pasta while it's still in the pan, and stirring to make a "creamy sauce".  I found it made big gooey clumps of parsley and half-melted cheese instead, so I adapted the recipe to add the parmesan later.  Same tastes, happier result.


Spaghetti with Lemon and Walnuts
Serves 3-4

May be served warm or at room temperature.

8 ounces uncooked spaghetti
Salt and freshly ground black pepper
1 tablespoon olive oil plus more for drizzling
4 garlic cloves, thinly sliced
1 ½ cups chopped fresh flat-leaf parsley
Zest from ½ lemon
2 ½ ounces grated Parmesan cheese (about 2/3 cup)
1/3 cup toasted walnuts, coarsely chopped
1 lemon, cut into quarters, for garnish


Bring a large pot of water to a boil and add 1 teaspoon salt.  Add pasta and cook until al dente according to package directions.  Reserve 1 cup cooking liquid, then drain the pasta.

Heat 1 tablespoon olive oil in a skillet over medium heat.  Add garlic and cook 2 minutes until pale golden-brown.  Place the pasta in the skillet, tossing to coat.  Add the parsley and toss, adding some pasta water if the pasta looks dry.  Taste and adjust salt if needed; sprinkle with pepper. 

Divide among shallow bowls and garnish with lemon zest, parmesan and walnuts.  Drizzle lightly with olive oil and add lemon quarters on the side for squeezing.

Friday, February 24, 2017

Yakisoba

Last Year's Post:Chicken with Lemon Pomegranate Sauce and Pistachio Rice
Two Years Ago:  Baked Pumpkin Spice Granola

Yakisoba is a Japanese dish that reminds me of fried rice because it's a great way to use up leftover bit of meats and vegetables.  At its most basic, the dish is made up of noodles, veggies, and sauce.  After that, the specifics are up to you:  pork, chicken, or vegetarian versions are all good, and the vegetables can be whatever you want although cabbage, carrots and onions are common.  I added a little caramelized broccoli for crunch and nutrition but that's just me.

The sauce is a little peculiar - ketchup, soy sauce, Worcestershire sauce and a touch of hot sauce - but somehow it works.  Yakisoba sauce is traditionally slightly spicy and slightly sweet but the sweet part didn't appeal to me so I left out the mirin or sugar.  Again, that's up to you.  Just go easy on the hot sauce until you taste the overall result - you can always add more at the table.  I read something online that leads me to believe the combination of ketchup and Worcestershire is a substitution that's made to approximate the taste of Japanese Tonkatsu sauce, which you likely won't find anywhere except an Asian market and which virtually no one has at home (except me, I'm sort of embarrassed to say).  Even though I had a big bottle of Tonkatsu in my refrigerator I made the recipe as written to be sure I understood the flavors, which were excellent.

Be sure to use a Dutch oven to stir-fry everything because you start with a giant pile of veggies (they cook down a lot) and end with piling the noodles in there too.  Even a large saute pan is too small, as I discovered the hard way.  (Envision cabbage, carrots and onions all over the cooktop.)  Note the switch from the saute pan to the Dutch oven below.


You want to saute the veggies until they've wilted and started to soften, but still retain some crunch.  Speaking of, I've discovered the bags of shredded carrots in the store are perfect for salads and stir-frys because they're shredded to just the right size.

A couple of other tips:  it's easier and more thorough to wash cabbage after you slice it, then just spin it dry in a salad spinner.  Same thing applies to leeks.  The second tip is to peel and shred (or thinly slice) broccoli stems for your stir frys rather than throwing the stems away.  A regular peeler and a shredding peeler are perfect for the task.


Yakisoba isn't fancy, but it's fast, delicious and a great way to use up leftovers.  And it makes a great lunch the next day.

Yakisoba
Serves 4

2 pork chops or 1 chicken breast, thinly sliced (or 1-2 cups cooked pork or chicken), optional
1 stalk of broccoli, florets cut off and stem peeled and shredded
1 small head Napa cabbage, sliced
2 medium carrots, grated (or ½ of a 10-oz bag of shredded carrots)
1 small yellow onion, sliced
2 tablespoons minced ginger
2 tablespoons vegetable oil
2 (3 oz) packages ramen noodles (seasoning packages discarded)
1 tsp sesame oil
¼ cup soy sauce
¼ cup Worcestershire sauce
2 tablespoons ketchup
1 teaspoon sriracha or other hot sauce, plus more for serving
2 tablespoons mirin, or a bit of sugar (optional)


Heat a large pot of water to boiling for the noodles.  When boiling, add the noodles and cook just until tender, 2-3 minutes.  Drain thoroughly and toss with 1 teaspoon sesame oil to avoid sticking.  Set aside.

In the meantime, put the vegetable oil in a large Dutch oven over medium-high heat.  Add the ginger and sauté, stirring, for 30 seconds.  If your pork or chicken is raw, add it now and sauté for 3-5 minutes until cooked through.  (If your meat is already cooked, it will be added later.) Remove the cooked meat from the pan.  Add broccoli florets and allow to brown for 1-2 minutes, then add the remainder of the vegetables (cabbage, carrots, onion and shredded broccoli stem).  Stir and cook until wilted, add a few drops of water as needed to prevent sticking, 5-10 minutes.

In a small bowl, combine the soy sauce, Worcestershire sauce, ketchup, and sriracha sauce.  Taste and adjust with additional hot sauce or the mirin or sugar for a slight sweetness as desired.

When the vegetables are wilted, add the meat and sauce to the pot and stir well.  Add the noodles and stir to coat with sauce, allowing the noodles to cook in the sauce for a minute until the sauce is mostly absorbed.


Serve with additional hot sauce on the side. 

Friday, August 26, 2016

Coconut Curry Rice

Last Year's Post:  Summer Harvest Quiche
Two Years Ago:   Balsamic Chicken Watermelon Salad

I don't remember where I found this recipe, but I was on a coconut jag at the time and had vague visions of Chinese fried rice with shredded coconut in it, mostly because the name was "coconut fried rice".  Maybe that doesn't sound all that great to you but not to worry, I was totally off base anyway.  Sometimes being wrong turns out to be a good thing.

The coconut in this case comes in the form of coconut milk used to cook the brown rice, which imparts a hint of coconut to the finished dish.  Combined with mild curry powder, the overall flavor profile is much more Malaysian or Indian than Chinese.  The flavors are complex yet delicate.  (I thought about adding some spiciness to the dish but finally decided against it because I was afraid it would overpower the coconut or curry.)  You could make the flavors more bold by adding more coconut milk or curry powder, and you could certainly serve hot sauce on the side, but we very much liked it as is.  (The Lawyer:  "Have we had this before?  This is really good!")

You can go vegetarian by using tofu, or add thinly sliced chicken or pork for meat people - directions are included for both. I used some thin-sliced pork chops I found on sale at the store.  Compared to the original recipe, I cut down slightly on the amount of rice and meat and amped up the veggies which I do with pretty much any recipe.


Note that the recipe calls for making the rice in advance and chilling it, which helps the rice to brown in the pan.  If you don't have the time, skip the chilling step and just go straight from cooking the rice to cooking everything else.  It will still turn out fine.

print recipe
Coconut Curry Rice
Serves 4-6

Note:  If you are using chicken or pork instead of tofu, skip the tofu instructions and vice versa.


1 block extra-firm tofu plus 2 tablespoons soy sauce
-or-
6-8 ounces raw chicken or pork cut into thin bite-sized slices

1 ¼ cups uncooked brown rice
1 can regular coconut milk
1 tablespoon coconut oil or canola oil
1 medium onion, chopped
1 medium red pepper, chopped
10-12 sugar snap peas, trimmed and sliced diagonally into ½” pieces
 3 cloves garlic, minced
2 teaspoons grated ginger
2 teaspoons curry powder
½ cup frozen peas
2 teaspoons soy sauce
1 cup roasted cashews


Rinse the rice and drain.  Combine 1¼ cups coconut milk with 1¼ cups water to make 2½ cups total liquid.  Place the rice in a medium saucepan with the liquids and bring to a boil over high heat.  Reduce heat to low, cover and simmer for 30-35 minutes until the liquid is absorbed.  Cool and place in the refrigerator for several hours.

(For the tofu:  Preheat oven to 325d.  Drain and press the tofu.  Chop into cubes and toss in a bowl with the soy sauce.  Let marinate for 10 minutes until the soy sauce is absorbed.  Spread the cubes on a lightly greased baking sheet and baked for 45 minutes, flipping midway.  Remove and set aside.)

Heat a large non-stick pan over medium heat and add the oil.  (For the chicken or pork:  add the meat to the pan and sauté for 3-4 minutes, stirring occasionally, until cooked through.  Remove and set aside.)
Add the onions to the pan and sauté for 2-3 minutes, then add the red pepper and sugar snaps and continue to sauté for 2 minutes more.  Add the garlic, ginger, and curry powder and sauté for 30-60 seconds until fragrant.  Add the rice and peas and mix to combine, then let cook undisturbed for 1-2 minutes to develop a crispy crust on the bottom.  Add the soy sauce and tofu, chicken or pork and stir again, scraping the bottom, then continue to cook for a minute or two until thoroughly heated through.

Serve hot topped with roasted cashews.


Friday, May 13, 2016

Spring Vegetable Ramen

Last Year's Post:  Chicken with Shallots
Two Years Ago:   Pan-Seared Tuna with Capers and Red Wine Sauce

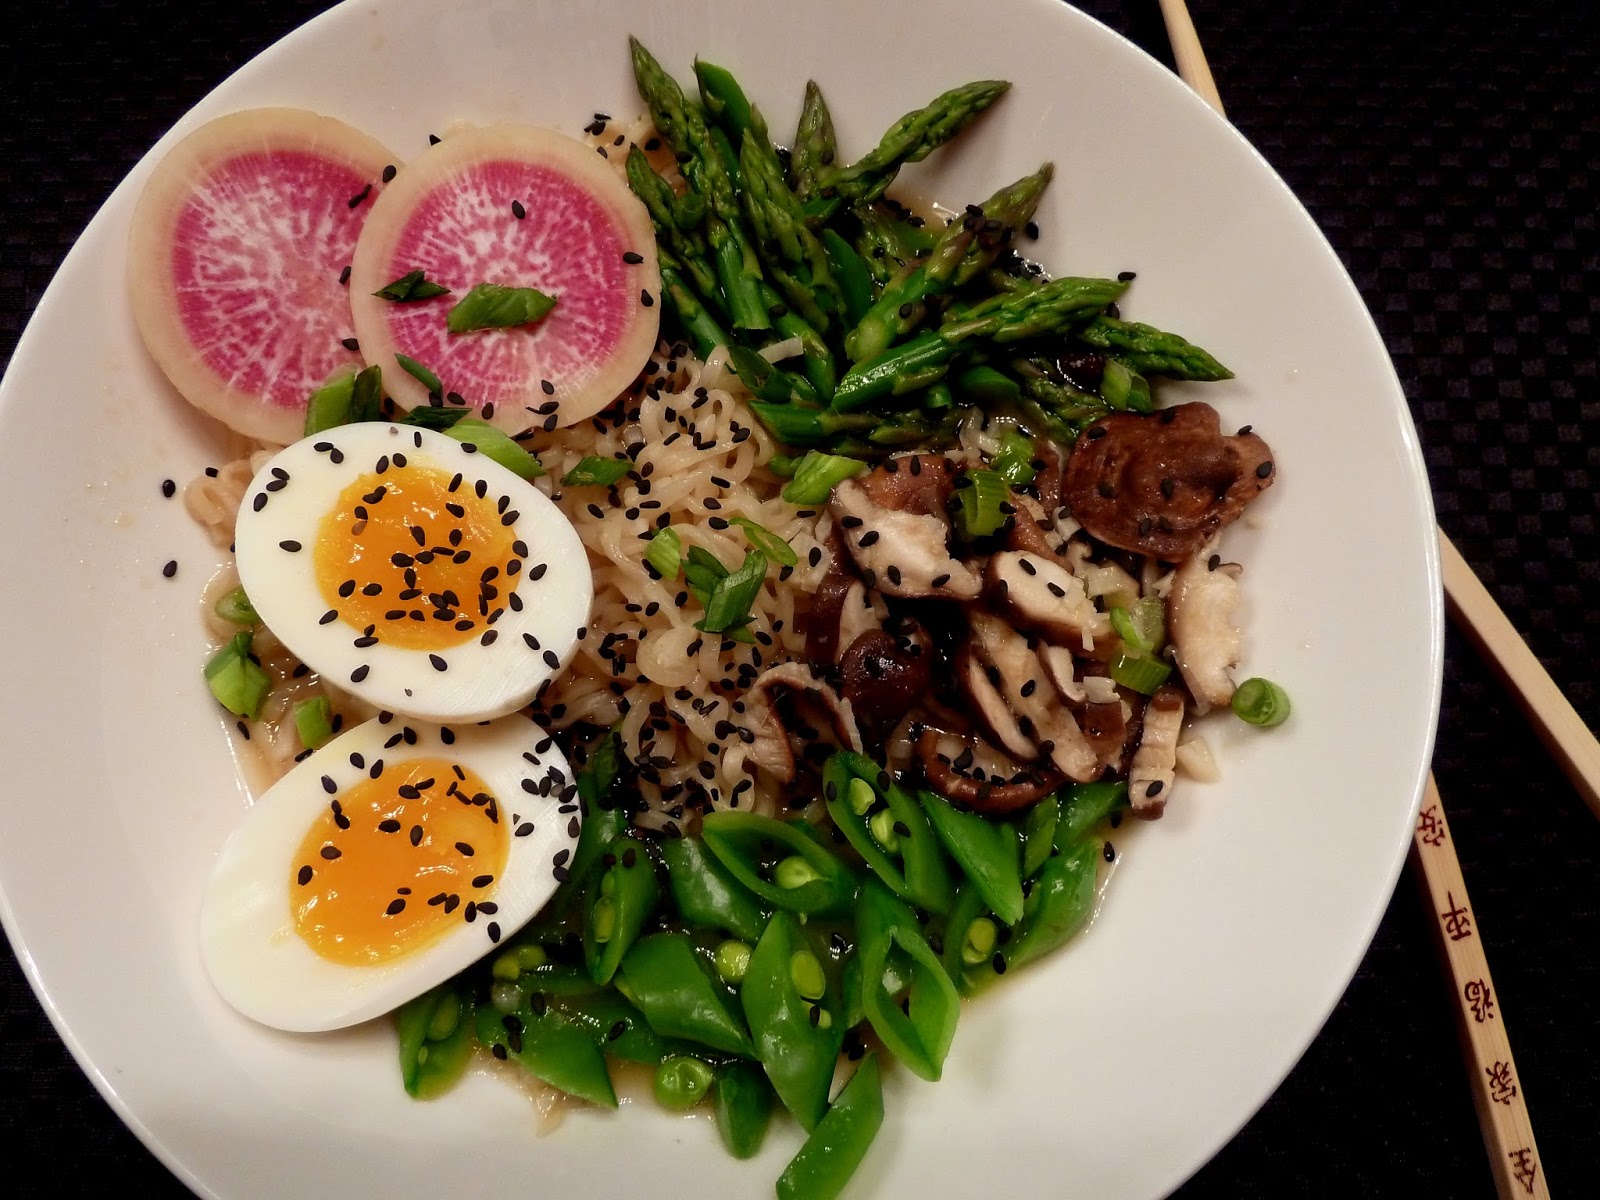
If you're looking for a light, healthy entree to counter-balance a heavy food episode or just want to cut down a little, give this recipe a try.  The broth is warming and fragrant with garlic, ginger and sesame, and the miso adds a deep umami flavor.  (You can usually find white miso - the mildest variety, near tofu at well-stocked supermarkets.  If you can't find it, the broth will be good anyway.)  The vegetables add nutrition and crunch,and the egg is great protein.  You could always add or substitute some shredded chicken for the egg if you want a more substantial meal.

I love the black sesame seeds for drama, but toasted white sesame seeds would work just as well.  And I couldn't resist adding the watermelon radish simply because I found one at the grocery store.  They're not all that easy to find but very pretty.  Funny story:  I thought the radish would stump the cashier for sure, but she just kept right on going and never missed a beat.  When I told her I thought it was going to stump her, she said "I've been a cashier for 25 years so I don't get stumped easily".  The woman in back of me said she'd never heard of a watermelon radish and the cashier told her it was also known as a shallot.  Not quite!  Shallots are mild onions, watermelon radishes are radishes.  Oh
well.


I've been reading a fair amount about how to hard-boil eggs lately because I've had trouble with the shells sticking and ripping up the whites.  Turns out the best tip is to boil the water first, then gently lower in the eggs.  Cook 6 minutes for soft-boiled (runny yolk) or 8 minutes for hard-boiled (hard yolk), then immediately place in an ice bath to stop the cooking process.  Works really well - the shells don't stick at all.

Spring Vegetable Ramen
Serves 4

4 eggs
1 bunch slender asparagus, trimmed
6 ounces sugar snap peas, trimmed
2 tablespoons toasted sesame oil, divided
1 bunch green onions, sliced, white and green parts separated
4 cloves garlic, minced
1 tablespoon grated fresh ginger
2 cups water
2 cups chicken broth
3 tablespoons white miso
1 ½ tablespoons reduced-sodium soy sauce
4 ounces fresh shiitake mushrooms, stemmed and sliced
2 (3 ounce) packages ramen noodle soup, seasoning packets discarded
Black or white sesame seeds, for garnish (optional)
Sliced watermelon radish, for garnish (optional)

Hard-cook the eggs:  fill a saucepan with enough water to cover the eggs and bring to a boil, then gently lower the eggs into the water.  Reduce heat, cover, and let simmer for 8 minutes.  Remove the eggs and immediately place in a bowl filled with ice water to stop the cooking process.  When completely cool, remove and pat dry.  Shell the eggs and cut in half.

Cut the tips off the asparagus, then cut the spears into 1” lengths.  Bring a large pot of water to a boil and add the asparagus spears.  Let boil for 1 minute, then add the asparagus tips and the sugar snap peas.  Boil an additional 30 seconds, then remove all with a slotted spoon and place in an ice water bath (save the water and keep it hot).  When cool, remove the vegetables from the water and pat dry.  Slice the sugar snap peas diagonally into 3-4 pieces each.  Set aside.

In a large saucepan, heat 1 tablespoon oil over medium heat.  Add green onion whites, garlic and ginger and cook, stirring, until fragrant, about 1 minute.  Add water, chicken broth, miso, soy sauce and the remaining 1 tablespoon oil, bring to a rolling simmer.  Add the mushrooms and simmer for 3 to 5 minutes.

Meanwhile, place the ramen noodles in the boiling water left from cooking the vegetables.  Cook, stirring occasionally, for 3 minutes until soft.  Drain.

To serve, divide the ramen noodles between wide shallow bowls.  Ladle in the broth mixture and mushrooms, then top with asparagus and sugar snap peas.  Garnish each bowl with 2 eggs halves, sesame seeds and watermelon radish slices.  Top with green onion tops and serve.


Friday, December 4, 2015

Southwest Eggrolls (baked not fried)

Last Year's Post: Beer Cheese
Two Years Ago:  Reese's Peanut Butter Cup Cookies

I found this recipe online as a Chili's Copycat for their Southwest-Style Eggrolls at a "top secret recipes" website, and the guy really nailed it - the flavor is just like the restaurant version.  I made one important change to make it healthier because I don't want to deep-fry anything:  I made it using phyllo dough and baked it until crisp and brown.  The result was fabulous and reminded me not only of those famous eggrolls, but also of a good restaurant chimichanga.  The eggrolls satisfied my Mexican cravings without a trip to the nearest Mexican restaurant, which always involves mass quantities of chips and salsa in addition to re-fried beans, none of which are healthy.

There are a fair number of ingredients and a good amount of prep in the recipe, so if you like them I would suggest making a double batch and freezing some for the next time.  To minimize the prep, use already-cooked chicken from the deli and use your mini food processor to mince the bell pepper and onion.  Be sure to mince ingredients before measuring.  How do you know to measure before or after chopping?  If the recipe says "2 tablespoons minced green onion", mince it first.  If it says "2 tablespoons green onion, minced" measure it first.  Make sure everything is prepped before you start cooking the peppers and onions because it goes fast from there on out.


The filling can be assembled in advance, leaving just the wrapping and baking for the end.  Don't worry if the phyllo sheets crack a little here or there, they get rolled up so many times that you'll never know the difference.


You can make these normal size and cut them up for appetizers or leave them whole as an entree.  They're actually bigger than an eggroll - more like a smallish chimichanga.  You could also making a small version by cutting the phyllo sheets in half and using less filling which would make them easier to dunk and pop in your mouth.  Phyllo is very flaky and the edges will crumble as you cut or bite the eggroll, but to me the trade-off is well worth it to avoid deep frying.

The other nice thing about making the eggrolls yourself - besides the fact that they're much healthier -is that you can make them as spicy as you want.  This recipe is very slightly spicy (the restaurant version needs to please everyone) but you can make it spicier by adding more jalapenos or more cayenne.  And then you can have your very own, favorite recipe southwest eggrolls piping hot right at home.

print recipe
Southwest Eggrolls
Makes 8 large eggrolls

Note:  to freeze for later, assemble eggrolls and freeze, then place in a resealable bag.  To bake, thaw eggrolls and bake as directed.

For the eggrolls:
2 cooked chicken breasts (from a rotisserie chicken or leftovers), diced into small cubes
¼ cup minced red bell pepper
¼ cup minced green onion
1 tablespoon vegetable oil
¼ cup frozen spinach, thawed and squeezed dry, finely chopped
¼ cup diced canned jalapeno peppers
2/3 cup frozen corn
½ cup canned black beans, rinsed and drained
1 tablespoon minced cilantro (or substitute parsley)
1 teaspoon ground cumin
1 teaspoon chili powder
½ teaspoon salt
¼ teaspoon cayenne
1 ½ cups shredded Monterey Jack cheese
16 (9”x14”) sheets of phyllo dough (one sleeve from a package of frozen phyllo dough), thawed
Olive oil or olive oil spray, for brushing

For the avocado-ranch dipping sauce:
1 avocado
¾ - 1 cup ranch dressing

Preheat the vegetable oil in a medium skillet over medium heat.  Add the red pepper and onion to the pan and sauté 1-2 minutes until tender.  Add the spinach next, stirring to break up clumps, then add the jalapenos and stir to combine.  Next add the corn and black beans and stir gently, then add the cilantro and spices and stir one final time.  Remove from the heat and let cool.  When completely cool, add the shredded cheese and stir to combine.

Note:  the filling can be made in advance.  Cover and refrigerate.

Preheat the oven to 425d.

When ready to assemble, remove the phyllo sheets from the wrapper and place flat on a work surface.  Immediately cover with a damp towel to make sure they don’t dry out.  Remove one phyllo sheet and place on a second work surface, keeping the remaining sheets covered with the towel.  Brush the sheet with olive oil or lightly spray with olive oil cooking spray.  Top with a second phyllo sheet and brush or spray with oil again.  Working with the short side nearest you, place a heaping ½ cup of filling on the lower part of the sheet leaving a 1” margin on the bottom and sides.  Fold the phyllo from the bottom up over the filling, then fold in 1” on both sides and roll up completely.  Place wrap seam side down on a baking sheet lined with foil; brush with oil.  Repeat with the remaining filling, phyllo sheets and oil.

Bake for 15 minutes until golden brown.  Let stand 5 minutes to cool.  While the eggrolls are baking, remove the avocado from its shell and mash, then combine with the ranch dressing.


Serve the eggrolls with the sauce on the side.

Friday, May 30, 2014

Chicken Gaston Gerard

Last Year's Post: Grilled Shrimp with Cucumber Horseradish Dipping Sauce
Two Years Ago:  Grilled Shrimp Greek Salad

I've been wanting to try this recipe for over a year, ever since The Lawyer and I took a geat trip to France.  While we were in Burgundy I learned about the classic regional dish called "Poulet (poolay) Gaston Gerard", which translates to "Chicken Gaston Gerard".  It was created by the wife of the mayor of Dijon (Madame Gaston Gerard) in 1930 to commemorate a visit by the famous French "Prince of Gastronomy" Curnonsky.  If you're a foodie geek like me, that story alone is enough to get you hooked.  If not, maybe you'll get hooked when I tell you the dish includes a mustard (Dijon, of course) cream sauce with Gruyere cheese.  Now are you interested?  I mean, how could it taste bad?  Cardboard would taste good with that sauce.

I did some research and discovered that although there are some small variations from recipe to recipe, the standard ingredients are chicken, Dijon mustard, Gruyere cheese, creme fraiche or heavy cream or half in half, and butter,  Pretty simple.  Many recipes call for bone-in chicken pieces but I prefer to work with boneless skinless chicken just for the ease of cooking and eating.  I found truly giant chicken breasts at the store so I first cut them in half horizontally to form thinner chicken cutlets and then again crosswise to make 8 total pieces that were about 3"x 3" - much easier and faster to cook. Can you believe all this came from two chicken breasts?  The chickens must have been the size of small turkeys.


The recipe is surprising fast and easy.  First you brown the chicken, then place it in a casserole dish and make the sauce in the same saute pan.  I used half and half instead of heavy cream, and the resulting sauce was slightly thickened but probably thinner than you would expect from a sauce that contains cheese. I think it's probably because the sauce contains less cheese than a normal "cheese sauce" so the flavor of the mustard can shine.  (After all, it is from Dijon France.)  That was perfectly OK with me, but if you want your sauce thicker I would use heavy cream and simmer it for a little while longer, or maybe add a little more cheese.  The predominant tastes in the sauce are mustard, cheese, and cream in that order.  It tastes very French. The sauce is then poured over the chicken and quickly browned under the broiler.


It's wonderful served with rice pilaf, mushrooms and peas, or farro with asparagus tips.  I think it's certainly company-worthy and I would call it a special occasion meal if for no other reason than the cheese and cream probably take it out of your weekly rotation.  It would make a great birthday meal, for example.  And the story alone is worth it.  I wonder what that Curnonsky guy thought?


printable recipe
Chicken Gaston Gerard
Serves 4

2 very large or 4 medium boneless skinless chicken breasts
Salt and freshly ground black pepper
2 tablespoons unsalted butter
1 bay leaf
1 sprig fresh thyme
2 tablespoons dry white wine
1 cup heavy cream or half and half
2 tablespoons Dijon mustard
¾ cup grated Gruyere cheese
¼ cup dry bread crumbs (Panko preferred)

Cut the chicken breasts in half horizontally to make thinner cutlets, then cut in half crosswise (if the breasts are very large) to make relatively thin pieces of chicken that are approximately 3” wide by 2-3” long.  You should have 8 pieces either way.

Season the chicken with salt and pepper.  Heat a sauté pan to medium-high and melt the butter.  Brown the chicken on the first side (approximately 4-5 minutes), then flip the chicken and reduce the heat to low.  Add bay leaf, thyme and white wine. Cook, covered, until the chicken is browned on the second side and fully cooked through, approximately 6-7 minutes.  Adjust cooking time depending on the thickness of your chicken pieces.  Do not overcook or the chicken may become dry.

Preheat a broiler.  Remove chicken from the sauté pan and place in a shallow casserole dish coated with cooking spray.   Discard bay leaf and thyme from the sauté pan and return to medium-high heat.  Add the cream and cook until it starts bubbling, then remove from the heat and stir in the mustard and all but 2 tablespoons of the grated cheese.  Pour the sauce over the chicken, add the rest of the grated cheese and the bread crumbs to the top, and place under the broiler for 30 seconds or so to brown.  Watch closely so the top doesn’t burn.

Excellent served with rice pilaf, mushrooms and peas, or warm farro with asparagus tips.


Thursday, November 21, 2013

Turkey & Pomegranate Salad

Last Year's Post: Brandied Cranberries
Two Years Ago:  Essential Foodie Gifts Under $20

You'll probably have some leftover turkey in the very near future, so I wanted to publish a recipe for a healthy, beautiful and delicious salad to help you get back on track after the Thanksgiving Day.  This recipe is a variation on the wild rice salad I published a few years ago, with less wild rice and more greens plus the addition of pomegranate seeds.

In the pantheon of beautiful fruits, pomegranates are arguably the rock star.  Their beautiful color on the outside is exceeded only by the beautiful little jewel-like seeds, which have incredible health benefits and a great tangy-sweet flavor.


So why don't we eat them more often?  Speaking at least for myself, I've always been intimidated by how to get the seeds out.  Since pomegranates are in season and they feel very festive at the holidays I decided to man up and figure it out.  There are a bunch of videos online (just Google "how to seed a pomegranate") such as an underwater seeding technique or the far more interesting and dramatic whack the heck out of it technique.  For the second video you have to be patient because the guy likes to hear himself talk, but it's worth it.  He's so enthusiastic about whacking the pomegranate with a wooden spoon that I was laughing by the end.  I had to try it even though the underwater technique certainly seemed safer and less likely to result in an injury to one or more fingers.  What's life without a little excitement?  (OK, true confession, I actually recruited The Lawyer for this little experiment.)

You score the pomegranate with a knife, pry it apart, stretch each half a little, then turn it over on your hand and whack it with a wooden spoon all over until all the seeds fall out.  And you know what?  It actually worked!  You've gotta try it out for yourself.  We'll definitely be eating more pomegranates now that we've found this tip.

What I like about this salad is the balance of flavors and textures - slightly bitter greens, creamy feta, chewy wild rice, crunchy nuts, sweet-tart pomegranate seeds, and delicious roast turkey.  You could substitute kale for the spinach or arugula, and could substitute a different type of nut or meat to suit your preference - I think chicken, duck, pork and even leftover roast beef would work just as well.  You could also use goat cheese or blue cheese in place of the feta if you like.  The salad dressing also adds a bright note with fresh orange juice and rind that pair perfectly with the pomegranate seeds.

If you cook the wild rice in advance, the salad comes together in about 20 minutes including the pomegranate whacking.  And how entertaining will it be to recruit your holiday house guests to do the whacking?!  Think of it as having your very own little reality food TV show.  Starring your relatives.  That alone should be worth it.


printable recipe
Turkey & Pomegranate Salad
Serves 4

For the salad:
¾ cup uncooked wild rice
2 cups water or low-sodium chicken broth
4 cups loosely packed spinach, arugula or kale, chopped
The seeds of one pomegranate
1 cup toasted walnuts, chopped
1 cup good-quality feta, coarsely crumbled
2 cup shredded cooked turkey

For the vinaigrette:
¼ cup white wine vinegar
1 ½ tablespoons olive oil
2 teaspoons sugar
2 teaspoons fresh grated orange rind
1 tablespoon fresh orange juice
¼ teaspoon dried basil
1/8 teaspoon salt
1/8 teaspoon pepper

Rinse and drain the wild rice.  Bring water or chicken broth to a boil in a medium saucepan.  Add the wild rice; cover, reduce heat, and simmer 45 minutes.  Check to determine if grains are swollen and most are split.  If not, check again every 10 minutes until done (typically 55-60 minutes).  Remove from heat, drain, and set aside to cool.  (May be made a day or two in advance.  Keep covered and refrigerated.)

To prepare the vinaigrette, combine all ingredients in a bowl and whisk to combine, or shake in a jar.  Set aside.

To prepare the salad, decoratively arrange the wild rice, spinach, pomegranate seeds, walnuts, feta and turkey on plates and drizzle with vinaigrette.  Alternately, all ingredients may be tossed with the vinaigrette in a large bowl and then plated.

Friday, October 4, 2013

Arroz Con Pollo

Last Year's Post: Spicy Homemade Peanut Butter
Two Years Ago:  Gingered Turkey and Spinach Salad

Arroz Con Pollo (air-oz cohn poy-oh) is a traditional dish from Latin America and the Caribbean.  The translation from Spanish is "chicken with rice" but that's not nearly as fun to say.  Although there are many variations, chicken, rice, saffron, tomatoes and olives are standard.  This particular recipe also has peas and I switched out bone-in skin-on chicken pieces in favor of boneless skinless chicken thighs, which are healthier and easier to eat.

The taste reminds me somewhat of paella because both dishes have rice and saffron, but paella traditionally is seafood-based.  Another difference is the addition of the citrus juices used to marinate the chicken, a technique common in Latin America.  Although I don't consider this dish to be particularly fancy, it's very flavorful and a departure from your everyday chicken recipes, plus the fragrance from the saffron is wonderful.


It's not at all difficult but including the marinating time, this dish takes a little over two hours to prepare so if you need to have dinner on the table fast after work you might want to either make this in advance or plan to serve it on a weekend.  It reheats perfectly by the way, and leftovers make great work lunches. I love having leftovers for lunch - they're usually much healthier and more interesting than whatever you'll find in your cafeteria or the nearest fast food place, plus it's a lot cheaper.


click here for a printable recipe

Arroz Con Pollo
Serves 6-8

For chicken
3 large garlic cloves, coarsely chopped
2 tablespoons fresh orange juice
2 tablespoons fresh lime juice
1 1/2 teaspoons salt
3/4 teaspoon black pepper
8 boneless skinless chicken thighs
1 tablespoon vegetable oil
1 tablespoon unsalted butter

For rice
1 lb onions, chopped (2 1/2 cups)
2 green bell peppers, chopped
3 large garlic cloves, minced
1/4 teaspoon crumbled saffron threads
1/4 cup dry white wine
2 teaspoons ground cumin
2 teaspoons salt
1 Turkish or 1/2 California bay leaf
1 (14- to 15-oz) can diced tomatoes, including juice
1 1/2 cups low-sodium chicken broth (12 fl oz)
1 1/2 cups water
2 cups long-grain white rice (3/4 lb)
1 cup frozen baby peas (not thawed; 5 oz)
1/2 cup small or medium pimiento-stuffed green olives (2 oz), halved crosswise
1/4 cup drained chopped bottled pimientos (2 oz), rinsed

Prepare chicken:
Purée garlic, orange juice, lime juice, salt, and pepper in a blender until smooth. Put chicken pieces in a large bowl and pour purée over them, turning to coat. Marinate chicken, covered and chilled, turning occasionally, 1 hour.  Transfer chicken, letting excess marinade drip back into bowl, to paper towels, then pat dry. Reserve marinade.  Heat oil and butter in 6- to 7-quart pot over moderately high heat until foam subsides, then brown chicken in 2 or 3 batches, without crowding, turning occasionally, about 6 minutes per batch. Transfer chicken as browned to a plate, reserving fat in pot.

Prepare rice and bake arroz con pollo:
Put oven rack in middle position and preheat to 350°F.

Sauté onions, bell peppers, and garlic in fat in pot over moderately high heat, stirring occasionally and scraping up brown bits from chicken, until vegetables are softened, 6 to 8 minutes.

While vegetables cook, heat saffron in a dry small skillet over low heat, shaking skillet, until fragrant, about 30 seconds. Add wine and bring to a simmer, then remove from heat.

Add cumin and salt to vegetables and cook over moderately high heat, stirring, 2 minutes. Stir in saffron mixture, bay leaf, tomatoes (including juice), broth, water, and reserved marinade and bring to a boil. Add all chicken pieces and gently simmer, covered, over low heat 10 minutes. Stir in rice, then return to a simmer. Cover pot tightly, then transfer to oven and bake until rice is tender and most of liquid is absorbed, about 20 minutes.

Scatter peas, olives, and pimientos over rice and chicken (do not stir) and let stand, pot covered with a kitchen towel, until peas are heated through and any remaining liquid is absorbed by rice, about 5 minutes. Discard bay leaf.

Friday, September 27, 2013

Forbidden Rice with Turkey, Roasted Squash and Walnuts

Last Year's Post: Smoked Salmon with Farfalle and Edamame
Two Years Ago:  Smoked Turkey Apple Panini

Inspiration can come from something as simple as peering in your cabinets to see what's lurking in there.  I discovered some forbidden rice in my pantry the other day and decided to create a fall-themed entree with it.  What, you are probably thinking, is forbidden rice and why do I have it if it's forbidden?  Basically it's black rice.  Supposedly it was considered the finest rice in ancient China and served only to the Emperor, so it became known as forbidden rice because it was forbidden to the general public.  I don't know if that's actually true or not but I like the story.  Anyway, I found this black rice at Whole Foods and thought it would be a great contrast to light-colored foods (think grilled halibut or salmon) or colorful foods such as the ingredients in this salad.  I always like to discover and try new ingredients that might be a little different than the norm to keep things interesting.

Forbidden rice tastes like brown or wild rice with a nice chewy texture as opposed to the softness of white rice.  If you can't find it at Whole Foods or other natural food stores, wild or brown rice would be a good substitute albeit not as pretty.  I'm all about pretty food whenever possible, and this deeply black rice is definitely pretty as well as dramatic.  In addition to its good looks, black rice is very high in antioxidants and iron so it's good for you as well.

So, to make it fall-ish I added roasted butternut squash, red pepper, sugar snaps, and toasted walnuts with a light vinaigrette.


In case you haven't cooked with butternut squash before, it's the pale-colored squash with the bulb at the end.  You probably won't need the entire squash (the smallest I found at the store was a 2 pounder, and you only need a pound) so plan to use the rest in another dish, or check the produce aisle for plastic cartons of already-peeled and cubed squash.  If you can't find it already prepared, peel the outside with a vegetable peeler, then cut in half.  Scoop out the seeds, then cut the remaining amount that you need into bite-sized (approximately 1" cubes).  Place on a foil-lined baking sheet, toss with olive oil, salt and pepper, and roast.


While the squash roasts you can cook the rice and make the vinaigrette.  The good news is that everything can be done in advance, or even the night before.  To make it a main dish I added cubed smoked turkey from the deli - one of my favorite meats for salads - but you could substitute literally any meat you want, such as chicken, duck, pork, beef, or bacon.  It seemed to want some creaminess so that's where the cheese comes in.  I used Manchego because I just so happened to have some in the refrigerator. You could, of course, substitute any cheese you like or just leave it out.

I'm calling it a salad because I don't know what else to call it, but you could serve it warm in which case it would seem to be more like a.........what?  Casserole?  Dinner entree? Who knows.  Anyway, whatever it is, it can be served warm, room temperature, or cold.  It holds well for several days so it would make a great dish for family gatherings or pot lucks.  And of course, you could eliminate the turkey and serve a nice piece of grilled chicken, fish, or pork on top of the rice mixture.  Same song, different verse.  I was trying to think of what I would call it in that event, but I finally gave up and just decided to call it dinner.


printable recipe
Forbidden Rice with Smoked Turkey, Roasted Squash, and Walnuts
Serves 4-5

Note:  The smallest butternut squashes typically available are about 2 lbs.  For that reason, look for peeled and already-cubed squash in your produce aisle, or plan to use the remaining squash in another use.

For the vinaigrette:
2 large garlic cloves, minced
1 tablespoon Dijon mustard
½ teaspoon salt
½ teaspoon sugar
¼ teaspoon freshly ground pepper
¼ cup rice vinegar
1/3 cup vegetable oil

For the salad:
1 pound butternut squash, peeled, seeded and cut into 1” chunks (see note)
Salt and pepper
2 tablespoons olive oil
1 cup black rice (preferably Forbidden Rice)
½ red bell pepper, seeded and chopped
15 sugar snap peas, trimmed and cut into thirds
3 scallions, white and green parts, sliced
½ cup diced hard cheese (Manchego, Cheddar, etc.)
8 ounces (sliced 1/2” thick) deli smoked turkey, chopped into cubes
½ cup walnuts, toasted and coarsely chopped

Preheat the oven to 400d.  Cover a large rimmed baking sheet with foil and place the squash cubes on foil.  Drizzle with oil, generously sprinkle with salt and pepper, and toss together with your hands. Spread the squash out in one layer and roast for 25 – 30 minutes, turning once with a spatula, until golden and tender.  Set aside to cool.

Meanwhile, place rice in a medium saucepan with 1 ¾ cups water and bring to a boil over high heat.  Turn the heat to low, cover and simmer for 30 minutes.  Let rest off the heat for a few minutes, then drain in a colander and let cool. 

While the squash and rice are cooling, make the vinaigrette by combining all ingredients in a food processor or shake in a jar.  Keep refrigerated until ready to serve.

When cooled, add the rice to a large bowl and add the red pepper, sugar snaps, scallions, cheese and turkey.  Toss to combine.  Add the vinaigrette and toss again.  Add the squash cubes and gently toss to avoid breaking up the squash. 

Serve in individual bowls garnished with walnuts.

May be made in advance and refrigerated.  Add the walnuts just before serving.