Showing posts with label bacon. Show all posts

Thursday, February 28, 2019

Ecuadorian Fried Rice (Chaulafan)


I first had Chaulafan at Cocina Latina restaurant in Minneapolis.  I was fascinated by the concept of Latin/Asian fusion represented by the dish - essentially fried rice (brought to South America by Chinese immigrants) with Latin influences such as cilantro, cumin and ancho chile powder.  It was so amazingly good that I had to re-create it at home, complete with the Colombian hot sauce that was served on the side.

There are quite a few ingredients but it comes together reasonably fast if you do some prep in advance - cook the rice, buy cooked chicken from the deli, and make the hot sauce.  (If you don't want to make the hot sauce you can use any bottled sauce but I've tested several and think the Colombian hot sauce is the best with this dish.) Having a helper also comes in handy for the chopping part.

I assume this is a fairly special-occasion dish since it contains not only bacon and shrimp but also chicken, eggs and even optional shredded pork.  Of course, you can eliminate one or more of the proteins if you want but I'd keep the bacon for flavor.

There are two ingredients that you may not have on hand - ancho chile powder and achiote powder.  Of the two, ancho chile is much easier to find and is important to the taste of the dish.  It's a mild but smokey chile that's really delicious.  Achiote powder is primarily a coloring agent and since the dish uses just 1/4 teaspoon you could eliminate it if you can't find it.

Leftovers heat up really well with the exception of the shrimp, which can get tough if you microwave them.  Leave them out while you reheat the rest of the rice and then stir them in after the rice is hot to gently rewarm them.

print
Chaulafan: Ecuadorian Fried Rice
Serves 3-4                           
 Note: To speed up meal prep, make the hot sauce and cook the rice in advance.

Rice
1 T oil
1 T white onion, diced
2 cups chicken broth
1 cup uncooked white rice
Salt to taste

Chaulafan
2 oz pancetta or diced bacon
4 raw very large shrimp, peeled, deveined, tails removed and cut in half lengthwise
2 eggs, beaten
Salt and pepper
 1 T vegetable oil
½ cup diced white onions
1 small carrot, diced 
2 garlic cloves, minced
3 T soy sauce, divided
1 T Worcestershire sauce, divided
3 T finely chopped cilantro, divided
2 tsp Ancho chile powder
1 tsp ground cumin
¼ tsp achiote powder
1/3 red and 1/3 green bell peppers, diced
½ cup frozen peas, thawed
1-1 ½ cups cooked shredded chicken (from the deli department)
½ - 1 cup cooked shredded pork, optional
4-5 green onions, finely chopped
Sliced red onion, for garnish
 Colombian hot sauce (see following recipe)

To cook the rice, heat the oil, add the onions and the rice, stir well. Then add the broth, season with salt to taste, bring to a boil, reduce heat to low, cover and simmer for about 20 minutes.  Cool.  May be made in advance and kept cooled and covered in the refrigerator.

Heat a large nonstick sauté pan over medium heat.  Add the pancetta or bacon and sauté, stirring occasionally, until crisp and brown.  Remove and drain on paper towels.  In the same pan, add the shrimp and sauté quickly (1-2 minutes) until barely cooked through.  Remove and set aside.  Add the beaten eggs to the pan, season with salt and pepper, and cooked until softly scrambled.  Remove, chop, and set aside.

Add the tablespoon of oil to the pan over medium heat, then add the remaining white onions, carrot, garlic, 1 tablespoon soy sauce, half the Worcestershire sauce, Ancho chile powder, cumin, and 1 tablespoon cilantro.  Cook for 5-8 minutes until the onions and carrots are cooked. 

Add the cooked rice (and optional pork), chicken, and bell pepper.  Stir well, taste and season with salt and pepper.  Cook over medium high heat for 5 minutes, stirring infrequently, allowing a brown crust to develop on the bottom.  Stir in the remaining soy sauce, Worcestershire sauce, cilantro, shrimp, eggs, peas and green onions and stir well.  Cover and heat through for about 3-4 minutes.

Serve garnished with sliced red onion and hot sauce on the side.

 Colombian Hot Sauce
½ cup water
½ cup white vinegar
2 habanero peppers, chopped and seeded
1 to 2 green onions, chopped
1 teaspoon sugar
2 tablespoons vegetable oil
1 tablespoon lime juice
½ teaspoon salt
½ cup cilantro, chopped
½ cup red bell pepper, chopped
1 medium tomato, peeled and seeded


Add water, vinegar, habanero peppers, onion, sugar, oil, lime juice and salt to a blender and blend well.  Add cilantro, red bell pepper and tomatoes.  Pulse once or twice to mix the ingredients without blending.  Use immediately or store, covered, in the refrigerator for up to a week.  Or, freeze in ice cubes trays for individual use later.

Friday, April 20, 2018

Rosemary Chicken with Red Wine Mushroom Sauce

Last Year's Post:  Broccoli Cheese Stuffed Sweet Potatoes
Two Years Ago:    Benedictine Sandwiches

I paid a visit to a new international market in town today just to see what was there, since they tend to carry interesting and unusual foods.  In particular, I've found that international markets carry all sorts of produce that you can't find in normal grocery stores.  Case in point, I found some very cute little white beech mushrooms that I decided to add to this recipe.  Of course you can use any kind of wild mushrooms you want but I thought they added visual interest as well as taste and texture, and they're a cute garnish.


Having said that, the primary star of the show is the deep rich red wine mushroom sauce. Tremendous depth of flavor is added by soaking dried porcini mushrooms in hot broth, then adding both the reconstituted porcinis and their soaking liquid to the sauce.  Of course the bacon doesn't hurt, either.  The dish tastes like it came from France or Italy and was simmered for hours.

The original recipe called for grilling boneless skinless chicken thighs.  If it's cold outside and you don't want to grill, just grill the chicken on an indoor grill pan or saute in a regular fry pan.  You could also substitute boneless skinless chicken breasts or cutlets for the thighs, whichever you prefer.

Be sure to serve the chicken with mashed potatoes or pappardelle pasta to soak up all the delicious sauce.

print recipe
Rosemary Chicken with Red Wine Mushroom Sauce
Serves 4

1 ½ pounds boneless skinless chicken thighs or breast cutlets
2 tablespoons olive oil, plus more for for drizzling
Salt and pepper
3 stems fresh rosemary, leaves stripped and chopped
1 cup chicken stock
2 slices bacon, chopped
2 cloves garlic, minced
1 shallot, finely chopped
8 ounces cremini mushrooms (can also use other wild mushrooms or a mix), cleaned, stemmed and sliced
1 tablespoon all-purpose flour
1 cup dry red wine


Heat an outdoor grill, grill pan or sauté pan over medium-high heat.  Drizzle chicken with oil, season with salt, pepper and rosemary.  Cook chicken 4-5 minutes on each side until golden and cooked through.  Remove from heat and let rest 5 minutes.

Place stock in a small saucepan and heat on high until hot but not boiling.  Add dried porcinis, stirring to make sure the mushrooms are submerged.  Cover the pan and simmer over low heat for 10 minutes to reconstitute the mushrooms.  Remove the mushrooms from the broth and chop.  Strain the broth through a paper towel over a sieve to remove any grit, then set the broth aside.

In a medium skillet, add 2 tablespoons olive oil over medium heat.  Add the bacon, garlic and shallot and sauté, stirring occasionally, for 3 minutes.  Add the cremini mushrooms to the pan and season with salt and pepper.  Sauté mushrooms for 10 minutes until browned.  Add flour and cook, stirring, 1 minute.  Add red wine to the pan and stir for 1 minute to reduce and thicken the sauce.  Add reserved mushroom stock and porcinis to the pan and simmer 1-2 minutes longer to combine.


Add the cooked chicken back to the pan and spoon sauce over to re-warm the chicken pieces for a minute or two.  Serve chicken with sauce over the top.

Friday, September 22, 2017

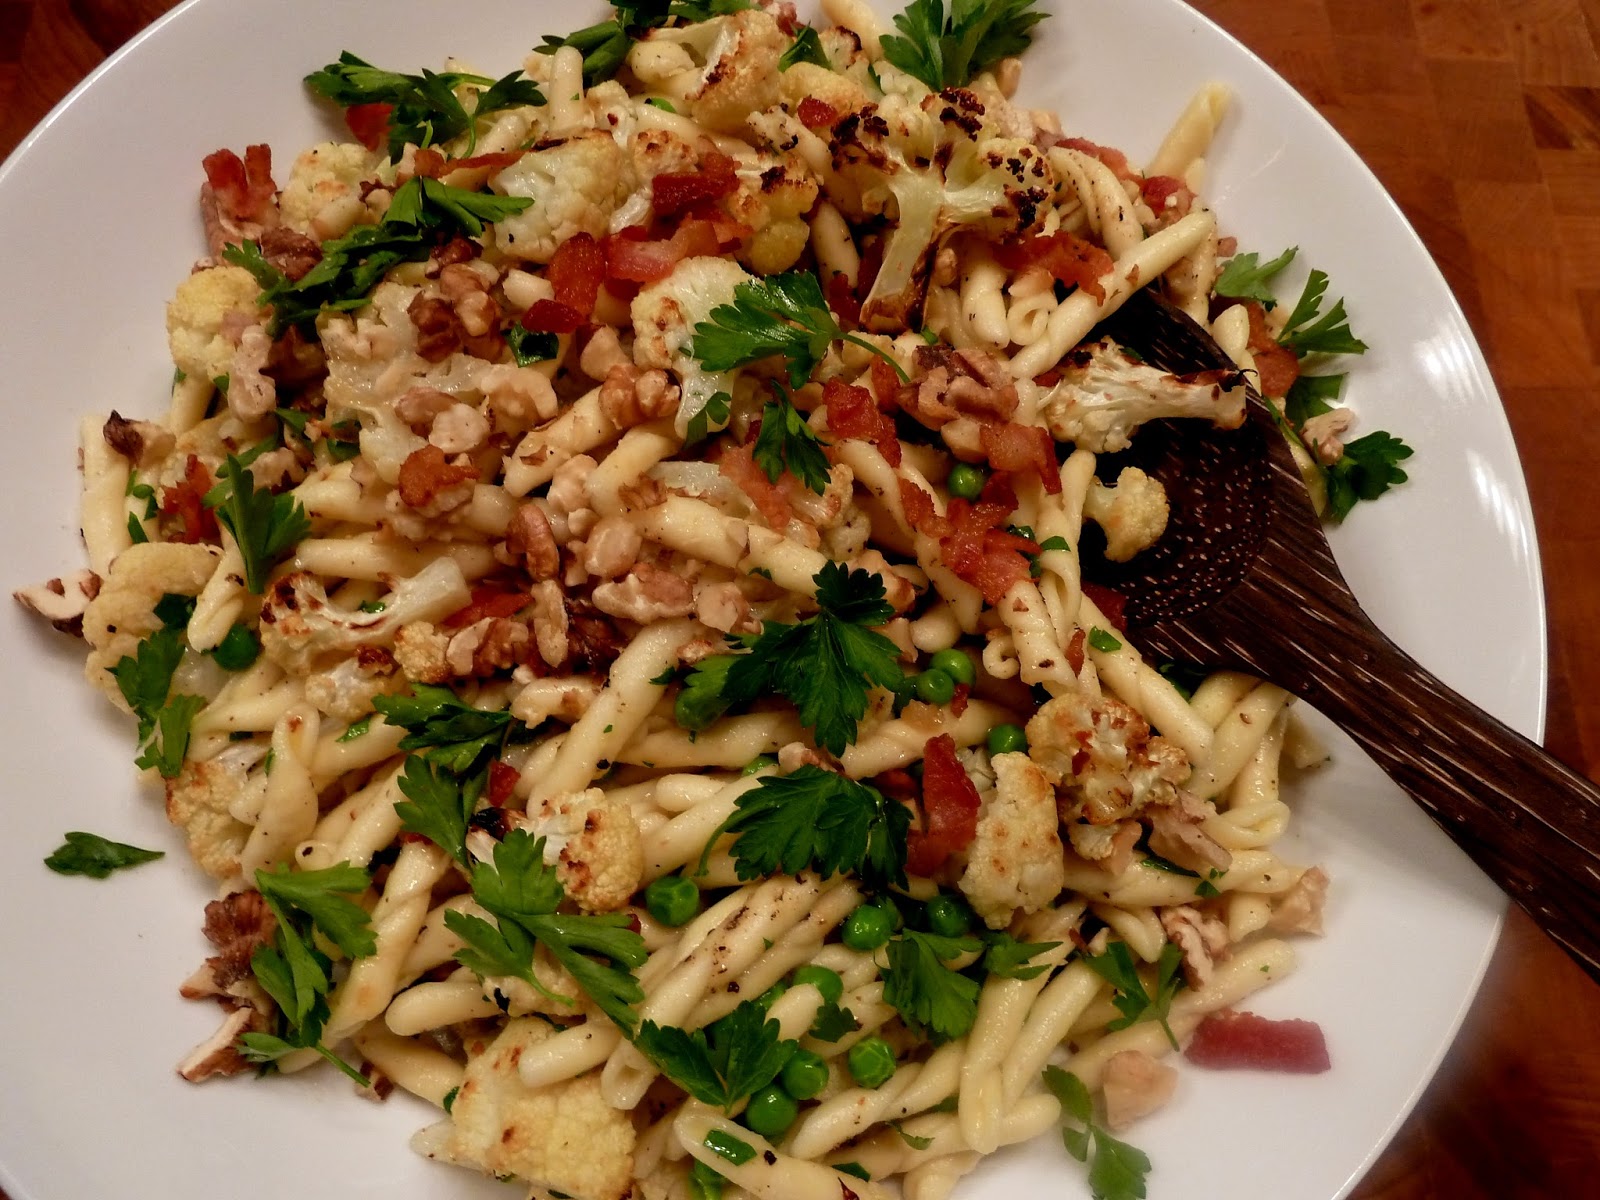
Roasted Cauliflower with Pasta and Walnuts

Last Year's Post: Korean Rice Bowls
Two Years Ago:  Healthy Baked Apples

This is an excellent and somewhat unusual pasta dish that can be served warm, room temperature or cold which makes it a good choice for any time of the year.  Plus, it's much lighter and healthier than most heavy red-sauce pastas.

I've recently discovered vegetables that I thought I didn't really care for all that much such as cabbage or cauliflower can actually become wonderful when they're cooked to the point that they turn into something else.  For cabbage, that means cooking it down until it's very tender and sweet (see cabbage and spring onion tart) and for broccoli or cauliflower that means roasting or sauteing  until they're pretty well torched (see chicken and caramelized broccoli ramen) which results in a much deeper and nuttier flavor.  The roasted cauliflower is a highlight of this salad, along with the walnuts and bacon.  (You could also use a combination of roasted cauliflower and broccoli if you want.)   Leave the bacon out and you've got a great vegetarian meal.


The sauce is very simple - good olive oil with a little garlic flavor (or a lot, depending on your taste). You could also add additional red pepper flakes to spice things up - there's just a small amount on the cauliflower.  The cauliflower only roasts for about 20 minutes so you could make this meal in the time it takes to boil water and cook pasta, making it a good choice for a weeknight meal.

Leftovers are excellent cold for lunch - just add a few drops of olive oil and maybe a squeeze of lemon to fresh things up.

print recipe
Roasted Cauliflower with Pasta and Walnuts
Serves 4

 1 small head cauliflower, large stems removed, florets separated and halved
2-3 tablespoons olive oil
2 cloves garlic, grated or minced
¼ teaspoon red pepper flakes (more for serving, if desired)
¼ teaspoon sea salt
9-10 ounces short-cut dry pasta (such as penne or ziti)
2/3 cup frozen peas
¼ cup olive oil
2-3 cloves garlic, lightly smashed
4 tablespoons fresh chopped parsley
2 slices bacon, chopped, fried until crisp and drained (optional)
¼ cup shredded parmesan cheese, plus more for serving
Salt and pepper to taste
1/3 cup walnuts, toasted and chopped


Preheat oven to 450d.

Add cauliflower to a mixing bowl with olive oil, garlic, red pepper flakes, and sea salt.  toss to coat, then spread on a parchment-lined baking sheet in a single layer.  Roast for 15 minutes, then turn the florets over.  Turn the oven to broil and return to the oven for 5 minutes or so, watching closely, until browned.  Remove and let cool.

Heat a large pot of water to a boil and cook pasta according to directions, adding the peas to the cooking water during the last 1-2 minutes.  Drain.

While the pasta is cooking, add the garlic cloves to the ¼ cup olive oil in a small saucepan and warm gently for a few minutes over low heat.  Remove the garlic cloves.

Return the pasta and peas to their cooking pot and add the garlic oil, parsley and parmesan, tossing to combine.  Taste and adjust seasonings.


Serve with the walnuts and optional bacon scattered on top and additional parmesan on the side.  Serve warm, at room temperature, or cold.  (If refrigerated, add a little additional olive oil and toss before serving.)

Saturday, August 22, 2015

Summer Harvest Quiche

Last Year's Post:  Chicken Gyros
Two Years Ago:   Grilled Shrimp and Corn Salad

You can never have too much of great summer tomatoes, corn and zucchini, can you?  The only question is how to use them in different ways so they don't get repetitive.  You've probably been using them in salads and as side dishes, but what about a quiche?  It makes a great light dinner or Sunday brunch, not to mention that it's ideal for work lunches throughout the week.

Quiche is easy to make and easy to customize, plus you can go fancy by making little individual ones or family-style by making one big one.  This recipe happens to be vegetarian but you could easily add crumbled cooked sausage, bacon, or even lump crab to make it special. Feel free to substitute whatever vegetables and cheese your family prefers or you happen to have on hand.

Serve with a big green salad and some crusty bread for a perfect late summer dinner. (Is there a sadder phrase than "late summer"?  Oh yes.  It's called "Winter". I remember a guy in my high school - a member of the ski team - who would wear a big "Think Snow" button on his jacket beginning in early November.  I wanted to slap him. )

Anyway, even if you have buckets of fresh tomatoes, roast them for this recipe (see how here) because fresh tomatoes are too watery for quiche.  Not to mention it's a great way to preserve all those fresh tomatoes for Winter.


print recipe
 Summer Harvest Quiche
Serves 6

1 9-inch pie crust
Pie weights or dried beans for blind-baking the crust
                                                                               
1 tablespoon olive oil   
1small zucchini
½ cup chopped onion                                                   
1 ear fresh corn
3 eggs, room temperature                                                          
1 ½ cups milk
½ teaspoon salt
¼ teaspoon pepper                                                       
1/3 cup sun-dried (or roasted) tomatoes, chopped
1 cup grated Gruyere cheese (packed)
2 tablespoons chives, chopped
1 tablespoon fresh rosemary, finely chopped
1 tablespoon basil, chopped


Preheat oven to 350 degrees.

Place the pie crust in a pie pan (preferably glass) and line with parchment paper or aluminum foil.  Fill the pie plate with pie weights or dried beans and bake for 10 minutes or until lightly brown.  Remove from the oven; remove the parchment paper and weights or beans. Let the pie crust cool for a few minutes.   Leave the oven at 350d.

Meanwhile, cut the zucchini in fourths lengthwise, then slice.  Sauté the zucchini and onion in the olive oil until softened and just beginning to brown, about 5 minutes.  Season with salt and pepper to taste and remove from the heat.

Briefly cook the ear of corn by boiling, steaming or grilling for 3-4 minutes.  Let cool, then cut the kernels off the cob.  Set aside.

Combine the eggs, milk, salt and pepper in a large bowl and whisk until well blended.  Add the chives, rosemary and basil and stir well.

Place the zucchini mixture, corn kernels, tomatoes and grated cheese in the pie crust.  Pour the egg mixture over the vegetables. 

Bake in the middle of the oven for 50-55 minutes at 350d until browned and set.

Remove from the oven and cool on a wire rack for at least 10-15 minutes before serving.

Saturday, June 7, 2014

Grilled Lobster Cobb Salad

Last Year's Post: Lemon Polenta Cake
Two Years Ago:  Hoisin Burgers with Wasabi Slaw

It's definitely salad time of the year, and this salad is an interesting twist on the usual Cobb salad that has chunks of chicken; it substitutes lobster meat instead, and grilled lobster at that.  The cooking technique in itself is interesting - remove the lobster meat from the shell and par-boil for a minute, then place on the grill for a minute per side while basting with butter to give the meat a nice smoky taste.  If you really wanted to give the salad a pronounced grill character you could also grill the tomatoes (using something larger than cherry tomatoes) and zucchini as well.  Grilled lobster meat, yum.


I found some beautiful baby Romaine leaves at the store, but you could always used chopped regular Romaine instead.  You can use whatever cheese you prefer and can always substitute other vegetables to suit your choice in addition to using shrimp or crab in place of the lobster.

Other than the lobster, the only other cooked ingredients are hard-boiled eggs (cook in advance) and a little chopped bacon (can also be cooked in advance).  After that, it's really just a matter of whisking the dressing, prepping the other ingredients, and assembly.  Easy, delicious, healthy, and kind of special......a perfect summer dinner.


printable recipe
Grilled Lobster Cobb Salad
Serves 2

Dressing:
1/2 shallot, finely chopped
1 tablespoon Dijon mustard
1 1/2 tablespoons balsamic vinegar
1 ½ teaspoons sherry vinegar
2 ½ tablespoons walnut oil
1/4 cup vegetable oil
Salt and freshly ground black pepper

Salad:
2 (5-6 oz) lobster tails, thawed if frozen
2 tablespoons butter, melted
3 strips bacon, chopped
½ small zucchini, chopped
1 ripe avocado
Juice of 1/2 a lemon
1 heart baby romaine, trimmed and leaves separated
2 hard-boiled eggs, chilled and sliced
1/4 pound red grape tomatoes, halved
2 ounces your favorite cheese, crumbled or diced
Salt

Dressing:
Combine shallot, Dijon, and vinegars in a large bowl and whisk well. While whisking, slowly drizzle in the oils until incorporated into the dressing. Season to taste with salt and pepper.

Salad:
Bring a large pot of salted water to boil.  Preheat grill to high or preheat the broiler.  Remove the lobster meat from tail and parboil for 1 minute or until no longer translucent. Place lobster meat on the grill basting with butter just long enough to get a little grill flavor (about 1 minute per side). If cooking indoors, broil until lightly golden.  Remove lobster from the grill and cut into cubes.

Cook the bacon until crisp. Drain on a paper towel lined plate and set aside.

Halve the avocado, discard the seed, score the flesh into chunks and scoop out into a small bowl. Toss with lemon juice.


 Arrange half of the romaine leaves on each serving plate and drizzle with some of the dressing.  Add the toppings in strips on top, starting on one end with the bacon, egg, tomato, lobster, zucchini, cheese, and avocado. Drizzle the remaining dressing on top.

Friday, March 21, 2014

Lentil Salad with Bacon and Walnuts

Last Year's Post: Asian Roast Pork with Broccoli Slaw and Pasta
Two Years Ago:  Rustic Egg Tart

I never used to like lentils, probably because they looked suspiciously like the split peas in split pea soup which is an unfortunate muddy brown-green color and (in turn) looks a lot like baby food. Amazing how long the food traumas of our youth can stick with us past all rational thought, isn't it?  Once I realized that there are different types of lentils and they aren't all muddy-colored I decided to try them.  Happily, I discovered that they taste great as well as being good for you.  I then embarked on a lentil discovery mission that at one point involving five different types of lentils sitting in my pantry.  Even I admit that's probably overkill.  I discovered that big lentils end up mushy and muddy-colored, and red and yellow lentils end up mushy also although their color is better.  Small green or black lentils retain their shape when cooked and have a very pleasant firm texture while being tender at the same time.

So having come full circle, I now use the small French green lentils called "Lentils du Puy". You can find them in some natural food stores like Whole Foods and high-end grocery stores.  They may also be labeled as "French lentils" in the bulk aisle - just be sure they're dark green and small.


I was recently watching an "America's Test Kitchen" episode on lentil salads (which inspired me to make this recipe), and they confirmed that Lentils du Puy are the best because they hold their shape when cooked and have the best flavor.  They also demonstrated a very interesting technique for brining and oven-baking the lentils, which I'd never heard of.  Apparently brining the uncooked lentils helps make the skin more flexible so they don't burst, and oven-cooking is more gentle and again helps the lentils cook evenly to a creamy tenderness without bursting.  (If you're not familiar with America's Test Kitchen, they try as many as hundreds of variations of a recipe to develop the perfect technique.  They're even more obsessive than I am.)  Anyway, of course I had to try it.

The lentils didn't burst, but it took a long time to soak them and then bake in the oven. I found it took a full 70 minutes of baking before they were tender, which in my opinion isn't worth it.  I've simmered French lentils before without any issues so I decided to compromise for this recipe by calling for brining (which can be done in advance) and then simmering on the stovetop for just 20 minutes, as most other recipes call for.

The reason why I like lentil salads is because they're so versatile and good for you. You can serve them for lunch or dinner, at room temperature or warm or cold, and you can vary the ingredients to suit your taste.  I added cooked egg and avocado in addition to the bacon and walnuts with a little bell pepper for color, but you can add whatever you like.  For example, your favorite cheese could substitute for the egg or avocado.  Even with the tender lentils, the texture of the salad is surprisingly crunchy and very satisfying with the addition of the peppers, bacon and walnuts and the avocado (or cheese) adds creaminess.

For some reason this recipe seems very French to me, probably because of the French lentils and walnuts.  I can just see it served for a light spring or summer dinner with a bottle of very dry Rose wine and some warm crusty bread.


printable recipe
Lentil Salad with Bacon and Walnuts
Serves 4

1 cup French green lentils (lentils du Puy), uncooked
Salt
2 cups low-sodium chicken broth
1 bay leaf
5 tablespoons olive oil
3 tablespoons sherry vinegar
1 minced shallot
1 teaspoon minced fresh thyme
Juice of half a lemon
1 avocado
3 hard-boiled eggs, cut into eighths
1 cup (loosely packed) baby spinach, chopped
3 slices of bacon, cooked and crumbled
1/3 cup walnuts, toasted and coarsely chopped
2/3 cup red bell pepper (or assorted colors), finely chopped


In a medium bowl, combine the lentils and 1 teaspoon salt.  Cover with 4 cups warm water and let stand for one hour.  Drain well.  (Drained lentils can be refrigerated for up to 2 days before cooking.)

Place the lentils in a large saucepan over medium-high heat with 2 cups of water, the chicken broth, bay leaf, and ½ teaspoon of salt.   Bring to boil; reduce heat and simmer until tender, about 20 minutes.  Taste to be sure the lentils are properly cooked.  Drain well.

While the lentils are cooking, combine the olive oil and sherry vinegar with ¼ teaspoon salt in a large bowl, whisking to blend.  Add the shallots and thyme. 

Place the lemon juice in a medium bowl. Cut the avocado in half and remove the pit.  Using a small knife, score each half in a diamond pattern all the way down to (but not through) the shell.  Use a large spoon to scoop the flesh from the avocado shell into the bowl with the lemon juice.   Toss gently to coat the avocado pieces with juice so they won’t discolor.

When the lentils are still somewhat warm, place them in the bowl with the vinaigrette and toss to combine.  Add the spinach, bell pepper and avocado and toss again.

Serve topped with eggs, bacon and walnuts.  May be served warm, room temperature, or cold.


Friday, January 24, 2014

Coq au Vin

Last Year's Post: Lobster with Pasta and White Wine-Butter Sauce
Two Years Ago:  Lemon Chicken and Fennel Pot Pies

Coq au Vin (coke oh vah) is one of the most famous chicken dishes in the world, and justifiably so.  Made with red wine, bacon, mushrooms and garlic, really, what's not to like? Julia Child often made Coq au Vin on her cooking show and it was considered her signature dish.  Although a traditional Coq Au Vin uses a whole cut-up chicken and takes a really long time to make, I was happy to discover this recipe that uses boneless skinless chicken thighs and has very authentic flavor even though it only takes about 1-1/2 to 2 hours to prepare.  Still, 2 hours are 2 hours so this is probably best made on a leisurely Sunday afternoon, say, when the windchill is about zero.  It reheats beautifully so you could then enjoy it any night of the week and it's a perfect winter comfort dish.

Having said that, we decided to make it on a Monday night for some reason.  It took even longer than 2 hours because when we bought the giant package of chicken thighs at Costco we neglected to notice that they were skin-on and bone-in.  How could we not notice that?  We were probably distracted by the display of car tires in the next aisle, or the giant screen TVs on the other side.  Really, you gotta love Costco.

The Lawyer spent a fair amount of time learning how to bone and skin chicken thighs that night and is not looking forward to the other four packages in the freezer.  If you actually look at the package and manage to buy boneless skinless chicken thighs successfully (unlike us), the recipe is really quite easy.  The reason it takes a while is because you brown different ingredients in succession in the same pot, then simmer everything together for a while, then reduce the sauce some more.  Believe me, it's so worth it.  The flavor is rich and deep and just begs to be served with mashed potatoes to sop up the sauce.

For one small minute I considered buying fresh pearl onions after noticing them in the produce aisle at the grocery store.  Luckily, the original recipe stated that frozen pearl onions were just as good in the finished dish and much easier to deal with.  Can you imagine peeling 24 teeny tiny onions that are about 1/2" in diameter?  Having done some equally silly things in my past (peeling individual chickpeas for hummus comes to mind.....vividly) I don't want to go down that road again.

First you start simmering the sauce with some herbs.


While the sauce simmers, you cook the bacon and then brown the chicken in the same pot the bacon cooked in.


Then you remove the chicken and brown the onions and mushrooms in the same pot.


The sauce, chicken and bacon go back into the pot with the mushrooms and onions to cook until the chicken is tender.


Finally, you remove the chicken one last time and reduce the sauce even more before serving the delicious finished dish.


If you've ever enjoyed Coq au Vin at a French restaurant or just want to up your game with a classic French recipe, give this one a try.

printable recipe
Coq au Vin
Serves 4-6

1 bottle (750 ml) red wine (Pinot Noir or Rhone Valley Grenache), divided
2 cups chicken stock
10 sprigs fresh flat-leaf parsley plus 2 tablespoons minced parsley, divided
2 sprigs fresh thyme
1 bay leaf
4 ounces bacon, cut into ¼” pieces
8 boneless skinless chicken thighs, trimmed of fat and cut in half crosswise
Salt and freshly ground pepper
5 tablespoons unsalted butter, divided
24 frozen pearl onions (about 1 cup) thawed and patted dry
8 ounces cremini mushrooms, cleaned, stems trimmed, halved if small, quartered or cut into 6 if large
2 garlic cloves, minced
1 tablespoon tomato paste
2 tablespoons flour

In a large saucepan over medium-high heat, combine all but 1 tablespoon of the red wine (reserving for later use), chicken stock, parsley sprigs, thyme and bay leaf and bring to a simmer.  Cook until mixture is reduced to 3 cups, about 20 to 25 minutes.  Discard herbs and reserve the wine mixture.

Meanwhile, in a large Dutch oven over medium heat, cook bacon stirring occasionally until browned, 7 to 8 minutes.  Using a slotted spoon, transfer bacon to a paper towel-lined plate.  Reserve 2 tablespoons bacon fat in a small bowl and discard the remainder. 

Lightly season chicken with salt and pepper.  Return Dutch oven to medium-high heat.  Add 1 tablespoon of bacon fat and heat until almost smoking.  Add half of the chicken in a single layer and cook until lightly browned, about 2 minutes per side.  Transfer cooked chicken to a bowl.  Add the remaining tablespoon of bacon fat and heat until almost smoking, then repeat with the remaining chicken.

Melt 3 tablespoons butter in the now-empty Dutch oven over medium-high heat.  When foaming subsides add pearl onions and mushrooms and cook, stirring occasionally until lightly browned, 5 to 8 minutes.  Reduce heat to medium, add garlic and cook until fragrant, about 30 seconds.  Add tomato paste and flour and cook, stirring frequently until well-combined, about 1 minute.

Add reduced wine mixture, scraping the bottom of the pot with a spoon to loosen browned bits.  Add ¼ teaspoon pepper, cooked chicken (and their juices) and cooked bacon.  Increase heat to high and bring to a boil.  Reduce heat to medium-low, cover pot and simmer until chicken is tender, about 25 minutes, stirring halfway through cooking time.


Using a slotted spoon, transfer chicken to a large bowl and tent with foil to keep warm.  Increase heat to medium-high and simmer until sauce is thick and glossy and measures about 3 ½ cups, about 5 minutes.  Remove from heat, stir in remaining 2 tablespoons butter and reserved 1 tablespoon wine.  Season to taste with salt and pepper.  Return chicken to pot.  Top with minced parsley to serve.

Friday, September 27, 2013

Forbidden Rice with Turkey, Roasted Squash and Walnuts

Last Year's Post: Smoked Salmon with Farfalle and Edamame
Two Years Ago:  Smoked Turkey Apple Panini

Inspiration can come from something as simple as peering in your cabinets to see what's lurking in there.  I discovered some forbidden rice in my pantry the other day and decided to create a fall-themed entree with it.  What, you are probably thinking, is forbidden rice and why do I have it if it's forbidden?  Basically it's black rice.  Supposedly it was considered the finest rice in ancient China and served only to the Emperor, so it became known as forbidden rice because it was forbidden to the general public.  I don't know if that's actually true or not but I like the story.  Anyway, I found this black rice at Whole Foods and thought it would be a great contrast to light-colored foods (think grilled halibut or salmon) or colorful foods such as the ingredients in this salad.  I always like to discover and try new ingredients that might be a little different than the norm to keep things interesting.

Forbidden rice tastes like brown or wild rice with a nice chewy texture as opposed to the softness of white rice.  If you can't find it at Whole Foods or other natural food stores, wild or brown rice would be a good substitute albeit not as pretty.  I'm all about pretty food whenever possible, and this deeply black rice is definitely pretty as well as dramatic.  In addition to its good looks, black rice is very high in antioxidants and iron so it's good for you as well.

So, to make it fall-ish I added roasted butternut squash, red pepper, sugar snaps, and toasted walnuts with a light vinaigrette.


In case you haven't cooked with butternut squash before, it's the pale-colored squash with the bulb at the end.  You probably won't need the entire squash (the smallest I found at the store was a 2 pounder, and you only need a pound) so plan to use the rest in another dish, or check the produce aisle for plastic cartons of already-peeled and cubed squash.  If you can't find it already prepared, peel the outside with a vegetable peeler, then cut in half.  Scoop out the seeds, then cut the remaining amount that you need into bite-sized (approximately 1" cubes).  Place on a foil-lined baking sheet, toss with olive oil, salt and pepper, and roast.


While the squash roasts you can cook the rice and make the vinaigrette.  The good news is that everything can be done in advance, or even the night before.  To make it a main dish I added cubed smoked turkey from the deli - one of my favorite meats for salads - but you could substitute literally any meat you want, such as chicken, duck, pork, beef, or bacon.  It seemed to want some creaminess so that's where the cheese comes in.  I used Manchego because I just so happened to have some in the refrigerator. You could, of course, substitute any cheese you like or just leave it out.

I'm calling it a salad because I don't know what else to call it, but you could serve it warm in which case it would seem to be more like a.........what?  Casserole?  Dinner entree? Who knows.  Anyway, whatever it is, it can be served warm, room temperature, or cold.  It holds well for several days so it would make a great dish for family gatherings or pot lucks.  And of course, you could eliminate the turkey and serve a nice piece of grilled chicken, fish, or pork on top of the rice mixture.  Same song, different verse.  I was trying to think of what I would call it in that event, but I finally gave up and just decided to call it dinner.


printable recipe
Forbidden Rice with Smoked Turkey, Roasted Squash, and Walnuts
Serves 4-5

Note:  The smallest butternut squashes typically available are about 2 lbs.  For that reason, look for peeled and already-cubed squash in your produce aisle, or plan to use the remaining squash in another use.

For the vinaigrette:
2 large garlic cloves, minced
1 tablespoon Dijon mustard
½ teaspoon salt
½ teaspoon sugar
¼ teaspoon freshly ground pepper
¼ cup rice vinegar
1/3 cup vegetable oil

For the salad:
1 pound butternut squash, peeled, seeded and cut into 1” chunks (see note)
Salt and pepper
2 tablespoons olive oil
1 cup black rice (preferably Forbidden Rice)
½ red bell pepper, seeded and chopped
15 sugar snap peas, trimmed and cut into thirds
3 scallions, white and green parts, sliced
½ cup diced hard cheese (Manchego, Cheddar, etc.)
8 ounces (sliced 1/2” thick) deli smoked turkey, chopped into cubes
½ cup walnuts, toasted and coarsely chopped

Preheat the oven to 400d.  Cover a large rimmed baking sheet with foil and place the squash cubes on foil.  Drizzle with oil, generously sprinkle with salt and pepper, and toss together with your hands. Spread the squash out in one layer and roast for 25 – 30 minutes, turning once with a spatula, until golden and tender.  Set aside to cool.

Meanwhile, place rice in a medium saucepan with 1 ¾ cups water and bring to a boil over high heat.  Turn the heat to low, cover and simmer for 30 minutes.  Let rest off the heat for a few minutes, then drain in a colander and let cool. 

While the squash and rice are cooling, make the vinaigrette by combining all ingredients in a food processor or shake in a jar.  Keep refrigerated until ready to serve.

When cooled, add the rice to a large bowl and add the red pepper, sugar snaps, scallions, cheese and turkey.  Toss to combine.  Add the vinaigrette and toss again.  Add the squash cubes and gently toss to avoid breaking up the squash. 

Serve in individual bowls garnished with walnuts.

May be made in advance and refrigerated.  Add the walnuts just before serving.

Friday, July 26, 2013

Spinach, Blueberry & Goat Cheese Salad

Last Year's Post: Grilled Cheese with Pesto, Spinach and Avocado

Summer is such a wonderful opportunity for those of us who are trying to eat healthy.  Fresh fruits and vegetables are abundant, beautiful and cheap, and fresh salads seem so appealing.  But it's easy to get into a salad rut and start to get bored, which is never good.  Life is too short and calories are too precious to be bored with what you eat. (Although I do know an elite ultra-marathon athlete who regards food as fuel and eats pretty much the same thing each day, which I can't even imagine.  He's been known to do a 135 mile bike ultra-marathon in the middle of winter at temperatures down to -30 degrees, which I also can't imagine.)

I always think that if I'm not excited about what I'm going to eat then something is wrong, which is why I tend to post a lot of different salad recipes such as The Perfect Little Summer SaladChicken Salad with Fruits and PeppadewsWild Rice SaladSummer Salad with Cheese, Fruit and Nuts, Farro, Kale & Smoked Mozzarella Salad, and French Chicken Salad among others.  I'm always looking for new salad recipes and was very excited when I found a new one for spinach salad with fresh blueberries, goat cheese, cucumber, and edamame.  What an interesting and refreshing combination!  Not only is it beautiful, but very healthy as well with  no less than three superfoods - spinach, blueberries and edamame.

The original recipe was vegetarian but it's easily made into a main dish by the addition of crumbled bacon or cooked chicken, turkey, pork or duck so it's a great opportunity to customize the salad to your tastes or use up leftover cooked meat.  You can further customize it by changing the cheese from goat to blue cheese or fontina or any other cheese you like.

I think I'm usually pretty good at envisioning what a recipe will taste like, but this one surprised me.  Not the main ingredients of the salad, but the salad dressing - it has a touch of Dijon mustard that I hadn't really focused on prior to trying the recipe.  If I had, I would've been skeptical that a mustard vinaigrette would somehow magically tie all the ingredients together including the blueberries, but it does.  Try it yourself and see if you agree.


The only ingredients in the salad that are cooked are the meat and the edamame, so if you plan ahead for those two items (or head to the salad bar - my local salad bar carries edamame and numerous meat items) the rest of the salad can come together in literally just a few minutes. It's a great no-cook alternative for a hot summer day.


Spinach, Blueberry & Goat Cheese Salad
Serves 4

For the dressing:
2 teaspoons Dijon mustard
Juice of 1/2 lemon
1 teaspoon sugar
2 tablespoons sherry vinegar
1/4 cup olive oil
Salt and pepper

For the salad:
1 package pre-washed spinach
1 1/2 cups fresh blueberries
1 cup chopped seedless cucumber
1 cup cooked edamame
1 cup crumbled goat cheese
1 cup chopped cooked chicken (or crumbled bacon or other meat)

 In a small bowl combine mustard, lemon juice, sugar, vinegar and a pinch of salt and pepper.  Slowly drizzle in olive oil while whisking until dressing comes together and sugar is dissolved.

Place spinach leaves in large bowl. Add blueberries, cucumber, edamame, goat cheese and chicken.  Add the salad dressing, toss to combine, and serve.


Friday, March 22, 2013

Egg Gratin

Last year's post: Rustic Egg Tart

This recipe would be great for Easter or Mother's Day brunch. It's different from typical egg dishes - omelets, frittatas, scrambled eggs, stratas or souffles  - because it's made with hard-boiled eggs, peas and green onions that are baked in a delicious cheese sauce. It can be assembled in advance so all you have to do is bake it before serving, which makes it great for entertaining. It's also perfect for an easy but impressive dinner any night of the week.

I used to make a similar version fairly often while in college because it was cheap and good, cheap being the most important of the two virtues at the time. That version called for some sort of cream soup but I try to avoid canned soups now due to their additives and high sodium levels, plus it's easy to make the sauce from scratch.  Have you looked at the ingredient list on a can of soup lately?

fun at the grocery store
Let's talk about eggs for a minute. Eggs have a number of good qualities and one drawback. The drawback is that they're fairly high in cholesterol so you don't want to eat them every day, but in my opinion that's outweighed by the good qualities. Eggs are all-natural and packed with a number of nutrients. One egg has 13 essential vitamins and minerals in varying amounts, high-quality protein, unsaturated fats and antioxidants, all for 70 calories. Eggs' nutrients can help you with weight management, muscle strength, eye health, brain function and having a healthy pregnancy. Particularly important for aiding healthy brain function and pregnancy is choline (pronounced KOH-leen), which is amply present in eggs. (Can you tell I've been doing research on the egg council website?)  This recipe calls for six eggs and feeds 4-5 people, so you're only consuming a little more than one egg per serving.

Is this considered a vegetarian meal?  Not to get overly detailed, but most people who describe themselves as vegetarians are actually lacto-ovo vegetarians if they eat eggs and dairy products. "Flexitarians" is a new term that describes people who eat a mostly vegetarian diet but occasionally eat meat.  Vegans, on the other hand, do not eat meat of any kind and also do not eat eggs, dairy products, or processed foods containing those or other animal-derived ingredients such as gelatin.  Undoubtedly that was way more than you really wanted to know, but basically I consider this a vegetarian meal.  Unless, of course, you add a garnish of some crispy bacon.  Umm, bacon.  (If you have vegetarian friends it would probably be a good idea to ask if they eat eggs before serving this dish.)

You could substitute spinach for the peas in the recipe, but my old version had peas so I like them for sentimental reasons. You could also substitute cheddar or swiss cheese for the Gruyere, and use English muffins or French bread instead of Italian bread - just be sure whatever bread you use is toasted or grilled until crisp to provide textural contrast to the creamy eggs.

Obviously the garnish is optional but I thought it made the plate look more springtime-ish and the daikon sprouts add a fresh taste with just the barest hint of radish spiciness.  Or there's always bacon. (If you're feeling wild and crazy you could even fry up some chorizo.)

There's a world of opinions regarding how to hard-boil eggs, the two issues being how to avoid a green ring around the yolk and how to make sure the shell is easy to remove.  All I can tell you is that I cook eggs the way my mother taught me and I've never had green rings and very rarely have issues with the shells.  Here's how: place the eggs in a small saucepan and just barely cover them with tap water.

Bring to a boil uncovered, then turn the heat down and simmer, covered, for 15 minutes.  Stick the saucepan in the sink and run cold water on the eggs for a couple of minutes to cool them down and stop the cooking process.  Done.

If you're planning to serve this for guests I would encourage you to buy a gratin dish because it looks so pretty.  Basically they're shallow baking dishes, usually oval in shape.  This dish is approximately 7.5" by 12" (not counting the handles) and the recipe fit perfectly.  If you plan to double the recipe larger gratin dishes are readily available.  Of course any regular baking dish will work but won't have quite the same wow factor.


printable recipe

Egg Gratin
Serves 4-5

6 hard-boiled eggs
2 tablespoons butter
3 tablespoons all-purpose flour
1 ½ cups milk (whole or 2%)
1 teaspoon salt, divided
½ teaspoon pepper
¼ teaspoon ground nutmeg
1 ¼ cups shredded cheese (Gruyere, cheddar or swiss)
4 green onions, sliced
1 cup frozen peas (not thawed)
paprika
daikon sprouts (optional)
crumbled cooked bacon (optional)
grilled or toasted Italian bread, French bread, or English muffins

Preheat the oven to 450d.

Grease a 6-cup (1.5L) gratin or casserole dish.  Slice the eggs crosswise into 5-6 pieces each and arrange in the dish. 

Reserving a few green onions for garnish, sprinkle the remaining green onions and the peas over the eggs.

 In a medium saucepan, melt butter over medium heat.  Stir in flour and cook, stirring, for about 90 seconds, without browning.  Gradually whisk in milk, then add ½ teaspoon salt, the pepper, and nutmeg.  Continue whisking and bring to boil; reduce heat and simmer for 2 minutes.  Remove from heat; stir in 1 cup of the cheese until melted.  Taste for seasoning and add the additional salt if needed.

 Pour the sauce evenly over the eggs, peas and onions to cover all.  Sprinkle with the remaining cheese.  

Bake on the oven’s center rack until bubbly and very slightly browned, about 25 minutes.  Turn the oven to broil and allow the dish to brown to your liking while watching closely, approximately 30-60 seconds.

Remove and garnish with paprika and the remaining green onions.

 Serve over grilled or toasted bread, garnished with daikon sprouts and/or bacon (optional).