Showing posts with label tomatoes. Show all posts

Friday, February 16, 2018

Minestrone Soup

Last Year's Post: Miso-Glazed Sea Bass
Two Years Ago:   Pasta Arrabiata

There comes a time every winter when everyone has a cold or flu, or just needs a warm and nutritious meal.  Minestrone soup is maybe not quite as famous as chicken soup in that category, but it should be.  It's full of nutritious vegetables, tomatoes, beans and pasta and it's absolutely delicious.  I was particularly interested in a recent cooking show where the chef said her 14-year-old daughter (and friends) absolutely love Minestrone; apparently kids will eat vegetables if they're in the right form.

I love soup, but the soups you find in a restaurant or grocery store have appalling amounts of sodium - usually more than is recommended for an entire day.  The solution is to make your own.  Canned vegetables and broths are also high-sodium culprits, so be sure to use the low-sodium or no-salt-added versions and you'll be fine.  You can always add salt as you're cooking or at the table and you'll still be nowhere near what the restaurant version would have contained.

This soup is easy to make but requires quite a bit of chopping.  I wanted to make it on a day where I wasn't going to be home until near dinnertime, so I did the chopping a day in advance and stored everything in plastic containers in the refrigerator.  That probably saved a good half hour so the soup was ready in about 45 minutes which isn't bad for a weeknight.  It's delicious right away, but it also reheats well and freezes well if you have leftovers.  Or, you could give a container of soup to a friend or co-worker who's a little under the weather.  Or just loves soup.

Served with some toasted garlic bread on the side, you've got a very satisfying yet healthy and vegetarian meal.


print
Minestrone Soup
Serves 6-8

2 tablespoons extra-virgin olive oil
1 large onion, diced
4 cloves garlic, diced
2 stalks celery, diced
1 large carrot, diced
1/3 lb green beans (about 1 ½ cups), trimmed and cut into 1” pieces (or can substitute diced zucchini)
1 teaspoon dried oregano
1 teaspoon dried basil
Kosher salt and freshly ground black pepper
1 14-ounce can crushed tomatoes
1 28-ounce can no-salt-added diced tomatoes
6 cups low-sodium chicken broth
1 15-ounce can low-sodium kidney beans, drained and rinsed
1 cup whole-grain elbow pasta (such as Barilla), uncooked
1/3 cup grated or shredded parmesan cheese
2 tablespoons chopped fresh basil or flat-leaf parsley


Heat the olive oil in a large pot over medium-high heat.  Add the onion and cook until translucent, about 4 minutes.  Add the garlic and cook 30 seconds.  Add the celery and carrot and cook until they begin to soften, about 5 minutes.  Stir in the green beans, dried oregano and basil, ¾ teaspoon salt and ½ teaspoon black pepper; cook 3 more minutes.


Add the diced and crushed tomatoes and the chicken broth to the pot and bring to a boil. Reduce the heat to medium low and simmer 10 minutes.  Stir in the kidney beans and dry pasta and cook until the pasta and vegetables are tender, about 10 minutes.  Taste and adjust salt if needed.  Ladle into bowls and top with parmesan and basil.

Friday, September 2, 2016

Mayan Quinoa Salad

Last Year's Post:  Wine Bar (or Brewery) Platters
Two Years Ago:   Baked Italian Sandwiches

This salad is a great example of clean eating that won't make you feel deprived even though it's vegetarian.  The secret is the variety of tastes and textures:  juicy tomatoes, creamy avocado and beans, toasty quinoa, and crunchy corn and pepitas.  There's so much going on that you'll never miss the meat, I promise.  The crunch factor is key, and the surprise ingredient is freeze-dried corn which is my newly discovered favorite.   The corn is dried with no additives or other ingredients, and it's naturally gluten, dairy, wheat and nut free.  It's very light and crunchy with a naturally sweet corn taste and is very low in fat and calories.  It makes a great snack but I particularly like it on salads because of its color, flavor and crunch.  You can find it in bags (or possibly a plastic container) in the produce aisle of your upscale grocer or natural foods store.


Note that the quinoa needs to be cooked and cooled for this salad, so you might want to start with that or cook it in advance. After that, you just shake up the vinaigrette, chop a few things, and assemble.  Fast, easy, delicious, and healthy!

print
Mayan Quinoa Salad
Serves 4

For the sherry vinaigrette:
1 medium shallot, minced
2 tablespoons sherry vinegar
1 tablespoon fresh lemon juice
1 teaspoon Dijon mustard
4 tablespoons extra-virgin olive oil
Salt and freshly ground black pepper

For the salad:
½ cup uncooked red or white quinoa
1 avocado
1 tablespoon lemon or lime juice
2 cups baby spinach, chopped
½ cup freeze-dried corn*
1 (15 oz) can black beans, rinsed and drained
½ cup pepitas (roasted salted pumpkin seeds)
2 cups slivered cherry tomatoes
Cilantro leaves, for garnish

For the vinaigrette:  stir shallot, vinegar, lemon juice and mustard in a small bowl and let stand for at least 15 minutes to blend.  Gradually whisk in oil (or shake in a jar to combine).  Season to taste with salt and pepper.

Prepare the quinoa according to package directions and let cool. 

Cut the avocado in half and remove the pit, then score the flesh in a crosshatch pattern with the tip of a knife.  Using a large spoon, scoop the chunks into a small bowl and toss with the lemon or lime juice to prevent browning.

To assemble the salads, place each ingredient decoratively in strips on the plates with complementary colors next to each other:  avocado, tomatoes, quinoa, spinach, beans, corn, and pepitas.  Garnish with cilantro leaves and drizzle with vinaigrette, passing extra vinaigrette at the table.


*Note:  you will find freeze-dried corn in a bag or package in the produce aisle with other dried vegetables.

Saturday, August 22, 2015

Summer Harvest Quiche

Last Year's Post:  Chicken Gyros
Two Years Ago:   Grilled Shrimp and Corn Salad

You can never have too much of great summer tomatoes, corn and zucchini, can you?  The only question is how to use them in different ways so they don't get repetitive.  You've probably been using them in salads and as side dishes, but what about a quiche?  It makes a great light dinner or Sunday brunch, not to mention that it's ideal for work lunches throughout the week.

Quiche is easy to make and easy to customize, plus you can go fancy by making little individual ones or family-style by making one big one.  This recipe happens to be vegetarian but you could easily add crumbled cooked sausage, bacon, or even lump crab to make it special. Feel free to substitute whatever vegetables and cheese your family prefers or you happen to have on hand.

Serve with a big green salad and some crusty bread for a perfect late summer dinner. (Is there a sadder phrase than "late summer"?  Oh yes.  It's called "Winter". I remember a guy in my high school - a member of the ski team - who would wear a big "Think Snow" button on his jacket beginning in early November.  I wanted to slap him. )

Anyway, even if you have buckets of fresh tomatoes, roast them for this recipe (see how here) because fresh tomatoes are too watery for quiche.  Not to mention it's a great way to preserve all those fresh tomatoes for Winter.


print recipe
 Summer Harvest Quiche
Serves 6

1 9-inch pie crust
Pie weights or dried beans for blind-baking the crust
                                                                               
1 tablespoon olive oil   
1small zucchini
½ cup chopped onion                                                   
1 ear fresh corn
3 eggs, room temperature                                                          
1 ½ cups milk
½ teaspoon salt
¼ teaspoon pepper                                                       
1/3 cup sun-dried (or roasted) tomatoes, chopped
1 cup grated Gruyere cheese (packed)
2 tablespoons chives, chopped
1 tablespoon fresh rosemary, finely chopped
1 tablespoon basil, chopped


Preheat oven to 350 degrees.

Place the pie crust in a pie pan (preferably glass) and line with parchment paper or aluminum foil.  Fill the pie plate with pie weights or dried beans and bake for 10 minutes or until lightly brown.  Remove from the oven; remove the parchment paper and weights or beans. Let the pie crust cool for a few minutes.   Leave the oven at 350d.

Meanwhile, cut the zucchini in fourths lengthwise, then slice.  Sauté the zucchini and onion in the olive oil until softened and just beginning to brown, about 5 minutes.  Season with salt and pepper to taste and remove from the heat.

Briefly cook the ear of corn by boiling, steaming or grilling for 3-4 minutes.  Let cool, then cut the kernels off the cob.  Set aside.

Combine the eggs, milk, salt and pepper in a large bowl and whisk until well blended.  Add the chives, rosemary and basil and stir well.

Place the zucchini mixture, corn kernels, tomatoes and grated cheese in the pie crust.  Pour the egg mixture over the vegetables. 

Bake in the middle of the oven for 50-55 minutes at 350d until browned and set.

Remove from the oven and cool on a wire rack for at least 10-15 minutes before serving.

Friday, May 22, 2015

Crab Fried Rice

Last Year's Post: Edamame Spread
Two Years Ago:  Sausage Sliders with Broccoli Rabe Pesto

There are usually several drawbacks to crab fried rice that you'll find in a restaurant: it contains large amounts of oil and sodium, but very little crab (and what's there is usually claw meat rather than lump crab).  Making your own solves all three, plus you can bump up the nutritional value by adding lots of veggies.  I like LOTS of crab so I did some investigating to discover where to buy the best crab without breaking the bank.  Outside of buying, cooking and shelling crabs yourself, I found the best source to be Costco.  They carry 1 pound tubs of lump crab for around $18, which is an excellent price compared to the smaller cans of crab most grocery stores carry.  (You can find the crab near the meat and deli area at Costco typically.  Not by the tires, underwear, or swing sets.  I love Costco.) It's worth it to check your local sources, especially if you have a good seafood market.  The crab makes all the difference.

Be aware that the rice needs to be cooked and refrigerated for at least several hours, so plan ahead or buy some at the Asian takeout counter in your grocery store.  The ingredient list may look a little long, but after you prep the ingredients it takes all of 10 minutes to stir-fry.  Prepping will take about 20 minutes.  The asparagus can be blanched while you're chopping (multi-tasking is a wonderful thing), and as you finish prepping each ingredient place it in its own little bowl so when you actually start cooking all you have to do is toss things into the pan.


This recipe calls for low-sodium soy sauce, so be sure to taste the rice right before serving to see if it needs a little more salt.  Or, let everyone season to their taste at the table.  And it only calls for a small amount of vegetable oil.  Control the sodium and fat, and bump up the veggies and crab for a better crab fried rice than you could get in any restaurant.


print recipe
Crab Fried Rice
Serves 4

Note: the rice should be cooked and refrigerated for several hours or overnight, so plan ahead.

1 cup uncooked jasmine rice
Pinch ground white pepper
Pinch granulated sugar
2 tablespoons low-sodium soy sauce
1 cup asparagus tips
1 tablespoon vegetable oil
2 large eggs
¼ small white onion, finely chopped
1 pound jumbo lump crabmeat, picked over for shells
1 clove of garlic, minced
5 scallions, white and light green parts, thinly sliced and divided
1 cup frozen peas, thawed
1 jalapeno, stemmed and seeds removed, minced
2 radishes, chopped
½ medium cucumber, thinly sliced into rounds
1 medium tomato--cored, halved and thinly sliced 

Bring 1 ¾ cups of water to a boil in a saucepan, then add the rice and stir.  Cover, turn heat to low, and simmer for 20 minutes, stirring occasionally.  Set aside to cool, then refrigerate covered for several hours or overnight.

Combine the pepper, sugar and soy sauce in a small bowl.  Bring a medium saucepan of water to a boil and drop in the asparagus tips.  Cook 2-3 minutes (depending on size) until crisp-tender, then immediately drop into a bowl of ice water to shock.  Drain and set aside. 

At this point you’re ready to start stir-frying, so be sure all ingredients are prepped and ready in small bowls because the process moves fast. Remove the rice from the refrigerator and fluff with a fork to separate any clumps before starting.

In a medium nonstick skillet or wok set over medium-high heat, add the oil and heat until shimmering, 1 to 2 minutes. Add the eggs to the skillet and stir constantly to scramble the eggs, cooking until the egg whites are set, 2 to 3 minutes.

Add the onion and cook, stirring occasionally, until the onion is tender, 3 to 5 minutes. Stir in the cooked rice, sauce mixture, and garlic and stir to combine. Add half of the scallions, peas, asparagus tips, jalapeno, radishes and crab.  Cook, tossing frequently for about 3 minutes, until the rice and crab are heated through and the sauce is incorporated.  Season to taste with salt and additional pepper.

Divide the fried rice between serving bowls and sprinkle with the remaining 1 tablespoon of scallions. Serve the fried rice alongside the sliced cucumbers and tomatoes.


Friday, March 20, 2015

Citizen Public House Chopped Salad

Last Year's Post:  Filipino Chicken Adobo
Two Years Ago:   Egg Gratin

Citizen Public House is a very popular Phoenix restaurant, and this is by far the most popular dish on their menu.  It's so popular that when they opened a second restaurant concept they had to offer it at there as well.  The salad even has its own Facebook page: https://www.facebook.com/TheOriginalChoppedSalad .  And the owner has been interviewed on television while making the salad.  So, that was enough for me!  We made it for a recent girls' getaway weekend and all four of us loved it, even Michelle who claims she's never had salmon before. (I mean, really.)

I was slightly skeptical because the combination of ingredients is pretty unusual, especially the "trail mix" of aged Asiago cheese, toasted pepitas (pumpkin seeds) and currants.  Not to mention the freeze-dried corn, which turns out to be very light and crunchy sort of like popcorn. You'll find it in bags in the produce section of upscale grocery stores, and I think Whole Foods carries it as well.  Don't be tempted to leave it out because it's important to the overall mix of flavors and textures.

Speaking of the overall mix, there's a lot going on in this salad but magically it somehow all comes together really well.  Creamy, crunchy, sweet, smoky, bitter, herbal - it's got it all.  If you're not a fan of salmon, try it anyway - it doesn't overwhelm the other ingredients and it does add a nice smokiness.  The chef who created it said he doesn't even usually like salmon but does like it in this salad.  Use hot-smoked salmon, not cold-smoked.  What's the difference?  Hot-smoked salmon is darker on top from the smoke, and is flaky.  Cold-smoked salmon is light in color, soft in texture, and typically sliced into very thin slices much like lox.

Although there are a number of ingredients, you only have to cook the couscous and make the dressing in the blender.  After that, it's just shredding cheese, chopping veggies, and assembling everything.  It's actually very easy.


My suggestion is to cook the couscous in advance so it has time to cool.  It keeps well in the refrigerator covered.  I don't suggest making the dressing in advance because I discovered it thickens when stored in the refrigerator.  If you really need to make it an hour or so early, be sure to stir it well after removing it from the refrigerator and thin if necessary with a little water or additional lemon juice.

This is definitely a company-worthy salad both in terms of presentation and taste, but easy enough to make for your family.  And healthy!

Note:  I slightly adapted the original recipe because it didn't state the number of servings, and to make it a little more clear.  Otherwise it's identical.  Because it's a restaurant recipe, the servings are quite generous.  If desired, you could cut down the amounts of each ingredient a little to make smaller servings.


print
Citizen Public House Chopped Salad
Serves 4 generously

Dressing:
1 ½ cups mayo
1/3 cup buttermilk
1 ½ Tbsp. Pecorino Romano cheese
Juice of 1 large lemon
18 basil leaves
1 ½ tsp. minced garlic

Trail mix:
1 cup black currants
1 cup toasted pepitas (pumpkin seeds)
¾ cup ground aged Asiago cheese

Tomato mix:
2 cups chopped Roma tomatoes or cherry tomatoes
3 Tbsp. balsamic vinegar
 2 tablespoons olive oil
Four large basil leaves, chopped
Salt and pepper to taste

2 cups smoked salmon, flaked
2 ½ cups freeze-dried corn
2 ½ cups chopped arugula
2 ½ cups cooked Israeli (pearl) couscous

 Combine all dressing ingredients thoroughly in blender and set aside. Toss all trail mix ingredients together in one bowl, and all tomato mix ingredients in a second bowl.  To assemble the salads, divide ingredients evenly between four plates and assemble in strips in the following order: salmon, couscous, arugula, trail mix, corn, and tomato mix.  Serve with dressing on the side or drizzled over the top.


Friday, August 15, 2014

Chicken Gyros

Last Year's Post: Grilled Shrimp and Corn Salad
Two Years Ago:  Gazpacho

It's late summer, which means the farmers markets (not to mention your garden) are bursting with fresh produce.  This recipe uses cucumbers, tomatoes, onions and lettuce, which makes it perfect for this time of the year.

Greek food is fresh, vibrant and usually pretty good for you.  Gyros (pronounced yeer-ohs) refers to a popular type of Greek meat that's thin-sliced off a giant spit and usually served as a sandwich with pita bread, yogurt sauce and cucumber.  Since most people don't have a giant spit handy, grilled chicken is typically substituted in recipes.  Chicken Gyros recipes often suffer from two major problems - dry, chewy, tasteless chicken, and leaky, cracking pita pockets. (Supermarket pita pockets are one of my all-time pet peeves to be filed under Never Buy Again Unless You Need to Punish Yourself.)  This recipe solves both problems and has the added bonus of using roast chicken from your local store (or your own leftover chicken), which makes it a very fast and easy meal to serve any night of the week.

The tzatziki sauce can be made at the same time you're making the rest of the meal, although it benefits from at least 30 minutes in the refrigerator to allow the flavors to blend.  It could also be made up to a day in advance.  The moist roast chicken is shredded and bathed in a light coating of garlic herb oil, which is also used to brush the bread before heating and lightly browning.  Finally, the cucumber salsa includes bright notes of tomato, red onion, Feta cheese, parsley and mint.  Iceberg lettuce adds the most crunch, although you could substitute sliced Romaine if you want.


I found the world's cutest cherry tomatoes at the farmer's market called "Tiny Tims" for obvious reasons.  Too cute for words.  You could also certainly use regular cherry tomatoes, or sliced or chopped regular tomatoes from your garden.  These were so tiny I left them whole.  And they were really sweet!


Back to the question of bread.  If you can find really fresh pocketless pita bread in your town, that's great.  Try the local Middle Eastern markets - they're an excellent source and a fun adventure.  Naan bread is an Indian/Asian flatbread very similar to pita bread (readily available in supermarket delis) that also works well.  Any other flatbread such as the "Flat Out" brand would work, and even flour tortillas would work in a pinch although they're less authentic.  The key is to make sure whatever flatbread you use is soft and foldable, although you could also serve the gyros open-faced with a knife and fork. I used naan bread and cut each one in half (they're big) for four individual sandwiches.


The recipe calls for dried oregano and rosemary, but you could certainly use fresh if you have some on hand. A good rule of thumb is to use approximately twice as much of a fresh chopped herb as called for dried.  I adapted this recipe from two others, and I'm genuinely pleased with the results.  In particular, the garlic herb oil, moist shredded chicken, and bright cucumber salsa make it the best chicken gyros recipe I've had.  I hope you like it too!


printable version
Chicken Gyros with Cucumber Salsa and Tzatziki
Serves 4

1 English cucumber, cut in half (or 2 Kirby cucumbers)
1 1/2 cups Greek yogurt
1 teaspoon fresh lemon juice
5 garlic cloves, minced, divided
Salt and pepper
1 pint grape tomatoes, quartered
1 small red onion, halved and chopped
1/2 cup crumbled Feta
1 tablespoon olive oil
1-2 teaspoons red wine vinegar
1/3 cup chopped flat-leaf parsley
1/4 cup chopped mint
1/4 cup extra-virgin olive oil
1 rounded teaspoon dried oregano
1 rounded teaspoon dried rosemary, crumbled
1 (8-ounce) package naan bread (2 breads) or 4 (8-inch) pocketless pita rounds
2 cups roast chicken, shredded
4 cups iceberg lettuce, thinly sliced
Lemon wedges, for serving


Peel and grate ½ cucumber, then squeeze it in a towel to remove excess water. Stir together with yogurt, lemon juice, and one third of garlic.  Season to taste with salt and pepper.  Refrigerate tzatziki for at least 30 minutes to allow flavors to blend (preferable but not necessary if you’re pressed for time).

Preheat broiler.

Cut remaining cucumber into 1/4-inch pieces and stir together with tomatoes, onion, Feta, 1 tablespoon olive oil, vinegar, parsley, and mint to make salsa.  Season with salt and pepper to taste.

Gently simmer ¼ cup oil, oregano, rosemary, remaining garlic, and salt and pepper in a small heavy saucepan until garlic is fragrant but not browned, 1 to 2 minutes (or microwave on low power for 30-60 seconds). Toss chicken with 3 tablespoons garlic oil and brush one side of bread with remainder.

Heat bread, oiled side up, in a 4-sided sheet pan, covered with foil, 3 to 4 inches from broiler 3 minutes. Uncover and broil, rotating bread for even coloring, until golden in spots, about 2 minutes.  Cut naan bread into half.

Spread some of tzatziki on warm bread and top with lettuce, chicken and salsa.  Fold in half.  Serve lemon wedges and remaining lettuce, salsa, and tzatziki on the side.

Note: Tzatziki can be made 1 day ahead and chilled.


Friday, February 7, 2014

Sesame Seed Chicken Salad


Last Year's Post: Linguini alla Puttanesca
Two Years Ago:  Chicken, Gruyere and Fig in Puff Pastry

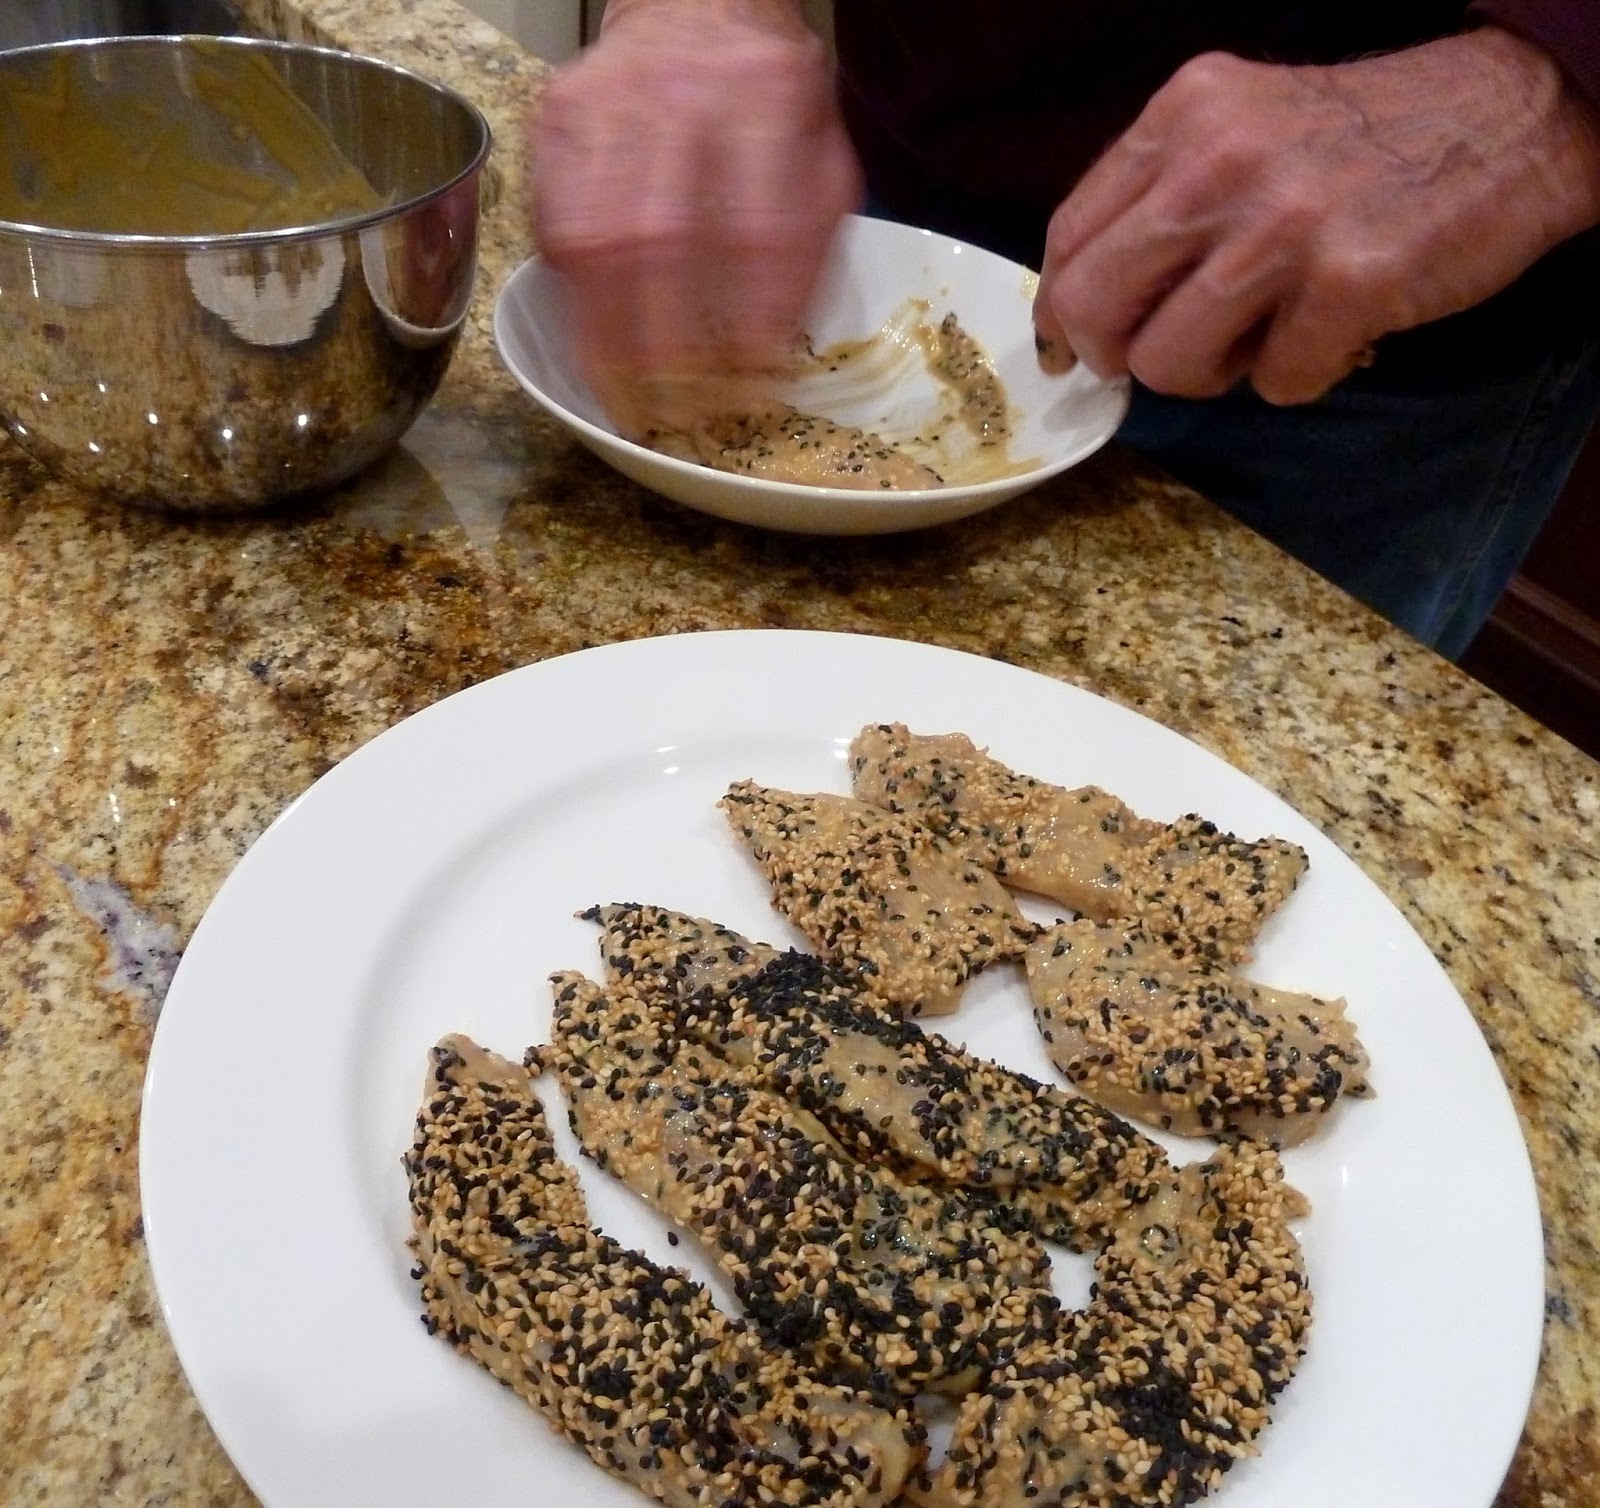
Salads are a great addition to your weekly dinner rotation during the summer of course, but also during the winter because they're a light and healthy change of pace from heavier winter foods .  The thing that's interesting about this chicken salad is the maple syrup/mustard and sesame seed coating on the chicken, which gives it great crunch and flavor.  It almost tastes deep-fried although it's not.  A combination of black and white sesame seeds is particularly dramatic, but all white seeds would be just as good if you don't want to buy black sesame seeds.  If you're interested, you can buy black sesame seeds at my favorite spice store, Penzeys, here or at your local Penzeys if you're lucky enough to have one in your city.

I also found some great multi-colored cherry tomatoes at my local natural foods store that add color to the salad.


Adding color to your food whenever possible makes it much more visually appealing.  In addition to the tomatoes, chicken and lettuce, the salad contains cucumber and cheese.  I prefer to use English cucumbers (the long thin cucumbers wrapped in plastic wrap) because they have a thinner skin and fewer seeds than regular cucumbers, plus I don't like the waxy coating they (whoever they are) put on regular cucumbers.


The original recipe called for chicken tenders, but a large boneless skinless chicken breast is just as easy to use - all you have to do is cut it into pieces that are about 1- 1 1/2" in diameter and 3-4" long.  The chicken pieces are marinated in a maple syrup and mustard mix for an hour, then rolled in sesame seeds and cooked in a skillet for just a few minutes.  While the chicken is marinating you can make the vinaigrette and chop the salad ingredients, so all you have to do is assemble and serve the salad while the chicken is done.  Easy and healthy!


printable recipe
Sesame Seed Chicken Salad
Serves 4 as a main dish

For the Dressing:
2 large garlic cloves, minced
1 tablespoon Dijon mustard
½ teaspoon salt
¼ teaspoon sugar
¼ teaspoon pepper
¼ rice wine vinegar
1/3 cup vegetable oil

For the Salad:
½ cup Dijon mustard
1/3 cup pure maple syrup
1- 1/3 lbs chicken tenders, or boneless skinless chicken breasts cut into pieces approximately  1 - 1 ½ “  in diameter and 3-4” long
2/3 cup sesame seeds (preferably a mixture of black and white)
2 tablespoons vegetable oil
2 (5-oz) bags mixed baby greens
½ English cucumber, unpeeled
16 – 20 cherry tomatoes, cut in half
1 cup crumbled feta or goat cheese


For the dressing, whisk all ingredients in a bowl or shake in a jar.

For the chicken, whisk mustard and syrup in a bowl to blend.  Add chicken and marinate 1 hour in the refrigerator.

While the chicken is marinating, cut the cucumber in half lengthwise and use a small spoon to remove the seeds.  Cut crosswise into slices.

After the chicken has marinated, remove from the marinade and shake off any excess.  Place the sesame seeds in a shallow bowl and roll the chicken in the seeds to coat on all sides.  Sprinkle with salt and pepper. 

Heat 1 tablespoon of vegetable oil in a large nonstick skillet over medium-high heat.  Place half the chicken pieces in the skillet and sauté until just cooked through, about 2 minutes per side.  Remove the cooked chicken pieces and repeat with the other tablespoon of oil and remaining chicken pieces.


Toss the lettuce, tomatoes, and cucumber with dressing and serve with the cheese and chicken pieces on top.

Friday, October 18, 2013

Tomato Soup and Grilled Cheese - All Grown Up


We had tomato soup and grilled cheese sandwiches umpteen times as kids - canned soup and water, plus white bread and pasteurized cheese slices.  Easy, quick, cheap, and something every kid will eat.  So when I came across these recipes I had to laugh - it was like childhood all over again except at warp speed.  I was first attracted to the homemade fresh cucumber pickles on the toasted cheese sandwiches - both the fact that they're freshly made, and that they're on a cheese sandwich in the first place.  The recipe suggested that the sandwiches go great with tomato soup, so I dug out my favorite roasted tomato soup recipe and voila!  Third grade lunch, all grown up.

One of the interesting things about the tomato soup recipe is that you can make it year-round with whatever plum tomatoes you find in the produce section because they're roasted to bring out their flavors, not to mention combined with chicken broth, tomato paste, red wine and a touch of cream.  How can you go wrong? It's a full-bodied, slightly chunky tomato soup that clearly has never seen the inside of a can.  I always use low-sodium products whenever possible, and they make a big difference in the sodium level of this recipe because chicken broth and tomato paste are both high in sodium if you use the regular products.  If you use low sodium products you'll need to add a little salt at the end but that's OK.  Definitely don't add salt until you taste the soup either way.


The cheese sandwich is equally interesting - dark rye (or pumpernickel) bread, sharp white cheddar cheese, mustard, and those homemade pickles.  The fresh cucumber pickles could also be served on any roast beef or pastrami sandwich (even burgers or brats) and are worth printing the recipe in and of themselves - fresh cucumbers briefly marinated in white wine vinegar, sugar, horseradish, Dijon, and fresh dill. 


Together with the dark rye and white cheese they have a Scandinavian feel.


We recently had this combination on a chilly, rainy day and really enjoyed the flavors.  If you made the soup in advance it would be a great and fast weeknight meal.

Roasted Tomato Soup
Serves 4

Note: because the tomatoes are roasted to bring out the flavors, this recipe can be made at any time of the year.

1.5 lbs fresh plum tomatoes
5 tablespoons olive oil, divided
½ teaspoon dried oregano, crumbled
¼ teaspoon dried basil, crumbled
½ cup finely chopped onion
1 cup low sodium chicken broth
¼ cup dry red wine
¼ cup heavy cream
1/4 cup low sodium tomato paste
Sugar to taste (approx 2 teaspoons, depending on the acidity of the tomatoes)
Salt and pepper to taste (approx 1 teaspoon salt if using low sodium tomato paste and low sodium chicken broth)


Preheat oven to 475 degrees. Core tomatoes and halve lengthwise. Place cut side down on a shallow baking sheet with sides and brush generously with 3 tablespoons of olive oil. Sprinkle with oregano, basil, salt and pepper. Roast tomatoes until the edges are charred, about 20 minutes. Scrape tomatoes, oil and herbs from pan into a food processor and process until not quite smooth.

In a saucepan, cook onion in remaining 2 tablespoons olive oil until translucent, about 3-4 minutes. Whisk in roasted tomato puree, broth, and wine, then whisk in tomato paste. Add the cream while whisking. Taste and add sugar if necessary. Add salt and pepper to taste and bring soup to a simmer. Thin with additional chicken broth if desired.


Open-Faced Cheese Sandwiches with Fresh Cucumber Pickles
Makes 4 sandwiches

Note: these cucumber pickles would also be great on ham or roast beef sandwiches, or burgers and brats.

½ English cucumber, very thinly sliced
1 teaspoon kosher salt
¼ cup white wine vinegar
2 tablespoons sugar
2 teaspoons chopped fresh dill
1 teaspoon Dijon mustard
½ teaspoon prepared horseradish
4 slices dark rye or pumpernickel bread
4 slices sharp white cheddar cheese
Butter and Dijon mustard


Place cucumber slices in a strainer; sprinkle with salt, tossing to coat well. Let stand for 15 minutes, then rinse and pat dry with paper towels.

Combine vinegar, sugar, dill, 1 teaspoon mustard, and horseradish in mixing bowl. Add cucumber slices and toss to coat. Let cucumbers stand a minimum of five minutes, or cover and chill up to one day. Cucumbers will softer slightly as they marinate.

Spread one side of each slice of bread with Dijon. Heat 2 teaspoons of butter in a large nonstick pan or griddle over medium heat. Add bread, mustard side up, and top each slice with a slice of cheese. Toast until cheese is melted and the bread is golden brown and crisp on the bottom.

Divide sandwiches among four serving plates, top with cucumbers, and serve.


Friday, August 2, 2013

Tomato Crumble

Last Year's Post: Smoky Peanut Mole with Pork Tenderloin
Two Years Ago:  Chicken Pasta Salad with Fresh Herbs and Corn
More Tomato Recipes: The Best Salsa Ever, Gazpacho, Tomato Olive Melts, Roasted Tomatoes

The very idea of a tomato crumble is intriguing, don't you think?  Most of us are familiar with fruit crumbles that are mixed with sugar and topped with a sweet streusel before baking.  In this version, ripe tomatoes are tossed with herbs and topped with a savory breadcrumb-parmesan-pine nut mixture before baking.  I made a trip to my local farmer's market this week and found beautiful tomatoes and herbs so I immediately thought of this recipe.


I first tasted it when The Lawyer's sister Marne made it for a family gathering.  It really caught my attention because baking intensifies the tomatoes' flavor and melds it with the herbs so it literally explodes with flavor.  It makes a lot so it's great for family gatherings or pot luck dinners but I would also encourage you to make it any night as a side dish to go with grilled steak, chicken, lamb, or even halibut or swordfish.  I served it with seared tuna and fresh corn on the cob and it was a total feast just for the two of us. It would also make a great vegetarian dish with the addition of a little tofu and served over rice or couscous. Leftovers?  Excellent!  Here are just a few of the many ways you can use them.
  • Toss with hot cooked pasta for dinner, or cooked and cooled pasta for a salad.  Add any other leftovers or cheese of choice.
  • Use as a filling for an omelet.
  • Use as a topping for toasted french bread slices along with some black olives to make bruschetta.
  • Make a tart or quiche using the tomatoes as a main ingredient.
  • Pizza!
  • Layer on french bread with sliced zucchini and other favorite vegetables; top with a slice of mozzarella and broil until browned for an open-face veggie melt.
  • Re-warm gently and use as a chunky topping for meat.
  • Make a contemporary twist on a BLT by using the baked tomatoes in place of fresh and arugula in place of lettuce along with bacon, then grill on a griddle or panini press until warm and crisp.
  • Top baked potatoes with the tomatoes and a little sour cream for stuffed baked potatoes.
  • Add to a breakfast sandwich with eggs and cheese on an English Muffin.
You get the idea.  Leftovers are like gold in this case.

The crumble is very easy to make.  You start by coring the tomatoes and cutting them in half, then gently squeezing them and poking out the seeds with your fingers.  I also removed the lighter-colored, more dense pieces connected to the seeds.  Here's a visual to show you what I removed.


Then you cut the tomatoes into chunks and let them drain 20 minutes in a colander to remove some of their water.


They'll still release water when they bake, which is no big deal - just use a slotted spoon to serve the tomatoes if you don't want as much liquid.  But I would definitely save the liquid with your leftovers, so you can use it depending on the next dish you make.

While the tomatoes drain you prepare the breadcrumb-parmesan-pine nut and butter topping.  Although the recipe calls for fresh breadcrumbs, I think using panko crumbs would work equally well and might even be a little crunchier.  After the tomatoes drain you simply place them in the baking dish, sprinkle in the herbs and toss them around, then top with the breadcrumb mixture and bake.  It's a great and different way to use some of the fresh tomatoes from your garden or the farmers market at this time of the year.


Tomato Crumble
Serves 6 to 8

Olive oil
2 1/2 to 3 lb. summer tomatoes
3 tablespoons chopped fresh basil, plus sprigs for garnish (optional)
1 tablespoon chopped fresh rosemary, plus sprigs for garnish (optional)
1 teaspoon salt
Freshly ground black pepper
3/4 cup fresh bread crumbs, made from day-old peasant white bread, including the crust
3/4 cup grated Parmesan cheese, preferably Parmigiano Reggiano
1/2 cup pine nuts
6 tablespoons unsalted butter, melted

Arrange a rack at center position and preheat oven to 375 degrees. Oil a shallow 2-quart baking dish and set aside.

Stem tomatoes, then halve horizontally. Squeeze halves lightly to extract juice, then scoop out seeds. Cut into 1-inch chunks and drain chunks in a colander for 20 minutes. (The amount of liquid that drains from the tomatoes will vary depending on the variety of tomato.)

Spread the tomato chunks in the baking dish. Add the basil, rosemary, salt and several grinds of black pepper, and toss.

Mix together the bread crumbs, Parmesan cheese and pine nuts in a large bowl. Add the butter and mix well with your hands until mixture is crumbly. Spread the mixture on top of the tomatoes.

Bake the tomato crumble until the topping is crisp and slightly browned and juices are bubbling, 30 to 35 minutes. Remove from the oven. Do not worry if there is liquid in the pan; you can spoon it out or leave as is. (The crumble can be prepared 3 hours ahead. Cool and leave at room temperature. Reheat in a preheated 350-degree oven until warm, about 15 minutes or longer.)

Garnish the center of the crumble with fresh basil and rosemary sprigs (optional).

Friday, July 19, 2013

Chicken Curry

Last Year's Post: Farm Stand Salad

Indian food has not been one of my favorites, so I have absolutely no idea why I decided to try this recipe in the first place ten years ago.  The reason why I remember how long it's been is because The Lawyer and I were in the process of a corporate move to Louisville, KY.  He had gone ahead to begin work and I stayed for a period of months in a small apartment in Minneapolis which didn't really give me much creative outlet for my cooking obsession.  I spent my spare time dreaming about all the great new recipes we would prepare when I finally arrived in Louisville.  Unfortunately, I decided that we needed to make a brand-new recipe the very day I arrived.  I also decided for some reason that all the boxes need to be unpacked in one weekend.  The two decisions collided, and not in a good way.

By the end of the first day of unpacking boxes we were both exhausted, but I had reached that point where you're so tired that you become unreasonably stubborn.  (Or at least I do.  Well, some would say I'm always unreasonably stubborn and that it's just a matter of degree.)  The Lawyer tried to talk me into going to a restaurant or at least ordering a pizza, but NO - I was going to make this recipe come hell or high water.  It's not hard, but a brand-new recipe is not a great idea for one of those nights. I don't recall most of the actual preparation but even through a haze of exhaustion I clearly remember how great it tasted. 

I always thought of Indian food as being heavy and fiery hot, but this dish is very light and fresh-tasting and has warmth from the spices rather than heat.   If you're new to Indian food this is a good introduction.  And it's fun to make because you can see and smell all the individual spices that go into making the overall complex flavor and can adjust them up or down to your taste the next time.  It's much more interesting and instructive than just buying a jar of curry powder and dumping it in.  My guess is that it was the homemade spice mix that attracted me in the first place.

The one fact you do need to come to grips with is that you need quite a number of spices.  Hopefully you already have many of them in your cupboard.  For the rest, I always recommend Penzeys (your local store or online www.penzeys.com) for the widest variety of fresh and inexpensive spices.  And remember, even after buying several spices this meal will still be cheaper than if you went to a restaurant.


The preparation is really pretty straight forward - coat chicken cubes in your homemade spice mix and brown, then remove.


Add onions, ginger and garlic to the pan and cook, then add some more spices - cardamom, bay leaf and cinnamon. I wrap them in cheesecloth and tie with kitchen string so they're easier to fish out later (you can find cheesecloth in some grocery stores and most kitchen supply stores).


Add tomatoes and the chicken pieces and simmer, then add a little yogurt, raisins and some cilantro.


Garnish with toasted sliced almonds and serve with basmati rice.  Don't skip the almonds - they're an important component for both flavor and crunch.


Not at all hard, but I do recommend trying it some day when you're not feeling unreasonably stubborn.

printable recipe

Chicken Curry
Serves 4-6

2 ½ teaspoons whole coriander seeds
2 teaspoons whole cumin seeds
1/8 teaspoon crushed red pepper flakes
½ teaspoon turmeric
½ teaspoon ground ginger
Pinch of ground cloves
½ teaspoon salt
½ teaspoon freshly ground black pepper
2 boneless skinless chicken breasts, cut into 1 1/2 “cubes
2 tablespoons peanut oil
2 tablespoons fresh ginger, minced
1 large garlic clove, minced
1 large or two medium onions, halved and thinly sliced
2 whole cinnamon sticks, about 3” long
1 bay leaf
3 green cardamom pods
4 cups whole canned tomatoes with juices
1 ½ cups low-sodium chicken broth
¼ cup plain yogurt
¾ cup golden raisins, roughly chopped
½ cup chopped fresh cilantro
Sliced almonds, toasted, for garnish
Hot cooked basmati rice

Special equipment needed: 
spice grinder
cheesecloth and kitchen string, for tying spice bundle

In a dry skillet over medium heat, toast coriander and cumin seeds until fragrant, 1 to 2 minutes.  Transfer to spice grinder, add crushed red pepper flakes, and grind to a powder.  Place in a large zip top bag, and add turmeric, ginger, cloves, salt and black pepper.  Add chicken and toss to coat.

Heat peanut oil in a large pot over medium-high heat.  Add chicken, cooking until browned, 3 to 5 minutes.  Remove chicken and set aside.

Reduce heat and add ginger, garlic and onions.  Cook until softened and browned, 8 to 10 minutes.  Meanwhile, place cinnamon sticks, bay leaf and cardamom pods in a square of cheesecloth and tie with kitchen string.  When the onions are brown add the spice bundle and cook for an additional 10 minutes, making sure the spice bundle is covered with onions.  Add the tomatoes and roughly crush with a potato masher or snip with a kitchen scissors.  Add the chicken stock and browned chicken and raise the heat to medium high.  Cook until the liquid is somewhat reduced, about 15 minutes.  Reduce heat to low and stir in yogurt and raisins.  Cook until warmed through, then add cilantro.  Taste and adjust salt and pepper.

Serve with basmati rice and garnish with toasted almonds.