Showing posts with label peas. Show all posts

Friday, September 22, 2017

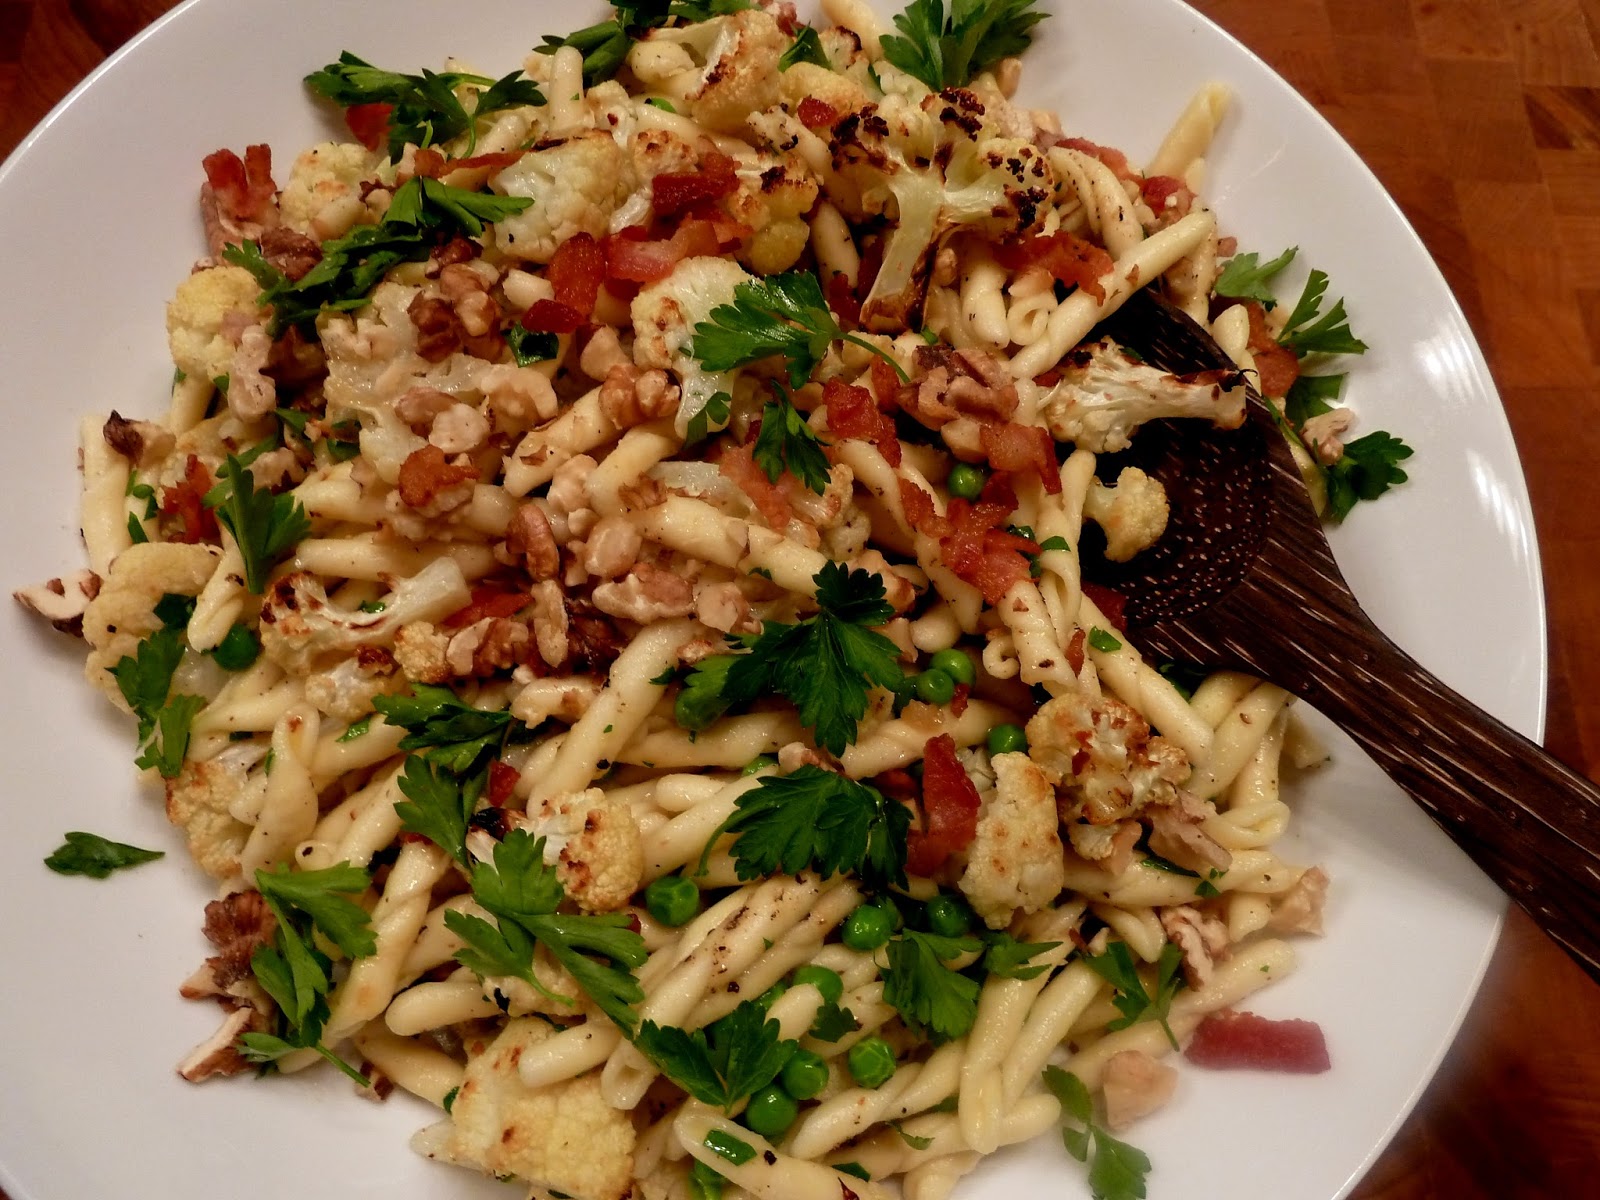
Roasted Cauliflower with Pasta and Walnuts

Last Year's Post: Korean Rice Bowls
Two Years Ago:  Healthy Baked Apples

This is an excellent and somewhat unusual pasta dish that can be served warm, room temperature or cold which makes it a good choice for any time of the year.  Plus, it's much lighter and healthier than most heavy red-sauce pastas.

I've recently discovered vegetables that I thought I didn't really care for all that much such as cabbage or cauliflower can actually become wonderful when they're cooked to the point that they turn into something else.  For cabbage, that means cooking it down until it's very tender and sweet (see cabbage and spring onion tart) and for broccoli or cauliflower that means roasting or sauteing  until they're pretty well torched (see chicken and caramelized broccoli ramen) which results in a much deeper and nuttier flavor.  The roasted cauliflower is a highlight of this salad, along with the walnuts and bacon.  (You could also use a combination of roasted cauliflower and broccoli if you want.)   Leave the bacon out and you've got a great vegetarian meal.


The sauce is very simple - good olive oil with a little garlic flavor (or a lot, depending on your taste). You could also add additional red pepper flakes to spice things up - there's just a small amount on the cauliflower.  The cauliflower only roasts for about 20 minutes so you could make this meal in the time it takes to boil water and cook pasta, making it a good choice for a weeknight meal.

Leftovers are excellent cold for lunch - just add a few drops of olive oil and maybe a squeeze of lemon to fresh things up.

print recipe
Roasted Cauliflower with Pasta and Walnuts
Serves 4

 1 small head cauliflower, large stems removed, florets separated and halved
2-3 tablespoons olive oil
2 cloves garlic, grated or minced
¼ teaspoon red pepper flakes (more for serving, if desired)
¼ teaspoon sea salt
9-10 ounces short-cut dry pasta (such as penne or ziti)
2/3 cup frozen peas
¼ cup olive oil
2-3 cloves garlic, lightly smashed
4 tablespoons fresh chopped parsley
2 slices bacon, chopped, fried until crisp and drained (optional)
¼ cup shredded parmesan cheese, plus more for serving
Salt and pepper to taste
1/3 cup walnuts, toasted and chopped


Preheat oven to 450d.

Add cauliflower to a mixing bowl with olive oil, garlic, red pepper flakes, and sea salt.  toss to coat, then spread on a parchment-lined baking sheet in a single layer.  Roast for 15 minutes, then turn the florets over.  Turn the oven to broil and return to the oven for 5 minutes or so, watching closely, until browned.  Remove and let cool.

Heat a large pot of water to a boil and cook pasta according to directions, adding the peas to the cooking water during the last 1-2 minutes.  Drain.

While the pasta is cooking, add the garlic cloves to the ¼ cup olive oil in a small saucepan and warm gently for a few minutes over low heat.  Remove the garlic cloves.

Return the pasta and peas to their cooking pot and add the garlic oil, parsley and parmesan, tossing to combine.  Taste and adjust seasonings.


Serve with the walnuts and optional bacon scattered on top and additional parmesan on the side.  Serve warm, at room temperature, or cold.  (If refrigerated, add a little additional olive oil and toss before serving.)

Saturday, April 8, 2017

Salmon Orzo Salad with Lemon and Pea Pods

Last Year's Post: Manchego Cheese Quesadilla with Pepper Jam
Two Years Ago:   Prosciutto, Mozzarella and Radicchio Panini

Hello, springtime!  OK, it might not exactly feel like spring where you live, but it's definitely April and that means flowers are right around the corner followed closely by shorts and swimsuits.  Time to put away the lasagna pan and lighten up.  Nothing says spring more to me than lemon, peas and radishes in a light salad with heart-healthy salmon.  If orzo isn't your thing you could substitute rice, quinoa, farro or even a bunch of greens instead.

The reason the recipe calls for pan-searing the salmon is because I like the crispy top crust both for color and texture in the salad.  If you prefer to grill or roast the salmon it would be just as good.


The question has come up (at least in my mind) whether this salad could be made in advance and served cold.  The answer is yes  - I had some salad left over that was just as good the next day, although the orzo absorbed the dressing so it needed some freshening with a squeeze of lemon and a few additional dill sprigs.


print
Salmon Orzo Salad with Lemon and Pea Pods
Serves 4

½ lb. fresh salmon filet
1 tablespoon soy sauce
8 ounces orzo pasta
1 cup snow peas, ends trimmed and cut in half
½ cup frozen peas
1/8 cup shallot, minced
1 tablespoon fresh dill, chopped
1 teaspoon lemon zest
1 tablespoon lemon juice
1 ½ teaspoons apple cider or white vinegar
1 teaspoon Dijon mustard
½ teaspoon salt
½ teaspoon pepper
¼ cup extra-virgin olive oil
2 cups baby spinach, roughly chopped
¼ cup radishes, thinly sliced
½ cup radish sprouts
¼ cup sliced almonds, toasted
Fresh dill sprigs, for garnish
Lemon wedges, for garnish

Rub the salmon with the soy sauce and marinate, covered, in the refrigerator for one hour.  Heat a large non-stick skillet over medium-high heat.  Add the salmon, skin side down, to the dry skillet and cook untouched for two minutes.  Carefully turn the salmon over and lower the heat to medium.  Cook an additional 2 minutes, peel the skin off the salmon and flip over.  Lower the heat to medium-low and cover; cook for an additional 5-6 minutes until the internal temperature reaches 145d.  Cool completely. Break into pieces.

Heat a large pot of salted water. Cook orzo as directed on package to desired doneness, adding pea pods and frozen peas during last 30 seconds of cooking. Drain pasta and peas; rinse in cold water.

In a small bowl, whisk shallot, dill, lemon zest, lemon juice, vinegar, mustard, salt and pepper. Gradually whisk in the olive oil.

In large bowl, toss orzo, pea pods, peas, spinach, radishes and radish sprouts with vinaigrette until coated. Add salmon and toss gently to combine.  Serve, sprinkled with almonds and garnished with dill sprigs and lemon wedges.

Friday, March 25, 2016

Spring Green Pasta

Last Year's Post: Citizen Public House Chopped Salad
Two Years Ago:   Lentil Salad with Bacon and Walnuts

Pasta Primavera is a great classic spring dish filled with bright vegetables.  The standard version often has a cream-based sauce which seems counter to the light, fresh feeling of the dish - a fragrant basil pesto seems better suited to the spring spirit.  I decided not to call this Pesto Pasta Primavera, however, because that level of alliteration seemed pretty annoying.

The good news is that you can make this dish before spring vegetables are actually available locally, using fresh produce from the store.  Then you can make it again using produce from the local farmer's market in a month or two.  I like the fact that it's vegetarian, but you could certainly add some cooked chicken or turkey if you want.  It's a fast, easy and healthy dish to get you in the mood for spring - you just do a fast vegetable saute while the pasta is cooking.


About the pesto: feel free to make your favorite recipe or buy some at the store.  A friend of mine introduced me to Costco's pesto sauce, which is excellent but like everything else at Costco comes in a large jar.  I divided it up between smaller containers and froze most of it - pesto keeps very well as long as it's thawed in the refrigerator and not the microwave.  Be sure to go light on the pesto at first while you toss everything together because you want it to be a fairly light coating on the pasta.  You can always add more if you want.

print recipe
Spring Green Pasta
Serves 4

8 ounces sugar snap peas
2 tablespoons olive oil
1 leek, white and light green parts only, chopped
1 small zucchini, diced
½ cup frozen peas
1 bunch thin asparagus spears, stalks diced, tips left whole
1 pound linguini pasta
½ cup prepared pesto
½ cup grated Parmesan cheese
Freshly ground black pepper


Fill a large pot with water and bring to a boil.  Drop the sugar snap peas in the water for 15 seconds, then remove with a mesh strainer and immediately place in a bowl of ice water.  (Do not discard the boiling water.)  When the sugar snaps are completely cool, drain and pat dry, then cut into thin pieces on the diagonal.

Cook the pasta in the boiling water according to package directions, then drain.

While the pasta cooks, add the olive oil to a large skillet over medium heat.  Add the leek and sauté for a minute or two, then add the zucchini, peas, and diced asparagus stalks.  Sauté for 2-3 more minutes, stirring frequently, until the vegetables are crisp-tender.  Add the asparagus tips and sauté for one more minute. Remove the skillet from the heat.  Add the drained pasta, sugar snaps, and sautéed vegetables back to the pasta pot and toss, adding some of the pesto at a time, until the pasta is coated to your liking (it should be lightly coated).

Serve in shallow bowls topped with Parmesan and coarse black pepper.


Friday, May 22, 2015

Crab Fried Rice

Last Year's Post: Edamame Spread
Two Years Ago:  Sausage Sliders with Broccoli Rabe Pesto

There are usually several drawbacks to crab fried rice that you'll find in a restaurant: it contains large amounts of oil and sodium, but very little crab (and what's there is usually claw meat rather than lump crab).  Making your own solves all three, plus you can bump up the nutritional value by adding lots of veggies.  I like LOTS of crab so I did some investigating to discover where to buy the best crab without breaking the bank.  Outside of buying, cooking and shelling crabs yourself, I found the best source to be Costco.  They carry 1 pound tubs of lump crab for around $18, which is an excellent price compared to the smaller cans of crab most grocery stores carry.  (You can find the crab near the meat and deli area at Costco typically.  Not by the tires, underwear, or swing sets.  I love Costco.) It's worth it to check your local sources, especially if you have a good seafood market.  The crab makes all the difference.

Be aware that the rice needs to be cooked and refrigerated for at least several hours, so plan ahead or buy some at the Asian takeout counter in your grocery store.  The ingredient list may look a little long, but after you prep the ingredients it takes all of 10 minutes to stir-fry.  Prepping will take about 20 minutes.  The asparagus can be blanched while you're chopping (multi-tasking is a wonderful thing), and as you finish prepping each ingredient place it in its own little bowl so when you actually start cooking all you have to do is toss things into the pan.


This recipe calls for low-sodium soy sauce, so be sure to taste the rice right before serving to see if it needs a little more salt.  Or, let everyone season to their taste at the table.  And it only calls for a small amount of vegetable oil.  Control the sodium and fat, and bump up the veggies and crab for a better crab fried rice than you could get in any restaurant.


print recipe
Crab Fried Rice
Serves 4

Note: the rice should be cooked and refrigerated for several hours or overnight, so plan ahead.

1 cup uncooked jasmine rice
Pinch ground white pepper
Pinch granulated sugar
2 tablespoons low-sodium soy sauce
1 cup asparagus tips
1 tablespoon vegetable oil
2 large eggs
¼ small white onion, finely chopped
1 pound jumbo lump crabmeat, picked over for shells
1 clove of garlic, minced
5 scallions, white and light green parts, thinly sliced and divided
1 cup frozen peas, thawed
1 jalapeno, stemmed and seeds removed, minced
2 radishes, chopped
½ medium cucumber, thinly sliced into rounds
1 medium tomato--cored, halved and thinly sliced 

Bring 1 ¾ cups of water to a boil in a saucepan, then add the rice and stir.  Cover, turn heat to low, and simmer for 20 minutes, stirring occasionally.  Set aside to cool, then refrigerate covered for several hours or overnight.

Combine the pepper, sugar and soy sauce in a small bowl.  Bring a medium saucepan of water to a boil and drop in the asparagus tips.  Cook 2-3 minutes (depending on size) until crisp-tender, then immediately drop into a bowl of ice water to shock.  Drain and set aside. 

At this point you’re ready to start stir-frying, so be sure all ingredients are prepped and ready in small bowls because the process moves fast. Remove the rice from the refrigerator and fluff with a fork to separate any clumps before starting.

In a medium nonstick skillet or wok set over medium-high heat, add the oil and heat until shimmering, 1 to 2 minutes. Add the eggs to the skillet and stir constantly to scramble the eggs, cooking until the egg whites are set, 2 to 3 minutes.

Add the onion and cook, stirring occasionally, until the onion is tender, 3 to 5 minutes. Stir in the cooked rice, sauce mixture, and garlic and stir to combine. Add half of the scallions, peas, asparagus tips, jalapeno, radishes and crab.  Cook, tossing frequently for about 3 minutes, until the rice and crab are heated through and the sauce is incorporated.  Season to taste with salt and additional pepper.

Divide the fried rice between serving bowls and sprinkle with the remaining 1 tablespoon of scallions. Serve the fried rice alongside the sliced cucumbers and tomatoes.


Saturday, July 13, 2013

Shrimp Fried Rice

Last Year's Post: Tomatoes!

A couple of years ago we traveled to China because we wanted to see their culture while it's in rapid growth mode as they transition to capitalism.  The pace and scope of their growth is absolutely staggering.  For example, it's a really big deal when an American city has a new skyscraper of 75 or more floors being built, but there must have been over 100 skyscrapers under construction in Beijing alone.  We were on a tour and our guide proudly told us the public restrooms had been greatly improved in preparation for the Beijing Olympics, which had occurred the previous year.  Hoo boy.  All I can say is that I'm glad we didn't go before the Olympics.  All meals were provided on the tour, and dinners were inevitably what I came to term "spinner dinners" because they consisted of multiple dishes served family-style on a large Lazy Susan in the center of the table.  Some things we could identify, and some we couldn't.  When asked what any particular unidentifiable dish was, the answer (in very limited English) was usually "chicken".  Right.  Anyway, there was always a huge bowl of white rice but never any fried rice, which led me to believe fried rice may be more of an American Chinese food tradition.

I think fried rice is something most people like but would regard as somewhat of a guilty pleasure.  It is, after all, typically fried in copious amounts of oil.  The good news is that you can make it at home and cut down on the oil and sodium while amping up the fresh veggies to make it healthier and just as good as any restaurant.  The other advantage of making it rather than buying it is that you can use up any leftover meat or vegetables you have on hand, or take advantage of whatever is in peak season at the farmer's market.  The end result either way will be much more fresh and appealing than takeout.

One of the unique garnishes that I've discovered for fried rice is shredded radishes, lightly seasoned with vinegar.  The peppery tart flavor and beautiful color are a wonderful contrast to the rice.  Although they're not essential to the dish, I would really encourage you to give the radishes a try.  It makes the dish kind of special.


There are only two key things that you need to know about making fried rice successfully, and they both involve the rice.  First, the rice must be cooked and be completely cold before you start cooking, so plan in advance and cook it the day (or morning) before you plan to serve it.  If it's not cold, the grains stick together and become a big lumpy mess.  The second tip is to spread the rice in the pan, press it down, and let it cook for a while to get a little crispy before stirring it. This is not stir-frying where your utensils and the food are in constant motion - that part comes later when you add the other ingredients.  You want the rice to have some crispy bits for flavor as well as texture.

I started with some beautiful raw shrimp but chicken, pork, duck, or any other meat would also work.  I like medium-sized shrimp for this dish because they're just the right size to pop whole into your mouth after removing the tail.


For the vegetables, I chose a combination of regular peas, sugar snap peas, and snow peas but you could use literally any vegetables you like.


The vegetables are briefly blanched in boiling water, then shocked in ice water to stop the cooking process.


The shrimp and eggs are cooked and removed from the pan, then the rice is added.


After the rice is cooked all the other ingredients and sauce are added to the pan and stir-fried until hot.  Yum.


printable recipe
Shrimp Fried Rice
Serves 4

1 cup thawed frozen peas
1 cup sugar snap or snow peas (or a combination), ends trimmed
2 eggs, beaten
Salt and pepper
3 tablespoons vegetable oil, divided
1 cup finely chopped yellow onion
½ lb peeled and deveined medium raw shrimp (31-40 per pound)
2 garlic cloves, minced
2 teaspoons grated fresh ginger
3 cups cooked and cooled brown or white rice (approximately 1 cup uncooked)
1 cup coarsely shredded radishes (about 5 large)
1 tablespoon rice vinegar
3 tablespoons low-sodium soy sauce (plus more to pass at the table)
2 teaspoons toasted sesame oil


Blanch the thawed peas and sugar snap or snow peas by dropping in boiling water for 30 seconds, then drain and immediately submerge in ice water.  Drain again.  Cut the sugar snaps or snow peas into ½ inch pieces.  Set aside.

Heat a large non-stick skillet over medium-high heat, then add one tablespoon of oil.  Add a pinch of salt and pepper to the beaten eggs, then add them to the pan and swirl to coat.  Cook for 30 to 45 seconds, then turn the eggs over and cook for another 10 seconds.  Remove from the pan and set aside.

Add ½ tablespoon of oil to the pan, then add the onion.  Reduce heat to medium and cook, stirring occasionally, for 2 minutes.  Add the shrimp and cook, stirring, until almost cooked through, another 3 to 5 minutes.  Add the garlic and ginger and cook, stirring, for 1 minute. Transfer the mixture to a bowl and return the skillet to the heat.

Add the remaining 1 ½ tablespoons of oil to the skillet, then add the rice, pressing it flat with the back of a nonstick pan-safe spatula.  Cook until the rice is slightly crispy, turning it over with the spatula, about 8 to 10 minutes.

While the rice is cooking, combine the radishes and vinegar in a small bowl.  In a second small bowl, combine the soy sauce and sesame oil.  Chop the egg and add it along with the peas and sugar snap or snow peas to the bowl with the shrimp.

When the rice is nicely crisped, add the contents of the shrimp bowl and the soy sauce mixture to the skillet and cook, stirring, until the mixture is heated through.  Serve in bowls and top with radishes.

Serve with extra soy sauce on the side.

Friday, April 26, 2013

Pasta Primavera

Last Year's Post: Special Brunch - Egg Strudel

Pasta Primavera literally means "spring pasta" and it's one of the first dishes I think of in spring.  It's characterized by light and fresh flavors, aromatic herbs, and beautiful, colorful vegetables.  Although many versions have a heavy cream sauce, somehow that doesn't seem like such a great idea when swimsuit season is around the corner.  This version is originally from Cooking Light magazine and although the sauce tastes very luxurious, it's great to know that it fits within a healthy lifestyle.  The sauce contains a small of amount of cream and white wine which both add to the rich flavor without adding a lot of calories or fat. Lemon juice, garlic, grated fresh Parmesan and lots of parsley and basil make the sauce incredibly flavorful and fresh-tasting.   Some pasta primavera versions also add shrimp or chicken, but the traditional version is meatless.  Feel free to add either if you want a more substantial meal, but I like it just as it is.


Since vegetables are the focus, it's important that they're beautiful and perfectly fresh.  Baby vegetables are particularly appropriate in this dish, such as the tiny asparagus tips and miniature bell peppers that I found.  If you can find tiny carrots or pattypan squash they would be great also,  or feel free to substitute your favorite vegetables for any of the ones listed in the recipe.


Along the same lines, feel free to substitute your favorite type of the pasta for the bow ties - I just thought they looked festive.  The pasta, vegetables and sauce are tossed together for a minute or so over medium heat to allow the sauce to coat everything well, and the dish is served warm or at room temperature - perfect for a spring dinner.

printable recipe

Pasta Primavera
Serves 4

Note:  any combination of your favorite vegetables may be used – baby carrots, sugar snap peas, baby pattypan squash, zucchini, and yellow squash all work well.  Cooked chicken or shrimp may be added also.

8 ounces bow tie pasta (or penne or cavatappi)
3/4 cup frozen peas (not thawed)
1 ½ cups small asparagus tips
2 teaspoons olive oil
1 cup seeded and sliced multi-colored bell peppers
½ teaspoon salt
¼ teaspoon freshly ground pepper
2 garlic cloves, minced
¼ cup dry white wine
1/3 cup whipping cream
1 tablespoon fresh lemon juice
¼ cup grated fresh Parmesan cheese
¼ cup thinly sliced fresh basil
¼ cup chopped fresh parsley
Lemon slices or quarters for garnish (optional)


Bring a large pot of water to boil and add pasta; cook according to package directions.  During the last minute of cooking, add the peas and asparagus tips to the pasta water (if the asparagus tips are medium to large, increase cooking time but still add the peas during the last minute).  Drain and return to the cooking pot.

While the pasta is cooking, heat oil in a medium non-stick skillet over medium-high heat.  Add peppers; sauté 1 minute.  Add salt, pepper and garlic; sauté 2 minutes.  Stir in wine, then add cream and juice and cook 1 minute.  Pour the sauce over the hot pasta vegetable mixture; add cheese and toss for a minute or so over medium heat to allow the sauce to coat all.  Remove from heat; stir in basil and parsley.

Serve in shallow bowls garnished with lemon (optional).

Friday, March 22, 2013

Egg Gratin

Last year's post: Rustic Egg Tart

This recipe would be great for Easter or Mother's Day brunch. It's different from typical egg dishes - omelets, frittatas, scrambled eggs, stratas or souffles  - because it's made with hard-boiled eggs, peas and green onions that are baked in a delicious cheese sauce. It can be assembled in advance so all you have to do is bake it before serving, which makes it great for entertaining. It's also perfect for an easy but impressive dinner any night of the week.

I used to make a similar version fairly often while in college because it was cheap and good, cheap being the most important of the two virtues at the time. That version called for some sort of cream soup but I try to avoid canned soups now due to their additives and high sodium levels, plus it's easy to make the sauce from scratch.  Have you looked at the ingredient list on a can of soup lately?

fun at the grocery store
Let's talk about eggs for a minute. Eggs have a number of good qualities and one drawback. The drawback is that they're fairly high in cholesterol so you don't want to eat them every day, but in my opinion that's outweighed by the good qualities. Eggs are all-natural and packed with a number of nutrients. One egg has 13 essential vitamins and minerals in varying amounts, high-quality protein, unsaturated fats and antioxidants, all for 70 calories. Eggs' nutrients can help you with weight management, muscle strength, eye health, brain function and having a healthy pregnancy. Particularly important for aiding healthy brain function and pregnancy is choline (pronounced KOH-leen), which is amply present in eggs. (Can you tell I've been doing research on the egg council website?)  This recipe calls for six eggs and feeds 4-5 people, so you're only consuming a little more than one egg per serving.

Is this considered a vegetarian meal?  Not to get overly detailed, but most people who describe themselves as vegetarians are actually lacto-ovo vegetarians if they eat eggs and dairy products. "Flexitarians" is a new term that describes people who eat a mostly vegetarian diet but occasionally eat meat.  Vegans, on the other hand, do not eat meat of any kind and also do not eat eggs, dairy products, or processed foods containing those or other animal-derived ingredients such as gelatin.  Undoubtedly that was way more than you really wanted to know, but basically I consider this a vegetarian meal.  Unless, of course, you add a garnish of some crispy bacon.  Umm, bacon.  (If you have vegetarian friends it would probably be a good idea to ask if they eat eggs before serving this dish.)

You could substitute spinach for the peas in the recipe, but my old version had peas so I like them for sentimental reasons. You could also substitute cheddar or swiss cheese for the Gruyere, and use English muffins or French bread instead of Italian bread - just be sure whatever bread you use is toasted or grilled until crisp to provide textural contrast to the creamy eggs.

Obviously the garnish is optional but I thought it made the plate look more springtime-ish and the daikon sprouts add a fresh taste with just the barest hint of radish spiciness.  Or there's always bacon. (If you're feeling wild and crazy you could even fry up some chorizo.)

There's a world of opinions regarding how to hard-boil eggs, the two issues being how to avoid a green ring around the yolk and how to make sure the shell is easy to remove.  All I can tell you is that I cook eggs the way my mother taught me and I've never had green rings and very rarely have issues with the shells.  Here's how: place the eggs in a small saucepan and just barely cover them with tap water.

Bring to a boil uncovered, then turn the heat down and simmer, covered, for 15 minutes.  Stick the saucepan in the sink and run cold water on the eggs for a couple of minutes to cool them down and stop the cooking process.  Done.

If you're planning to serve this for guests I would encourage you to buy a gratin dish because it looks so pretty.  Basically they're shallow baking dishes, usually oval in shape.  This dish is approximately 7.5" by 12" (not counting the handles) and the recipe fit perfectly.  If you plan to double the recipe larger gratin dishes are readily available.  Of course any regular baking dish will work but won't have quite the same wow factor.


printable recipe

Egg Gratin
Serves 4-5

6 hard-boiled eggs
2 tablespoons butter
3 tablespoons all-purpose flour
1 ½ cups milk (whole or 2%)
1 teaspoon salt, divided
½ teaspoon pepper
¼ teaspoon ground nutmeg
1 ¼ cups shredded cheese (Gruyere, cheddar or swiss)
4 green onions, sliced
1 cup frozen peas (not thawed)
paprika
daikon sprouts (optional)
crumbled cooked bacon (optional)
grilled or toasted Italian bread, French bread, or English muffins

Preheat the oven to 450d.

Grease a 6-cup (1.5L) gratin or casserole dish.  Slice the eggs crosswise into 5-6 pieces each and arrange in the dish. 

Reserving a few green onions for garnish, sprinkle the remaining green onions and the peas over the eggs.

 In a medium saucepan, melt butter over medium heat.  Stir in flour and cook, stirring, for about 90 seconds, without browning.  Gradually whisk in milk, then add ½ teaspoon salt, the pepper, and nutmeg.  Continue whisking and bring to boil; reduce heat and simmer for 2 minutes.  Remove from heat; stir in 1 cup of the cheese until melted.  Taste for seasoning and add the additional salt if needed.

 Pour the sauce evenly over the eggs, peas and onions to cover all.  Sprinkle with the remaining cheese.  

Bake on the oven’s center rack until bubbly and very slightly browned, about 25 minutes.  Turn the oven to broil and allow the dish to brown to your liking while watching closely, approximately 30-60 seconds.

Remove and garnish with paprika and the remaining green onions.

 Serve over grilled or toasted bread, garnished with daikon sprouts and/or bacon (optional).

Friday, March 8, 2013

Orange-Pecan Salmon with Three Pea Salad

Last Year's Post: Spinach Salad with Spicy Orange Dressing

Think Spring
For some reason this dinner says "spring" to me, although the ingredients are available year-round.  Maybe it's the beautiful green peas or the sweet-tart orange sauce on the salmon.  Whatever, if you find yourself longing for spring this is a great meal to make plus it's healthy.

The salmon is quickly marinated and then served with a unique and fabulous sauce made with orange marmalade, soy sauce, and chopped pecans. Although the salmon recipe specifies plain toasted pecans, I like to make a batch of spiced pecans to freeze and use for recipes like this in addition to topping salads or stir fries.  The sweet-spicy coating adds another layer of flavor to the dish without being overwhelming.

The three pea salad is made with sugar snap peas, snow peas, and green peas with a fresh and light vinaigrette.  It goes beautifully with the salmon.  Here's another idea - if you're planning Easter dinner, the three pea salad would be a fabulous side dish to an entree of ham along with some au gratin potatoes.  The pink ham and creamy white potatoes would look beautiful alongside the emerald green peas.  (I learned the importance of food colors on the plate from The Lawyer's parents, who are both artists.)
The recipe that was the inspiration for this salad included sour cream in the dressing.  I couldn't imagine covering up that beautiful green color with a creamy dressing so my version leaves it out.

After this meal we found ourselves with some leftovers and combined them the next day with some cooked brown rice for a great cold salad.  The orange sauce flavored the rice while the peas added crunch and the salmon added meatiness.  Yum.  Be sure to make extras!

Orange-Pecan Salmon printable recipe

Orange-Pecan Salmon

Serves 4
  
1 cup orange marmalade
½ cup reduced-sodium soy sauce
¼ teaspoon salt
¼ teaspoon pepper
4 6-oz salmon fillets, approximately 1” thick, skinned
1 cup toasted chopped pecans
  
In a small bowl, combine the marmalade, soy sauce, salt and pepper.  Pour 1/2 cup marinade into a large resealable plastic bag.  Add the salmon; seal bag and turn to coat.  Refrigerate for up to 30 minutes.  Set aside the remaining marinade.

Drain and discard marinade from salmon.  Place salmon in a greased 11”x7” baking dish and bake, uncovered, at 350d for 20-25 minutes or until the fish flakes easily with a fork.

In a small saucepan, bring reserved marinade to a boil; cook and stir until slightly thickened.  Serve sauce over the salmon; sprinkle with pecans.


Three Pea Salad printable recipe

Three Pea Salad
Serves 4
  
1 tablespoon minced shallot
1 tablespoon sherry vinegar
¼ cup extra-virgin olive oil
Salt and pepper
¼ lb sugar snap peas
¼ lb snow peas
6 oz frozen baby peas

In a large bowl, whisk together the shallot and vinegar.  Add the olive oil while whisking, then add salt and pepper to taste.  Set aside to allow the flavors to meld.

Trim the sugar snap peas and snow peas by cutting off the tough ends.  Bring a large saucepan of water to a boil.  Fill a large bowl with ice water.  Add the sugar snap peas to the boiling water and blanch for 20 seconds.  Add the snow peas and cook an additional 20 seconds.  Add the frozen baby peas and cook for 30 seconds longer.  Drain and immediately transfer the colander with the peas to the ice water to stop the cooking.  Drain again; spread the peas out on a clean towel and pat dry.

Add the peas to the dressing and toss to coat.


Friday, March 30, 2012

Spring Risotto


Risotto is a classic Italian comfort food consisting of creamy rice and Parmesan cheese. This recipe freshens up the classic for spring with the addition of peas, asparagus, smoked turkey (or ham), mozzarella, and pesto. It's a main dish entree that makes a complete meal when served with a salad.

For some reason I was always mildly intimidated by the thought of making risotto - I guess the process seemed somewhat mysterious and complicated. Turns out if you can use a spoon to stir you can make risotto. Even my friend John, who's been known to oven-roast tomatoes into charcoal briquettes, could handle this one.  (John says he put them in the oven, then forgot about them and went out with his buddies for the afternoon.  Lucky he didn't burn the house down.)

John's "oven-roasted" tomatoes
The only trick to making risotto is that you need to use arborio rice because it has a higher starch content than most rice varieties. The starch combines with hot broth as you stir to create the creamy sauce that's the hallmark of risotto.

My tip of the day is how to clean leeks.  Leeks are large, mild-flavored members of the onion family that are excellent at trapping dirt as they grow. I learned a great technique a few years ago regarding how to ensure you get them absolutely clean.  The trick is to slice them up first, then throw them into a strainer and lower the strainer into a large bowl of cold water.  Agitate the water with your hand to remove the dirt, then lift the strainer of clean leeks out of the bowl of water and drain.  Presto!  Clean leeks.  Much easier than trying to rinse them before cutting or trying to fish all the little pieces out of the water individually.

leeks in strainer in bowl of cold water

rinsed and drained

I think one of the reasons this recipe reminds me so much of spring is because of the wonderful green colors - from light to dark - of the leeks, asparagus, peas and pesto.  I hope you enjoy it!


* * click here for a printable recipe version * *

Risotto with Peas, Asparagus and Pesto
Serves 4

Kosher salt
3 leeks (white and light green parts only)
2 tablespoons unsalted butter
1 cup Arborio rice
½ cup dry white wine (optional)
2 cups fresh or frozen asparagus spears cut into 1” pieces
1 cup frozen peas, thawed
¾ cup diced smoked turkey or ham
½ cup pesto
1 cup diced fresh mozzarella
½ cup grated parmesan
pepper


Slice each leek lengthwise and then crosswise into thin slices. Rinse in cold water and drain. To make the broth, bring 6 cups of water and 1 teaspoon of salt to a simmer in a large pot over medium heat. Add the leeks and cook for 3 to 4 minutes; remove with a slotted sp[oon to a bowl. Adjust the heat to keep the broth at a gentle simmer.

Meanwhile, heat one tablespoon of butter in a wide saucepan over medium-high heat. Add the rice and cook, stirring, for one minute. Add the wine and cook, stirring, until almost evaporated, about one more minute. Add two cups of the hot leek broth to the rice and cook, stirring frequently, until almost absorbed, about 6 minutes. Adjust the heat to keep the risotto at a simmer during this process. Add one more cup of broth and cook, stirring, for three more minutes. Add the asparagus to the pot and stir for an additional two minutes, then add the leeks, peas, and one more cup of broth. Cook, stirring, until almost absorbed, about 5-6 minutes. Taste the rice to see if it’s al dente.

Stir in the turkey and remaining one tablespoon of butter. Remove from the heat and stir in the pesto, mozzarella, and parmesan. Taste and season with salt and pepper.