Friday, March 30, 2012

Spring Risotto


Risotto is a classic Italian comfort food consisting of creamy rice and Parmesan cheese. This recipe freshens up the classic for spring with the addition of peas, asparagus, smoked turkey (or ham), mozzarella, and pesto. It's a main dish entree that makes a complete meal when served with a salad.

For some reason I was always mildly intimidated by the thought of making risotto - I guess the process seemed somewhat mysterious and complicated. Turns out if you can use a spoon to stir you can make risotto. Even my friend John, who's been known to oven-roast tomatoes into charcoal briquettes, could handle this one.  (John says he put them in the oven, then forgot about them and went out with his buddies for the afternoon.  Lucky he didn't burn the house down.)

John's "oven-roasted" tomatoes
The only trick to making risotto is that you need to use arborio rice because it has a higher starch content than most rice varieties. The starch combines with hot broth as you stir to create the creamy sauce that's the hallmark of risotto.

My tip of the day is how to clean leeks.  Leeks are large, mild-flavored members of the onion family that are excellent at trapping dirt as they grow. I learned a great technique a few years ago regarding how to ensure you get them absolutely clean.  The trick is to slice them up first, then throw them into a strainer and lower the strainer into a large bowl of cold water.  Agitate the water with your hand to remove the dirt, then lift the strainer of clean leeks out of the bowl of water and drain.  Presto!  Clean leeks.  Much easier than trying to rinse them before cutting or trying to fish all the little pieces out of the water individually.

leeks in strainer in bowl of cold water

rinsed and drained

I think one of the reasons this recipe reminds me so much of spring is because of the wonderful green colors - from light to dark - of the leeks, asparagus, peas and pesto.  I hope you enjoy it!


* * click here for a printable recipe version * *

Risotto with Peas, Asparagus and Pesto
Serves 4

Kosher salt
3 leeks (white and light green parts only)
2 tablespoons unsalted butter
1 cup Arborio rice
½ cup dry white wine (optional)
2 cups fresh or frozen asparagus spears cut into 1” pieces
1 cup frozen peas, thawed
¾ cup diced smoked turkey or ham
½ cup pesto
1 cup diced fresh mozzarella
½ cup grated parmesan
pepper


Slice each leek lengthwise and then crosswise into thin slices. Rinse in cold water and drain. To make the broth, bring 6 cups of water and 1 teaspoon of salt to a simmer in a large pot over medium heat. Add the leeks and cook for 3 to 4 minutes; remove with a slotted sp[oon to a bowl. Adjust the heat to keep the broth at a gentle simmer.

Meanwhile, heat one tablespoon of butter in a wide saucepan over medium-high heat. Add the rice and cook, stirring, for one minute. Add the wine and cook, stirring, until almost evaporated, about one more minute. Add two cups of the hot leek broth to the rice and cook, stirring frequently, until almost absorbed, about 6 minutes. Adjust the heat to keep the risotto at a simmer during this process. Add one more cup of broth and cook, stirring, for three more minutes. Add the asparagus to the pot and stir for an additional two minutes, then add the leeks, peas, and one more cup of broth. Cook, stirring, until almost absorbed, about 5-6 minutes. Taste the rice to see if it’s al dente.

Stir in the turkey and remaining one tablespoon of butter. Remove from the heat and stir in the pesto, mozzarella, and parmesan. Taste and season with salt and pepper.

Friday, March 23, 2012

Rustic Egg Tart


If you would like to receive email notifications of  Cracked Pepper posts you can sign up at left.

Believe it or not, Easter is only about two weeks away.  How did that happen?   If you have thoughts of a special Easter breakfast or brunch, consider this Rustic Egg Tart.  It's easy to make and spectacular on the plate.  With a fruit salad, some juice and coffee, you have a delicious and special brunch. Oh, and don't forget the Peeps.

Puff pastry is one of my favorite magic ingredients and forms the basis for these individual tarts.  The pastry is partially baked, then topped with two cheeses, egg and bacon and placed back in the oven until the egg white is set.  The tart has great crispness from the puff pastry and bacon.  I experimented with adding arugula to the tart before it was cooked (below) or after it was cooked (above) - it works both ways or leave it out entirely if you're not a fan.


Although the recipe serves four, it's easily doubled if you're having guests - just use two baking sheets and rotate them after half the time in the oven.

Even though this tart works really well as a special breakfast, it works equally well as a light lunch or dinner with a salad.  I could see enjoying one of these tarts at room temperature in the spring sitting outdoors with The Lawyer and a nice glass of bone-dry rose wine.   Yum.

* * click here for a printable recipe version * *


Rustic Egg Tart
Serves 4

All-purpose flour, for dusting
1 sheet frozen puff pastry (half of a 17 to 18 oz package), thawed
2 strips bacon
1 ½ cups shredded havarti cheese
3 tablespoons shredded parmesan cheese
2 cups baby arugula (optional)
4 large eggs
Salt and pepper
Chopped fresh chives for garnish

Preheat the oven to 425d.  Line a baking sheet with parchment paper.  On a lightly floured surface, roll the puff pastry into a 12 inch square, then cut into four equal squares.  Transfer to the prepared baking sheet and prick all over with a fork.  Bake until golden, 8 to 10 minutes.

Meanwhile, cook the bacon in a medium skillet over medium heat, turning until crisp, 8 to 10 minutes.  Remove and drain on paper towels, then crumble.

Let the tart shells cool slightly on the baking sheets.  If the centers are very puffy, prick with a fork to deflate.  Sprinkle evenly with havarti, parmesan and optional arugula (alternatively, arugula can be placed under or around the tarts when served).  Make a shallow well in the cheese in the center of each tart.  Crack one egg at a time into a small bowl, then use the bowl to gently transfer the egg to the center of the tart.  Season eggs with salt and pepper and top with bacon crumbles.  Return the tarts to the oven and bake until the egg whites are set, 10 to 15 minutes.  Top with chives.


Friday, March 16, 2012

Swordfish en Papillote


Cooking something "en papillote" (pronounced en pa-pee-oh) is French for cooking it "in parchment" - basically cooking in a paper pouch to seal in moisture.  If you happen to be Italian, you would call it "al cartoccio".  Not only is it a great cooking method for delicate seafood or poultry because the food remains nice and moist, it's also high drama for dinner guests.  You serve the sealed pouches at the table so each guest can tear theirs open and breath the wonderful aromas.  People react as though they're opening a present - it's really fun.

When I was a kid in Girl Scouts we wrapped potaotes, onions and hamburgers in aluminum foil and grilled them over a campfire.  Basically it's the same thing although we called them hobo packets.  OK, probably some of you that know me well are scratching your heads at the thought of me as a Girl Scout.  Technically, I was a Brownie and didn't last long enough to be a Girl Scout.  I disliked selling cookies to strangers and thought the brown uniform was too ugly for words.  The green Girl Scout uniform is the second ugliest outfit in the world.  Why did someone think they should dress girls in tree colors?

Sorry, back to recipes.  This one features tender, moist swordfish and linguine in a very flavorful Mediterranean sauce that includes tomatoes, capers, roasted red peppers, and black olives.  The taste is as spectacular as the colorful presentation.

wax paper version

You can use either parchment paper or wax paper for your pouches - parchment paper is more traditional but wax paper shows off the beautiful colors.


parchment version

The only trick is how to cut and wrap the paper to ensure it looks pretty and stays sealed.  I'll show you step by step in the recipe below.

If you don't like swordfish you could try this with any fish you like, or with chicken breasts. As I said, the beauty is that the fish or meat is fully cooked but still very moist because it basically steams in the pouch.  The sauce recipe makes more than you'll need so you can have the leftovers on pasta later that week with a little parmesan sprinkled on top.  Yum.

* * click here for a printable recipe copy * *


Swordfish en Papillote
Serves 4

Note: this recipe makes about 1 quart of sauce. You will have leftover sauce that can be used to top pasta or chicken for another meal.

1 28 ounce can of whole plum tomatoes
Salt and pepper
1 tablespoon finely chopped fresh oregano leaves, or 1 teaspoon dried oregano
1 tablespoon finely chopped fresh flat-leaf parsley
1 tablespoon minced garlic
¼ cup minced red onion
2 tablespoons of rinsed and drained capers
½ cup roasted red bell peppers, coarsely chopped
12 pitted and sliced kalamata olives
2 tablespoons fresh lemon juice
½ teaspoon dried red pepper flakes
6 tablespoons olive oil, divided
½ lb dried linguini
4 large sheets of parchment paper or waxed paper or brown paper lunch bags
4 (5-6 oz) swordfish steaks

Drain the tomatoes and slice thinly lengthwise. Place in a large bowl and season with salt and pepper. Add oregano, parsley, garlic, onion, capers, peppers, olives, lemon juice, pepper flakes, and 4 tablespoons of olive oil. Stire gently to mix and set aside at least one hour for flavors to blend.


Preheat oven to 450d.

Bring a large pot of salted water to a boil and cook linguini until al dente. Drain and toss with remaining 2 tablespoons of olive oil. Reserve.

Trim the skin off the swordfish steaks and trim away any dark red areas. Salt and pepper on both sides.

Fold each sheet of parchment or waxed paper in half. Place the fold on the bottom edge. Starting at the right side, cut a large semi-circle with the fold as the spine and one end more pointed then the other.


Open the paper and place a small pile of linguini on one side, close to the fold. Top with a spoonful of tomato sauce to moisten the linguini. Lay a piece of swordfish on top and add another spoon of sauce. Season with salt and pepper.


Fold the other half of the paper over the fish. Starting at the flatter end of the semicircle (not the pointy end), fold 1-2 inches of the edge inwards. Work your way around the circle making a series of tight, overlapping folds to enclose the fish. When you reach the pointy edge, fold the last pleat several times and wrap it under the pouch.


(Alternately, place a small square of parchment or waxed paper on the bottom of four paper lunch bags, add the ingredients as described, and fold over the tops of the bags.)

wax paper version


parchment paper version

Place all bags or pouches on a baking sheet and bake for 15 minutes. To serve, transfer the bags to 4 dinner plates and let each diner cut open the package to enjoy the aromas.


Friday, March 9, 2012

Spinach Salad with Spicy Orange Dressing


The Lawyer and I over-endulged a little last weekend so it was time to even the scales with a nice light healthy dinner.  Although this spinach salad is light in calories and fat, it's loaded with vitamins and anti-oxidants.  It has such big, bold flavors and crunchy textures that it's very satisfying as a vegetarian entree, but you can amp up the protein if you want by adding some cooked crumbled bacon, grilled chicken or shrimp, or whatever.  We chose to add a little bacon since we had some in the freezer.  With a piece of crusty bread on the side it was a filling dinner.

We happen to like spicy foods, but I was reminded that not everyone shares our tastes when I was at a bridal shower recently and one of the participants pronounced a small tea sandwich as "too spicy" because it had black olive tapenade and feta cheese.  She didn't even get as far as the peppadew garnish. ( I thought it was the best sandwich out of the lot.)  Oh well, everyone's tastes are different.  This salad is spicy but not overly so, and you can control the amount of heat by varying the amount of red pepper sauce (or leave it out entirely).  You can also leave out the red jalapeno - I liked the way it looked a a garnish but I would certainly fine slice or mince it if you intend to eat it.


There are two ingredients in this recipe that you might not be familiar with - daikon sprouts and jicama.  Daikon sprouts are like alfalfa sprouts except they're from Japanese daikon radishes, so they have a slightly spicy radish-y flavor.  I found them in the produce section next to the alfalfa sprouts.  They're worth searching out because they go so beautifully in this salad but if you can't find them you can substitute alfalfa sprouts or bean sprouts.

Jicama is the other interesting ingredient.  Pronounced hi-ka-ma, it's the tuberous root of a native Mexican vine also called the Mexican Turnip.  It's not going to win any beauty contests anytime soon.


Jicama is typically peeled, cut up and eaten raw.  It has a crisp white interior (better-looking than the exterior) and a slightly sweet and starchy flavor somewhat reminiscent of a potato or an apple.


Along with the carrots and almonds, it adds great crunch to the salad in addition to a subtle sweetness. It can be found in the produce section near parsnips and turnips.  (Just tell your kids it's a fruit.)


Spinach Salad with Spicy Orange Dressing
Serves 4

1 cup orange juice
1 teaspoon honey
2 teaspoons sesame oil
1 tablespoon soy sauce
2 tablespoons rice wine vinegar
1 teaspoon hot red pepper sauce (optional)
1 shallot, chopped
2 teaspoons grated fresh ginger
6 cups washed baby spinach
1/3 cup julienned carrot
1/3 cup julienned jicama
1/3 cup daikon sprouts
1/3 cup sliced almonds, toasted
2 tablespoons mixture of black sesame seeds and white sesame seeds
Half a red jalapeno for garnish (optional)


For the dressing, cook the orange juice in a saucepan over medium heat until syrupy and reduced to approximately 3 tablespoons, about 15 minutes. Combine with the honey, sesame oil, soy sauce, vinegar, and hot sauce in a blender. Add the shallot and ginger and process until smooth. Store in the refrigerator.

For the salad, mix the spinach, daikon sprouts, carrot and jicama in a large bowl. Add the dressing and toss to coat well. Garnish with almonds, sesame seeds and red jalapeno (if using).


Optional: add crumbled cooked bacon, cooked sliced chicken or pork, or cooked shrimp


Friday, March 2, 2012

Lasagna Techniques


Everyone loves lasagna, don't they?  Yes, it's some work but it makes a lot and re-heats or freezes really well.  It's great for a weekend afternoon project.  I'd like to pass along three techniques that I've recently learned for making lasagna in addition to giving you a really good recipe in case you don't happened to have one from your great-grandmother.

1.  Lasagna is too big
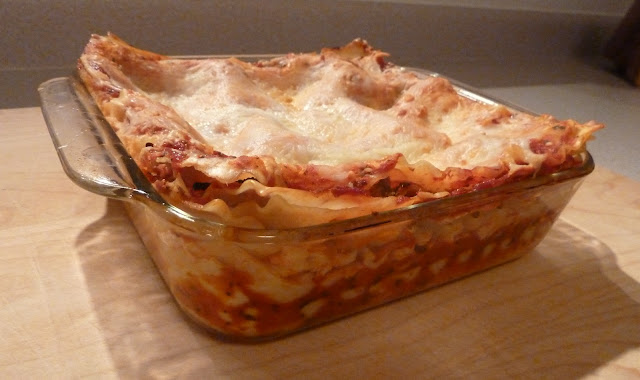
Not many of us have huge families any more and it seems a shame to reserve lasagna only for big parties.  If you make it for a small family, you end up eating it every day for the next two weeks which is probably not the best idea.  So what are you supposed to do with a 9x13 pan of lasagna?  Make two smaller pans. I used the following recipe that called for a typical 9x13 pan and instead used two glass dishes that were each about 8" square.  Have one for dinner and freeze the other one for later or give it to a friend or relative.  Why did it take my entire life for me to figure this out? 
baked and cooled - love the way the noodles rise at the corners
2. Lasagna tends to fall apart when you try to serve it
For greater structural integrity, place each layer of noodles in the opposite direction.  Again, why didn't I do this before?  Maybe because the noodles were sized to fit a 9x13 pan.  See #1 above.

3. Lasagna runs all over when you serve it
Take a tip from restaurants and bake the lasagna the day before you want to serve it.  It cuts into perfect, clean pieces the next day prior to re-heating.  This gives you the added benefit of being able to serve lasagna any night of the week.


The following recipe is slightly unusual in its use of zucchini and cremini mushrooms (I always like recipes with lots of vegetables).  Italian sausage is the protein - you can choose a pork or turkey version, mild or spicy.  (You could even use a vegetarian sausage.) We recently made this recipe for The Lawyer's parents (who can't tolerate much spice) so their pan was mild but we added crushed red pepper flakes to our pan.  Everybody was happy.  By the way, if you happen to have roasted tomatoes left from last summer (see my August post), they make a fabulous addition to lasagnas.

One last thought - when The Lawyer and I were making the lasagna for this post (yes, he helps) he asked me why it didn't call for no-cook noodles.  The reason is structural integrity - how the lasagna holds together when you cut and serve it.  This recipe has good structural integrity due to three reasons - the ratio of sauce to noodles, the slight overlapping of the individual noodles, and criss-crossing the noodle layers.  If you use no-cook noodles you have to use more sauce because the noodles absorb moisture as they cook.  You shouldn't overlap them because they expand in all directions as they absorb moisture, and it's harder to criss-cross the layers because you can't neatly cut them to size.  You could try breaking them but that sounds a lot harder.  So, if you value the convenience of no-cook noodles and don't care that the lasagna layers might slide around a little on your plate, go ahead and use them.

* * click here for a printable recipe * *


Lasagna
Makes 1-9x13 pan or 2-8x8 pans

1-1/2 (16 oz) boxes of lasagna noodles
Olive oil
1 pound Italian sausage (hot or mild or a mix)
4 cloves garlic, smashed, divided
Crushed red pepper flakes
1 (12 oz) package cremini mushrooms, stems removed and caps sliced
1 large zucchini, cut in quarters lengthwise and sliced crosswise
2 cups ricotta
2 cups grated parmesan, divided
2 eggs, lightly beaten
6 to 7 fresh basil leaves, cut into chiffonade
1 large jar marinara sauce (or homemade)
1 pound grated mozzarella

Bring a large pot of salted water to a boil. Working in batches, cook the lasagna noodles until they’re soft and pliable but not limp, 6-7 minutes. Remove from the water and lay flat on parchment paper or a sheet tray to cool.

In a large sauté pan, place 1 tablespoon of olive oil over medium-high heat. Remove the sausage from casings, add to the pan and cook, breaking up with a wooden spoon, until brown and crumbly. Remove from the pan and reserve on paper towels.

Pour the fat from the pan and add new olive oil together with 2 cloves of garlic and a pinch of crushed red pepper over medium heat (be careful not to burn the garlic). When the garlic becomes very aromatic, remove it from the heat and discard. Add the mushrooms to the pan and season with salt. Cook until the moisture has evaporated and the mushrooms are golden, 4 to 5 minutes. Remove from the pan and reserve. Repeat the process with the remaining garlic and zucchini.

In a small bowl, combine the ricotta, half the parmesan, the eggs, and the basil. Mix to combine well and season with salt.

Preheat the oven to 350 degrees.

Spray a 9x13 deep baking dish (or two 8x8 baking dishes) with non-stick cooking spray. Spread the bottom of the dish with marinara sauce. Arrange a layer of lasagna noodles, overlapping slightly (cut to fit if needed). Spread 1/3 of the ricotta mixture over the noodles. Arrange a second layer of noodles over the ricotta in the other direction. Spread a light layer of sauce, then add 1/3 of the sausage, 1/3 of the mushrooms, and 1/3 of the zucchini. Sprinkle a layer of mozzarella and some of the remaining parmesan over the vegetables. Repeat these layers until all ingredients have been used up and the pan(s) are full. Be sure there is a layer of pasta on top covered with sauce and sprinkled with mozzarella and parmesan. Cover with foil.

Place the lasagna on a baking sheet and bake in the oven until hot and bubbly, about 75 minutes, removing the foil for the last 20 minutes or so. Let cool for 20 minutes before slicing.

May be baked in advance and reheated for the most perfect slices. May be frozen, baked or unbaked. Thaw overnight before baking or reheating.