Friday, February 21, 2014

Power Muffins

Last Year's Post: Sloppy Joes for Grownups
Two Years Ago:  Very Lemon Chicken and Fruited Couscous

Everybody likes muffins, and you might even be fooled into thinking that they're better for you than, say, a breakfast sandwich when faced with the choice at your favorite coffee shop.  But the culprits in muffins are calories and fat, even if the name sounds healthy.  For example, a Dunkin' Donuts Honey Bran Raisin Muffin has 500 calories and 14 grams of fat.

This recipe is different - packed with carrots, apples, flax seed and oat bran, it's good for you and delicious. Think of it as a healthy version of a Morning Glory muffin. Really, how can anything be bad when it starts with fresh foods like this?


When made in a medium size (remember medium-sized food?) each muffin has about 220 calories, 9 fat grams, 5 grams of protein and a bunch of great vitamins and minerals, especially potassium and vitamin A.  One muffin makes a healthy breakfast with some yogurt, or a perfect mid-morning or after-school snack for kids. It's filling but not heavy, moist and flavorful with the heady scent of cinnamon, cloves and nutmeg.  If you need an energy boost after a hard workout this would be a good choice to keep you on track and energized.  One recipe makes about 16 muffins which keep perfectly in the freezer so it's easy to grab one on the go.

The recipe calls for peeled and cored apples, which has always caused me some trauma because apples are so round.  My grandmother was one of those people who could peel an apple with a paring knife in one long continuous peel, but then again she had apple trees in her back yard and made zillions of apple pies in her lifetime.  I not only can't peel an apple that way, I really don't want to learn so I have my own peculiar way of peeling apples.  I start by cutting the apple down the middle and then each half again to make four quarters using a big chef's knife.  Then I switch to a smaller knife to cut out the core part from each quarter and cut each quarter yet again into two pieces.  I lay each piece on its nice flat side and use the small knife to cut the peel off.  It's probably more time-consuming, but I'm not going to cut myself and it works.


After peeling and shredding the apples and carrots, it's really just a matter of measuring, mixing and baking.  I sprinkled some coarse sugar on the top for a little crunch and sparkle, but that's up to you.  One last thought - you can find ground flax seed and oat bran at your local health food store.


printable recipe
Power Muffins
Makes approximately 16 medium muffins

Note:  Each muffin has about 220 calories, 9 grams of fat, 35 carbohydrate grams and 5 grams of protein.  They’re nutrient-packed and a particularly good source of potassium and vitamin A along with other vitamins and minerals.


1 ½ cups all-purpose flour
¾ cup ground flax seed
¾ cup oat bran
1 cup brown sugar
2 teaspoons baking soda
1 teaspoon baking powder
1 teaspoon salt
2 teaspoons cinnamon
¼ teaspoon ground cloves
1/8 teaspoon ground nutmeg
¾ cup skim milk
2 tablespoons vegetable oil
2 eggs, beaten
1 teaspoon vanilla extract
2 cups shredded carrots
½ cup raisins
2 apples, peeled, cored and shredded
1 cup chopped toasted pecans or walnuts
Sparkling (coarse) sugar, optional

Preheat oven to 350d.  Grease muffin pan or line with paper muffin liners.

In a large bowl, mix together flour, flax seed, oat bran, brown sugar, baking soda, baking powder, salt, cinnamon, cloves and nutmeg.  Add the milk, eggs, vanilla and oil and mix until blended.  Stir in the carrots, apples, raisins and nuts.  Fill prepared muffin cups ¾ full, or paper liners to just under the top of the paper.  Sprinkle the tops with sparkling sugar, optional.


Bake at 350d for 22-25 minutes until a toothpick inserted into the center of a muffin comes out clean.  Cool before removing from the pan.

Friday, February 14, 2014

Wild Mushroom and Gruyere Quiche

Last Year's Post:  Wild Mushroom & Wild Rice Chicken Soup
Two Years Ago:   Turnovers

Quiche is very versatile in terms of working well for brunch, lunch or dinner.  The only issue with quiche is getting it out of the dish neatly, even after it rests for a while. (And those of you who know me know I am ALL about neatness.) I have two suggestions for how to get around that issue.  The first is to make individual little quiches, which was my solution for years.  It does, however, require a little more work and some specialized pans that are available in gourmet kitchen stores.


Although I called that a solution, it's really more an avoidance of the original problem.  There is basically only one solution for neatly cutting a whole quiche - make it in advance and refrigerate it, then cut and reheat. If you've ever wondered how restaurants serve such nice neat slices, that's their secret. (The same thing works for pies and lasagna.)

Here's the difference between cutting a slice after the quiche rests for 30 minutes out of the oven (top) and the next day (bottom).


If you don't care whether your slices are perfect or you can't wait because your wild mushroom quiche smells that good or you really like the gooey cheesiness of it all, by all means dig in.  If you're having company for brunch and want it to look really pretty, make it in advance.  The other bonus is that you won't have to worry about any extra liquid in the dish.

OK, so enough about technique.  I chose this particular quiche because I really like the starring role the wild mushrooms play with nutty Gruyere cheese as the perfect complement.  They're left in chunks and browned until they're deeply flavorful and earthy, and there's lots of them.  I used oyster mushrooms, creminis, and shiitakes but you can use all of one or two types if you want.


After cleaning and trimming the stems, cut them into chunks and saute (the mushrooms shrink quite a bit as they lose their liquid). Sauteing until browned is the secret to great flavor.


The mushrooms have such deeply earthy flavor that the quiche makes a very satisfying dinner paired with a fresh green salad and crusty bread.  One other note - the recipe calls for a 9" deep dish pie pan, but a regular 9" pan will also work as long as your crust didn't slip down the side when it was first baked.  Just make sure the pan isn't full to the very top of the crust before baking or it may leak a bit as it bakes and puffs.

printable recipe
Wild Mushroom and Gruyere Quiche
Serves 6-8

 Note:  For the most perfect slices, bake the quiche a day in advance and refrigerate.  Cut slices and reheat.

2 tablespoons (1/4 stick) butter
2/3 cups chopped shallot (about 3 medium)
12 to 14 ounces assorted wild mushrooms (such as shiitake, oyster, cremini)
1 homemade or refrigerated pie crust
3 large eggs
2/3 cup half and half
1/3 cup milk
½ teaspoon salt
½ teaspoon black pepper
1 tablespoon chopped fresh thyme
1 ½ cups (packed) coarsely grated Gruyere cheese (about 5 ounces), divided

Wipe mushrooms with a clean damp cloth to remove dirt.  Remove shiitake stems completely and slice the ends off the stems of other mushrooms.  Cut mushrooms in half or quarters depending on their size and shape to create pieces of ½ - ¾” in size. 

Melt butter in a large heavy skillet over medium-high heat.  Add shallots; sauté until beginning to soften, about 2 minutes.  Add mushrooms; sprinkle with salt and pepper and sauté until mushrooms have released their liquid, are tender and beginning to brown, about 9-10 minutes.  Set aside to cool.

Preheat oven to 450d.  Press the pie crust firmly onto the bottom and sides of a 9” deep-dish glass pie plate.  Bake until light golden brown, pressing on sides of crust with back of spoon if crust begins to slide down sides of dish, about 12-13 minutes.  Remove to cool slightly.  Reduce oven temperature to 325d.

Whisk eggs, half and half, milk, ½ teaspoon salt, ½ teaspoon pepper and thyme in a large bowl to blen.  Stir in 1 cup of grated Gruyere.  Place the sautéed mushrooms in the pie crust and pour the filling over the mushrooms.  Sprinkle the remaining ½ cup cheese over the top.


Bake until the quiche is puffed, golden brown, and just set in the center, about 45 minutes.  Cool 30 minutes before serving.

Friday, February 7, 2014

Sesame Seed Chicken Salad


Last Year's Post: Linguini alla Puttanesca
Two Years Ago:  Chicken, Gruyere and Fig in Puff Pastry

Salads are a great addition to your weekly dinner rotation during the summer of course, but also during the winter because they're a light and healthy change of pace from heavier winter foods .  The thing that's interesting about this chicken salad is the maple syrup/mustard and sesame seed coating on the chicken, which gives it great crunch and flavor.  It almost tastes deep-fried although it's not.  A combination of black and white sesame seeds is particularly dramatic, but all white seeds would be just as good if you don't want to buy black sesame seeds.  If you're interested, you can buy black sesame seeds at my favorite spice store, Penzeys, here or at your local Penzeys if you're lucky enough to have one in your city.

I also found some great multi-colored cherry tomatoes at my local natural foods store that add color to the salad.


Adding color to your food whenever possible makes it much more visually appealing.  In addition to the tomatoes, chicken and lettuce, the salad contains cucumber and cheese.  I prefer to use English cucumbers (the long thin cucumbers wrapped in plastic wrap) because they have a thinner skin and fewer seeds than regular cucumbers, plus I don't like the waxy coating they (whoever they are) put on regular cucumbers.


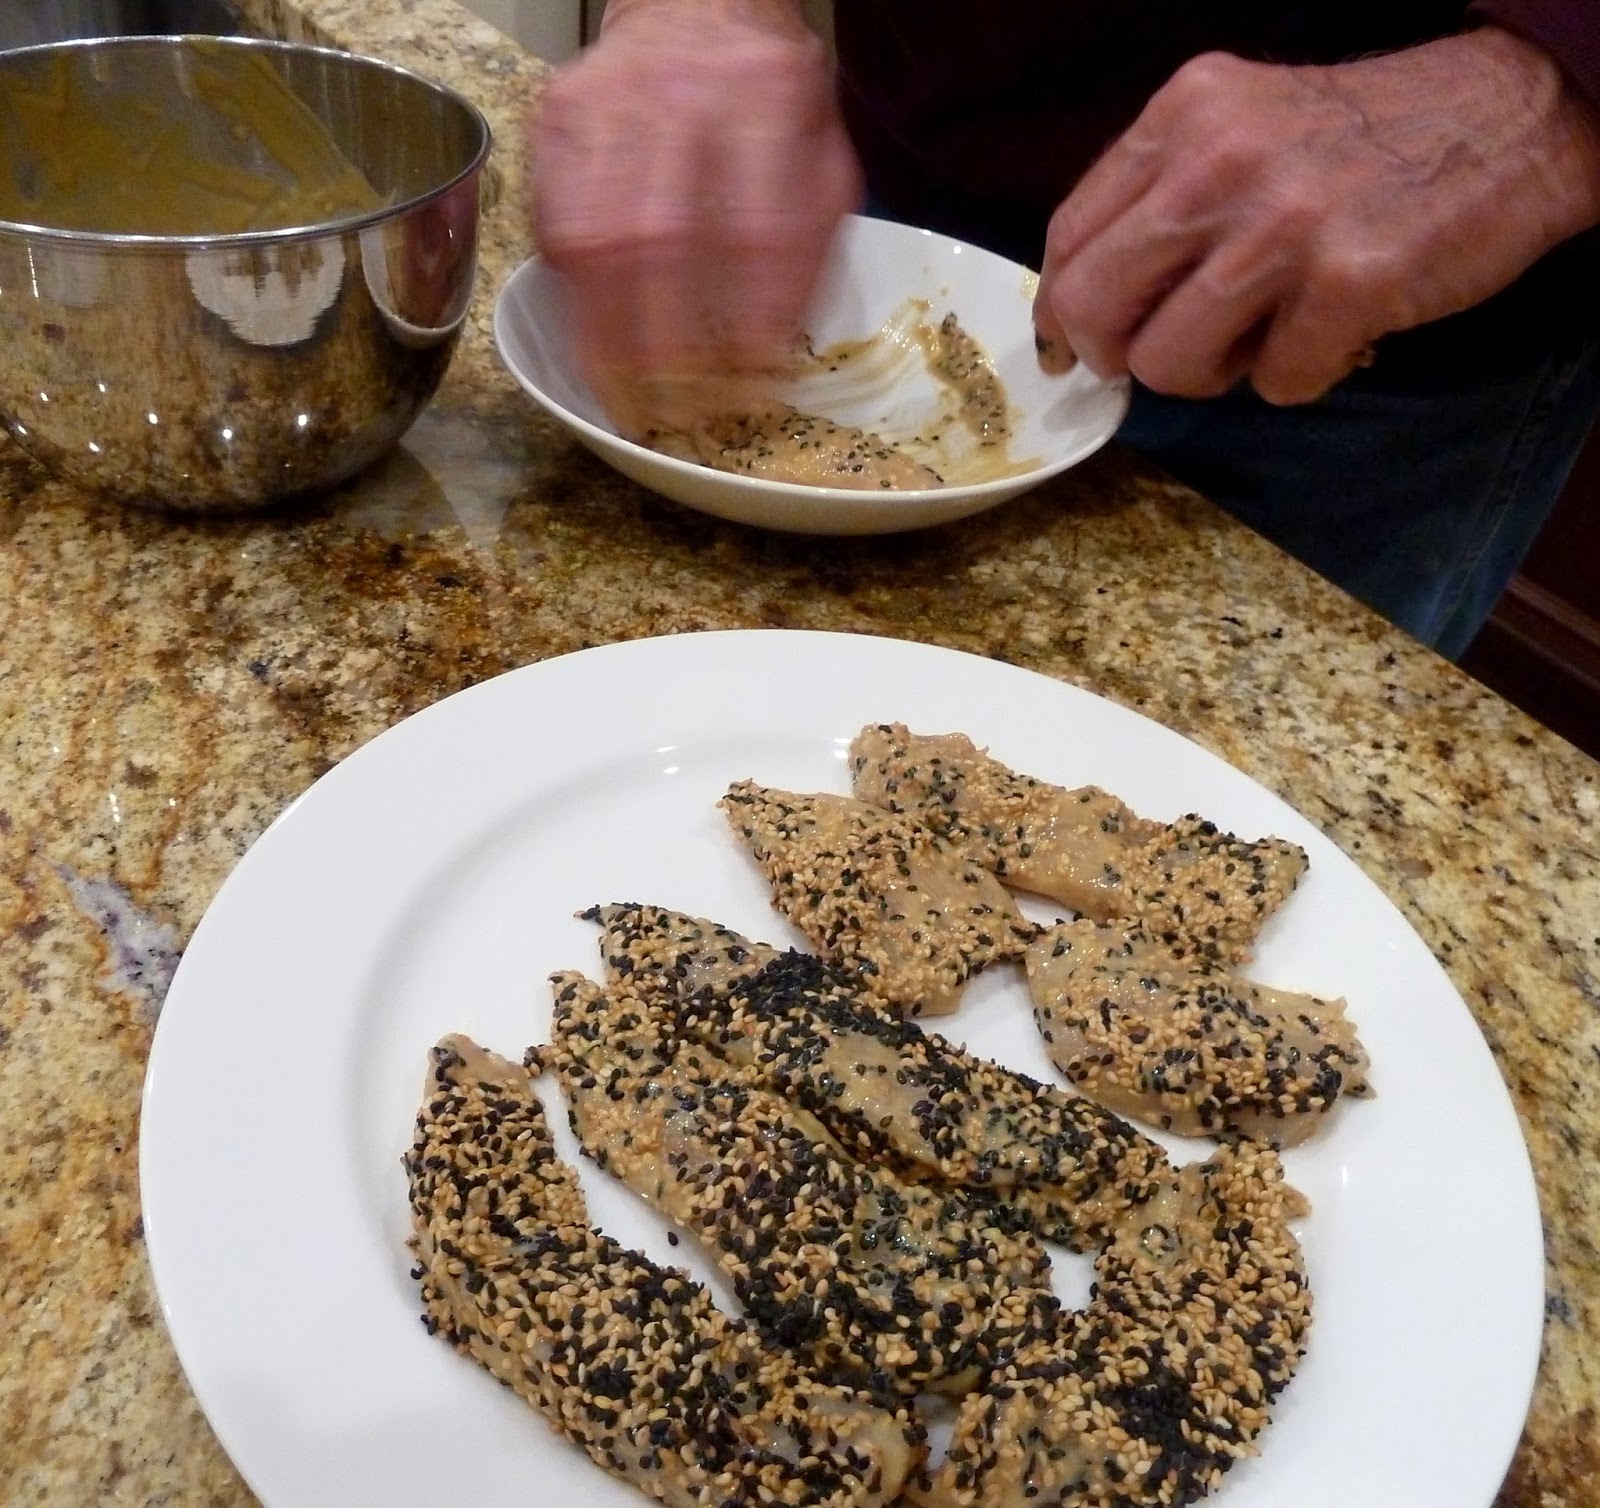
The original recipe called for chicken tenders, but a large boneless skinless chicken breast is just as easy to use - all you have to do is cut it into pieces that are about 1- 1 1/2" in diameter and 3-4" long.  The chicken pieces are marinated in a maple syrup and mustard mix for an hour, then rolled in sesame seeds and cooked in a skillet for just a few minutes.  While the chicken is marinating you can make the vinaigrette and chop the salad ingredients, so all you have to do is assemble and serve the salad while the chicken is done.  Easy and healthy!


printable recipe
Sesame Seed Chicken Salad
Serves 4 as a main dish

For the Dressing:
2 large garlic cloves, minced
1 tablespoon Dijon mustard
½ teaspoon salt
¼ teaspoon sugar
¼ teaspoon pepper
¼ rice wine vinegar
1/3 cup vegetable oil

For the Salad:
½ cup Dijon mustard
1/3 cup pure maple syrup
1- 1/3 lbs chicken tenders, or boneless skinless chicken breasts cut into pieces approximately  1 - 1 ½ “  in diameter and 3-4” long
2/3 cup sesame seeds (preferably a mixture of black and white)
2 tablespoons vegetable oil
2 (5-oz) bags mixed baby greens
½ English cucumber, unpeeled
16 – 20 cherry tomatoes, cut in half
1 cup crumbled feta or goat cheese


For the dressing, whisk all ingredients in a bowl or shake in a jar.

For the chicken, whisk mustard and syrup in a bowl to blend.  Add chicken and marinate 1 hour in the refrigerator.

While the chicken is marinating, cut the cucumber in half lengthwise and use a small spoon to remove the seeds.  Cut crosswise into slices.

After the chicken has marinated, remove from the marinade and shake off any excess.  Place the sesame seeds in a shallow bowl and roll the chicken in the seeds to coat on all sides.  Sprinkle with salt and pepper. 

Heat 1 tablespoon of vegetable oil in a large nonstick skillet over medium-high heat.  Place half the chicken pieces in the skillet and sauté until just cooked through, about 2 minutes per side.  Remove the cooked chicken pieces and repeat with the other tablespoon of oil and remaining chicken pieces.


Toss the lettuce, tomatoes, and cucumber with dressing and serve with the cheese and chicken pieces on top.

Friday, January 31, 2014

Raspberry Dark Chocolate Wonton Cups

Last Year's Post: Banh Mi
Two Years Ago:  Tuxedo Strawberries

Raspberry and dark chocolate, what more do you need to say?  Valentine's Day is coming up, and these little cups would make a very special treat.  For that matter, they're perfect for any time when you want a little special dessert and would also be great as a sweet alternative for an appetizer party or for a Easter or Mother's Day brunch.

Although they look fancy, they're very easy to make - just bake some wonton wrappers in a mini-muffin pan, and fill with whipped cream, chocolate shavings, and a raspberry.  Start to finish this project took about 45 minutes, and most of that was spent waiting for the oven to heat or for the wonton cups to cool.  You can make your own whipped cream, or whipped topping from the store will work just fine.  This will probably be best made on the same day you plan to serve them, and I wouldn't fill them very far in advance so the whipped cream doesn't soften the wonton cups.

You can make your own variations by substituting chocolate (or other flavored) pudding for the whipped topping, white chocolate for dark, blackberries for raspberries, etc.  Whatever combination you use will be delicious, impressive and pretty.


printable recipe
Raspberry Dark Chocolate Wonton Cups
Makes 12 cups

12 wonton wrappers
1 tablespoon melted butter
1 tablespoon white sugar
½ cup dark chocolate shavings
¾ cup sweetened whipped cream or nondairy whipped topping
12 fresh raspberries

Special equipment: mini-muffin pan


Preheat oven to 350d.

Brush wonton wrappers with butter and sprinkle with sugar.  Press sugar side up into ungreased miniature muffin cups.  Bake at 350d for 5-7 minutes until crisp and lightly brown.   Transfer wrappers to a wire rack to cool.


Spoon whipped cream or topping into each muffin cup.  Top with chocolate shavings and a single raspberry.

Friday, January 24, 2014

Coq au Vin

Last Year's Post: Lobster with Pasta and White Wine-Butter Sauce
Two Years Ago:  Lemon Chicken and Fennel Pot Pies

Coq au Vin (coke oh vah) is one of the most famous chicken dishes in the world, and justifiably so.  Made with red wine, bacon, mushrooms and garlic, really, what's not to like? Julia Child often made Coq au Vin on her cooking show and it was considered her signature dish.  Although a traditional Coq Au Vin uses a whole cut-up chicken and takes a really long time to make, I was happy to discover this recipe that uses boneless skinless chicken thighs and has very authentic flavor even though it only takes about 1-1/2 to 2 hours to prepare.  Still, 2 hours are 2 hours so this is probably best made on a leisurely Sunday afternoon, say, when the windchill is about zero.  It reheats beautifully so you could then enjoy it any night of the week and it's a perfect winter comfort dish.

Having said that, we decided to make it on a Monday night for some reason.  It took even longer than 2 hours because when we bought the giant package of chicken thighs at Costco we neglected to notice that they were skin-on and bone-in.  How could we not notice that?  We were probably distracted by the display of car tires in the next aisle, or the giant screen TVs on the other side.  Really, you gotta love Costco.

The Lawyer spent a fair amount of time learning how to bone and skin chicken thighs that night and is not looking forward to the other four packages in the freezer.  If you actually look at the package and manage to buy boneless skinless chicken thighs successfully (unlike us), the recipe is really quite easy.  The reason it takes a while is because you brown different ingredients in succession in the same pot, then simmer everything together for a while, then reduce the sauce some more.  Believe me, it's so worth it.  The flavor is rich and deep and just begs to be served with mashed potatoes to sop up the sauce.

For one small minute I considered buying fresh pearl onions after noticing them in the produce aisle at the grocery store.  Luckily, the original recipe stated that frozen pearl onions were just as good in the finished dish and much easier to deal with.  Can you imagine peeling 24 teeny tiny onions that are about 1/2" in diameter?  Having done some equally silly things in my past (peeling individual chickpeas for hummus comes to mind.....vividly) I don't want to go down that road again.

First you start simmering the sauce with some herbs.


While the sauce simmers, you cook the bacon and then brown the chicken in the same pot the bacon cooked in.


Then you remove the chicken and brown the onions and mushrooms in the same pot.


The sauce, chicken and bacon go back into the pot with the mushrooms and onions to cook until the chicken is tender.


Finally, you remove the chicken one last time and reduce the sauce even more before serving the delicious finished dish.


If you've ever enjoyed Coq au Vin at a French restaurant or just want to up your game with a classic French recipe, give this one a try.

printable recipe
Coq au Vin
Serves 4-6

1 bottle (750 ml) red wine (Pinot Noir or Rhone Valley Grenache), divided
2 cups chicken stock
10 sprigs fresh flat-leaf parsley plus 2 tablespoons minced parsley, divided
2 sprigs fresh thyme
1 bay leaf
4 ounces bacon, cut into ¼” pieces
8 boneless skinless chicken thighs, trimmed of fat and cut in half crosswise
Salt and freshly ground pepper
5 tablespoons unsalted butter, divided
24 frozen pearl onions (about 1 cup) thawed and patted dry
8 ounces cremini mushrooms, cleaned, stems trimmed, halved if small, quartered or cut into 6 if large
2 garlic cloves, minced
1 tablespoon tomato paste
2 tablespoons flour

In a large saucepan over medium-high heat, combine all but 1 tablespoon of the red wine (reserving for later use), chicken stock, parsley sprigs, thyme and bay leaf and bring to a simmer.  Cook until mixture is reduced to 3 cups, about 20 to 25 minutes.  Discard herbs and reserve the wine mixture.

Meanwhile, in a large Dutch oven over medium heat, cook bacon stirring occasionally until browned, 7 to 8 minutes.  Using a slotted spoon, transfer bacon to a paper towel-lined plate.  Reserve 2 tablespoons bacon fat in a small bowl and discard the remainder. 

Lightly season chicken with salt and pepper.  Return Dutch oven to medium-high heat.  Add 1 tablespoon of bacon fat and heat until almost smoking.  Add half of the chicken in a single layer and cook until lightly browned, about 2 minutes per side.  Transfer cooked chicken to a bowl.  Add the remaining tablespoon of bacon fat and heat until almost smoking, then repeat with the remaining chicken.

Melt 3 tablespoons butter in the now-empty Dutch oven over medium-high heat.  When foaming subsides add pearl onions and mushrooms and cook, stirring occasionally until lightly browned, 5 to 8 minutes.  Reduce heat to medium, add garlic and cook until fragrant, about 30 seconds.  Add tomato paste and flour and cook, stirring frequently until well-combined, about 1 minute.

Add reduced wine mixture, scraping the bottom of the pot with a spoon to loosen browned bits.  Add ¼ teaspoon pepper, cooked chicken (and their juices) and cooked bacon.  Increase heat to high and bring to a boil.  Reduce heat to medium-low, cover pot and simmer until chicken is tender, about 25 minutes, stirring halfway through cooking time.


Using a slotted spoon, transfer chicken to a large bowl and tent with foil to keep warm.  Increase heat to medium-high and simmer until sauce is thick and glossy and measures about 3 ½ cups, about 5 minutes.  Remove from heat, stir in remaining 2 tablespoons butter and reserved 1 tablespoon wine.  Season to taste with salt and pepper.  Return chicken to pot.  Top with minced parsley to serve.

Friday, January 17, 2014

Lobster and Shrimp Gratin

Last Year's Post: Italian Sausage and Wild Mushroom Risotto
Two Years Ago:  Salmon with Pumpkin-Seed Cilantro Pesto

I'm posting this recipe now because Valentine's Day is coming up and you might be thinking about making a special meal.  If you love seafood, this is a great way to enjoy a very special meal without breaking the bank.  I made this gratin with lobster and shrimp, but you could use all lobster or all shrimp or even crab.  The sauce is rich and creamy, and the breadcrumb topping adds a wonderful crunch.  Served over pasta, the gratin is filling enough that a moderate amount of seafood is more than plenty.  I bought two small (6-8 oz) lobster tails and 10 extra-large (U13-15) shrimp at the store for about $30.  Including the other ingredients, this dish cost around $35 to make, which is under $9 per serving.  That's very affordable considering what you would pay for it in a restaurant.

Although the lobster tails were small and there were only 10 shrimp, the lobster meat is cut into pieces and the shrimp are cut in half lengthwise (head to tail) so each diner receives half a lobster tail in addition to 5 shrimp pieces in their portion.  The other cool thing about cutting the shrimp lengthwise is that they curl into very pretty corkscrew shapes when they cook.  (The slight yellow tint after cooking is due to the saffron in the cooking sauce.)


In the interest of full disclosure, I will tell you that there is a fair amount of prep work involved in preparing the seafood, chopping vegetables, making the sauce, cooking the vegetables, and preparing the breadcrumb topping.  First of all, it's SO worth it.  And second, the good news is that it can all be done in advance.  I mean, who wants to be slaving away in the kitchen when you're trying to have a special dinner?  If you assemble the dish in advance you may want to extend the cooking time by a few minutes just to be sure the sauce gets good and hot - check for bubbles around the edges.

Speaking of vegetables, I have to get in a plug for farmer's markets whenever possible - check out the spectacular carrots I found this week.


I know this isn't the lowest-calorie menu I've ever posted, but you can lighten it somewhat if you want by using half and half instead of heavy cream.  And hey, it's a special meal.  I read a quote yesterday by some celebrity or other who said that she tried to eat healthy but also allowed herself to splurge.  She said it's all about the balance of good to bad, and I agree.  What fun is life if you don't allow yourself a treat once in a while?  Just be sure to go back to healthy eating again the next day!

My last comment is about the gratin dish - I love my gratin dish but if you don't happen to have one, don't worry.  Use any baking dish you have that's relatively wide and shallow (this dish is about 12" x 9") rather than small and deep.  That's because it's all about spreading the breadcrumb topping as widely as possible so every bite has that wonderful crunch in addition to the creamy sauce and seafood.


Serve the gratin with a fresh green salad, crusty bread and a good wine and your guests will be very impressed.


printable recipe
Lobster and Shrimp Gratin
Serves 4

1 cup seafood stock or clam juice
1 cup heavy cream (or half and half)
½ cup plus 3 tablespoons white wine, divided
3 tablespoons tomato puree
¼ teaspoon saffron threads
10 very large (U13-15) raw shrimp, peeled, deveined and tails removed, cut in half lengthwise (head to tail)
2 small (6-8 oz) raw lobster tails, meat removed from shell and cut into pieces
6 tablespoons unsalted butter, divided
1 tablespoon all-purpose flour
Salt and pepper
1 leek, white and light green parts only, cut in half lengthwise and sliced
¾ cup chopped carrot
¾ cup panko bread crumbs
1/3 cup freshly grated Parmesan
2 tablespoons minced fresh flat-leaf parsley
1 tablespoon chopped fresh tarragon leaves
2 cloves minced fresh garlic
8 oz spaghetti or fettuccine, cooked

For the Sauce:
Combine the stock, cream, ½ cup of wine, tomato puree and saffron in a medium saucepan.  Bring to a boil, lower the heat, and add the shrimp and lobster pieces.  After 3 minutes, use a slotted spoon to remove the shrimp and lobster to a bowl and set aside. 

Continue to simmer the sauce until reduced by half, about 12 minutes.  Mash 1 tablespoon of butter together with the flour.  Whisk the butter mixture into the sauce along with ½ teaspoon salt and ½ teaspoon pepper.  Simmer, stirring constantly until thickened, about 5 minutes.  Set aside.

Melt 2 tablespoons of butter in a medium sauté pan.  Add the leeks and carrots and cook over medium heat for 5 minutes, until softened.  Add the remaining 3 tablespoons of wine, ¼ teaspoon salt and ¼ teaspoon pepper and cook for 5 to 10 minutes, until tender.  Set aside.

Combine the panko, Parmesan, parsley, tarragon, and garlic.  Melt the remaining 3 tablespoons of butter and mix it into the crumbs until moistened.

Preheat the oven to 375 degrees.

Spray a 9” x 12” grain dish (or similar-sized shallow baking dish) with nonstick cooking spray.  Place the shrimp and lobster pieces in the dish, followed by the vegetables.  Pour the sauce evenly over the top and cover with the breadcrumb mixture.  Place on a baking sheet (for ease of lifting) and bake for 20-25 minutes until the top is browned and the sauce is bubbly.


Serve hot over hot cooked pasta.

Friday, January 10, 2014

Italian Sausage Soup

Last Year's Post: Rosemary-Lemon Grilled Ahi with Pearl Couscous
Two Years Ago:  Broccoli, Cabbage and Brussels Sprout Salad with Dijon Vinaigrette

Having spent far too many years of my life in cold climates, I can sympathize with everyone who has been shivering their way through the polar vortex during the past week or so.  "Polar vortex" sounds so dramatic, like you're going to get sucked in and end up in the middle of the earth or on another planet, don't you think? Or maybe you'll pop out in the Bermuda Triangle, which would be a nice change of temperature except for the little problem of needing a boat.

Although I now live in Phoenix, I promise never to be one of those people who wait until the absolute coldest day of the year and then call you to gloat.  I mean really, talk about kicking someone when they're down and cranky.

Instead, I extend my warmest thoughts to you along with this hot and hearty soup recipe.  Is anything better when it's cold or you have a cold than soup? (And it doubles as a great hand-warmer.)  This is absolutely the best Italian sausage soup ever, featuring zucchini, fettuccine and sausage in a beef broth seasoned with tomatoes, red wine, basil and oregano.  Serve it with a loaf of hot crusty bread and you have a feast for the coldest night.


I particularly like spicy Italian sausage in this recipe, but of course you can use mild sausage or half and half.  To cut calories and fat I recommend turkey sausage, but any Italian sausage will taste great.  If you use pork sausage just be sure to drain off most of the fat after browning.  You could also add some baby spinach if you want to bump up the nutritional value even further.

Those of you who read this blog regularly are probably sick of hearing me talk about sodium levels, but I checked the sodium levels of all the beef broth products in the store and they vary wildly.  Be aware of the sodium level you choose, and adjust seasonings at the end.  Many years ago before I became aware of sodium levels I used a common high sodium broth to make this soup and thought it tasted great without adding salt.  When I started cutting down on sodium I tried a beef broth with no sodium added and thought the soup tasted flat without salt, which was easily fixed after I tasted it. When did life become so complicated?  Anyway, start with lower sodium broth and add a little bit of salt at a time when the soup is done until you're happy.


This is a slow cooker recipe, but you could easily make it in a big pot on the stove and simmer it for a hour or two instead.  Don't be tempted to cook the pasta in the soup - it will soak up too much of the broth and is likely to become mushy.  Several people who have tried this recipe over the years have commented that they prefer to use a short-cut pasta such as penne or shells rather than fettuccine for ease of spooning up.  I like the fettuccine broken into short lengths but feel free to use whatever type of pasta you prefer or have on hand.

I grated some parmesan that I had on hand for an optional topping, which was very good but not necessary.


Stay warm and out of the Bermuda Triangle!


printable recipe
Italian Sausage Soup
Serves 8

Note:  This recipe could also be made in a soup pot on top of the stove, simmered for an hour or two.  Do not add pasta until shortly before serving.

1 tablespoon olive oil
19.5 oz pkg mild or spicy turkey Italian sausage, removed from casings
2 cloves garlic, minced
1 large onion, chopped
32 oz canned whole peeled tomatoes
1 ¼ cups dry red wine
5 cups beef broth
½ teaspoon dried basil
½ teaspoon dried oregano
2 zucchini, cut in half length-wise and sliced into half-moons
1 green bell pepper, chopped
3 tablespoons chopped fresh parsley
8 oz dried fettuccine, broken into shorter lengths
Salt and pepper to taste


While still in the can, snip the tomatoes with a kitchen scissors into smaller pieces. 

Heat olive oil in a large skillet over medium heat.  Add sausage and cook, crumbling with the edge of a spoon, until browned.  Remove with a slotted spoon and drain. 

Add onion to the same skillet and cook for 2 minutes, then add garlic and cook 1 additional minute.  Transfer to a slow cooker and stir in tomatoes and their juices, wine, broth, basil, and oregano.  Add sausage, zucchini, bell pepper, and parsley.

Cover and cook on low for 4 to 6 hours.

Bring a pot of lightly salted water to a boil.  Cook pasta in boiling water until barely al dente accordingly to package directions.  Drain and add pasta to slow cooker.  Simmer for a few minutes, then taste and adjust seasonings prior to serving.


Note:  If you save some of the soup for later you may want to add additional beef broth as the pasta will absorb some.