Showing posts with label dessert. Show all posts

Sunday, September 15, 2019

Cardamom Cognac Apple Cake


It's almost officially fall, and that means apples.  This is not your typical apple pie or tart or crumble - it's a very moist, thin cake completely filled with apples and pecans and flavored with cardamom and cognac.  It's sophisticated and tastes quite French, which is a good thing in my world.  Normal people might think of this as a dessert, in which case you might want to add a little sweetened whipped cream or vanilla yogurt on the side.  I'm not much of a dessert person so to me this is weekend brunch fare with a good strong cup of coffee on the side.

As I said, the cake is very moist and actually there isn't much actual cake because there are so many apples.  It's almost like an apple pie with a little bit of cake batter.  The cognac adds a complex flavor note and the cardamom adds warm spice.  If you like cardamom, I guarantee you'll like this cake. 

If you have it for brunch (or not), cut the leftovers into individual slices and freeze (wrapped tightly) for breakfast during the week. 

print
Cardamom Cognac Apple Cake
Serves 6-8

1 cup all-purpose flour
½ teaspoon ground cardamom
¼ teaspoon cinnamon
¾ teaspoon baking powder
¼ teaspoon kosher salt
2 large eggs, at room temperature
3/4 cup granulated sugar
3 tablespoons cognac (Calvados or bourbon work well too)
½ teaspoon vanilla extract
1/3 cup buttermilk, at room temperature
½ cup pecans, lightly toasted and coarsely chopped
3 medium Honeycrisp apples
1 stick (1/2 cup) unsalted butter, melted, plus more for greasing the pan
1 tablespoon coarse (sparkling) sugar
Confectioners’ sugar, for dusting, optional


Preheat the oven to 350F. Place a piece of parchment paper into a 9-or 10-inch cast iron pan and grease with butter.

 In a bowl, whisk together the flour, cardamom, cinnamon, baking powder, and salt. In a separate larger bowl, beat the eggs until foamy. Whisk in the granulated sugar, cognac, and vanilla extract. Pour in the buttermilk and whisk to combine. 

Peel, halve, and core 2 1/2 of the apples, then cut them into 1/2-inch cubes. Reserve the remaining ½ apple (unpeeled, and cut into very thin slices) for the top. 

 Add half of the flour mixture to the wet ingredients, stirring until just combined, then gently fold in half of the melted butter. Repeat with the remaining flour and butter. Gently fold in the pecans and cubed apples (reserving the slices). Transfer the batter to the pan and arrange the apple slices in groups on top of the batter. Sprinkle with sparkling sugar.

Bake until the cake turns golden brown and a cake tester inserted into the center comes out clean, about 55-65 minutes. Transfer the skillet to a cooling rack and let sit for 5-10 minutes before carefully lifting the cake and paper out of the pan (have an extra set of hands helps to do this). The cake may be served warm or at room temperature.  Dust with confectioners’ sugar before serving, if desired. 


Friday, October 7, 2016

Apple Strudel

Last Year's Post: Smoked Salmon Cakes
Two Years Ago:  Pretzel Chicken Bites

It's fall, and you want to make something with apples.  Why not an apple strudel?  Contrary to what you might think, apple strudel isn't complicated or difficult to make.  In fact, I think it's actually easier than making an apple pie if you use puff pastry. (Phyllo dough is also commonly used but a bit more difficult to work with.) It's a relatively light and healthy dessert because the portion size is small and it doesn't have much sugar.  I've found that people generally fall into one of two camps when it comes to apple desserts:  less sweet or more sweet.  As written, this strudel is lightly sweet.  If you're one of those who like sweeter apple desserts, feel free to increase the amount of sugar by a tablespoon or two.  Or, there's always ice cream - cinnamon ice cream would be particularly fabulous.


Strudel is best eaten warm, so you could assemble it in advance and refrigerate it, then bake it while you eat dinner.  The added bonus is that your house will smell great.  Apple strudel also makes a great breakfast or brunch treat on a weekend morning.


print
Apple Strudel
Serves 6

Note that the puff pastry needs to thaw for 30 minutes so plan ahead. 

2 large (or 3 small) Granny Smith apples
1 tablespoon all-purpose flour (plus more for dusting the work surface)
1/4 teaspoon ground cinnamon
2 tablespoons brown sugar
2 tablespoons raisins
¼ cup toasted pecans or almonds, chopped (optional)
1/2 of a 17.3-ounce package frozen puff pastry  (1 sheet), thawed for 30 minutes
1 egg
1 tablespoon water
2 tablespoons powdered sugar  

Heat the oven to 375°F.  Line a baking sheet with parchment paper.

Peel the apples and cut into quarters through the stem end.  Remove the core from each piece and slice crosswise into thin slices.  Mix the sugar, 1 tablespoon flour and cinnamon in a medium bowl. Add the apples, raisins and optional nuts and toss to coat.

Beat the egg and water in a small bowl with a fork. 

Sprinkle a small amount of flour on the work surface.  Unfold the pastry sheet and roll out to a 16 x 12-inch rectangle. With the short side facing you, spoon the apple mixture onto the bottom half of the pastry sheet to within 1 inch of the edge.  Roll up like a jelly roll.  Place seam-side down on prepared baking sheet.  Tuck the ends under to seal.  Brush the pastry with the egg mixture. Cut five 2-inch long slits at even intervals in the top of the pastry (this will allow steam to escape and will help with slicing individual pieces later on).

Bake for 30-35 minutes or until the pastry is golden brown. Let the pastry cool on the baking sheet on a wire rack for 20-30 minutes. Lightly sprinkle with powdered sugar and cut into slices along the slit lines.  Serve warm.


Friday, September 18, 2015

Healthy Baked Apples

Last Year's Post: Roast Pork, Fennel and Green Bean Salad
Two Years Ago:  Lavash Chips, Za'atar, Hummus and Green Harissa

Having grown up in the Midwest - one of the prime apple-growing regions of the country - I've always been a big fan of apples in any form.  The University of Minnesota is the largest propagator of new apple varieties and if you go to their Arboretum in the fall they have some of their newest available for sale with charming names like 1016 or 587 - varieties that may or may not make it to the commercial market.  Honeycrisp, the most popular variety ever, is from the U of MN (go Golden Gophers) as is its love child, Sweetango.  If you like Honeycrisp, you'll love Sweetango.  It's fairly new and in limited distribution right now but if you see it at your local store, buy it.

Anyway, baked apples are a great alternative for people trying to eat healthy because they don't involve pie crust but have many of the same flavors as apple pie.  This recipe is particularly healthy because it cuts down on the butter and sugar and is served with yogurt or low fat ice cream rather than whipped cream or maple syrup.

The type of apple you use will influence the ultimate taste, texture and appearance of your baked apples.  Apples that stay firm when baked are preferred because some apples will bake down into mush, which is great for applesauce but not so much for baked apples.  I used Pink Lady apples and was very pleased with their firm texture and sweet apple flavor but I think Honeycrisp or Braeburn would work just as well.  If you like your baked apples a little softer, just cook them a little longer.  Test the apples by sliding a small knife down from the top to see how much resistance there is.

The Lawyer has been known to bake apples whole (without cutting the top off) while possibly choosing the wrong kind of apple because they sometimes tended to come out wrinkled on the top and brown rather than red.  That's another reason to like this recipe - choosing the right apple and cutting the top off makes for a very pretty final presentation.


Are baked apples for breakfast, or for dessert?  The answer is yes.  I tend to think of them as a great breakfast alternative but they would be a spectacular, simple and healthy dessert for any entertaining you do.  And although the recipe says to serve the apples warm, they're also great right out of the refrigerator the next day.


print recipe
Healthy Baked Apples
Serves 4

Note: Use whatever kind of apples you like best. Cooking apples such as Jonathan, Rome Beauty, or Granny Smith work well, as do Honey Crisp, Pink Lady and Braeburn.


4 medium apples
2 tablespoons brown sugar
1 tablespoon butter, melted
½ teaspoon ground cinnamon
¼ teaspoon ground nutmeg
Up to ¼ cup chopped dried fruit, nuts, or granola (optional)
½ cup apple juice

Preheat oven to 350 degrees. Cut the tops off the apples. Remove the core and seeds with a small spoon or knife.  Place the apples in an ovenproof baking dish.

In a small bowl, combine the brown sugar, butter, cinnamon, nutmeg and optional ingredients. Spoon this mixture into the centers of the apples. Pour apple juice into the baking dish.  Using a small spoon, take a little of the juice from the bottom of the dish and drizzle it on top of the apples to moisten.  Bake apples for 40 to 45 minutes or until the apples are firm but tender, basting them occasionally with the juices from the baking dish.  Let cool for a few minutes.  Drizzle with pan juices one last time.

Serve warm with yogurt or low fat ice cream.


Friday, May 15, 2015

Melon Ribbon Bowls


Last Year's Post: Pan-Seared Tuna with Capers and Red Wine Sauce
Two Years Ago:  Orzo and Radicchio Salad

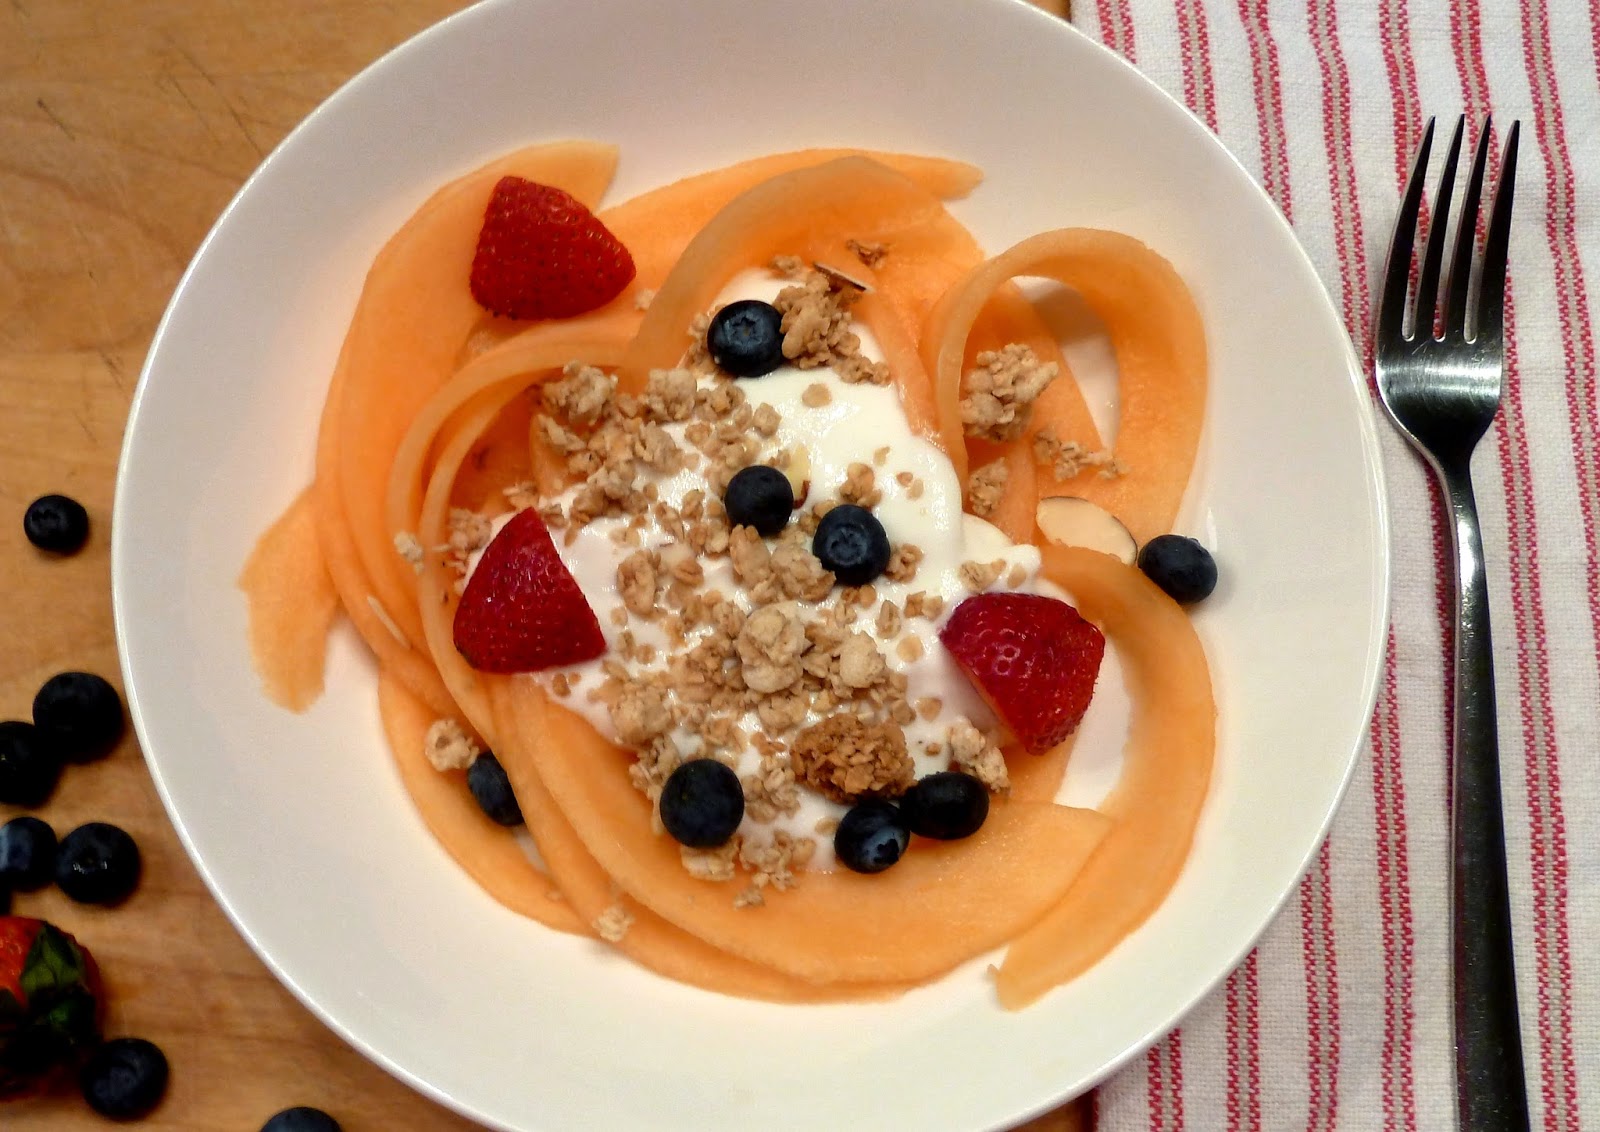
This is so simple I really can't call it a recipe - it's more an assembly technique.  I ran across a picture of the melon ribbons in a magazine and immediately loved the idea as a very pretty breakfast, brunch, or healthy dessert.  The whole concept revolves around an innovative technique for thin-slicing the melon to make ribbons.  Other than that, you're really just making a yogurt parfait.  The original recipe called for making an orange anise syrup, but I think that's overkill.  If you really want a little sweetness, just add a drizzle of honey.

To make melon ribbons, you cut the melon in half and scoop out the seeds, then cut it into quarters.  Carefully separate the flesh from the rind, then use a mandoline, vegetable peeler, or sharp knife to cut ribbons.  After that it's just assembly.  I was having so much fun with the process that I entirely forgot the mint garnish, but I think it still came out great and it was very delicious to eat.  Serve with forks, not spoons.


Melon Ribbon Bowls
Serves 4

The melon ribbons make a great breakfast, brunch, or healthy dessert.


1 ripe cantaloupe or honeydew melon (or a combination)
Vanilla Greek yogurt
Granola
Strawberries, raspberries, blueberries, or a combination
Honey (optional)
Sliced almonds for garnish (optional)
Mint sprigs for garnish (optional)

Cut the melon in half and remove the seeds.  Cut each half again to make quarters, then carefully slice away the flesh from each quarter in one whole piece.  Using a mandoline or vegetable peeler, make thin melon slices.


Divide the melon slices among four bowls, then top with yogurt, a sprinkle of granola, and a few berries.  Optional garnishes include a drizzle of honey, some sliced almonds, or mint sprigs.

Friday, July 25, 2014

Chocolate Honey Almond Tartlets

Last Year's Post: Spinach, Blueberry & Goat Cheese Salad
Two Years Ago:   Smoky Peanut Mole with Pork Tenderloin

Finger foods are great for parties, which is why I made these little tartlets for a recent get-together with friends.  I knew that anything chocolate would be a hit, and liked the idea that they're easy to eat and would accommodate people that want "just a bite".

So, my expectation going in was that the tartlets would taste like chocolate on a graham cracker crust, right?  What surprised me was that you can also taste the almonds and honey, adding to the complexity of flavor even in these tiny little one-bite treats.  One of the guests, admittedly a chocolate fiend, snatched one the moment the tray was brought out and immediately named them "chocolate angel wings".  (She did regular fly-bys for the rest of the night.)

That might be a bit of hyperbole but they are really, really good.  The graham cracker crust is crisp with that light touch of almond, which the chocolate is somewhat soft and has a rich hint of honey.  You just peel off the paper and pop the tartlet your mouth whole.  Very fun!

You'll need a mini-cupcake pan and liners to make the tartlets.  The original recipe stated it makes 16 tartlets but I found it makes quite a few more - depending on how much crust and filling you put in each liner, it should make at least 20 tartlets.  After zapping the crust ingredients in a food processor, you fill each liner and tamp them down with your fingers or a shot glass.  (The Lawyer as a hand model once again.)


After baking the crusts and making the chocolate filling, you fill each liner.  I found drizzling in the chocolate with a small spoon worked best.


Note that after filling the tartlets they need to be refrigerated at least 2 hours to harden, so plan ahead.  Although the adults went crazy for them, they'd be perfect for kids too.


printable recipe
Chocolate Honey Almond Tartlets
Makes 20-22 tartlets

5 graham crackers (2 ¾ ounces)
1 tablespoon slivered almonds
2 tablespoons (1 ounce) unsalted butter, cut into ½ -inch pieces, room temperature
1/3 cup heavy cream
2 tablespoons honey
1 cup (5 ounces) semi-sweet chocolate chips, such as Ghirardelli

Special equipment:  mini-muffin tin and liners


Preheat the oven to 350 d.  Line a mini-muffin tin with mini-cupcake liners. 

Place the graham crackers and almonds in a food processor and process to fine crumbs, 15 to 20 seconds.  Add the butter and pulse until incorporated.  Add one heaping teaspoon of the crumb mixture to each muffin cup, pressing it into the bottom with your fingers or a shot glass.  Bake for 8 minutes, or until the crusts are firm, rotating the tin halfway through.


In a small saucepan over low heat, whisk the cream and honey together until the honey has dissolved.  Raise the heat to medium and bring the mixture to just below a boil.  Place the chocolate chips in a medium bowl and pour the hot cream over the chocolate, whisking until smooth.  Pour chocolate into each prepared muffin cup until just below the rim of the liner.  Refrigerate for at least 2 hours before serving.

Friday, July 18, 2014

Fresh Cherry Hand Pies

Last Year's Post: Chicken Curry
Two Years Ago:  Grilled Cheese with Pesto, Spinach and Avocado

It's still fresh cherry season so I wanted to post one more way to use them besides chicken with fresh cherry salsa, or wild rice salad.  I've always been a fan of hand pies because although normal people probably view them as individual desserts, I view them as breakfast pastries.  Since I do eat breakfast and typically don't eat dessert, that line of reasoning puts them squarely in my wheelhouse.  (That line of reasoning also could be called the height of rationalization, but we won't mention that part.)


Although stemming and pitting fresh cherries takes a few minutes, I actually find it sort of soothing.  While I was pitting the cherries I thought about the giant community garden The Lawyer and I used to rent on a yearly basis and how much work it was, but how much it taught me to respect fresh and beautiful fruits and vegetables in all their forms.  (Growing up as a city kid I took it for granted that produce just magically appeared in the grocery store without any thought regarding the process up to that point.) I thought about the fact that some grower in Washington state went to all the work not only to grow these gorgeous cherries for me (well, along with a few other people I'm sure) but took the time and effort to become organically certified.  Taking the time and effort to use these fresh cherries is one way of honoring the grower and the fruit.  (Gag, did I really say that?  Too much pitting time, obviously.)

Anyway, the process thereafter is simplified by using premade pie crusts.  (If you have strong feelings about homemade pie crusts, by all means have at it.)  There are a few refrigerator chilling interludes, however, so you might want to think about when to start the hand pies if you want them for breakfast.  I would suggest assembling them the day prior, then covering and refrigerating them overnight.  Then all you have to do is bake them the next morning.

First you make the cherry filling.


Then you roll each pie crust out to make it slightly larger, cut the crusts into four wedges each, and assemble the hand pies (there's a 30 minute refrigerator stop in there also).


After assembling, they sit in the refrigerator 10 more minutes before brushing with egg, sprinkling with sugar, and baking.  After assembly you could either refrigerator or freeze the hand pies to bake later.


They're not too sweet and the whole cherries in the filling make them special.


printable recipe
Cherry Hand Pies
Makes 8


4 cups pitted fresh cherries (from 1 ¼ lb whole cherries)
½ cup sugar
Kosher salt
1 tablespoon cornstarch
Juice of ½ lemon
2 refrigerated pie crusts, thawed according to directions
1 large egg yolk
Parchment paper
Coarse (sparkling) sugar for garnish, optional


In a medium saucepan over medium heat, combine cherries, sugar and a pinch of salt.  Cook, stirring often, until sugar dissolved and liquid begins to simmer, about 8 minutes.  Remove a few spoonfuls of liquid and place in a small bowl, then whisk in cornstarch and lemon juice.  Pour cornstarch mixture back in saucepan and continue cooking and stirring until thickened, about 8 minutes more.  Pour into a heat-proof bowl and let stand until cool, about 1 hour. (Note: the filling may be made a day in advance and refrigerated covered until ready to use.)

On a lightly floured surface, unroll pie dough and roll out to a 14” round; repeat with remaining dough.  Quarter each round to make 8 equal wedges total.  Stack wedges between sheets of parchment paper and refrigerate at least 30 minutes.

Preheat oven to 375d.

Arrange 1 wedge of dough on a work surface next to a small bowl of water.  Spoon ¼ cup of cherry filling (drained of most juices) into the center of the wedge, leaving a 1 ½ inch border all around.  Run a damp finger around the border, then carefully fold dough in half, lining up edges and pressing gently to seal.  Crimp edges with a fork, then transfer to a parchment paper-lined rimmed baking sheet.  Repeat with remaining wedges and filling.  Transfer baking sheet to refrigerator; chill about 10 minutes.

Beat egg yolk with 1 tablespoon water.  Brush pies with the egg mixture, then make two ¾” slits in each.  Sprinkle pies with coarse sugar and bake until golden brown, 20 to 25 minutes.  Let stand at least 10 minutes before serving.


Note: after brushing with egg mixture and sprinkling with sugar, the assembled pies may be refrigerated or frozen prior to baking.  Baking time may need to be increased slightly. If frozen, thawing before baking tends to produce more even browning.  

Saturday, April 5, 2014

Mixed Berry Jalousie

Last Year's Post: Joanne Chang's Lemon Bars
Two Years Ago:  In Praise of Asparagus

I've always admired the beautiful pastries in French pastry shops, but never thought I could actually make one.  To my surprise, it's really easy to make a jalousie (zhah-loo-ZEE), which is a light and flaky puff pastry enclosing a luscious fruit filling, using frozen puff pastry and frozen mixed berries.  It reminds me of a fruit turnover in terms of taste, but it's much more impressive.  Since Easter and Mother's Day are coming up, I thought I would publish this recipe because it would make a perfect addition to your brunch table.  Serve it whole on a cutting board with a sharp knife and let your guests cut small pieces to their desire.  Jalousie also makes a great dessert served with whipped cream, creme fraiche, or ice cream.

The length of the recipe may give you pause, but most of it is just an explanation of how to roll, cut and assemble the puff pastry.  There aren't many ingredients and you can assemble the whole thing the night before so it's easy to bake in the morning.  It's worth looking for sparkling (coarse) sugar because it makes the pastry look professional - you can find it in some upscale groceries, gourmet shops, or at King Arthur Flour.

If your berries vary widely in size like mine did, it's a good idea to cut the larger berries to a more uniform size with the other fruit.  I cut the strawberries with a kitchen shears after they were cooked, mainly because I wasn't smart enough to cut them before I started.


To assemble the jalousie, you roll the pastry out and cut it lengthwise, then put one piece on a baking sheet and brush the edges with egg wash.  Add the berry filling, then fold and slash the top piece and put it on top of the pastry.  Unfold, seal the edges, and refrigerate for 20 minutes or overnight.  Before baking you simply brush it with egg wash and sprinkle with sparkling sugar.


People will be impressed.  I know I was.


printable recipe
Mixed Berry Jalousie 
Makes 1 6”x 14” pastry; serves 6 as breakfast or dessert, or 12 as part of a brunch or dessert buffet

Note: the filling may be prepared and the jalousie assembled in advance, up to the night before baking. 

For the filling:
12 ounces frozen mixed berries
¼ cup granulated sugar (or more to taste)
1 tsp fresh lemon juice (or more to taste)
¼ tsp finely grated lemon zest
Generous pinch of cinnamon
Pinch of kosher salt
1 ½ tablespoons cornstarch

For the pastry:
1 sheet frozen packaged puff pastry, thawed according to package directions
Flour for rolling out the dough
1 large egg
1 tsp sparkling sugar (can substitute granulated sugar)

Sweetened whipped cream, crème fraiche, or ice cream, optional

For the filling:
In a 3 quart saucepan, stir together the frozen berries, sugar, lemon juice, lemon zest, cinnamon and salt.  Heat over medium high until the berries start to release their juices and the juices begin to bubble, 1-2 minutes.  Reduce heat to medium and simmer, stirring gently from time to time, until the berries release more juices and soften but still hold their shape somewhat, 7-9 minutes.  Remove from the heat.

With a slotted spoon, scoop out the berries, letting as much juice as possible drain back into the pan, and put the berries into a small heat-proof bowl.

Dissolve the cornstarch in 3 tablespoons cold water.  Whisk into the juices in the pan and bring to a boil over medium-high heat.  Boil, stirring constantly with a wooden spoon, until very thick, up to 2 minutes.  Scrape the sauce into the bowl with the berries and gently fold together.  Taste and adjust sugar and lemon juice to your preference.  Let cool completely before proceeding. 

May be refrigerated for up to 2 days in a covered container before using.

For the pastry:
Line a large rimmed baking sheet with parchment.

In a small bowl, make an egg wash by beating the egg with 1 tablespoon cold water until well combined. 

Unfold the puff pastry dough on a floured surface, and gently pinch together any seams that have split.  With a floured rolling pin, roll the dough into a 12x14-inch rectangle, using a sharp knife to even the edges.  Cut the rectangle in half lengthwise to form two 6x14-inch rectangles.  Gently fold one of the rectangles in half and transfer to the baking sheet, then unfold.

Use a pastry brush to brush a 1-inch border of egg wash around all edges of the dough.  Save the remaining egg wash.  Spread the fruit filling evenly down the length of the dough, leaving the egg-washed border clear.

Lightly dust the remaining piece of puff pastry with flour and gently fold it in half lengthwise; don’t crease the fold.  Using a sharp knife, cut 1 ½ -inch long slashes at 1-inch intervals along the folded side of the dough, leaving at least a 1-inch border on the remaining three sides.  Do not unfold the dough.  Gently lift the folded strip (another pair of hands helps here) and position it over the fruit-filled dough rectangle, match up the straight edges (the fold should be down the middle of the pastry).

Gently unfold the top piece and stretch it over the filling, matching the straight edges all the way around.  Press the edges gently with your fingertips to seal, then gently crimp all the edges with a fork.

Chill the assembled jalousie for 15 to 20 minutes.

At this point the jalousie may be refrigerated, covered with foil or plastic, overnight.

Position a rack in the lower third of the oven and preheat to 400d.

Right before baking, brush the top of the jalousie with a very light coating of the remaining egg wash (you won’t need it all) and sprinkle with sparkling or granulated sugar.

Bake the jalousie for 15 minutes, then rotate the baking sheet.  Continue baking until the pastry is puffed and deep golden brown, 12 – 15 minutes.  Immediately transfer the jalousie from the baking sheet to a wire rack by lifting the parchment paper onto the rack, then sliding it out from under the jalousie.

Let cool for at least 45 minutes.  Serve slightly warm or at room temperature, with optional cream or ice cream.  


Best the day it’s baked, but will keep wrapped well in aluminum foil, for 3 days.  Reheat at 325d for 5 minutes before serving.

Friday, January 31, 2014

Raspberry Dark Chocolate Wonton Cups

Last Year's Post: Banh Mi
Two Years Ago:  Tuxedo Strawberries

Raspberry and dark chocolate, what more do you need to say?  Valentine's Day is coming up, and these little cups would make a very special treat.  For that matter, they're perfect for any time when you want a little special dessert and would also be great as a sweet alternative for an appetizer party or for a Easter or Mother's Day brunch.

Although they look fancy, they're very easy to make - just bake some wonton wrappers in a mini-muffin pan, and fill with whipped cream, chocolate shavings, and a raspberry.  Start to finish this project took about 45 minutes, and most of that was spent waiting for the oven to heat or for the wonton cups to cool.  You can make your own whipped cream, or whipped topping from the store will work just fine.  This will probably be best made on the same day you plan to serve them, and I wouldn't fill them very far in advance so the whipped cream doesn't soften the wonton cups.

You can make your own variations by substituting chocolate (or other flavored) pudding for the whipped topping, white chocolate for dark, blackberries for raspberries, etc.  Whatever combination you use will be delicious, impressive and pretty.


printable recipe
Raspberry Dark Chocolate Wonton Cups
Makes 12 cups

12 wonton wrappers
1 tablespoon melted butter
1 tablespoon white sugar
½ cup dark chocolate shavings
¾ cup sweetened whipped cream or nondairy whipped topping
12 fresh raspberries

Special equipment: mini-muffin pan


Preheat oven to 350d.

Brush wonton wrappers with butter and sprinkle with sugar.  Press sugar side up into ungreased miniature muffin cups.  Bake at 350d for 5-7 minutes until crisp and lightly brown.   Transfer wrappers to a wire rack to cool.


Spoon whipped cream or topping into each muffin cup.  Top with chocolate shavings and a single raspberry.