Showing posts with label easy. Show all posts

Friday, July 14, 2017

Spanish Chicken Salad with Manchego and Smoky Almonds

Last Year's Post:  Spiced Carrot Soup (Hot or Cold)
Two Years Ago:   Baked Falafel

This is a sophisticated salad that's incredibly easy to throw together in the time it takes to toast some almonds.  But there are a few somewhat unusual ingredients that are key:  Manchego cheese, smoked paprika, piquillo peppers and really good sherry vinegar.  Manchego cheese is a Spanish cheese similar to Gruyere that you can find in most good cheese shops.  Smoked paprika can be found in some spice aisles and at Penzeys, my favorite spice store.  Smoked paprika is very Spanish and makes the salad much more interesting so don't be tempted to substitute regular paprika.  Piquillo peppers can be found in most grocery stores next to regular jarred roasted red peppers.  I think they have a brighter and more interesting taste than regular roasted red peppers but if you can't find them, regular roasted peppers would be fine.


And finally, sherry vinegar.  Sherry vinegar is my favorite vinegar ever since I had the opportunity to sample a really good quality one from Spain, and I'll never go back.  Please don't buy one of those little bottles from the grocery store.  Take the time and effort to get a high-quality bottle from your local gourmet store or online - the difference in taste is amazing.  I bought this one online from iGourmet.


Anyway, after you buy the Spanish ingredients it's a very quick salad to assemble because you use precooked deli chicken.  The only cooking you do is to toast the almonds.  Stay nearby and stir frequently while they toast because they can burn fast.


print
Spanish Chicken Salad with Manchego and Smoky Almonds
Serves 4


2 tablespoons unsalted butter
½ cup sliced almonds
½ teaspoon smoked paprika
Salt and pepper
1 small shallot, minced
2 tablespoons sherry wine vinegar
6 tablespoons extra-virgin olive oil
8 cups salad green, preferably red and green
½ cup drained piquillo peppers from jar, cut into thin strips
4 cups shredded deli chicken meat
1 cup Manchego cheese, cut into cubes or strips


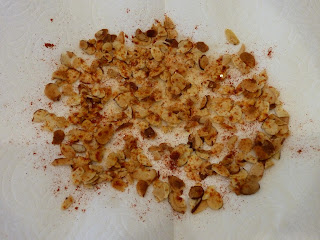
Melt butter in a medium skillet over medium heat.  Add almonds and cook, stirring frequently, until golden and fragrant, about 10 minutes.  Watch closely so they don’t turn too dark.  Transfer almonds to paper towels and sprinkle with smoked paprika and salt.  Let cool.


Whisk shallot, vinegar and oil in a small bowl (or shake in a small jar with lid) to blend.  Season dressing with salt and pepper.  Place salad greens in a large bowl.  Add dressing and toss to coat.  Divide among plates, then top with rows of chicken, peppers, cheese, and almonds.  (Alternately, toss everything together except the almonds and divide between plates, then sprinkle almonds on top.)

Friday, March 24, 2017

Baked Four Cheese Spaghetti

Last Year's Post: Vietnamese Chicken Salad
Two Years Ago:  Citizen Public House Chopped Salad

I found this recipe over ten years ago in Food & Wine magazine, and finally found an occasion to try it out when our friends Brad and Mary came to visit for the weekend.  They were going to arrive shortly before dinner time so I wanted an easy make-ahead but still impressive meal.  I made the dish in the morning, so all I had to do when they arrived was throw it in the oven and toss together a big green salad and some garlic bread to go with it.

There's a fair amount of cheese grating involved in the prep, so if you decide to double the recipe for a 9"x13" pan I would definitely break out the food processor. Try to find a Fontina that the label describes as mild because Fontinas vary between mild and pungent.  Mild works best here.  Same thing with the Gorgonzola - I discovered that Gorgonzola dolce is basically a mild Gorgonzola.  I managed to find it in my local cheese shop but if you can't find it, just ask for the mildest Gorgonzola they have.  The cheeses all meld together so no one taste particularly stands out, which means kids will probably like this also.


This dish was very cheesy and very good on its own, but I could definitely see adding some crumbled bacon or prosciutto, or cooked and chopped broccoli rabe.  It's far easier to make than lasagna, and more interesting than your typical baked short pasta dish.  And if you double it, it serves a lot of people.  AND it's vegetarian.  A total winner in my book.

Baked Four Cheese Spaghetti
Serves 4 generously

Notes: the recipe can be made earlier in the day and refrigerated, covered.  Uncover and bake per directions.  Also, the recipe can be doubled for a 9”x13” pan.

¾ lb spaghetti
4 ounces mild Fontina, coarsely shredded
4 ounces mozzarella, coarsely shredded
4 ounces Gruyere, coarsely shredded
2 ounces Gorgonzola dolce, crumbled
Salt and freshly ground pepper

Preheat oven to 350d.  Spray an 8” by 8” baking dish (or similar sized dish) with nonstick spray.  Cook the spaghetti in a large pot of salted water until al dente.  Drain well and spread the spaghetti on a baking sheet to cool.

In a medium bowl, toss the Fontina, mozzarella and Gruyere together.   Spread one third of the spaghetti in the prepared dish in an even layer.  Sprinkle 1/3 of the mixed cheeses and half of the Gorgonzola over the spaghetti and season with salt and pepper.  Repeat with another layer of spaghetti, mixed cheeses, Gorgonzola and salt and pepper.  Top with the remaining spaghetti and mixed cheeses.

Baked the spaghetti in the center of the oven until the top is golden brown, about 40 minutes.  If desired, turn on the broiler during the last minute or two to create a few darker brown crispy bits but watch closely so it doesn’t burn.


Let cool for a few minutes before cutting and serving.

Friday, April 1, 2016

Manchego Cheese Quesadilla with Pepper Jam

Last Year's Post: Labneh
Two Years Ago:  Classic Potato Gratin

This is my version of a no-recipe dinner.  I was on the way home last night with no idea of what to have for dinner except I knew The Lawyer wanted to grill something.  When I stopped at the store nothing in the meat case looked appealing so I grabbed some flour tortillas, a wedge of Manchego cheese, some pepper preserves and a container of micro-greens.  Done.

This is so easy I'm not even going to pretend it's a recipe - just grate your favorite cheese (fontina, manchego or goat cheese would work particularly well with the pepper jam), put it on some flour tortillas, top with another tortilla, brush both sides with a little olive oil and grill outdoors or on a grill pan or in a skillet until the cheese has melted and the tortillas are golden on both sides.  Serve with the pepper jam (which you can find in almost any grocery store with the other jams) or onion jam if you can find it, and any kind of small greens.  Dinner is served in about 15 minutes.


It's basically an interesting twist on a grilled cheese sandwich, and it makes the perfect light dinner for one of those nights when you've had one of those days.


No recipe (see above)

Friday, January 29, 2016

Prosciutto-Wrapped Chicken with Asparagus Pesto Sauce

Last Year's Post: Hand Blended Loose Leaf Chai Tea
Two Years Ago:  Coq au Vin

Life as a food blogger has its ups and downs.  The downside happens when a recipe doesn't come out as you hoped, or it was a ton of work, or it tastes good but doesn't look like much.  But then there's the upside when a recipe is even more delicious than you thought, it's easy to make and beautiful to boot.  Happily, this is one of those because I had a spectacular (and expensive) halibut failure last week and was feeling rather traumatized but now I'm all better.  :-)

It's so spectacular, in fact, that I would suggest it for a special occasion dinner like a birthday, anniversary or Valentine's day - it's that good.  And it's fast enough to make on a weeknight - all you have to do it steam some asparagus, cook some pasta or rice to go with the dish, then cook the chicken and add the sauce at the end.  I was tempted to leave out the cream but after tasting it I wouldn't - it adds flavor and creaminess (duh) and it's only a 1/4 cup for four servings.

The recipe was so easy that I couldn't even think of all that many pictures to take of the process.


Prosciutto-Wrapped Chicken with Asparagus Pesto Sauce
Serves 4

6-8 ounces asparagus, tough ends snapped off, cut into 1” pieces
¼ cup flour
4 chicken cutlets (or 2 large chicken breasts, cut in half horizontally to make 4 cutlets)
4 slices prosciutto
2 tablespoons extra-virgin olive oil
¼ cup pesto
¼ cup heavy cream
¼ cup chicken broth
Fresh basil leaves, for garnish (optional)
Hot cooked pasta, rice or mashed potatoes for serving


Steam the asparagus pieces for 4-5 minutes (depending on the size of the spears this may need to be adjusted up or down) until crisp-tender, then run under cold water or shock in an ice bath to stop cooking.  Drain and set aside.

Put the flour in a shallow plate.  Pat the chicken cutlets dry, then season with pepper on both sides.  Lightly dredge both sides in flour and shake off the excess.  Wrap a piece of prosciutto around each cutlet and set aside.

Mix the pesto, cream and chicken broth together in a small bowl.  Set aside.

When ready to start cooking, heat the olive oil in a large heavy skillet over medium-high heat.  Add the chicken cutlets and cook for five minutes or until the cutlets release easily without sticking and are golden brown.  Lower the heat to medium, turn the cutlets over and cook for an additional 4-5 minutes until golden and cooked through.

Lower the heat to low and add the pesto sauce.  Simmer very gently for 1-2 minutes until the sauce thickens slightly, then add the asparagus.  Simmer for another minute to heat the asparagus through, then taste and adjust seasonings (remember the prosciutto is salty so go easy on salt in the sauce).


Place the cutlets with the asparagus pesto sauce over hot pasta, rice or potatoes.  Garnish with optional basil leaves and serve immediately.

Saturday, January 23, 2016

Sesame Salmon en Papillote

Last Year's Post:  Eggplant and Rice Parmigiana
Two Years Ago:   Lobster and Shrimp Gratin

Cooking something "en papillote" (pronounced en pa-pee-oh) is French for cooking "in parchment" - basically cooking in a paper pouch to seal in moisture.  It's a great way to cook delicate fish because it seals in the moisture so the fish doesn't dry out, and at the same time it becomes infused with the flavors of the sauce.  I've previously posted recipes for swordfish en papillote (with an Italian twist) and sea bass en papillote (with a Mediterranean theme) so I thought this Asian salmon would be a good complement.   

It's not only flavorful, it's a very healthy dinner as well.  I modified a recipe that I found online to include spinach for nutrition and color, mushrooms for flavor, and sesame seeds for crunch and because they look great.  A mix of white and black seeds is especially attractive - you can find black sesame seeds at Asian markets and at Penzeys - but all white seeds would work also.  Tip: you can usually find a large container of toasted white sesame seeds in the Asian section of your grocery store for much less than a small bottle in the spice aisle.

The recipe is really easy once you get the parchment paper technique down.  Basically you just take a big piece of paper, fold it in half, and cut it in a folded semi-circle with one end slightly more pointy than the other.  Open it up, pile the ingredients on one side of the fold, and close the other side over the top.  Then you start make tight little overlapping folds to ensure the packet is sealed.  Or, you could just use aluminum foil and crimp the edges which is easier, but not as traditional or pretty.  If you plan to serve the packets at the table, parchment is definitely the way to go.


Sometime I remove the contents from the packets before serving, depending on my mood and the contents of the packet.  If there's going to be a lot of cutting involved it tends to be easier to take them out of the paper although it's less dramatic and fun.   Either way, it's a fast, easy and delicious meal that's very healthy.


print
Sesame Salmon en Papillote
Serves 4

For the sauce:
Zest of ½ orange
1 tablespoon fresh orange juice
1 teaspoon peeled minced fresh ginger
3 tablespoons soy sauce
2 teaspoons rice vinegar
2 teaspoons toasted sesame oil
1 teaspoon honey

10-12 leaves baby spinach per packet, about ½ bag of baby spinach
1 red bell pepper, seeded and thinly sliced
7 ounces shiitake mushrooms, cleaned, stemmed and thinly sliced
4 (6 ounce) salmon fillets, skinned
Freshly ground black pepper
¼ cup toasted white or black sesame seeds, or a mix
1/3 cup green onions, thinly sliced on the diagonal
Parchment paper (or aluminum foil)

Preheat oven to 425d.

Combine all sauce ingredients in a small bowl and whisk until blended; set aside.

Cut 4 large (approximately 16” by 12”) sheets of parchment paper.  (If you don’t have parchment paper, foil works just as well but definitely transfer the contents out of the foil before serving.) Fold each sheet in half. Place the fold on the bottom edge nearest you. Starting at the right side, cut a large semi-circle with the fold as the spine and one end more pointed then the other.  Open the paper and place ¼ of the spinach leaves, red bell pepper and shiitake mushrooms in a pile on one side, near the fold.  Moisten with one tablespoon of the sauce.  Place a salmon fillet on top; season with black pepper and additional tablespoon of marinade.  Sprinkle the top of the salmon with sesame seeds.

Fold the other half of the paper over the fish. Starting at the flatter end of the semicircle (not the pointy end), fold 1-2 inches of the edge inwards. Work your way around the circle making a series of tight, overlapping folds to enclose the fish. When you reach the pointy edge, fold the last pleat several times and wrap it under the pouch.  Repeat with the other three packets.

Place the packets on a baking sheet and bake for 11-12 minutes, depending on thickness.


Transfer the packets to plates and cut open.  Garnish with green onions prior to serving.  Alternatively, transfer the package contents to a plate and garnish prior to serving.  Serve any remaining sauce on the side.

Friday, October 9, 2015

Chicken Limone Pasta

Last Year's Post: Pretzel Chicken Bites
Two Years Ago:  Arroz Con Pollo

As the weather turns cooler many of us start to crave rich, hot cheesy pasta dishes.  Unfortunately, they're usually full of fat and calories.  I recently came across this dish on the menu of a local wine bistro and was attracted to it for three reasons:  it fulfills the hot pasta requirement, I love lemon, and it sounded much lighter than a typical spaghetti or lasagna.  I re-created it at home and was very happy with the results - it's very lemony and tastes rich even though the sauce is much lighter than a red sauce.  The herbs add a pop of fresh flavor and the rotisserie chicken is moist and meaty.  The entire meal takes less than a half hour to prepare, so it qualifies as a quick and easy weeknight meal.

Really, who doesn't like lemons?


I made it a little extra-special by using this fun egg tagiatelle with cool edges I found at the store, but you could use regular tagiatelle or pappardelle or even linguine or fettucine.


Buying pre-shredded rotisserie saves even more time than buying a whole rotisserie chicken and shredding it yourself - many stores now carry it in their deli or on their salad bar.  All you have to do is make a quick pan sauce while the pasta cooks, then toss the pasta with the sauce and herbs and top with chicken.


It not only satisfied my pasta cravings, it somehow managed to do so without the help of any cheese at all.  That's saying something.

print recipe
Chicken Limone Pasta
Serves 2

½ - 1 cup shredded rotisserie chicken
6 ounces dry pappardelle pasta (or spaghetti or linguine)
2 tablespoons butter, divided
2 garlic cloves, minced
¼ cup white wine
1 cup chicken broth
Zest of half a lemon
Juice of a whole lemon
2 tablespoons capers
Salt and pepper
2 tablespoons mixed chopped herbs (parsley, chives, thyme, etc.)


Bring a large pot of salted water to a boil and cook pasta until just al dente – it will cook further in the sauce.  Drain and set aside.

Meanwhile, melt 1 tablespoon butter in a large skillet over medium heat.  Add garlic and sauté for 30 seconds or until fragrant but do not brown.  Add wine and simmer to reduce by half.  Add chicken broth, lemon juice and capers, then turn heat to medium-high and cook until reduced by half.  Add remaining tablespoon of butter, then add salt and pepper to taste.


Add pasta to the skillet and cook on low for a minute or two, tossing to combine the pasta and sauce.  Add the herbs and toss to combine right before serving.  Serve in shallow bowls topped with chicken and  lemon zest.

Friday, October 2, 2015

Smoked Salmon Cakes

Last Year's Post: Perfect Apple Crisp
Two Years Ago:  Forbidden Rice with Turkey, Roasted Squash and Walnuts

I came across a salmon cake recipe the other day that looked interesting, but I thought it might be a little bland made with plain old salmon.  Since The Lawyer has a smoker I asked him to smoke some salmon, thinking that would make them more interesting.  And were they ever!  The results were outstanding and the mild horseradish sauce made them even better.

If you don't want to smoke your own salmon, it's readily available in most stores.  Look for it in vacuum-sealed packages at the seafood counter.  Just be sure to buy hot-smoked salmon, not cold-smoked.  You can tell the difference just by looking at it - hot-smoked salmon is darkened from the smoke and is sold as a chunk.  Cold-smoked salmon is much lighter in color (it almost looks uncooked) and is sold as an entire fillet, typically thinly sliced.  Hot-smoked salmon has a more pronounced smoke flavor and a meatier texture which makes it perfect for the salmon cakes.


The key is to treat the salmon like you would treat lump crab meat - gently.  Break it into coarse flakes with your hands, then mix and shape the cakes gently so you don't break the flakes up.  Because there's very little binder, treat the cakes gently in the pan also - using two spatulas to turn them (one on top, one on the bottom.)


This meal comes together very quickly and it's healthy if you go easy on the horseradish sauce.  The Lawyer and I were so impressed with this dish that we agreed it would be appropriate for our Gourmet Club - high praise indeed.

print recipe
Smoked Salmon Cakes
Serves 4

For the sauce:
1/2 cup mayonnaise
1/4 cup finely chopped onion
1 tablespoon capers
1 tablespoon chopped fresh parsley leaves plus additional for the salad
1 tablespoon prepared horseradish
Salt and freshly ground black pepper, to taste

For the salmon cakes:
18 ounces hot-smoked salmon
1 1/3 cups panko bread crumbs
2 eggs, beaten
2 rounded teaspoons Old Bay seasoning blend
½ small red bell pepper, seeded and finely chopped
3 tablespoons fresh chives, finely chopped
3 tablespoons fresh dill, finely chopped plus additional for the salad
1 teaspoon hot pepper sauce
2 tablespoons vegetable oil
1 lemon, zested and juiced
1-2 teaspoons olive oil
Salad greens
Salt and pepper
Lemon wedges, for serving


To make the sauce, combine all ingredients in a small bowl.  Add salt and pepper to taste.  Refrigerate covered until ready to serve.

For the salmon cakes, break the salmon apart into coarse flakes using your hands.  (Make sure there aren’t any bones as you’re doing this.)  In a large mixing bowl, combine salmon, bread crumbs, eggs, Old Bay, red pepper, chives, dill, hot sauce and lemon zest (not lemon juice). Mix together gently with your hands, then form into 8 patties.  Place in the refrigerator for 10-15 minutes to firm up.

Heat a large fry pan over medium heat, then add the vegetable oil.  Place the salmon cakes in the pan and fry on the first side until golden brown, about 3-4 minutes.  Gently flip over (using two spatulas, one on top and one on bottom) and fry 3-4 minutes more until browned on the second side.  Remove to a paper-towel-lined plate to drain for a minute.

Toss salad greens with the lemon juice, olive oil and salt and pepper.

To plate, divide salad green among plates and top with additional parsley leaves and chopped dill.  Place two salmon cakes on each plate and serve with lemon wedges and the sauce on the side.


Friday, June 5, 2015

Mini Shrimp Tacos

Last Year's Post:  Chicken Gaston Gerard
Two Years Ago:   Grilled Shrimp with Cucumber Dipping Sauce

I have a strange fascination with miniature or finger-food versions of larger foods and have posted a few in the past such as tiny pizzassausage sliders with broccoli rabe pestoraspberry dark chocolate wonton cupskorean slidersgoat cheese and chorizo rolls, and chocolate honey almond tartlets.  I love them because they're easy to eat, cute, and perfect for parties.

This is another in the series, made incredibly easy by using scoop chips as the base rather than trying to form and bake wonton wrappers. (Medium-ish shrimp will work best to fit the scoops - I used large and felt they might have actually been a little too large.  But they were still really good.) All you have to do is bake or grill the shrimp, combine some diced avocado with lime juice so it doesn't brown, and combine some sour cream with chipotle chiles or any hot sauce you have on hand.  Then just assemble and serve.


This would be a great recipe for a summer grilling party or any Mexican party or just any party at all.  Enjoy!

print recipe
Mini Shrimp Tacos
Makes 24 mini tacos

24 medium-to-large raw shrimp, peeled, deveined and tails removed
Non-stick spray
Your favorite chili powder blend
1 teaspoon grated lime zest
 1 tablespoon fresh lime juice
1 avocado, diced
1/3 cup sour cream
1 teaspoon chipotle chiles in adobo, finely minced (or your favorite hot sauce)
2 tablespoons cilantro leaves
24 tortilla chip scoops

Preheat oven to 375d (or preheat a grill to medium).

If baking in the oven, spray a baking sheet with non-stick spray.  Shake a light coating of chili powder blend on the shrimp and place them on the baking sheet.  Bake for 5-8 minutes until curled and pink.   If grilling the shrimp, place on skewers and lightly coat with the chili powder blend.  Grill 2-3 minutes per side until curled and pink.  Set aside.

Combine the avocado with the lime juice in a small bowl and toss gently to coat (this will prevent browning).  Combine the sour cream with the chipotle chiles or other hot sauce.

To assemble, place a teaspoon of avocado in each scoop, followed by a small amount of sour cream and a cilantro leaf or two.  Top with a shrimp and a sprinkle of lime zest.


Friday, February 27, 2015

Chicken and Mushroom Gratinate

Last Year's Post: Power Muffins
Two Years Ago:  Sloppy Joes for Grown-Ups

The first question that came to mind when I found this recipe is "what the heck is a gratinate?"  Here's the definition according to the dictionary:  gratinate - to cook with a covering of buttered crumbs or grated cheese until a crust or crisp surface forms.  "Gratin" has more or less then same definition, so don't ask me how they're different.

Anyway, this is a rustic Italian dish from Lidia Bastianich that certainly fits the description:  chicken and mushrooms covered in melted cheese and cooked in a tomato wine sauce.  

The chicken is cooked on the stovetop low and slow to get it started and keep it tender, then the dish is finished in the oven to melt the cheese and thicken the sauce.


The whole thing cooks in one skillet which makes it great for a weekday meal and gives you time to prepare something to soak up the sauce on the side:  pasta, mashed potatoes, or polenta.  I chose polenta simply because we're having pasta later in the week.


It's somewhat reminiscent of chicken parmesan, but without the fried crust and heavy red sauce.  This dish is lighter while still fancy enough to serve for a Sunday dinner or special occasion.  And completely delicious.


Chicken and Mushroom Gratinate
Serves 4

2 large boneless skinless chicken breasts (about 20 ounces total)
4 ounces shiitake mushrooms, cleaned and stems removed
½ cup flour for dredging
2 tablespoons olive oil
3 tablespoons butter, divided, cut into cubes
1 cup tomato sauce or tomato puree
¼ teaspoon red pepper flakes
2/3 cup dry white wine
6 fresh sage leaves, shredded
12 small thin slices Fontina cheese, about 4 ounces
8 tablespoons shredded Parmigiano-Reggiano


Preheat oven to 425d.

Cut chicken breasts in half horizontally to form 4 cutlets.  Pound lightly to an even thickness, then dredge in flour to lightly coat both sides.  Salt and pepper each side.  Set aside.

In a large oven-proof skillet, heat 2 tablespoons of olive oil over medium heat.  Add the mushroom caps in a single layer and sauté, about 2 minutes per side, until tender and browned.  Remove and salt lightly.

Add 1 tablespoon of butter to the olive oil remaining in the pan and reduce heat to medium-low.  When the butter is melted, add the chicken cutlets in one layer and cook gently for about 90 seconds, until very lightly colored with no browning.  Turn cutlets over and spread a heaping tablespoon of tomato sauce on top of each.  Arrange the mushroom caps over the chicken, overlapping to cover, then add 3 small slices of Fontina on top of each cutlet, overlapping to cover.

Raise the heat to medium and sprinkle the red pepper flakes into the sauce.  Add the remaining butter into the sauce.  After the butter melts add the wine and remainder of the tomato sauce around the cutlets (not over them).  Bring to a simmer, then drop the sage into the sauce all around the pan.  Finally, sprinkle two tablespoons of shredded Parmigiano-Reggiano over each cutlet.   

Place the skillet in the oven for 10 minutes, then check to see that the cheese is melted and the sauce has thickened somewhat.  Turn the broiler on and continue to bake for 3-4 minutes, watching carefully, until the cheese is browned to your liking (do not let burn).

Serve immediately, with polenta, mashed potatoes or pasta to soak up the sauce.

Saturday, February 21, 2015

Baked Pumpkin Spice Granola

Last Year's Post: Wild Mushroom and Gruyere Quiche
Two Years Ago:  Wild Mushroom & Wild Rice Chicken Soup

"Baked pumpkin spice granola" - doesn't that just sound good?  Like it will make your kitchen smell great.  And it's true.

The Lawyer and I like to sprinkle granola over yogurt for breakfast, and it's also fabulous in pancakes to add crunch.  Or, eaten straight out of hand, it makes a delicious mid-afternoon snack.  One time I gave some homemade granola to a friend who didn't particularly like to cook, and she told me later that she had it for dinner every night for a week.  However you eat it, granola is delicious.  This particularly granola is only lightly sweet but has the most wonderful flavor combination where no one flavor overwhelms.  At first you taste the spices, then a hint of coconut comes in, and then the pumpkin comes through.  

This granola is slightly darker than most you'll find at the store, due to the spices, dark brown sugar, maple syrup and pumpkin.  It's about the color of "normal" granola before it's baked, so don't freak out when it turns slightly darker during baking.  Just be sure to stir every ten minutes and it won't turn too dark.

Granola is incredibly easy to make and much less expensive than buying it in the store.  Its a fun little weekend project that you'll appreciate during the following week.  And it makes a great gift, too.


printable recipe
Baked Pumpkin Spice Granola
Yields approximately 5 cups

3 ¾ cups old-fashioned rolled oats
2/3 cup unsweetened coconut
2/3 cup sliced almonds
2 teaspoons ground cinnamon
1 teaspoon pumpkin pie spice*
1/8 teaspoon salt
½ cup pumpkin puree
1/3 cup pure maple syrup
¼ cup plus 2 tablespoons vegetable oil
3 tablespoons dark brown sugar
1 teaspoon vanilla extract

Preheat oven to 325d.

Line two large baking sheets with silicone baking mats or parchment paper.  In a large bowl, toss the oats, coconut, almonds, spices and salt together until well combined.  Set aside.

In a medium bowl, add the pumpkin puree, maple syrup, vegetable oil, brown sugar and vanilla; whisk until smooth.  Pour over dry ingredients and mix until everything is moistened.  Divide evenly between the baking sheets and spread out into a thin layer.

Bake each batch for 40 minutes, stirring every 10-15 minutes.  Allow granola to cool on the baking sheets for 20 minutes.  Cover tightly and store at room temperature.


* Or use ½ teaspoon ground cloves, ¼ teaspoon ground nutmeg, and ¼ teaspoon ground allspice.