Showing posts with label mozzarella. Show all posts

Friday, March 24, 2017

Baked Four Cheese Spaghetti

Last Year's Post: Vietnamese Chicken Salad
Two Years Ago:  Citizen Public House Chopped Salad

I found this recipe over ten years ago in Food & Wine magazine, and finally found an occasion to try it out when our friends Brad and Mary came to visit for the weekend.  They were going to arrive shortly before dinner time so I wanted an easy make-ahead but still impressive meal.  I made the dish in the morning, so all I had to do when they arrived was throw it in the oven and toss together a big green salad and some garlic bread to go with it.

There's a fair amount of cheese grating involved in the prep, so if you decide to double the recipe for a 9"x13" pan I would definitely break out the food processor. Try to find a Fontina that the label describes as mild because Fontinas vary between mild and pungent.  Mild works best here.  Same thing with the Gorgonzola - I discovered that Gorgonzola dolce is basically a mild Gorgonzola.  I managed to find it in my local cheese shop but if you can't find it, just ask for the mildest Gorgonzola they have.  The cheeses all meld together so no one taste particularly stands out, which means kids will probably like this also.


This dish was very cheesy and very good on its own, but I could definitely see adding some crumbled bacon or prosciutto, or cooked and chopped broccoli rabe.  It's far easier to make than lasagna, and more interesting than your typical baked short pasta dish.  And if you double it, it serves a lot of people.  AND it's vegetarian.  A total winner in my book.

Baked Four Cheese Spaghetti
Serves 4 generously

Notes: the recipe can be made earlier in the day and refrigerated, covered.  Uncover and bake per directions.  Also, the recipe can be doubled for a 9”x13” pan.

¾ lb spaghetti
4 ounces mild Fontina, coarsely shredded
4 ounces mozzarella, coarsely shredded
4 ounces Gruyere, coarsely shredded
2 ounces Gorgonzola dolce, crumbled
Salt and freshly ground pepper

Preheat oven to 350d.  Spray an 8” by 8” baking dish (or similar sized dish) with nonstick spray.  Cook the spaghetti in a large pot of salted water until al dente.  Drain well and spread the spaghetti on a baking sheet to cool.

In a medium bowl, toss the Fontina, mozzarella and Gruyere together.   Spread one third of the spaghetti in the prepared dish in an even layer.  Sprinkle 1/3 of the mixed cheeses and half of the Gorgonzola over the spaghetti and season with salt and pepper.  Repeat with another layer of spaghetti, mixed cheeses, Gorgonzola and salt and pepper.  Top with the remaining spaghetti and mixed cheeses.

Baked the spaghetti in the center of the oven until the top is golden brown, about 40 minutes.  If desired, turn on the broiler during the last minute or two to create a few darker brown crispy bits but watch closely so it doesn’t burn.


Let cool for a few minutes before cutting and serving.

Friday, August 29, 2014

Baked Italian Sandwiches

 Last Year's Post: Pinchos Morunos
Two Years Ago:   Seafood Cobb Salad

School has started, which means everyone's schedule has gone crazy again.  Football games, after-school activities and other commitments make it really difficult to sit down as a family to eat dinner.  I'm posting these hot sandwiches because they're a great make-ahead solution for a busy workday or a hungry teenager that comes home in the evening.  Everything is assembled in advance - all you have to do is throw however many sandwiches you want into the oven.  I think you could even put the foil-wrapped frozen sandwiches in a slow cooker and turn it on for a few hours while you're gone to a game, or heat the sandwiches before leaving home and throw them in an insulated bag to take to a chilly outdoor game to eat hot - they're really versatile. Although this combination is totally delicious (if I do say so myself), after you make them one time you'll start thinking up your own combinations, tailoring the meats, spice levels and other elements to your family's tastes.

The recipe as written makes 5 sandwiches, but I would strongly suggest doubling it (or making two varieties) to keep in your freezer.  They're very easy to assemble.  The only key is to get rolls that aren't overly squishy (such as hamburger buns) - you want the outer crust to be a little more sturdy so it holds its shape when you pull out the insides.  Hard rolls, ciabatta rolls, or other round-ish sturdy rolls are perfect.  If you could find round pretzel buns they'd be really good also.  Heating the sandwiches in the oven does several things:  it melts the cheeses into gooey goodness, it causes the pesto to permeate the bread and other ingredients with fragrance and flavor, it uniformly heats all the ingredients as opposed to just the outside, and it causes the exterior of the roll to because slightly crisp without becoming really crunchy.  Although I like paninis and grilled sandwiches as much as the next person, this treatment is slightly different and just as good.


Don't be afraid to pack the sandwiches tightly because they'll shrink down a little as the cheese melts. You just don't want them over-stuffed so the tops don't fit and they leak as they're heated.

While we were eating these last night The Lawyer told me how good they were. I remarked that I would definitely have one for dinner when he's gone next week.  His reply?  "Don't eat them all".  Enough said.

printable recipe
Baked Italian Sandwiches
Makes 5 sandwiches

3 ounces (about ½ cup) pitted Kalamata olives, chopped
1/3 cup chopped red onion
4-5 sun-dried tomatoes, chopped
6 ounces shredded mozzarella
1 cloves garlic, minced
5 round sandwich rolls, ciabatta rolls, or hard rolls
3-4 ounces pesto
5 slices provolone cheese
5 ounces thinly sliced salami (about 30 slices)
½ shredded Parmesan


Combine the first five ingredients (olives through garlic) in a medium bowl and set aside.

Cut the top third off each roll and pull out most of the soft interior bread from both the tops and bottoms, being careful not to break through the crust.  Softly press the interior of the rolls and tops to create as much space as possible.

Brush the interior of the rolls and tops with a light layer of pesto, then layer ingredients in the following order:  one slice of provolone, 5-6 slices of salami, the shredded mozzarella mixture, and the Parmesan.  Gently press down on the top of the ingredients so the sandwiches will fit together tightly.  Replace the lid on each and press together.  Wrap each sandwich tightly in foil.

At this point, the sandwiches may be frozen for up to several months.


To bake, preheat the oven to 350d.  Do not remove the foil before baking.  If frozen, bake the sandwiches for 45 minutes.  If not frozen, bake the sandwiches for 25 minutes.  Unwrap and serve.

Friday, July 27, 2012

Grilled Cheese with Pesto, Spinach and Avocado


I love sandwiches of all types, and they seem especially suited to summer for some reason.  Maybe because they're easy and don't require long hours in a hot kitchen.  I particularly like unusual sandwiches like this adult version of the classic grilled cheese that has pesto, mozarella, goat cheese, spinach and avocado.  The combination of creamy avocado and melty cheese with the savory pesto and crisp toasted bread is really excellent.  Even the lemon juice used to keep the avocado from browning adds to the overall flavor.

Sandwiches are also a great excuse to eat potato chips, which some of you know I am addicted to.  I have to have a discussion with myself every time I go near a bag of kettle chips to prevent myself from eating the entire thing.  I told that to The Lawyer last night (when we had these sandwiches with chips) and his reply was "you have a lot of discussions with yourself, don't you?"  I'm not sure what that meant, but it's true so I really couldn't take offense.  The advantage of having a discussion with yourself is that you always make sense and you always come to agreement in the end.

Anyway, this sandwich is really simple to make and can be either grilled like a conventional grilled cheese, or toasted up in a panini press. You can use any type of bread that's your favorite, but I've found a multigrain bread works well.  Depending on how ambitious you are, you can make pesto from scratch (especially if you have basil in your garden) or just buy a container at the store.   Serve the sandwiches with some fresh corn or tomatoes or cucumbers from the farmers market and you have a great summer meal.  Notice I didn't say potato chips.  It was a conscious effort.


* * click here for a printable recipe * *

Grilled Cheese Sandwich with Pesto, Spinach and Avocado
Serves 4

8 slices of bread (white or whole grain)
1 container refrigerated pesto (or homemade)
8 thin slices mozzarella
4 handfuls baby spinach
1 avocado
Juice of half a lemon
3 oz log goat cheese, crumbled
Olive oil


Cut the avocado in half and remove the pit. With a small knife score each avocado half lengthwise into slices and use a large spoon to scoop around the skin to remove all the slices at once. Place in a small bowl and carefully toss with the lemon juice to prevent browning.

Thinly spread pesto on each piece of bread (go easy, pesto has a strong flavor). On half the bread slices, layer one piece of mozzarella, several avocado slices, a little crumbled goat cheese, spinach, and a second slice of mozzarella. Top with a second slice of bread and press together gently.

Heat one tablespoon of olive oil in a frying pan over medium heat. Add one sandwich (or two if your pan is big enough) and fry until golden brown, then flip and cook until the second side is brown. You may want to cover the pan briefly while the sandwich is cooking to ensure all the cheese melts and the sandwich is hot throughout. Alternately, heat a Panini press and grill until the sandwich has nice grill marks and is nicely browned.

Serve immediately.

Friday, July 13, 2012

Tomatoes!


Tomatoes are an obsession for many people, and we're heading right into tomato season.  I plan to feature a few favorite tomato recipes in the coming weeks (including the best salsa ever) so I thought I'd get a little head start now.  Print this recipe and pull it out the first time you see local tomatoes at the market.

The more I thought about this post, the more I realized that I have a lot to say about tomatoes.  The Lawyer and I had a community garden plot for years where we grew almost 30 different varieties of tomatoes, mostly heirloom varieties.  We read tomato catalogs.  We attended tomato tastings at a local hobby farm.  We deliberately grew every color of tomato available to see how they tasted.  So, you can see why I consider myself somewhat of a tomato expert.  Here are a few of the things I learned along the way.

1.  Heirloom tomatoes taste best.  They look funny, they're fussy to grow, and they don't transport well so you'll only find them at local farmers markets.  But the taste is far superior to the nice round, red tomatoes that were engineered to look good and transport over distances.  Be aware that not all tomatoes at a farmers market are heirlooms.  Heirlooms are almost always labeled as such and have funny names like Green Zebra and Mortgage Lifter. If in doubt, ask.  They're probably going to be more expensive than non-heirloom varieties because they're not nearly as prolific (one heirloom vine may produce 5-6 tomatoes compared to 20-30 on a normal tomato plant) but they're SO worth it.


2.  The darker the heirloom tomato, the better the taste.  Green, orange, pink, yellow and striped tomatoes look cool but they don't have much taste.  Deep red and black tomatoes taste best.  (Black tomatoes aren't really black but they're darker than red tomatoes - see below).


3.  Heirloom tomatoes need to be eaten as soon as they're ripe because they can over-ripen quickly.  By the way, did you know that you should never refrigerate a tomato?  It ruins the taste and texture.  That goes for any tomatoes, not just heirlooms.

4.  The reason why a lot of recipes specify Roma tomatoes is beause they have less water/seeds and more meat than regular tomatoes so they aren't as watery in a sauce or salsa.  But they don't have the best flavor for eating raw.

So what are the very best tomato varieties in terms of taste?  In my humble opinion, three stand out.  Two black tomato varieties - Purple Cherokee and Black Russian - are excellent.  I think the picture above was a Black Russian I found last year at the farmers market.  But the holy grail for many tomato fanatics (including me) is Brandywine -  a very large, deep red, lumpy variety that's quite difficult to grow and just about the least prolific variety that exists.  I've always had fond memories of fresh tomatoes that a neighbor used to bring over when I was a kid.  The taste seemed so spectacular in my memory compared to anything I've had since then, that I wondered if I was remembering it wrong.  Then we grew Brandywine and with the first bite I knew it was the exact same taste as in my childhood.  I guess that food memories can lie dormant for a long time and then be recalled with clarity, much like aromas or music, when you encounter them again. 

Brandywine

If you're at a farmers market and happen to see any of these three varieties, buy them immediately and go straight home and eat them.  These are not the type of tomatoes you make into salsa or spaghetti sauce, these are premium eating tomatoes.  Or put them on a sandwich.  How's that for a segue?

Tomato olive melts are a lot like tuna melts but with olive spread instead of tuna.  This is one of my oldest recipes (I have no idea where I found it) and it was originally called "Crostini" and positioned as an appetizer.  The crunchy toasted bread contrasts with the rich olive spread, oozy cheese, and fresh tomatoes to make a classic combination.  We liked them so much that we decided they could be a light meal - just add a green salad on the side.  Or add an egg on the top and they would make a fabulous breakfast.  If you wanted to serve them as an appetizer just use smaller bread or cut them in half.  Any way you serve them, they're absolutely delicious and simple enough that each element really stands out, which is why they need the best tomatoes you can find. 

One last thought about olive spread.  The original recipe called it "olivada".  I've also seen it labeled "bruschetta", "olive pate", and "tapenade".  Basically it's finely chopped kalamata olives with olive oil and a little vinegar.  You can also find green olive or even artichoke varieties.  They're in jars in the olive section of your store.


* * click here for a printable recipe * *

Tomato Olive Melts
Makes 16 pieces

16 slices ½” thick Italian bread
¼ cup olive oil
1/3 black olive tapenade (paste)
½ lb. fresh mozzarella cheese, cut into 16 ¼” thick slices
½ lb. fresh tomatoes, cut into 16 ¼” slices
Salt and pepper


Preheat the oven to 400d. Brush one side of the bread slices with some of the olive oil and arrange on a baking sheet oiled side up. Bake until lightly browned and crusty, about 4 minutes.

Spread the olive tapenade on each toast, cover each with a slice of mozzarella and top with a slice of tomato. Brush the tomatoes with the remaining olive oil and sprinkle with salt and pepper. Bake until the cheese is melted, about 8 to 10 minutes. Serve at once.


Friday, March 2, 2012

Lasagna Techniques


Everyone loves lasagna, don't they?  Yes, it's some work but it makes a lot and re-heats or freezes really well.  It's great for a weekend afternoon project.  I'd like to pass along three techniques that I've recently learned for making lasagna in addition to giving you a really good recipe in case you don't happened to have one from your great-grandmother.

1.  Lasagna is too big
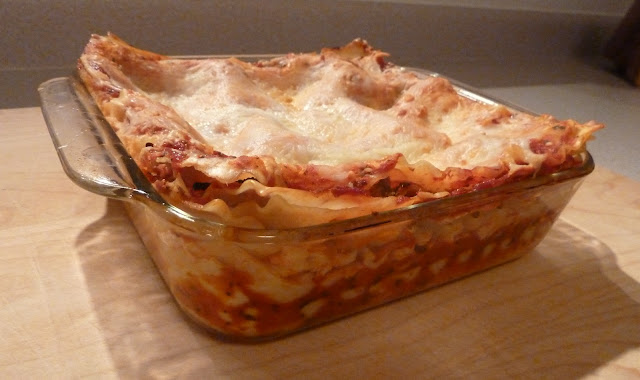
Not many of us have huge families any more and it seems a shame to reserve lasagna only for big parties.  If you make it for a small family, you end up eating it every day for the next two weeks which is probably not the best idea.  So what are you supposed to do with a 9x13 pan of lasagna?  Make two smaller pans. I used the following recipe that called for a typical 9x13 pan and instead used two glass dishes that were each about 8" square.  Have one for dinner and freeze the other one for later or give it to a friend or relative.  Why did it take my entire life for me to figure this out? 
baked and cooled - love the way the noodles rise at the corners
2. Lasagna tends to fall apart when you try to serve it
For greater structural integrity, place each layer of noodles in the opposite direction.  Again, why didn't I do this before?  Maybe because the noodles were sized to fit a 9x13 pan.  See #1 above.

3. Lasagna runs all over when you serve it
Take a tip from restaurants and bake the lasagna the day before you want to serve it.  It cuts into perfect, clean pieces the next day prior to re-heating.  This gives you the added benefit of being able to serve lasagna any night of the week.


The following recipe is slightly unusual in its use of zucchini and cremini mushrooms (I always like recipes with lots of vegetables).  Italian sausage is the protein - you can choose a pork or turkey version, mild or spicy.  (You could even use a vegetarian sausage.) We recently made this recipe for The Lawyer's parents (who can't tolerate much spice) so their pan was mild but we added crushed red pepper flakes to our pan.  Everybody was happy.  By the way, if you happen to have roasted tomatoes left from last summer (see my August post), they make a fabulous addition to lasagnas.

One last thought - when The Lawyer and I were making the lasagna for this post (yes, he helps) he asked me why it didn't call for no-cook noodles.  The reason is structural integrity - how the lasagna holds together when you cut and serve it.  This recipe has good structural integrity due to three reasons - the ratio of sauce to noodles, the slight overlapping of the individual noodles, and criss-crossing the noodle layers.  If you use no-cook noodles you have to use more sauce because the noodles absorb moisture as they cook.  You shouldn't overlap them because they expand in all directions as they absorb moisture, and it's harder to criss-cross the layers because you can't neatly cut them to size.  You could try breaking them but that sounds a lot harder.  So, if you value the convenience of no-cook noodles and don't care that the lasagna layers might slide around a little on your plate, go ahead and use them.

* * click here for a printable recipe * *


Lasagna
Makes 1-9x13 pan or 2-8x8 pans

1-1/2 (16 oz) boxes of lasagna noodles
Olive oil
1 pound Italian sausage (hot or mild or a mix)
4 cloves garlic, smashed, divided
Crushed red pepper flakes
1 (12 oz) package cremini mushrooms, stems removed and caps sliced
1 large zucchini, cut in quarters lengthwise and sliced crosswise
2 cups ricotta
2 cups grated parmesan, divided
2 eggs, lightly beaten
6 to 7 fresh basil leaves, cut into chiffonade
1 large jar marinara sauce (or homemade)
1 pound grated mozzarella

Bring a large pot of salted water to a boil. Working in batches, cook the lasagna noodles until they’re soft and pliable but not limp, 6-7 minutes. Remove from the water and lay flat on parchment paper or a sheet tray to cool.

In a large sauté pan, place 1 tablespoon of olive oil over medium-high heat. Remove the sausage from casings, add to the pan and cook, breaking up with a wooden spoon, until brown and crumbly. Remove from the pan and reserve on paper towels.

Pour the fat from the pan and add new olive oil together with 2 cloves of garlic and a pinch of crushed red pepper over medium heat (be careful not to burn the garlic). When the garlic becomes very aromatic, remove it from the heat and discard. Add the mushrooms to the pan and season with salt. Cook until the moisture has evaporated and the mushrooms are golden, 4 to 5 minutes. Remove from the pan and reserve. Repeat the process with the remaining garlic and zucchini.

In a small bowl, combine the ricotta, half the parmesan, the eggs, and the basil. Mix to combine well and season with salt.

Preheat the oven to 350 degrees.

Spray a 9x13 deep baking dish (or two 8x8 baking dishes) with non-stick cooking spray. Spread the bottom of the dish with marinara sauce. Arrange a layer of lasagna noodles, overlapping slightly (cut to fit if needed). Spread 1/3 of the ricotta mixture over the noodles. Arrange a second layer of noodles over the ricotta in the other direction. Spread a light layer of sauce, then add 1/3 of the sausage, 1/3 of the mushrooms, and 1/3 of the zucchini. Sprinkle a layer of mozzarella and some of the remaining parmesan over the vegetables. Repeat these layers until all ingredients have been used up and the pan(s) are full. Be sure there is a layer of pasta on top covered with sauce and sprinkled with mozzarella and parmesan. Cover with foil.

Place the lasagna on a baking sheet and bake in the oven until hot and bubbly, about 75 minutes, removing the foil for the last 20 minutes or so. Let cool for 20 minutes before slicing.

May be baked in advance and reheated for the most perfect slices. May be frozen, baked or unbaked. Thaw overnight before baking or reheating.

Friday, December 9, 2011

Roasted Tomato Tart with Goat Cheese and Black Olives


If you would like to receive email notifications of Cracked Pepper posts, you can sign up at left.

Remember those tomatoes you roasted last summer?  This recipe is a great way to showcase them, not to mention that it makes a delicious light dinner with a salad and some crusty bread.  It's a good counter-balance to all those heavy dinners that are so prevalent at this time of the year, and it also makes great leftovers for lunch the next day.  If you didn't quite get around to roasting tomatoes last summer, it's OK because the recipe contains instructions for starting with fresh tomatoes.  They'll still taste great because roasting brings out all the flavors and sugars even in grocery store tomatoes.

This tart would also be good served for an easy brunch entree if you happen to be entertaining at this time of the year.  I like making it in a tart pan with a removeable bottom because it makes it easier to cut - I always have trouble getting the first piece out of a regular pie pan.  If you don't have a 9" tart pan you can use a pie pan instead.


Goat cheese gives the tart a mildly tangy flavor.  If you don't care for goat cheese you could certainly substitute any other cheese of your choice.  But if you haven't tasted goat cheese, give it a try.  The flavor is mild because it's mixed with mozzarella and it's a great complement to the olive, tomato, and fresh thyme flavors in the tart. 

I've really been trying to stretch myself when it comes to eating new foods, especially healthy foods.  I recently tried some brussel sprouts that The Lawyer's Sister #2 prepared for Thanksgiving and discovered that I really do like them when they're sliced and sauteed. My open-minded attitude still doesn't extend as far as raw oysters, however.  Slimy slippery disgusting little gray things.  Bleh.

Note that the recipe simply calls for a pie crust without mentioning the origin of said crust.  I knew I was on a slippery slope between the ardent pie-crust-makers on one side and the equally ardent pie-crust-in-a-box people on the other.  I didn't even want to get into that debate because you can't win.  It's sort of like discussing politics.  I still want to put my friend Ted (the Conservative) and my mom (the Liberal) in a closet and see who comes out alive.  I'm betting on mom.  She's little but she's feisty.

If you have roasted tomatoes in your freezer, pat yourself on the back and skip the first paragraph. 


* * click here for a printable recipe * *


Roasted Tomato Tart with Goat Cheese and Black Olives
Serves 6-8

4 tablespoons olive oil, divided
5 roma tomatoes, cored, halved lengthwise and seeded
Salt and pepper

1 pie crust

1 cup shredded mozzarella cheese
½ cup soft fresh plain goat cheese (about 4 ounces)
1 tablespoon minced fresh thyme
2 large eggs
¼ cup half and half
1 large garlic clove, minced
½ cup pitted kalamata or nicoise olives, halved
3 tblespoons freshly grated parmesan cheese


To Roast the Tomatoes:
Preheat the oven to 350d. Line a rimmed baking sheet with foil; brush foil with 1 tablespoon olive oil.  Place the tomato halves, cut side up, on the baking sheet.  Drizzle the remaining olive oil over the tomatoes and sprinkle with salt and pepper.  Roast for 2 hours until shrunken and somewhat dried.  Cool tomatoes on the sheet.  (Can be prepared 1 day ahead.  Store in a covered container in the refrigerator.)

To Prepare the Tart
Transfer the pie crust to a 9 inch tart pan or pie pan, pressing pastry firmly onto the bottom and sides of the pan.  Fold overhang in and press, pushing the crust slightly above the pan.  Pierce the crust all over with a fork and place in the refrigerator to chill.

Preheat the oven to 375d.  Line the pastry with foil and fill with dried beans or pie weights.  Bake until the crust is set, about 20 minutes.  Remove the foil and beans and bake until the crust edges are golden, about 12 minutes longer.  Cool the crust 10 minutes and reduce the oven temperature to 350d.

Meanwhile, mash the mozzarella, goat cheese, and thyme together using a fork.  Season with salt and pepper.  Add eggs and half-and-half and stir until well blended.  Spread cheese filling evenly in the crust.  Arrange tomato halves (cut side up) and olive halves evenly over the filling.  Sprinkle parmesan cheese on the top.  Bake until the filling is puffed and set, about 35 minutes.  Cool 5 minutes.  Serve the tart warm.