Showing posts with label breakfast. Show all posts

Sunday, September 15, 2019

Cardamom Cognac Apple Cake


It's almost officially fall, and that means apples.  This is not your typical apple pie or tart or crumble - it's a very moist, thin cake completely filled with apples and pecans and flavored with cardamom and cognac.  It's sophisticated and tastes quite French, which is a good thing in my world.  Normal people might think of this as a dessert, in which case you might want to add a little sweetened whipped cream or vanilla yogurt on the side.  I'm not much of a dessert person so to me this is weekend brunch fare with a good strong cup of coffee on the side.

As I said, the cake is very moist and actually there isn't much actual cake because there are so many apples.  It's almost like an apple pie with a little bit of cake batter.  The cognac adds a complex flavor note and the cardamom adds warm spice.  If you like cardamom, I guarantee you'll like this cake. 

If you have it for brunch (or not), cut the leftovers into individual slices and freeze (wrapped tightly) for breakfast during the week. 

print
Cardamom Cognac Apple Cake
Serves 6-8

1 cup all-purpose flour
½ teaspoon ground cardamom
¼ teaspoon cinnamon
¾ teaspoon baking powder
¼ teaspoon kosher salt
2 large eggs, at room temperature
3/4 cup granulated sugar
3 tablespoons cognac (Calvados or bourbon work well too)
½ teaspoon vanilla extract
1/3 cup buttermilk, at room temperature
½ cup pecans, lightly toasted and coarsely chopped
3 medium Honeycrisp apples
1 stick (1/2 cup) unsalted butter, melted, plus more for greasing the pan
1 tablespoon coarse (sparkling) sugar
Confectioners’ sugar, for dusting, optional


Preheat the oven to 350F. Place a piece of parchment paper into a 9-or 10-inch cast iron pan and grease with butter.

 In a bowl, whisk together the flour, cardamom, cinnamon, baking powder, and salt. In a separate larger bowl, beat the eggs until foamy. Whisk in the granulated sugar, cognac, and vanilla extract. Pour in the buttermilk and whisk to combine. 

Peel, halve, and core 2 1/2 of the apples, then cut them into 1/2-inch cubes. Reserve the remaining ½ apple (unpeeled, and cut into very thin slices) for the top. 

 Add half of the flour mixture to the wet ingredients, stirring until just combined, then gently fold in half of the melted butter. Repeat with the remaining flour and butter. Gently fold in the pecans and cubed apples (reserving the slices). Transfer the batter to the pan and arrange the apple slices in groups on top of the batter. Sprinkle with sparkling sugar.

Bake until the cake turns golden brown and a cake tester inserted into the center comes out clean, about 55-65 minutes. Transfer the skillet to a cooling rack and let sit for 5-10 minutes before carefully lifting the cake and paper out of the pan (have an extra set of hands helps to do this). The cake may be served warm or at room temperature.  Dust with confectioners’ sugar before serving, if desired. 


Monday, March 11, 2019

Brunch Board


You've heard of charcuterie boards, mezze platters, cheese and cracker boards.....so why not a brunch board?  My inspiration was that two friends were coming over for brunch and I wanted it to be fun and casual, so I decided to go with all finger foods.  OK, there are a few small spoons and knives for spreading things, but everything is grabbed off the communal platter and eaten with your fingers.  For my version, I added:

  • Grilled bread
  • Homemade ricotta cheese with lemon
  • Lingonberry preserves
  • Marinated green olives
  • Cherry tomatoes
  • Hummus
  • Deviled eggs
  • Smoked Gouda and sharp Cheddar cheeses
  • Strawberries
  • Watermelon slices
Other options:
  • Mini bagels (or toasted bagel slices) instead of bread
  • Cream cheese instead of ricotta
  • Smoked salmon
  • Capers
  • Different cheeses
  • Different fruits
  • Mini fruit tarts
  • Etc.
You get the idea - anything you'd associate with brunch that can be eaten with your fingers.  Serve with several fruit juice options, good coffee, and maybe some champagne if you're feeling festive. The best part is that anything you actually have to make (like deviled eggs) can be done in advance and the rest is just assembly.  Put everything on a big tray or cutting board to serve, which makes clean-up a breeze. 

Spring is right around the corner, so there will be plenty of opportunities for a fun brunch for Easter or Mothers Day or just plain celebrating spring.  It's a really easy way to entertain.

Wednesday, July 11, 2018

Cherry Vanilla Overnight Oats


Overnight oats have been very popular on internet sites for a couple of years and I've always meant to try them but hadn't gotten around to it.  I was inspired by some beautiful Rainier cherries I found at the store to make overnight oats using the cherries, but I didn't want to pile everything into a mason jar overnight the way most recipes do.  I guess the theory is that your breakfast is ready to grab and go the next morning, but it seems to me that it would get all mixed together overnight into a pile of mush.  So instead I did the overnight thing with the milk and oats (which is necessary to soften the oats) but then layered everything together in a pretty glass the next morning.  That way the oats, yogurt, and cherries all retained their own taste and texture, and I was able to add a sprinkle of chopped nuts on top for a nice crunch without the nuts getting soft overnight.


I can never resist Rainier cherries because they're so pretty, but regular fresh cherries would work equally well and are usually less expensive than Rainiers.  If it's not fresh cherry season, use frozen cherries - more on that below.

I really liked the fresh cherry texture with the softer yogurt and oats.  I think softer fresh fruits like raspberries wouldn't be quite as nice but you could always use frozen berries that have been partially thawed so they retain a little more chew.  Partially frozen cherries or berries have the added benefit of making your breakfast nice and cold which is great for a hot summer day.  In fact, I think of this as the summer (cold) version of oatmeal, with all the nutrition and goodness that comes along with it.

You could always do the mason jar version of this recipe, but it only takes a minute or two to assemble in the morning and I think it's worth it.

print

Cherry Vanilla Overnight Oats
Makes 1 serving

Per Serving:
½ cup old-fashioned oats
½ cup milk (nonfat, soy milk, nut milk, whatever)
¼ cup plain unsweetened yogurt
½ teaspoon vanilla extract
5 fresh cherries, pitted and halved
1 tablespoon chopped toasted pecans or walnuts, optional
Mint sprigs for garnish, optional


Combine oats, milk and ¼ teaspoon vanilla in a container and mix.  Seal the container and refrigerate overnight.  In the morning, combine the remaining ¼ teaspoon vanilla with the yogurt.  Layer the ingredients in a decorative glass in the following order:  oat mixture, half the yogurt, half the cherries, the other half of yogurt, the other half of cherries.   Garnish with chopped nuts and mint sprigs and serve.


Note: partially thawed frozen pitted sweet cherries would be a great substitute for fresh cherries, especially on a hot day.


Friday, May 4, 2018

French Bread with Roasted Tomatoes and Cheese


 Last Year's Post: Spinach Puff Pastry Tarts
Two Years Ago:    Leek, Bacon and Gruyere Tart

I was thinking this week that breakfast doesn't have to be the same old boring thing.  In Europe, breakfast often involves bread and cheese similar to American breakfasts, but served in different ways.  I wanted to serve some French bread with cheese and roasted tomatoes, and I was inspired to use the idea as an excuse to try a new cheese.  I looked up a list of soft cheeses online and headed to my cheese shop, where I found a cow's milk cheese from southwest France called Chaumes.  The online list of cheeses said it was one of the most popular French cheeses so I decided to give it a try.  It's mild and buttery and tastes a lot like Brie.  As for the tomatoes, I found some nice dark ones at the store but decided to roast them anyway - unless you have perfect peak-of-summer tomatoes, roasting almost always helps intensify their flavor.


One of my friends recently told me she was looking for some 20 minute recipes.  If you count roasting the tomatoes this will take more like 30 minutes, but if you roast them in advance it's about 5 minutes to prep.  And it's so simple that it's basically a non-recipe:  roast some tomatoes and put them on a baguette with some nice soft cheese.  Add a little butter to the bread first if you want, and add some herbs to the tomatoes, and you have a really fast and simple breakfast, lunch or light dinner.  And a great excuse to try a new cheese.

print
French Bread with Roasted Tomatoes and Cheese
Serves 2

4 small-ish tomatoes
Olive oil
Salt and pepper
French or Italian dried herb blend (optional but very good)
1 baguette
Butter
Interesting soft cheese (Brie or similar, I used Chaumes)
Chopped parsley, for garnish


To roast the tomatoes:  Preheat the oven to 400d.  Cut each tomato crosswise into slices.  Place on a baking pan and brush with a little olive oil, then sprinkle with salt, pepper and dried herbs.  Roast in the oven for 20 minutes until softened but not collapsed.  Remove and cool.

Cut the baguette crosswise into two pieces, and then cut each piece lengthwise in half.  Spread with a little butter and microwave for a few seconds to warm the bread and melt the butter.  Distribute cheese and tomato slices among the bread pieces and warm for a few more seconds in the microwave if desired.  Sprinkle with parsley and serve.

Friday, October 7, 2016

Apple Strudel

Last Year's Post: Smoked Salmon Cakes
Two Years Ago:  Pretzel Chicken Bites

It's fall, and you want to make something with apples.  Why not an apple strudel?  Contrary to what you might think, apple strudel isn't complicated or difficult to make.  In fact, I think it's actually easier than making an apple pie if you use puff pastry. (Phyllo dough is also commonly used but a bit more difficult to work with.) It's a relatively light and healthy dessert because the portion size is small and it doesn't have much sugar.  I've found that people generally fall into one of two camps when it comes to apple desserts:  less sweet or more sweet.  As written, this strudel is lightly sweet.  If you're one of those who like sweeter apple desserts, feel free to increase the amount of sugar by a tablespoon or two.  Or, there's always ice cream - cinnamon ice cream would be particularly fabulous.


Strudel is best eaten warm, so you could assemble it in advance and refrigerate it, then bake it while you eat dinner.  The added bonus is that your house will smell great.  Apple strudel also makes a great breakfast or brunch treat on a weekend morning.


print
Apple Strudel
Serves 6

Note that the puff pastry needs to thaw for 30 minutes so plan ahead. 

2 large (or 3 small) Granny Smith apples
1 tablespoon all-purpose flour (plus more for dusting the work surface)
1/4 teaspoon ground cinnamon
2 tablespoons brown sugar
2 tablespoons raisins
¼ cup toasted pecans or almonds, chopped (optional)
1/2 of a 17.3-ounce package frozen puff pastry  (1 sheet), thawed for 30 minutes
1 egg
1 tablespoon water
2 tablespoons powdered sugar  

Heat the oven to 375°F.  Line a baking sheet with parchment paper.

Peel the apples and cut into quarters through the stem end.  Remove the core from each piece and slice crosswise into thin slices.  Mix the sugar, 1 tablespoon flour and cinnamon in a medium bowl. Add the apples, raisins and optional nuts and toss to coat.

Beat the egg and water in a small bowl with a fork. 

Sprinkle a small amount of flour on the work surface.  Unfold the pastry sheet and roll out to a 16 x 12-inch rectangle. With the short side facing you, spoon the apple mixture onto the bottom half of the pastry sheet to within 1 inch of the edge.  Roll up like a jelly roll.  Place seam-side down on prepared baking sheet.  Tuck the ends under to seal.  Brush the pastry with the egg mixture. Cut five 2-inch long slits at even intervals in the top of the pastry (this will allow steam to escape and will help with slicing individual pieces later on).

Bake for 30-35 minutes or until the pastry is golden brown. Let the pastry cool on the baking sheet on a wire rack for 20-30 minutes. Lightly sprinkle with powdered sugar and cut into slices along the slit lines.  Serve warm.


Friday, August 12, 2016

Spanish Omelet

Last year's post:  Cold Sesame Noodles with Cucumber
Two Years Ago:   Empanadas with Chicken, Corn and Zucchini

Although most people in the United States think of omelets as breakfast food, the Spanish omelet (or Spanish tortilla, not to be confused with Mexican tortillas) is a happy hour or dinner entree.  This omelet is one of the most common tapas items, found all over Spain.  A Spanish omelet closely resembles a frittata because it's cooked in a pan and then cut into wedges to serve.  Although it's typically fried in a fair amount of olive oil, then flipped and fried on the other side, this recipe is a lighter and simpler version.  It uses only the fat from the chorizo, and there's no flipping involved - it bakes in the oven, which makes it puff up beautifully.  It makes an easy, fast and delicious dinner.

One of my good friends in college spent a year studying in Spain.  When she returned, she made a traditional Spanish omelet for her buddies so we could try it out.  She fried potato slices and onions in a lot of olive oil, then added the eggs and let the bottom cook until brown.  She put an inverted plate over the frying pan with her hand on top, flipped the pan over so the omelet was on the plate, then slid the omelet back into the pan to brown the other side.  Impressive, but a little scary unless you don't care about your kitchen, which we didn't because we were in a college apartment, after all.

Anyway, as I mentioned this recipe has chorizo in addition to the potatoes, which really revs up the flavor. Make sure you buy Spanish chorizo - not Mexican chorizo - and take the paper casing off before slicing. If you do happen to buy Mexican chorizo by mistake (or can't find Spanish chorizo), just cook it and crumble it like Italian sausage and use it that way.  It'll taste a little different but will still be very good.

Shallots (a mild onion) are added to a parsley salad that goes on top of the omelet when served.  The lemon, shallots and parsley lend bright and tart notes that balance the omelet beautifully.


A brief discussion about pans - this recipe calls for a 7 or 8" nonstick ovenproof pan (or a larger pan if you're going to double the recipe to serve four).  I bought a cast iron skillet a few years ago to make cornbread, and it works perfectly for this recipe.  If you don't have one, consider buying one - they're cheap and they last forever.  Properly seasoned and cared for, they become perfectly non-stick.  All you have to do after making something is to rinse the pan with hot water (not soap) and scrub with a brush, then dry thoroughly and wipe with a drop of cooking oil.  I had absolutely no issue with taking the entire omelet out of the pan in one piece.  (Just don't use cooking spray, it becomes gummy and sticky and hard to remove.)

Spanish omelets are traditionally served either warm or at room temperature, so they're very versatile for parties (cut in small pieces) or family members who come home at different times.

printable recipe
Spanish Omelet
Serves 2

1 red potato, about 3-4” in diameter, scrubbed and cut into chunks
4 eggs
Salt and pepper
4 ounces Spanish chorizo, paper casing removed and sliced
2 sprigs fresh rosemary, leaves picked
1 shallot, peeled and very finely sliced
1 lemon, juiced
2 tablespoons olive oil
1 bunch fresh flat-leaf parsley, leaves picked

Preheat the oven to 500 degrees.

Put the potato chunks in a pan of boiling salted water and simmer until just cooked through but not falling apart, approximately 8 – 10 minutes.  Drain in a colander.  Beat the eggs with a fork in a mixing bowl, season with salt and pepper, and set aside.  Put the sliced shallot in a medium bowl with the lemon juice, some salt and pepper and the olive oil.  Stir and set aside for the shallots to soften while you make the omelet.

Heat a 7 or 8” nonstick (or cast iron) ovenproof frying pan over medium-high heat.  Add the chorizo slices and potatoes and cook until everything is lightly golden, 3-4 minutes.  Remove from the pan with a slotted spoon and set aside.  Sprinkle the rosemary leaves into the pan, then immediately pour on the egg mixture.  Add the chorizo and potatoes on top, spreading out evenly.  Place the pan in the preheated oven and bake until the omelet is puffed and golden, about 8 – 10 minutes.

Remove the omelet from the pan and cut into pieces.  Add the parsley to the shallots and toss to coat.  Serve the omelet with some of the parsley salad on top.

The omelet may be served warm or at room temperature.


Saturday, May 28, 2016

The Best Crisp Waffles

Last Year's Post: Crab Fried Rice
Two Years Ago:   Grilled Salmon and Pineapple with Avocado Dressing

I should say right up front that I have definite opinions about good and bad waffles.  Bad waffles are what you too often find at buffet brunches - pale, doughy and heavy.  Bleh.  Good waffles, on the other hand, are airy, brown and crisp, at least in my world.  The Lawyer is renowned for his waffle-making skills in the family to the point that every time his father sees us he asks "where are the waffles?"

There are two secrets:  the recipe itself, and the cooking technique.  Many years ago I ran across a fussy recipe from America's Test Kitchen that promised light, crisp waffles (yes they were) but it involved whipping egg whites and a master class in folding ingredients just to the right degree which no sane person can (or should) do early in the morning, even fortified with coffee.

The recipe posted below for buttermilk waffles is from Martha Stewart and is quite a bit easier and just as good.   I just adapted the recipe to include The Lawyer's waffle-cooking-perfection technique, which is to turn the waffle iron to the highest setting, wait until the red light goes out, put in the batter, and wait until the green light comes on.  Simple, but effective.  As you can see above the waffles come out deeply golden, light and perfectly crisp.  Keep them warm on a rack in the oven rather than stacking them, which will steam the crispness out.

And here's one more tip for amazing waffles - Jiffy Corn Muffin Mix.  Say what?  Yes, that ubiquitous little box that's been around for a hundred years,  It's on a lower shelf in every grocery store and costs about $.25.  Follow the directions on the side for waffles and cook the same way as described above - they make crisp waffles with a very appealing crunch from the cornmeal.  They are The Lawyer's father's favorite.  (Actually, it makes great pancakes too.)


Waffles are a great breakfast for a holiday weekend with the family.  Add real maple syrup, some sausage, juice and good coffee and you're good to go.

print recipe
Buttermilk Waffles
Serves 4

2 cups all-purpose flour (spooned and leveled)
2 tablespoons sugar
2 teaspoons baking powder
1 teaspoon baking soda
½ teaspoon salt
2 cups low-fat buttermilk
½ cup (1 stick) unsalted butter, melted
2 large eggs
Vegetable oil, for waffle iron

Preheat oven to 275d; set a rack on a baking sheet and place in oven.

In a medium bowl, whisk together flour, sugar, baking powder, baking soda, and salt; set aside.  In a large bowl, whisk together buttermilk, butter, and eggs; add flour mixture and mix just until batter is combined.

Heat waffle iron according to manufacturer’s directions on highest heat; brush with oil.  Pour batter onto iron, close, and cook according to directions (until the light turns green).  The waffles should be dark golden and crisp.  Remove and place on rack in oven to keep warm while making the remaining waffles.

Friday, March 4, 2016

Baked Oatmeal

Last Year's Post:  Chicken and Mushroom Gratinate
Two Years Ago:   Chicken Parmesan with Oven-Roasted Tomato Sauce

Everyone knows that oatmeal is really good for you, but it's tough to make on a weekday.  I've tried a slow cooker overnight version, but that resulted in a gooey soft mess after cooking so long.  Baking the oatmeal in advance not only solves the problem, but it also gives the top a nice brown crispness while the inside remains tender.

If you bake the oatmeal the night before, it's easy to reheat single servings in the toaster oven or microwave so you could even bring a container to work.  Health food at work!  What a concept.  It might seem that the recipe really won't result in the number of servings listed, but oatmeal is very filling.  I made a half recipe and it truly was four servings.  OK, maybe three if you're really hungry.

Although the recipe calls for bananas as a bottom layer I'm not overly fond of the texture of cooked bananas so I substituted some fresh raspberries I had on hand to supplement the frozen wild blueberries.  Feel free to use any single fruit or combination of fruits that you like, and the same for the nuts.  And although the recipe suggests using a sweetener such as maple syrup I made it without any sweetening at all and was very pleased with the result.  It's important to add something on top when it's served, however, since oatmeal can be a bit dry.  Vanilla yogurt works well, as would milk if you serve it in a bowl.  Of course, warm maple syrup would be fabulous.


If you wanted to be a little fancy and serve it for a brunch, you could bake the oatmeal in individual ramekins and serve it topped with a few fresh berries alongside little individual pitchers of maple syrup or cream.  Yum.

print
Baked Oatmeal
Serves 6-8

Note: Feel free to substitute your favorite in-season berries or any other fruit, and your favorite nuts.

2 cups/7 oz rolled oats (not instant)
1/2 cup/2 oz walnut pieces, toasted and chopped
1/3 cup/2 oz natural cane sugar or maple syrup, plus more for serving (optional)
1 teaspoon aluminum-free baking powder
1 1/2 teaspoons ground cinnamon
Scant 1/2 teaspoon fine-grain sea salt
2 cups milk
1 large egg
1.5 tablespoons unsalted butter, melted and cooled slightly
2 teaspoons pure vanilla extract
2 ripe bananas cut into 1/2-inch pieces (or additional berries)
1 1/2 cups/6.5 oz huckleberries, blueberries, or mixed berries
Vanilla yogurt, optional

Preheat the oven to 375°F with a rack in the top third of the oven. Generously butter the inside of an 8-inch square baking dish.

In a bowl, mix together the oats, half the walnuts, the sugar (if using), the baking powder, cinnamon, and salt.  In another bowl, whisk together the maple syrup (if using) the milk, egg, half of the butter, and the vanilla.

Arrange the bananas in a single layer in the bottom of the prepared baking dish. Sprinkle two-thirds of the berries over the top. Cover the fruit with the oat mixture. Slowly drizzle the milk mixture over the oats. Gently tap the baking dish on the countertop a few times to make sure the milk moves through the oats. Scatter the remaining berries and remaining walnuts across the top.

Bake for 35 to 45 minutes, until the top is nicely golden and the oat mixture has set. Remove from the oven and let cool for a few minutes. Serve with optional sugar, maple syrup, or vanilla yogurt on top.


Can be made ahead; reheat individual servings in a toaster oven or microwave.

Friday, November 6, 2015

Dutch Baby

Last Year's Post:  Sausage and Lentils
Two Years Ago:   Halibut Provencale

There are quite a few variations on the puffed German pancake theme.  I think this one - called a Dutch Baby for no apparent reason (although I'm sure that's politically incorrect on some level) - is particularly interesting because it's quite different from one you might have had in a German-themed breakfast restaurant.  Those tend to be highly puffed and very thin.  This turned out to be less puffed and even after it collapsed (yes, they all collapse) it was still a good 1/2" to 3/4" thick, at least when made in a 9" cast iron skillet.  I was doubtful when the recipe claimed it would serve four, but it was right -  the crepe (I'm going to call it a crepe rather than a pancake) was very filling.  It was rich, and tender, and tasted French which is what I say about anything that tastes really good.

You start by preheating the oven, then whizzing all the ingredients in a blender while some butter melts in the pan.  Pour in the batter and bake for 15 minutes or so.  Total time start to finish is about 30 minutes which makes this more appropriate for a weekend breakfast than during the week.  It would be great for a holiday breakfast or brunch.


I'm calling it a crepe because it tasted more like a thick crepe than a pancake to me - more eggy and less floury, almost like a custard.  Actually it's unique and unlike anything else I've had before.  The lemon sugar and toasted almonds were perfect on top - no syrup or jam needed.  Just serve some fresh fruit along side and you have an elegant and unusual breakfast or brunch.

print recipe
Dutch Baby
Serves 4 

2 tablespoons unsalted butter, room temperature
3 large eggs
3/4 cup whole milk
1/2 cup all-purpose flour (spooned and leveled)
1/4 teaspoon salt
1/2 teaspoon pure vanilla extract
1/4 cup plus 1 tablespoon sugar
1 teaspoon lemon zest
2 tablespoons sliced almonds, toasted


Combine 1 tablespoon sugar with lemon zest and set aside.

Preheat oven to 425 degrees. In a medium (9”) cast-iron or ovenproof nonstick skillet, melt butter over medium heat; set aside.

In a blender, combine eggs, milk, flour, salt, vanilla, and 1/4 cup sugar. Blend until foamy, about 1 minute. Pour batter into skillet; bake until pancake is puffed and lightly browned, about 15-20 minutes.

Sprinkle pancake with lemon sugar and almonds.  Remove from pan, slice into wedges, and serve immediately.


Friday, September 18, 2015

Healthy Baked Apples

Last Year's Post: Roast Pork, Fennel and Green Bean Salad
Two Years Ago:  Lavash Chips, Za'atar, Hummus and Green Harissa

Having grown up in the Midwest - one of the prime apple-growing regions of the country - I've always been a big fan of apples in any form.  The University of Minnesota is the largest propagator of new apple varieties and if you go to their Arboretum in the fall they have some of their newest available for sale with charming names like 1016 or 587 - varieties that may or may not make it to the commercial market.  Honeycrisp, the most popular variety ever, is from the U of MN (go Golden Gophers) as is its love child, Sweetango.  If you like Honeycrisp, you'll love Sweetango.  It's fairly new and in limited distribution right now but if you see it at your local store, buy it.

Anyway, baked apples are a great alternative for people trying to eat healthy because they don't involve pie crust but have many of the same flavors as apple pie.  This recipe is particularly healthy because it cuts down on the butter and sugar and is served with yogurt or low fat ice cream rather than whipped cream or maple syrup.

The type of apple you use will influence the ultimate taste, texture and appearance of your baked apples.  Apples that stay firm when baked are preferred because some apples will bake down into mush, which is great for applesauce but not so much for baked apples.  I used Pink Lady apples and was very pleased with their firm texture and sweet apple flavor but I think Honeycrisp or Braeburn would work just as well.  If you like your baked apples a little softer, just cook them a little longer.  Test the apples by sliding a small knife down from the top to see how much resistance there is.

The Lawyer has been known to bake apples whole (without cutting the top off) while possibly choosing the wrong kind of apple because they sometimes tended to come out wrinkled on the top and brown rather than red.  That's another reason to like this recipe - choosing the right apple and cutting the top off makes for a very pretty final presentation.


Are baked apples for breakfast, or for dessert?  The answer is yes.  I tend to think of them as a great breakfast alternative but they would be a spectacular, simple and healthy dessert for any entertaining you do.  And although the recipe says to serve the apples warm, they're also great right out of the refrigerator the next day.


print recipe
Healthy Baked Apples
Serves 4

Note: Use whatever kind of apples you like best. Cooking apples such as Jonathan, Rome Beauty, or Granny Smith work well, as do Honey Crisp, Pink Lady and Braeburn.


4 medium apples
2 tablespoons brown sugar
1 tablespoon butter, melted
½ teaspoon ground cinnamon
¼ teaspoon ground nutmeg
Up to ¼ cup chopped dried fruit, nuts, or granola (optional)
½ cup apple juice

Preheat oven to 350 degrees. Cut the tops off the apples. Remove the core and seeds with a small spoon or knife.  Place the apples in an ovenproof baking dish.

In a small bowl, combine the brown sugar, butter, cinnamon, nutmeg and optional ingredients. Spoon this mixture into the centers of the apples. Pour apple juice into the baking dish.  Using a small spoon, take a little of the juice from the bottom of the dish and drizzle it on top of the apples to moisten.  Bake apples for 40 to 45 minutes or until the apples are firm but tender, basting them occasionally with the juices from the baking dish.  Let cool for a few minutes.  Drizzle with pan juices one last time.

Serve warm with yogurt or low fat ice cream.


Friday, May 15, 2015

Melon Ribbon Bowls


Last Year's Post: Pan-Seared Tuna with Capers and Red Wine Sauce
Two Years Ago:  Orzo and Radicchio Salad

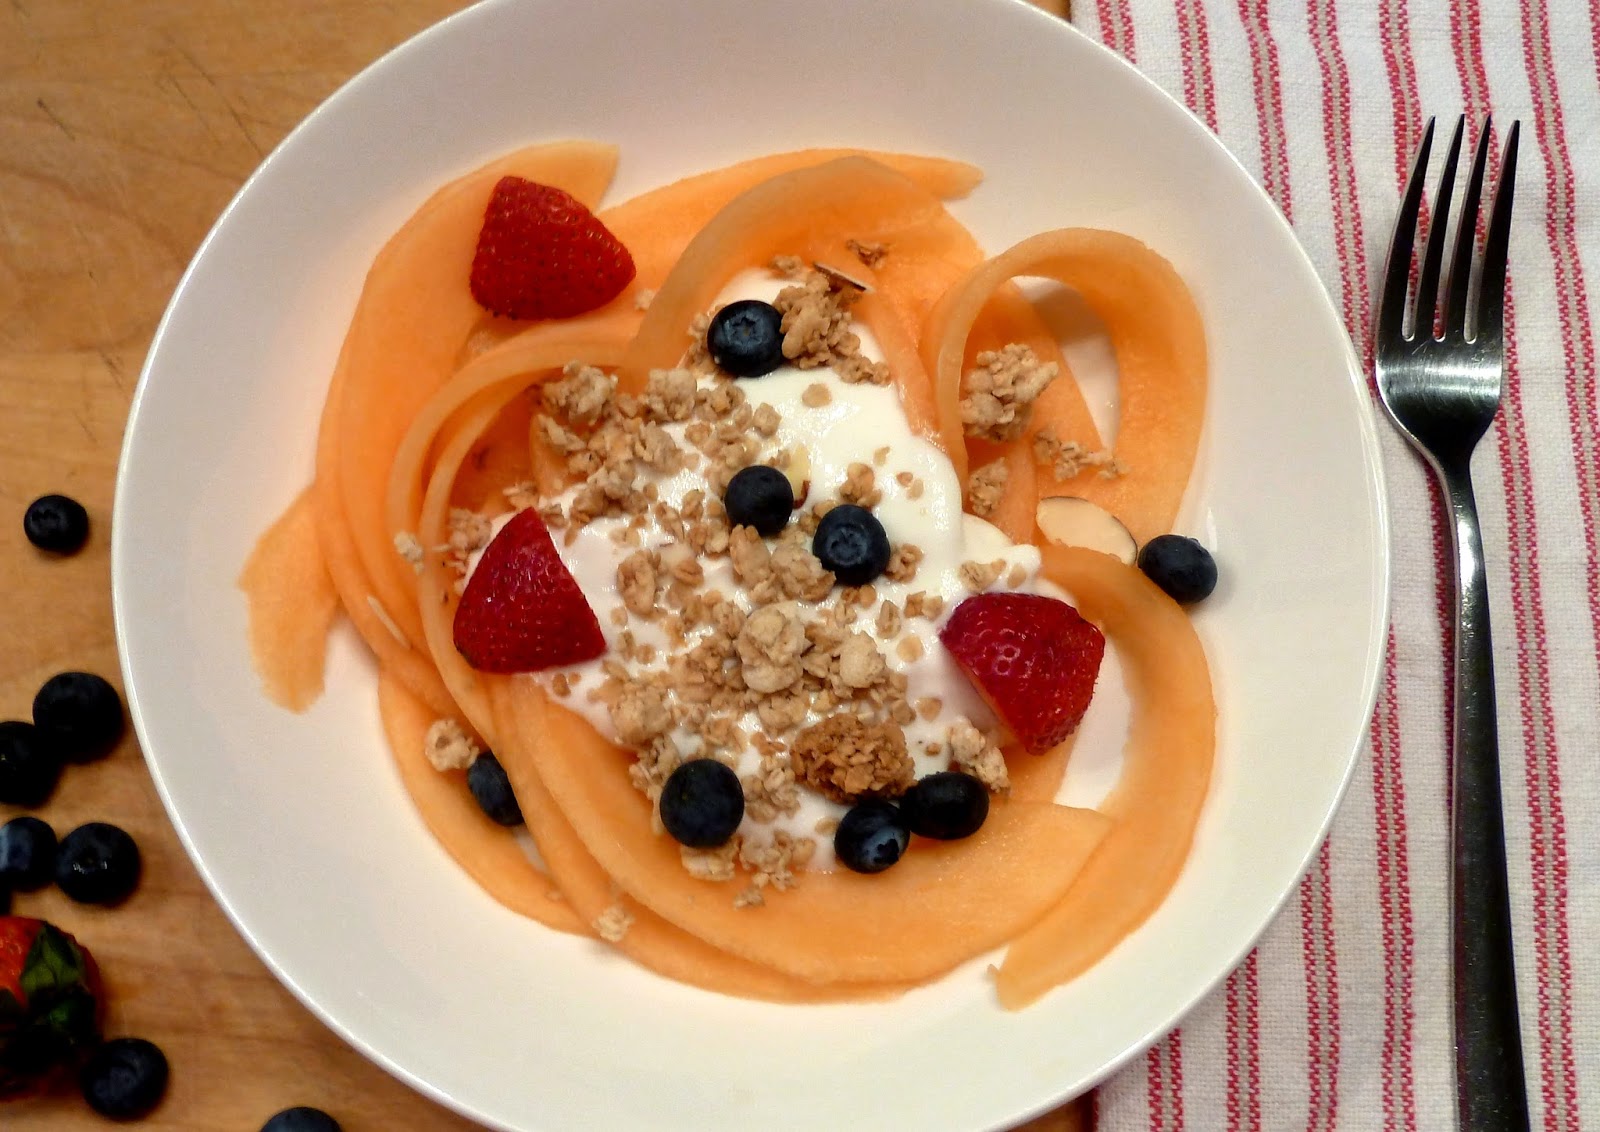
This is so simple I really can't call it a recipe - it's more an assembly technique.  I ran across a picture of the melon ribbons in a magazine and immediately loved the idea as a very pretty breakfast, brunch, or healthy dessert.  The whole concept revolves around an innovative technique for thin-slicing the melon to make ribbons.  Other than that, you're really just making a yogurt parfait.  The original recipe called for making an orange anise syrup, but I think that's overkill.  If you really want a little sweetness, just add a drizzle of honey.

To make melon ribbons, you cut the melon in half and scoop out the seeds, then cut it into quarters.  Carefully separate the flesh from the rind, then use a mandoline, vegetable peeler, or sharp knife to cut ribbons.  After that it's just assembly.  I was having so much fun with the process that I entirely forgot the mint garnish, but I think it still came out great and it was very delicious to eat.  Serve with forks, not spoons.


Melon Ribbon Bowls
Serves 4

The melon ribbons make a great breakfast, brunch, or healthy dessert.


1 ripe cantaloupe or honeydew melon (or a combination)
Vanilla Greek yogurt
Granola
Strawberries, raspberries, blueberries, or a combination
Honey (optional)
Sliced almonds for garnish (optional)
Mint sprigs for garnish (optional)

Cut the melon in half and remove the seeds.  Cut each half again to make quarters, then carefully slice away the flesh from each quarter in one whole piece.  Using a mandoline or vegetable peeler, make thin melon slices.


Divide the melon slices among four bowls, then top with yogurt, a sprinkle of granola, and a few berries.  Optional garnishes include a drizzle of honey, some sliced almonds, or mint sprigs.

Saturday, February 21, 2015

Baked Pumpkin Spice Granola

Last Year's Post: Wild Mushroom and Gruyere Quiche
Two Years Ago:  Wild Mushroom & Wild Rice Chicken Soup

"Baked pumpkin spice granola" - doesn't that just sound good?  Like it will make your kitchen smell great.  And it's true.

The Lawyer and I like to sprinkle granola over yogurt for breakfast, and it's also fabulous in pancakes to add crunch.  Or, eaten straight out of hand, it makes a delicious mid-afternoon snack.  One time I gave some homemade granola to a friend who didn't particularly like to cook, and she told me later that she had it for dinner every night for a week.  However you eat it, granola is delicious.  This particularly granola is only lightly sweet but has the most wonderful flavor combination where no one flavor overwhelms.  At first you taste the spices, then a hint of coconut comes in, and then the pumpkin comes through.  

This granola is slightly darker than most you'll find at the store, due to the spices, dark brown sugar, maple syrup and pumpkin.  It's about the color of "normal" granola before it's baked, so don't freak out when it turns slightly darker during baking.  Just be sure to stir every ten minutes and it won't turn too dark.

Granola is incredibly easy to make and much less expensive than buying it in the store.  Its a fun little weekend project that you'll appreciate during the following week.  And it makes a great gift, too.


printable recipe
Baked Pumpkin Spice Granola
Yields approximately 5 cups

3 ¾ cups old-fashioned rolled oats
2/3 cup unsweetened coconut
2/3 cup sliced almonds
2 teaspoons ground cinnamon
1 teaspoon pumpkin pie spice*
1/8 teaspoon salt
½ cup pumpkin puree
1/3 cup pure maple syrup
¼ cup plus 2 tablespoons vegetable oil
3 tablespoons dark brown sugar
1 teaspoon vanilla extract

Preheat oven to 325d.

Line two large baking sheets with silicone baking mats or parchment paper.  In a large bowl, toss the oats, coconut, almonds, spices and salt together until well combined.  Set aside.

In a medium bowl, add the pumpkin puree, maple syrup, vegetable oil, brown sugar and vanilla; whisk until smooth.  Pour over dry ingredients and mix until everything is moistened.  Divide evenly between the baking sheets and spread out into a thin layer.

Bake each batch for 40 minutes, stirring every 10-15 minutes.  Allow granola to cool on the baking sheets for 20 minutes.  Cover tightly and store at room temperature.


* Or use ½ teaspoon ground cloves, ¼ teaspoon ground nutmeg, and ¼ teaspoon ground allspice.

Friday, November 14, 2014

Cornmeal Herb Scones


Last Year's Post: Thai Lettuce Wraps
Two Years Ago:  Brandied Cranberries

Breakfast is one of my favorite meals, especially weekend breakfast - there's something luxurious about taking the time to have something special.  In a previous life, "something special" often involved large amounts of eggs, potatoes, and toast, or plates of pancakes or french toast that would make me feel like doing nothing more than laying on the couch for the rest of the day.  Ah, the good old days.  I still like a special weekend (or holiday!) breakfast, but I've learned to exercise a little restraint and these days it more often involves a bagel or pastry with a cup of really good coffee.  It's still a treat, it's just a smaller treat.

Hence the scones.  I've discovered that scones purchased in a bakery or restaurant can vary from cakey - much like a muffin - to hard and dry, so I've learned to rely on making them at home.  My ideal scone is tender and somewhat crumbly, but not cakey and not overly sweet.  I was attracted to this recipe because I like crunchiness of cornmeal and had never put it in scones before.  The original recipe called for a fingerprint of plum jam on top of each scone, which I swapped in favor of some minced herbs.  I expected the scone to be on the savory side, but was very surprised that it went incredibly well with raspberry jam - something about the herbs really complemented the flavor of the jam.  The scone itself is lightly crunchy from the cornmeal, yet not really what I would call overly savory or sweet - just right in the middle.  I was very pleased with the recipe.

The scones are very easy to make in a food processor, and they freeze beautifully.  You could make them a day in advance if you want to serve them right away in the morning, then reheat them briefly in the microwave.  (Ideal for busy holiday mornings.)


The recipe calls for the egg and the butter to be at room temperature which I've noticed before, and led me to wonder why.


Here's what I found at RealSimple.com after a little searching:

At room temperature, eggs, butter, and milk bond and form an emulsion that traps air. During baking, the air expands, producing light, airy, evenly baked treats. Batters made with room temperature ingredients are smooth and evenly incorporated. Cold ingredients don’t incorporate evenly to bond, resulting in dense cookies, rock-hard breads, and clumpy cheesecakes. Batters made with cold ingredients won’t come together smoothly.

Take eggs, butter, and other dairy products out of the refrigerator at least 30 minutes and up to 1 hour before baking. 


If you’re short on time, cut your butter into small pieces and microwave for a few seconds at a time, checking often, until they’re just malleable. Make sure to keep eye on it because microwaves vary.  Bring cold eggs to room temperature by placing them in a bowl of warm water for 15 minutes. Don’t use hot water or put eggs on top of a hot oven—this will heat them unevenly, and the whites will start to set.

I always thought "room temperature" meant the ingredients had to sit out for hours, so I was glad to find this info.

printable recipe
Cornmeal Herb Scones
Makes 8 scones

¾ c heavy cream
1 large egg, at room temperature
1 2/3 cups all-purpose flour
1/3 cup cornmeal
3 tablespoons sugar
2 teaspoons baking powder
½ teaspoon kosher salt
1 tablespoon minced mixed herbs (thyme and rosemary)
6 tablespoons unsalted butter, at room temperature


Heat oven to 400d.  Line a baking sheet with parchment paper.

In a small bowl or measuring cup, whisk together the egg and cream.

In a food processor, pulse together the flour, cornmeal, sugar, baking powder, salt and herbs.  Add the butter and pulse until the mixture forms coarse crumbs.  Drizzle in as much of the cream mixture as you need to make a smooth, moist but not wet dough.  Save remaining cream mixture for brushing.

Turn dough out onto prepared baking sheet.  Pat into a 1 ¼ -inch thick round.  Using a small knife, cut into 8 pie-shaped wedges and push them ½” apart using a small spatula.  Brush dough with the remaining cream mixture.

Transfer pan to oven and bake until uniformly golden brown, 15 to 17 minutes, rotating once.  Cool 5 minutes in the pan, then transfer to a wire rack to cool completely.  Serve scones with butter and jam.

Note:  the scones freeze well wrapped in foil or in a zip top bag.  Thaw and reheat briefly in a microwave oven.