Showing posts with label brunch. Show all posts

Sunday, September 15, 2019

Cardamom Cognac Apple Cake


It's almost officially fall, and that means apples.  This is not your typical apple pie or tart or crumble - it's a very moist, thin cake completely filled with apples and pecans and flavored with cardamom and cognac.  It's sophisticated and tastes quite French, which is a good thing in my world.  Normal people might think of this as a dessert, in which case you might want to add a little sweetened whipped cream or vanilla yogurt on the side.  I'm not much of a dessert person so to me this is weekend brunch fare with a good strong cup of coffee on the side.

As I said, the cake is very moist and actually there isn't much actual cake because there are so many apples.  It's almost like an apple pie with a little bit of cake batter.  The cognac adds a complex flavor note and the cardamom adds warm spice.  If you like cardamom, I guarantee you'll like this cake. 

If you have it for brunch (or not), cut the leftovers into individual slices and freeze (wrapped tightly) for breakfast during the week. 

print
Cardamom Cognac Apple Cake
Serves 6-8

1 cup all-purpose flour
½ teaspoon ground cardamom
¼ teaspoon cinnamon
¾ teaspoon baking powder
¼ teaspoon kosher salt
2 large eggs, at room temperature
3/4 cup granulated sugar
3 tablespoons cognac (Calvados or bourbon work well too)
½ teaspoon vanilla extract
1/3 cup buttermilk, at room temperature
½ cup pecans, lightly toasted and coarsely chopped
3 medium Honeycrisp apples
1 stick (1/2 cup) unsalted butter, melted, plus more for greasing the pan
1 tablespoon coarse (sparkling) sugar
Confectioners’ sugar, for dusting, optional


Preheat the oven to 350F. Place a piece of parchment paper into a 9-or 10-inch cast iron pan and grease with butter.

 In a bowl, whisk together the flour, cardamom, cinnamon, baking powder, and salt. In a separate larger bowl, beat the eggs until foamy. Whisk in the granulated sugar, cognac, and vanilla extract. Pour in the buttermilk and whisk to combine. 

Peel, halve, and core 2 1/2 of the apples, then cut them into 1/2-inch cubes. Reserve the remaining ½ apple (unpeeled, and cut into very thin slices) for the top. 

 Add half of the flour mixture to the wet ingredients, stirring until just combined, then gently fold in half of the melted butter. Repeat with the remaining flour and butter. Gently fold in the pecans and cubed apples (reserving the slices). Transfer the batter to the pan and arrange the apple slices in groups on top of the batter. Sprinkle with sparkling sugar.

Bake until the cake turns golden brown and a cake tester inserted into the center comes out clean, about 55-65 minutes. Transfer the skillet to a cooling rack and let sit for 5-10 minutes before carefully lifting the cake and paper out of the pan (have an extra set of hands helps to do this). The cake may be served warm or at room temperature.  Dust with confectioners’ sugar before serving, if desired. 


Friday, February 23, 2018

Kale Chorizo Potato Quiche

Last Year's Post:  Yakisoba
Two Years Ago:   Chicken with Lemon Pomegranate Sauce and Pistachio Rice

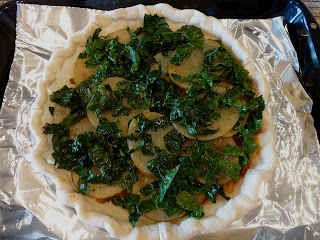
The is a great quiche for fall or winter, because it's spicy and filling with big flavors from the Mexican chorizo and kale.  It makes a great dinner with a side salad, and an excellent weekend brunch with some fruit.

My recommendation is to use a mandoline to slice the potatoes into uniformly thin slices.  If you don't have a mandoline, use a very sharp knife or cut them into small cubes instead.


I've said it a million times but it bears repeating, Mexican chorizo and Spanish chorizo are not the same.  Mexican chorizo is a fresh chorizo that will typically be found in trays in the pork section of your store.  Spanish chorizo is a dried sausage that looks much like pepperoni.  You want Mexican chorizo here.  One of the big benefits of using chorizo is that it contains all the spices you need for the whole dish except for salt and pepper, which makes things easy.


First you pre-bake the crust.  While it bakes, prep the veggies and shred the cheese.  Then you just saute the chorizo and onion, and repeat with the potatoes and kale.  Stir together the eggs and milk, and assemble.   Make a big salad while it bakes.  Delicious.


print
Kale Chorizo Potato Quiche
Serves 8

1 pie crust
1/3 lb Mexican chorizo
1/2 small white onion, diced
1 russet potato, sliced thinly or diced into small cubes
1/4 cup water
4 cups torn fresh kale leaves
4 eggs
3/4 cup milk
3 oz. white cheddar cheese, shredded and divided
Salt & pepper

Preheat the oven to 400F. Roll pie dough out to 1/4″ thick and fit it to a pie pan. Line with foil and pie weights. Cook for 8-9 minutes, then remove the foil and cook for another 4 minutes. Remove from the oven and set aside.

In a large frying pan over medium heat, brown the chorizo. Cook, breaking apart with a wooden spoon, until it is all browned. Add the onion and cook for 3 minutes, then remove the chorizo and onions. Add the 1/4 cup of water and deglaze before adding the potatoes.  Season with salt and pepper.   Cover and cook until the potatoes are softened but not breaking apart, approximately 3 minutes, gently stirring once.    Add the kale to the pan and cook until just wilted (1-2 minutes). Remove from heat.

In a large bowl, whisk together the eggs, milk, and about 1/4 tsp each of salt and pepper. Layer 1/3 of the cheddar cheese in the crust, followed by half of the potato mixture, then all of the chorizo mixture and the other half of the potato mixture. Pour the custard over all.  Top with the remaining cheese. 

Bake at 375F for 40-45 minutes, or until the top is puffed and golden and the middle is set.


Friday, December 8, 2017

The Way Too Easy - No Butter Scone

Last Year's Post:  Baked Egg Bowls
Two Years Ago:    Southwest Eggrolls (baked not fried)

If you like scones, this recipe is for you.  And if you've ever had a dried-out hockey puck of a scone in a bakery, give this one a chance.  Yes, you can buy a scone mix, but this recipe is easier than making cookies and you can customize it any way you want.  My favorite part is that you can mix up the dough the night before and then just bake the scones in the morning while you sip on coffee.  Warm scones for weekend breakfast!  Since I'm not particularly a morning person that really appealed to me.  (Thanks to my good friend Brad for the recipe!)

Scones seem to be sort of a cross between a biscuit and a muffin.  Some recipes lean more toward the more tender/crumbly biscuit end of the spectrum such as this cornmeal herb scone or this savory breakfast scone, but this recipe is soft and skews more toward the muffin side.  You can add your favorite spices, dried fruit, chocolate chips, flavored extracts and even grated lemon or orange zest to make it your own creation.

If you're having people for breakfast or brunch, this is an easy way to serve warm, fresh baked goods without fussing around with muffin papers or fancy pastries.

print
The Way Too Easy – No Butter Scone
Makes 8

2 cups all purpose flour
1 tablespoon baking powder
½ teaspoon salt
2 teaspoons cinnamon (or other spices)
1 ¼ cups raisins (or cranberries, chocolate chips, nuts, or a combination)
1/3 cup granulated sugar
1 ¼ cups cream, cold
1-2 teaspoons flavored extract (vanilla, orange, etc.), optional

Topping
Eggwash (one egg beaten with one tablespoon water) or melted butter
Coarse sugar (can substitute regular sugar, just not as pretty)


Preheat oven to 375d.

Combine dry ingredients in a large bowl, stirring in raisins or other add-ins last.  Add cream and stir until ingredients are just combined.  Form a ball of the dough and place on a floured surface.  Flatten and then fold a few times, then flatten into a circle about 1” thick if you’re going to cut wedges, or into a log about 12” long if you’re going to cut rounds.

Cut the circle into 8 wedges and place on a parchment lined cookie sheet.  If you formed a log, cut it into 8 equal pieces and put it on the parchment lined sheet.  Brush the tops with egg wash or butter, then sprinkle with sugar.  Bake about 15 minutes until golden.  Let cool on baking sheet about 10 minutes before serving warm.


Make Ahead:  Follow the recipe until you’ve formed the round or log.  Wrap the dough tightly in plastic wrap and refrigerate for at least one hour and up to overnight.  Remove and proceed with the rest of the recipe.

Friday, October 7, 2016

Apple Strudel

Last Year's Post: Smoked Salmon Cakes
Two Years Ago:  Pretzel Chicken Bites

It's fall, and you want to make something with apples.  Why not an apple strudel?  Contrary to what you might think, apple strudel isn't complicated or difficult to make.  In fact, I think it's actually easier than making an apple pie if you use puff pastry. (Phyllo dough is also commonly used but a bit more difficult to work with.) It's a relatively light and healthy dessert because the portion size is small and it doesn't have much sugar.  I've found that people generally fall into one of two camps when it comes to apple desserts:  less sweet or more sweet.  As written, this strudel is lightly sweet.  If you're one of those who like sweeter apple desserts, feel free to increase the amount of sugar by a tablespoon or two.  Or, there's always ice cream - cinnamon ice cream would be particularly fabulous.


Strudel is best eaten warm, so you could assemble it in advance and refrigerate it, then bake it while you eat dinner.  The added bonus is that your house will smell great.  Apple strudel also makes a great breakfast or brunch treat on a weekend morning.


print
Apple Strudel
Serves 6

Note that the puff pastry needs to thaw for 30 minutes so plan ahead. 

2 large (or 3 small) Granny Smith apples
1 tablespoon all-purpose flour (plus more for dusting the work surface)
1/4 teaspoon ground cinnamon
2 tablespoons brown sugar
2 tablespoons raisins
¼ cup toasted pecans or almonds, chopped (optional)
1/2 of a 17.3-ounce package frozen puff pastry  (1 sheet), thawed for 30 minutes
1 egg
1 tablespoon water
2 tablespoons powdered sugar  

Heat the oven to 375°F.  Line a baking sheet with parchment paper.

Peel the apples and cut into quarters through the stem end.  Remove the core from each piece and slice crosswise into thin slices.  Mix the sugar, 1 tablespoon flour and cinnamon in a medium bowl. Add the apples, raisins and optional nuts and toss to coat.

Beat the egg and water in a small bowl with a fork. 

Sprinkle a small amount of flour on the work surface.  Unfold the pastry sheet and roll out to a 16 x 12-inch rectangle. With the short side facing you, spoon the apple mixture onto the bottom half of the pastry sheet to within 1 inch of the edge.  Roll up like a jelly roll.  Place seam-side down on prepared baking sheet.  Tuck the ends under to seal.  Brush the pastry with the egg mixture. Cut five 2-inch long slits at even intervals in the top of the pastry (this will allow steam to escape and will help with slicing individual pieces later on).

Bake for 30-35 minutes or until the pastry is golden brown. Let the pastry cool on the baking sheet on a wire rack for 20-30 minutes. Lightly sprinkle with powdered sugar and cut into slices along the slit lines.  Serve warm.


Friday, August 12, 2016

Spanish Omelet

Last year's post:  Cold Sesame Noodles with Cucumber
Two Years Ago:   Empanadas with Chicken, Corn and Zucchini

Although most people in the United States think of omelets as breakfast food, the Spanish omelet (or Spanish tortilla, not to be confused with Mexican tortillas) is a happy hour or dinner entree.  This omelet is one of the most common tapas items, found all over Spain.  A Spanish omelet closely resembles a frittata because it's cooked in a pan and then cut into wedges to serve.  Although it's typically fried in a fair amount of olive oil, then flipped and fried on the other side, this recipe is a lighter and simpler version.  It uses only the fat from the chorizo, and there's no flipping involved - it bakes in the oven, which makes it puff up beautifully.  It makes an easy, fast and delicious dinner.

One of my good friends in college spent a year studying in Spain.  When she returned, she made a traditional Spanish omelet for her buddies so we could try it out.  She fried potato slices and onions in a lot of olive oil, then added the eggs and let the bottom cook until brown.  She put an inverted plate over the frying pan with her hand on top, flipped the pan over so the omelet was on the plate, then slid the omelet back into the pan to brown the other side.  Impressive, but a little scary unless you don't care about your kitchen, which we didn't because we were in a college apartment, after all.

Anyway, as I mentioned this recipe has chorizo in addition to the potatoes, which really revs up the flavor. Make sure you buy Spanish chorizo - not Mexican chorizo - and take the paper casing off before slicing. If you do happen to buy Mexican chorizo by mistake (or can't find Spanish chorizo), just cook it and crumble it like Italian sausage and use it that way.  It'll taste a little different but will still be very good.

Shallots (a mild onion) are added to a parsley salad that goes on top of the omelet when served.  The lemon, shallots and parsley lend bright and tart notes that balance the omelet beautifully.


A brief discussion about pans - this recipe calls for a 7 or 8" nonstick ovenproof pan (or a larger pan if you're going to double the recipe to serve four).  I bought a cast iron skillet a few years ago to make cornbread, and it works perfectly for this recipe.  If you don't have one, consider buying one - they're cheap and they last forever.  Properly seasoned and cared for, they become perfectly non-stick.  All you have to do after making something is to rinse the pan with hot water (not soap) and scrub with a brush, then dry thoroughly and wipe with a drop of cooking oil.  I had absolutely no issue with taking the entire omelet out of the pan in one piece.  (Just don't use cooking spray, it becomes gummy and sticky and hard to remove.)

Spanish omelets are traditionally served either warm or at room temperature, so they're very versatile for parties (cut in small pieces) or family members who come home at different times.

printable recipe
Spanish Omelet
Serves 2

1 red potato, about 3-4” in diameter, scrubbed and cut into chunks
4 eggs
Salt and pepper
4 ounces Spanish chorizo, paper casing removed and sliced
2 sprigs fresh rosemary, leaves picked
1 shallot, peeled and very finely sliced
1 lemon, juiced
2 tablespoons olive oil
1 bunch fresh flat-leaf parsley, leaves picked

Preheat the oven to 500 degrees.

Put the potato chunks in a pan of boiling salted water and simmer until just cooked through but not falling apart, approximately 8 – 10 minutes.  Drain in a colander.  Beat the eggs with a fork in a mixing bowl, season with salt and pepper, and set aside.  Put the sliced shallot in a medium bowl with the lemon juice, some salt and pepper and the olive oil.  Stir and set aside for the shallots to soften while you make the omelet.

Heat a 7 or 8” nonstick (or cast iron) ovenproof frying pan over medium-high heat.  Add the chorizo slices and potatoes and cook until everything is lightly golden, 3-4 minutes.  Remove from the pan with a slotted spoon and set aside.  Sprinkle the rosemary leaves into the pan, then immediately pour on the egg mixture.  Add the chorizo and potatoes on top, spreading out evenly.  Place the pan in the preheated oven and bake until the omelet is puffed and golden, about 8 – 10 minutes.

Remove the omelet from the pan and cut into pieces.  Add the parsley to the shallots and toss to coat.  Serve the omelet with some of the parsley salad on top.

The omelet may be served warm or at room temperature.


Friday, April 29, 2016

Leek, Bacon and Gruyere Tart

Last Year's Post: Spanish Asparagus Revuelto
Two Years Ago:   Coconut Lime Grilled Shrimp with Pineapple Rice

Mother's Day is coming up, and I have a suggestion for a much more fun alternative to a stuffy, over-priced restaurant buffet.  I've been doing this Mother's Day brunch menu for a long time, and it really works.

Here's the game plan:
1.  Make one or more savory tarts, depending on the size of your crowd.  The one shown above is popular with all age groups and can be served warm or at room temperature.
2.  Buy a big plastic container of cut-up fruit at the store, and put it in a pretty bowl.  (No one will ever know.)
3.  Buy croissants, muffins and other pastries and arrange them on a large platter.
4.  Buy at least 4-5 fun and interesting organic juice blends and stick them in a big tub of ice.  Add a bottle of champagne to make mimosas for the adults.
5.  Make a big pot of strong coffee.

If you have family members who always ask "what can I bring?", assign the fruit, pastries, juices and champagne to others.  That way all you have to do is make the tart(s) and brew the coffee.

If it's a nice day, have the party outside.  Everyone is relaxed and the kids have so much more fun than if they were forced to dress up and sit at a restaurant table for endless hours.  And interestingly, the juices are usually the hit of the party because people like to try different kinds that they wouldn't normally have.


This particular tart recipe combines sauteed mild leeks with bacon and nutty Gruyere cheese and is absolutely delicious.  It calls for an 11" tart pan which is pretty big and would serve 6 for dinner with a salad and crusty bread, or would easily serve 8 as part of a larger brunch.  If you want to make a couple of different tarts or quiches (basically the same thing except a quiche pan is deeper than a tart pan), here are a couple of other ideas I've posted in the past:  roasted tomato tart with goat cheese and black olivescotswold quichewild mushroom and gruyere quichesummer harvest quiche, and cabbage and spring onion tart.  If you do make two different tarts, cut them into smaller pieces so everyone can try both.

Leek, Bacon and Gruyere Tart
Serves 6-8

One unbaked pie crust, homemade or purchased
4 slices bacon, cut into small dice
1 oz. (2 Tbs.) unsalted butter
3 large leeks (white and light green parts only), cleaned and sliced crosswise 1⁄4 inch thick to yield about 4 cups
1 Tbs. unbleached all-purpose flour
2 large eggs
1⁄3 cup heavy cream
1⁄3 cup whole milk
3⁄4 tsp. kosher salt
1⁄8 tsp. freshly grated nutmeg
Freshly ground black pepper
2⁄3 cup grated Gruyère (or Emmentaler)

Position a rack in the center of the oven and heat the oven to 450°F.

Roll the dough out to a 14-inch circle about 1⁄8 inch thick.  Transfer the dough to an 11-inch fluted tart pan with a removable bottom and press it carefully into the corners and up the sides of the pan. Fold any excess dough back into the pan and press along the sides to make a sturdier rim. Prick the surface of the dough all over with a fork, line it with parchment, and fill it with pie weights or dried beans. Put the pan on a rimmed baking sheet and bake until the edges of the tart shell are dry and flaky (but not browned), about 10 minutes. Remove the weights and parchment; the center should still be moist and raw. Prick the bottom again and return the shell to the oven. Bake until the bottom surface is completely dry, 5 to 7 minutes more. Remove from the oven and let cool.

Lower the oven temperature to 375°F.

Make the filling:
In a 12-inch skillet, cook the bacon over medium heat until crisp and golden brown, about 5 minutes. With a slotted spoon, transfer the bacon to a dish and set aside. Discard all but about 2 tsp. of the bacon fat. Set the skillet over medium-low heat, add the butter, let it melt, and then add the leeks. Stir to coat them with the fat, cover, and cook, stirring occasionally, until soft, 8 to 10 minutes. Stir the flour into the leeks and cook uncovered, stirring, for about 2 minutes to cook off the raw-flour flavor. Set aside and let cool slightly.

In a medium bowl, lightly whisk the eggs. Add the cream, milk, salt, nutmeg, and several grinds of pepper and whisk until blended. Add the bacon and leeks to the mixture and stir to combine.

To assemble the tart, scatter 1⁄3 cup cheese over the cooled tart shell and pour in the egg mixture. Spread the leeks evenly. Scatter the remaining 1⁄3 cup cheese evenly over the top. Bake until the custard is set and the top is light golden brown, about 35 minutes. Let cool on a rack for at least 30 minutes before serving.


Friday, March 4, 2016

Baked Oatmeal

Last Year's Post:  Chicken and Mushroom Gratinate
Two Years Ago:   Chicken Parmesan with Oven-Roasted Tomato Sauce

Everyone knows that oatmeal is really good for you, but it's tough to make on a weekday.  I've tried a slow cooker overnight version, but that resulted in a gooey soft mess after cooking so long.  Baking the oatmeal in advance not only solves the problem, but it also gives the top a nice brown crispness while the inside remains tender.

If you bake the oatmeal the night before, it's easy to reheat single servings in the toaster oven or microwave so you could even bring a container to work.  Health food at work!  What a concept.  It might seem that the recipe really won't result in the number of servings listed, but oatmeal is very filling.  I made a half recipe and it truly was four servings.  OK, maybe three if you're really hungry.

Although the recipe calls for bananas as a bottom layer I'm not overly fond of the texture of cooked bananas so I substituted some fresh raspberries I had on hand to supplement the frozen wild blueberries.  Feel free to use any single fruit or combination of fruits that you like, and the same for the nuts.  And although the recipe suggests using a sweetener such as maple syrup I made it without any sweetening at all and was very pleased with the result.  It's important to add something on top when it's served, however, since oatmeal can be a bit dry.  Vanilla yogurt works well, as would milk if you serve it in a bowl.  Of course, warm maple syrup would be fabulous.


If you wanted to be a little fancy and serve it for a brunch, you could bake the oatmeal in individual ramekins and serve it topped with a few fresh berries alongside little individual pitchers of maple syrup or cream.  Yum.

print
Baked Oatmeal
Serves 6-8

Note: Feel free to substitute your favorite in-season berries or any other fruit, and your favorite nuts.

2 cups/7 oz rolled oats (not instant)
1/2 cup/2 oz walnut pieces, toasted and chopped
1/3 cup/2 oz natural cane sugar or maple syrup, plus more for serving (optional)
1 teaspoon aluminum-free baking powder
1 1/2 teaspoons ground cinnamon
Scant 1/2 teaspoon fine-grain sea salt
2 cups milk
1 large egg
1.5 tablespoons unsalted butter, melted and cooled slightly
2 teaspoons pure vanilla extract
2 ripe bananas cut into 1/2-inch pieces (or additional berries)
1 1/2 cups/6.5 oz huckleberries, blueberries, or mixed berries
Vanilla yogurt, optional

Preheat the oven to 375°F with a rack in the top third of the oven. Generously butter the inside of an 8-inch square baking dish.

In a bowl, mix together the oats, half the walnuts, the sugar (if using), the baking powder, cinnamon, and salt.  In another bowl, whisk together the maple syrup (if using) the milk, egg, half of the butter, and the vanilla.

Arrange the bananas in a single layer in the bottom of the prepared baking dish. Sprinkle two-thirds of the berries over the top. Cover the fruit with the oat mixture. Slowly drizzle the milk mixture over the oats. Gently tap the baking dish on the countertop a few times to make sure the milk moves through the oats. Scatter the remaining berries and remaining walnuts across the top.

Bake for 35 to 45 minutes, until the top is nicely golden and the oat mixture has set. Remove from the oven and let cool for a few minutes. Serve with optional sugar, maple syrup, or vanilla yogurt on top.


Can be made ahead; reheat individual servings in a toaster oven or microwave.

Friday, November 6, 2015

Dutch Baby

Last Year's Post:  Sausage and Lentils
Two Years Ago:   Halibut Provencale

There are quite a few variations on the puffed German pancake theme.  I think this one - called a Dutch Baby for no apparent reason (although I'm sure that's politically incorrect on some level) - is particularly interesting because it's quite different from one you might have had in a German-themed breakfast restaurant.  Those tend to be highly puffed and very thin.  This turned out to be less puffed and even after it collapsed (yes, they all collapse) it was still a good 1/2" to 3/4" thick, at least when made in a 9" cast iron skillet.  I was doubtful when the recipe claimed it would serve four, but it was right -  the crepe (I'm going to call it a crepe rather than a pancake) was very filling.  It was rich, and tender, and tasted French which is what I say about anything that tastes really good.

You start by preheating the oven, then whizzing all the ingredients in a blender while some butter melts in the pan.  Pour in the batter and bake for 15 minutes or so.  Total time start to finish is about 30 minutes which makes this more appropriate for a weekend breakfast than during the week.  It would be great for a holiday breakfast or brunch.


I'm calling it a crepe because it tasted more like a thick crepe than a pancake to me - more eggy and less floury, almost like a custard.  Actually it's unique and unlike anything else I've had before.  The lemon sugar and toasted almonds were perfect on top - no syrup or jam needed.  Just serve some fresh fruit along side and you have an elegant and unusual breakfast or brunch.

print recipe
Dutch Baby
Serves 4 

2 tablespoons unsalted butter, room temperature
3 large eggs
3/4 cup whole milk
1/2 cup all-purpose flour (spooned and leveled)
1/4 teaspoon salt
1/2 teaspoon pure vanilla extract
1/4 cup plus 1 tablespoon sugar
1 teaspoon lemon zest
2 tablespoons sliced almonds, toasted


Combine 1 tablespoon sugar with lemon zest and set aside.

Preheat oven to 425 degrees. In a medium (9”) cast-iron or ovenproof nonstick skillet, melt butter over medium heat; set aside.

In a blender, combine eggs, milk, flour, salt, vanilla, and 1/4 cup sugar. Blend until foamy, about 1 minute. Pour batter into skillet; bake until pancake is puffed and lightly browned, about 15-20 minutes.

Sprinkle pancake with lemon sugar and almonds.  Remove from pan, slice into wedges, and serve immediately.


Friday, September 18, 2015

Healthy Baked Apples

Last Year's Post: Roast Pork, Fennel and Green Bean Salad
Two Years Ago:  Lavash Chips, Za'atar, Hummus and Green Harissa

Having grown up in the Midwest - one of the prime apple-growing regions of the country - I've always been a big fan of apples in any form.  The University of Minnesota is the largest propagator of new apple varieties and if you go to their Arboretum in the fall they have some of their newest available for sale with charming names like 1016 or 587 - varieties that may or may not make it to the commercial market.  Honeycrisp, the most popular variety ever, is from the U of MN (go Golden Gophers) as is its love child, Sweetango.  If you like Honeycrisp, you'll love Sweetango.  It's fairly new and in limited distribution right now but if you see it at your local store, buy it.

Anyway, baked apples are a great alternative for people trying to eat healthy because they don't involve pie crust but have many of the same flavors as apple pie.  This recipe is particularly healthy because it cuts down on the butter and sugar and is served with yogurt or low fat ice cream rather than whipped cream or maple syrup.

The type of apple you use will influence the ultimate taste, texture and appearance of your baked apples.  Apples that stay firm when baked are preferred because some apples will bake down into mush, which is great for applesauce but not so much for baked apples.  I used Pink Lady apples and was very pleased with their firm texture and sweet apple flavor but I think Honeycrisp or Braeburn would work just as well.  If you like your baked apples a little softer, just cook them a little longer.  Test the apples by sliding a small knife down from the top to see how much resistance there is.

The Lawyer has been known to bake apples whole (without cutting the top off) while possibly choosing the wrong kind of apple because they sometimes tended to come out wrinkled on the top and brown rather than red.  That's another reason to like this recipe - choosing the right apple and cutting the top off makes for a very pretty final presentation.


Are baked apples for breakfast, or for dessert?  The answer is yes.  I tend to think of them as a great breakfast alternative but they would be a spectacular, simple and healthy dessert for any entertaining you do.  And although the recipe says to serve the apples warm, they're also great right out of the refrigerator the next day.


print recipe
Healthy Baked Apples
Serves 4

Note: Use whatever kind of apples you like best. Cooking apples such as Jonathan, Rome Beauty, or Granny Smith work well, as do Honey Crisp, Pink Lady and Braeburn.


4 medium apples
2 tablespoons brown sugar
1 tablespoon butter, melted
½ teaspoon ground cinnamon
¼ teaspoon ground nutmeg
Up to ¼ cup chopped dried fruit, nuts, or granola (optional)
½ cup apple juice

Preheat oven to 350 degrees. Cut the tops off the apples. Remove the core and seeds with a small spoon or knife.  Place the apples in an ovenproof baking dish.

In a small bowl, combine the brown sugar, butter, cinnamon, nutmeg and optional ingredients. Spoon this mixture into the centers of the apples. Pour apple juice into the baking dish.  Using a small spoon, take a little of the juice from the bottom of the dish and drizzle it on top of the apples to moisten.  Bake apples for 40 to 45 minutes or until the apples are firm but tender, basting them occasionally with the juices from the baking dish.  Let cool for a few minutes.  Drizzle with pan juices one last time.

Serve warm with yogurt or low fat ice cream.


Saturday, September 12, 2015

Mexican Baked Egg Casserole

Last Year's Post:  Pesto for the Freezer
Two Years Ago:   Smoked Turkey, Kale and Blue Cheese Sandwiches

When I first saw this recipe from a restaurant in Mexico City I fell in love with the little individual casserole dishes they used and spent a fair amount of time looking for "individual casserole dishes with handles" online until I realized they were actually French onion soup bowls, easily found at my local Bed, Bath and Beyond.  You may choose to make a large family casserole instead but I'm obsessed with anything individual or miniaturized so I just had to have them.

Anyway, this casserole is equally perfect for a weekday dinner or a lazy weekend brunch with layers of beans, ham or turkey, eggs, salsa and cheese all baked until the cheese is nice and gooey.  The original recipe called for re-fried beans, thin slices of ham, eggs, red salsa, and cheese.  I made it lighter by using whole beans instead of re-fried and salsa verde instead of ranchero sauce (basically red salsa) but the specifics are up the you - any beans, ham or turkey, red salsa or green, and your favorite cheese.  You can cook your own beans and make your own salsa verde (my favorite recipe follows) or you can buy a can of beans and a jar of your favorite salsa, which is perfectly fine.

Assuming you have beans and salsa already prepared, this dish takes about 20-25 minutes to prepare so it's pretty easy even for a weeknight dinner.

 I sauteed the ham in a little butter to add color and flavor but that's optional.


Then you start layering: salsa verde, beans, ham, egg, more salsa, cheese.


Pop them in the oven for a few minutes until the cheese melts and you're done.  One tip -  slightly undercook your eggs (although making sure the whites are done) because they'll cook a little more in the oven.  If you don't like runny yolks that's fine, but they add a nice rich sauce as you eat.


I served the eggs with toast and strawberries for brunch, but if I served the eggs for dinner I would probably add either tortilla chips or warm tortillas alongside.

One last thought about the Salsa Verde - it's lighter and brighter than red salsas and totally delicious when the vegetables are grilled for a nice smoky touch.  And it's easy:  grill, puree, then simmer for a few minutes with some lime juice.  The salsa keeps well in a tightly covered jar in the refrigerator for up to a week or for several months when frozen.  I always make this salsa and my favorite red salsa every fall and freeze plenty for the winter months.


print recipe
Mexican Baked Egg Casserole
Serves 4

2 teaspoons olive oil
4 eggs
Salt and pepper
Non-stick spray
1 tablespoon butter
1 ½ cups chopped turkey or ham
2 cups whole black or pinto beans (rinsed and drained)
2 cups red salsa or Salsa Verde (recipe follows for Salsa Verde)
2 cups (about 8 ounces) shredded cheese such as Oaxaca, mozzarella or cheddar


Preheat oven to 375d.

In a medium skillet over medium-high heat, heat the olive oil.  Crack each egg into a small bowl one at a time and slide into the skillet (this prevents any shell bits from getting in the skillet).  Alternately, use a small individual egg pan to cook each egg.  Cook until the eggs are just shy of the way you like them since they’ll cook a little more in the oven, but make sure the whites are fully cooked.  Remove to a plate and set aside.

Melt the butter in a medium non-stick skillet and sauté the turkey or ham pieces for a few minutes until lightly browned.  Set aside. Warm the beans and salsa separately in the microwave. 

To assemble, spray a casserole dish (or individual ramekins or soup bowls) with non-stick spray.  Add a thin layer of salsa, then the beans and ham or turkey.  Place the eggs on top, then cover with a generous layer of salsa and add the shredded cheese over all.

Place in the oven until the cheese has completely melted, 8-10 minutes, then turn to broil for 30-60 seconds to lightly brown the cheese if desired.  Serve immediately.


Salsa Verde
Makes about 4 cups

6 unpeeled garlic cloves
11 fresh tomatillos, husked, rinsed
1 large onion, quartered through root end
3-4 jalapeno chiles
½ cup chopped fresh cilantro
1 teaspoon sugar
Coarse kosher salt
2 tablespoons olive oil
1 cup low-sodium chicken broth
4 tablespoons fresh lime juice