Showing posts with label cheese. Show all posts

Friday, January 12, 2018

Fresh Homemade Ricotta

Last Year's Post: Slow Cooker Marinara
Two Years Ago:   Quinoa Stuffed Peppers

I recently gave myself a challenge to make spinach and ricotta cannelloni from scratch.  I didn't go full-on crazy since I bought fresh pasta sheets from the store, but I did decide to make my own ricotta and grate my own Parmigiano-Reggiano and cook the spinach from fresh.  Although the project took a few hours, it was fun and the results were spectacular.  I'll post that recipe soon.

In the meantime, the fresh ricotta was such a revelation that I wanted to post it right away.  I've never been a big ricotta fan because I've only used supermarket brands that are typically chalky and watery.  Fresh homemade ricotta, in contrast, is very creamy and rich and as moist (or dry) as you want to make it.  For example, if you want to use it as a spread on crostini, you might want to keep it more moist.  For my cannelloni, I wanted it a little on the dry side so the filling didn't leak as the pasta baked. 


It's incredibly easy to make - just heat some milk and cream with a little salt, add some lemon juice to curdle it, and strain it until it reaches your desired consistency, then refrigerate until ready to use.  (You can make it a few hours or days in advance of the actual recipe where you want to use it.)  Some recipes call for using vinegar to curdle the mixture, but the lemon juice really adds a nice subtle note - just be sure to use fresh lemon juice, not bottled.  One note of caution - I've read comments that ultra-pasteurized organic milk will not curdle although I haven't tried it, so you might want to use milk that's not ultra-pasteurized.

Fresh ricotta has many uses, from appetizers to ravioli to lasagna.  It's a way to up your game that will impress people no end, and no one needs to know how easy it is.  I'll never buy ricotta again.


print
Fresh Homemade Ricotta
Yield: 1 1/2 - 2 cups (approximately 11 ounces)

3 cups whole milk
1 cup of heavy cream
1/2 teaspoon kosher salt or sea salt
3 tablespoons fresh lemon juice or white vinegar (lemon juice is preferred for flavor, but vinegar can be used as long as it is a neutral, white vinegar)
3 large squares cheesecloth


Prepare either a fine-holed colander or a fine-mesh strainer by lining it with the layers of cheesecloth and placing it in a larger bowl. Set aside.

In a medium, heavy-bottomed saucepan, heat the milk, cream, and salt over medium heat just until it reaches 190 degrees Fahrenheit, stirring occasionally to prevent sticking or burning.  Remove the pot from the heat and pour in the acid (lemon juice or vinegar).  Stir with a wooden spoon to incorporate the acid well. Curds will start to form immediately.  Let the mixture sit for about 5 minutes, undisturbed, and then pour it into the prepared cheesecloth-lined colander or strainer. 

Let it sit, undisturbed, for anywhere from half an hour (for a wetter, thinner consistency) to 2 hours (for thicker, creamier, dryer ricotta). It depends on your preference and how you intend to use it. Check the ricotta periodically to determine whether it has reached your desired consistency and to drain the bowl if the liquid is getting close to the bottom of the cheesecloth.  As soon as the bowl is cool enough you can transfer it to the refrigerator to finish straining there.

When the ricotta is to your liking, scrape it into an airtight covered container and refrigerate for up to several days.


Sunday, January 8, 2017

Endive, Apple and Avocado Salad

Last Year's Post: Chicken and Wild Rice
Two Years Ago:  Miso-Glazed Scallops with Quinoa and Grilled Pineapple

It's the time of the year when everyone is looking for lighter, healthier meals after the holiday.  This salad was originally created by Giada deLaurentiis' aunt as a holiday side salad but I thought it would be more than substantial enough for a nice vegetarian entree with a few small modifications.  It's got an interesting combination of ingredients.  Fruit and nuts aren't uncommon in a salad and cheese isn't all that unusual either, but corn is the unique addition to the party.  The original recipe called for regular defrosted corn but I happened to have some freeze-dried corn on hand, which I love and thought would work better.  The light crunch and slight sweetness was a great addition.  If you can't find freeze-dried corn (try the produce section of your grocery or a natural foods store), substitute regular corn or just leave it out.  It's still a delicious and substantial salad.

If you're not familiar with Belgian endive, it looks like this.  My checkout person at the grocery store had quite a time figuring out what the right code was for it so apparently not just everyone buys it.


It's mild and crunchy and doesn't wilt in a salad, which makes it great for entertaining or big family get-togethers.  But again, you could certainly substitute other hearty greens or lettuces.

Served with warm crusty bread on the side, this makes a great start to the New Year as a main dish, or a spectacular side salad for a buffet.


print
Endive, Apple and Avocado Salad
Serves 4 as an entrée or 6-8 as a side salad

¼ cup olive oil
2 tablespoons fresh lemon juice
¼ teaspoon salt
6 medium heads Belgian endive, ends trimmed and cut crosswise into ½” pieces
1 Granny Smith apple, peeled, cored and cut into ½” cubes 
1 avocado, flesh cut into ½” cubes
¼ pound firm white cheese (such as Gouda, Monterey Jack, or mozzarella) cut into ½” cubes
¼ cup dried cranberries, or the seeds of 1 small pomegranate
½ cup freeze-dried corn or defrosted corn kernels
1/4 cup flat-leaf parsley leaves
1/3 cup toasted chopped walnuts, pecans or almonds


To make the dressing, place the olive oil, lemon juice and salt in a small bowl and whisk, or shake in a small jar.  Set aside.


Combine the endive, apple and avocado in a large bowl and toss immediately toss with a small amount of dressing so they don’t turn brown.  Add the remaining ingredients and enough additional dressing to coat lightly.  Serve.

Saturday, September 12, 2015

Mexican Baked Egg Casserole

Last Year's Post:  Pesto for the Freezer
Two Years Ago:   Smoked Turkey, Kale and Blue Cheese Sandwiches

When I first saw this recipe from a restaurant in Mexico City I fell in love with the little individual casserole dishes they used and spent a fair amount of time looking for "individual casserole dishes with handles" online until I realized they were actually French onion soup bowls, easily found at my local Bed, Bath and Beyond.  You may choose to make a large family casserole instead but I'm obsessed with anything individual or miniaturized so I just had to have them.

Anyway, this casserole is equally perfect for a weekday dinner or a lazy weekend brunch with layers of beans, ham or turkey, eggs, salsa and cheese all baked until the cheese is nice and gooey.  The original recipe called for re-fried beans, thin slices of ham, eggs, red salsa, and cheese.  I made it lighter by using whole beans instead of re-fried and salsa verde instead of ranchero sauce (basically red salsa) but the specifics are up the you - any beans, ham or turkey, red salsa or green, and your favorite cheese.  You can cook your own beans and make your own salsa verde (my favorite recipe follows) or you can buy a can of beans and a jar of your favorite salsa, which is perfectly fine.

Assuming you have beans and salsa already prepared, this dish takes about 20-25 minutes to prepare so it's pretty easy even for a weeknight dinner.

 I sauteed the ham in a little butter to add color and flavor but that's optional.


Then you start layering: salsa verde, beans, ham, egg, more salsa, cheese.


Pop them in the oven for a few minutes until the cheese melts and you're done.  One tip -  slightly undercook your eggs (although making sure the whites are done) because they'll cook a little more in the oven.  If you don't like runny yolks that's fine, but they add a nice rich sauce as you eat.


I served the eggs with toast and strawberries for brunch, but if I served the eggs for dinner I would probably add either tortilla chips or warm tortillas alongside.

One last thought about the Salsa Verde - it's lighter and brighter than red salsas and totally delicious when the vegetables are grilled for a nice smoky touch.  And it's easy:  grill, puree, then simmer for a few minutes with some lime juice.  The salsa keeps well in a tightly covered jar in the refrigerator for up to a week or for several months when frozen.  I always make this salsa and my favorite red salsa every fall and freeze plenty for the winter months.


print recipe
Mexican Baked Egg Casserole
Serves 4

2 teaspoons olive oil
4 eggs
Salt and pepper
Non-stick spray
1 tablespoon butter
1 ½ cups chopped turkey or ham
2 cups whole black or pinto beans (rinsed and drained)
2 cups red salsa or Salsa Verde (recipe follows for Salsa Verde)
2 cups (about 8 ounces) shredded cheese such as Oaxaca, mozzarella or cheddar


Preheat oven to 375d.

In a medium skillet over medium-high heat, heat the olive oil.  Crack each egg into a small bowl one at a time and slide into the skillet (this prevents any shell bits from getting in the skillet).  Alternately, use a small individual egg pan to cook each egg.  Cook until the eggs are just shy of the way you like them since they’ll cook a little more in the oven, but make sure the whites are fully cooked.  Remove to a plate and set aside.

Melt the butter in a medium non-stick skillet and sauté the turkey or ham pieces for a few minutes until lightly browned.  Set aside. Warm the beans and salsa separately in the microwave. 

To assemble, spray a casserole dish (or individual ramekins or soup bowls) with non-stick spray.  Add a thin layer of salsa, then the beans and ham or turkey.  Place the eggs on top, then cover with a generous layer of salsa and add the shredded cheese over all.

Place in the oven until the cheese has completely melted, 8-10 minutes, then turn to broil for 30-60 seconds to lightly brown the cheese if desired.  Serve immediately.


Salsa Verde
Makes about 4 cups

6 unpeeled garlic cloves
11 fresh tomatillos, husked, rinsed
1 large onion, quartered through root end
3-4 jalapeno chiles
½ cup chopped fresh cilantro
1 teaspoon sugar
Coarse kosher salt
2 tablespoons olive oil
1 cup low-sodium chicken broth
4 tablespoons fresh lime juice


Saturday, March 28, 2015

Labneh

Last Year's Post: Lentil Salad with Bacon and Walnuts
Two Years Ago:  Asian Roast Pork with Broccoli Slaw and Pasta

I have to thank my friend Rita as the inspiration for this particular post.  She brought some appetizers to our house a while back that used Greek yogurt cream cheese, which I hadn't heard of previously.  It was very good and I liked the idea of the product (healthier than cream cheese) so I looked for it in the store.  There are at least two different brands out there and both seem to be a blend of Greek yogurt with cream cheese.  They have the texture of cream cheese but not quite the richness, plus an added tang from the yogurt.

OK, fast forward a few weeks when I stumbled across an article on ways to use yogurt, including making labneh.  Labneh?  Labneh is a cheese made from straining the liquid out of yogurt, popular in the Middle East and Central Asia.  It sounded like the yogurt cream cheese except even better because it doesn't contain cream cheese, so of course I had to try it.

We all know how healthy yogurt is, but what I didn't know is that strained yogurt has a higher protein content and lower sugar/carbohydrate content than regular yogurt. In addition to Labneh, Greek yogurt is also a strained yogurt  unless the label reads "Greek-style" in which case it may be thickened with thickening agents rather than by straining.

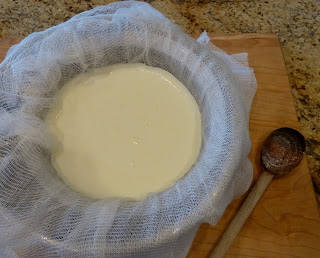
The process for making Labneh couldn't be simpler - combine yogurt with a tiny bit of salt, enclose in cheesecloth, and suspend over a bowl in the refrigerator for 24 hours to allow the liquid to drip out and the cheese to thicken.  How thick you want it is entirely up to you - the longer it sits, the thicker it gets.  (If you have a fine mesh strain that hooks over a bowl, you could line it with cheesecloth and use it instead of the wooden spoon trick to suspend the yogurt.)


The result is wonderful - a cream cheese substitute that's actually good for you and delicious at the same time - a total win/win in my book. If you put it in cute little glass jars it makes a great hostess gift.  Here are some ideas for how to use Labneh that you could print on a card to go with the jar:

  • Open-faced sandwich with thin toasted bread, labneh, sliced radishes, sea salt.
  • Add a bit of brown sugar and some chopped walnuts to labneh, and use to fill pitted dates.
  • Stuff peppadews or hollowed-out cherry tomatoes with labneh, garnish with small basil leaf. 
  • Place labneh in a shallow bowl, drizzle with olive oil and sprinkle with za’atar seasoning, serve with toasted pita wedges.
  • Serve a dollop on top of quiche or frittata.
  • Bagels!
  • Slice of rye toast, layer of labneh, layer of fig jam.
  • Spoon a dollop on stew, chili or lentil soup.
  • Breakfast granola bowl with labneh, granola, fruit, a drizzle of honey.

printable recipe
Labneh
Makes about 2 cups

Note:  Full-fat yogurt really is better to give the cheese richness.  Don’t substitute low-fat or non-fat.
  
32 ounces plain full-fat yogurt
¼ teaspoon kosher salt

 Line a deep bowl with a triple layer of cheesecloth.  Stir the salt into the yogurt and spoon into the cheesecloth.  Gather the top of the cloth together and tie with a string.  Tie the neck of the bundle to a wooden spoon that’s long enough to set across the top of the bowl. Use the spoon to hang the bundle over the bowl making sure the bottom of the cheesecloth is suspended a couple of inches above the bottom of the bowl.  Cover the whole thing with foil or plastic wrap and refrigerate for 24 hours.  Check to see if you like the consistency of the cheese – if you want it even thicker you can refrigerate it longer,  it’s all a matter of preference.


Remove the cheese from the cloth and store in glass or plastic containers in the refrigerator.

Saturday, June 7, 2014

Grilled Lobster Cobb Salad

Last Year's Post: Lemon Polenta Cake
Two Years Ago:  Hoisin Burgers with Wasabi Slaw

It's definitely salad time of the year, and this salad is an interesting twist on the usual Cobb salad that has chunks of chicken; it substitutes lobster meat instead, and grilled lobster at that.  The cooking technique in itself is interesting - remove the lobster meat from the shell and par-boil for a minute, then place on the grill for a minute per side while basting with butter to give the meat a nice smoky taste.  If you really wanted to give the salad a pronounced grill character you could also grill the tomatoes (using something larger than cherry tomatoes) and zucchini as well.  Grilled lobster meat, yum.


I found some beautiful baby Romaine leaves at the store, but you could always used chopped regular Romaine instead.  You can use whatever cheese you prefer and can always substitute other vegetables to suit your choice in addition to using shrimp or crab in place of the lobster.

Other than the lobster, the only other cooked ingredients are hard-boiled eggs (cook in advance) and a little chopped bacon (can also be cooked in advance).  After that, it's really just a matter of whisking the dressing, prepping the other ingredients, and assembly.  Easy, delicious, healthy, and kind of special......a perfect summer dinner.


printable recipe
Grilled Lobster Cobb Salad
Serves 2

Dressing:
1/2 shallot, finely chopped
1 tablespoon Dijon mustard
1 1/2 tablespoons balsamic vinegar
1 ½ teaspoons sherry vinegar
2 ½ tablespoons walnut oil
1/4 cup vegetable oil
Salt and freshly ground black pepper

Salad:
2 (5-6 oz) lobster tails, thawed if frozen
2 tablespoons butter, melted
3 strips bacon, chopped
½ small zucchini, chopped
1 ripe avocado
Juice of 1/2 a lemon
1 heart baby romaine, trimmed and leaves separated
2 hard-boiled eggs, chilled and sliced
1/4 pound red grape tomatoes, halved
2 ounces your favorite cheese, crumbled or diced
Salt

Dressing:
Combine shallot, Dijon, and vinegars in a large bowl and whisk well. While whisking, slowly drizzle in the oils until incorporated into the dressing. Season to taste with salt and pepper.

Salad:
Bring a large pot of salted water to boil.  Preheat grill to high or preheat the broiler.  Remove the lobster meat from tail and parboil for 1 minute or until no longer translucent. Place lobster meat on the grill basting with butter just long enough to get a little grill flavor (about 1 minute per side). If cooking indoors, broil until lightly golden.  Remove lobster from the grill and cut into cubes.

Cook the bacon until crisp. Drain on a paper towel lined plate and set aside.

Halve the avocado, discard the seed, score the flesh into chunks and scoop out into a small bowl. Toss with lemon juice.


 Arrange half of the romaine leaves on each serving plate and drizzle with some of the dressing.  Add the toppings in strips on top, starting on one end with the bacon, egg, tomato, lobster, zucchini, cheese, and avocado. Drizzle the remaining dressing on top.

Friday, February 7, 2014

Sesame Seed Chicken Salad


Last Year's Post: Linguini alla Puttanesca
Two Years Ago:  Chicken, Gruyere and Fig in Puff Pastry

Salads are a great addition to your weekly dinner rotation during the summer of course, but also during the winter because they're a light and healthy change of pace from heavier winter foods .  The thing that's interesting about this chicken salad is the maple syrup/mustard and sesame seed coating on the chicken, which gives it great crunch and flavor.  It almost tastes deep-fried although it's not.  A combination of black and white sesame seeds is particularly dramatic, but all white seeds would be just as good if you don't want to buy black sesame seeds.  If you're interested, you can buy black sesame seeds at my favorite spice store, Penzeys, here or at your local Penzeys if you're lucky enough to have one in your city.

I also found some great multi-colored cherry tomatoes at my local natural foods store that add color to the salad.


Adding color to your food whenever possible makes it much more visually appealing.  In addition to the tomatoes, chicken and lettuce, the salad contains cucumber and cheese.  I prefer to use English cucumbers (the long thin cucumbers wrapped in plastic wrap) because they have a thinner skin and fewer seeds than regular cucumbers, plus I don't like the waxy coating they (whoever they are) put on regular cucumbers.


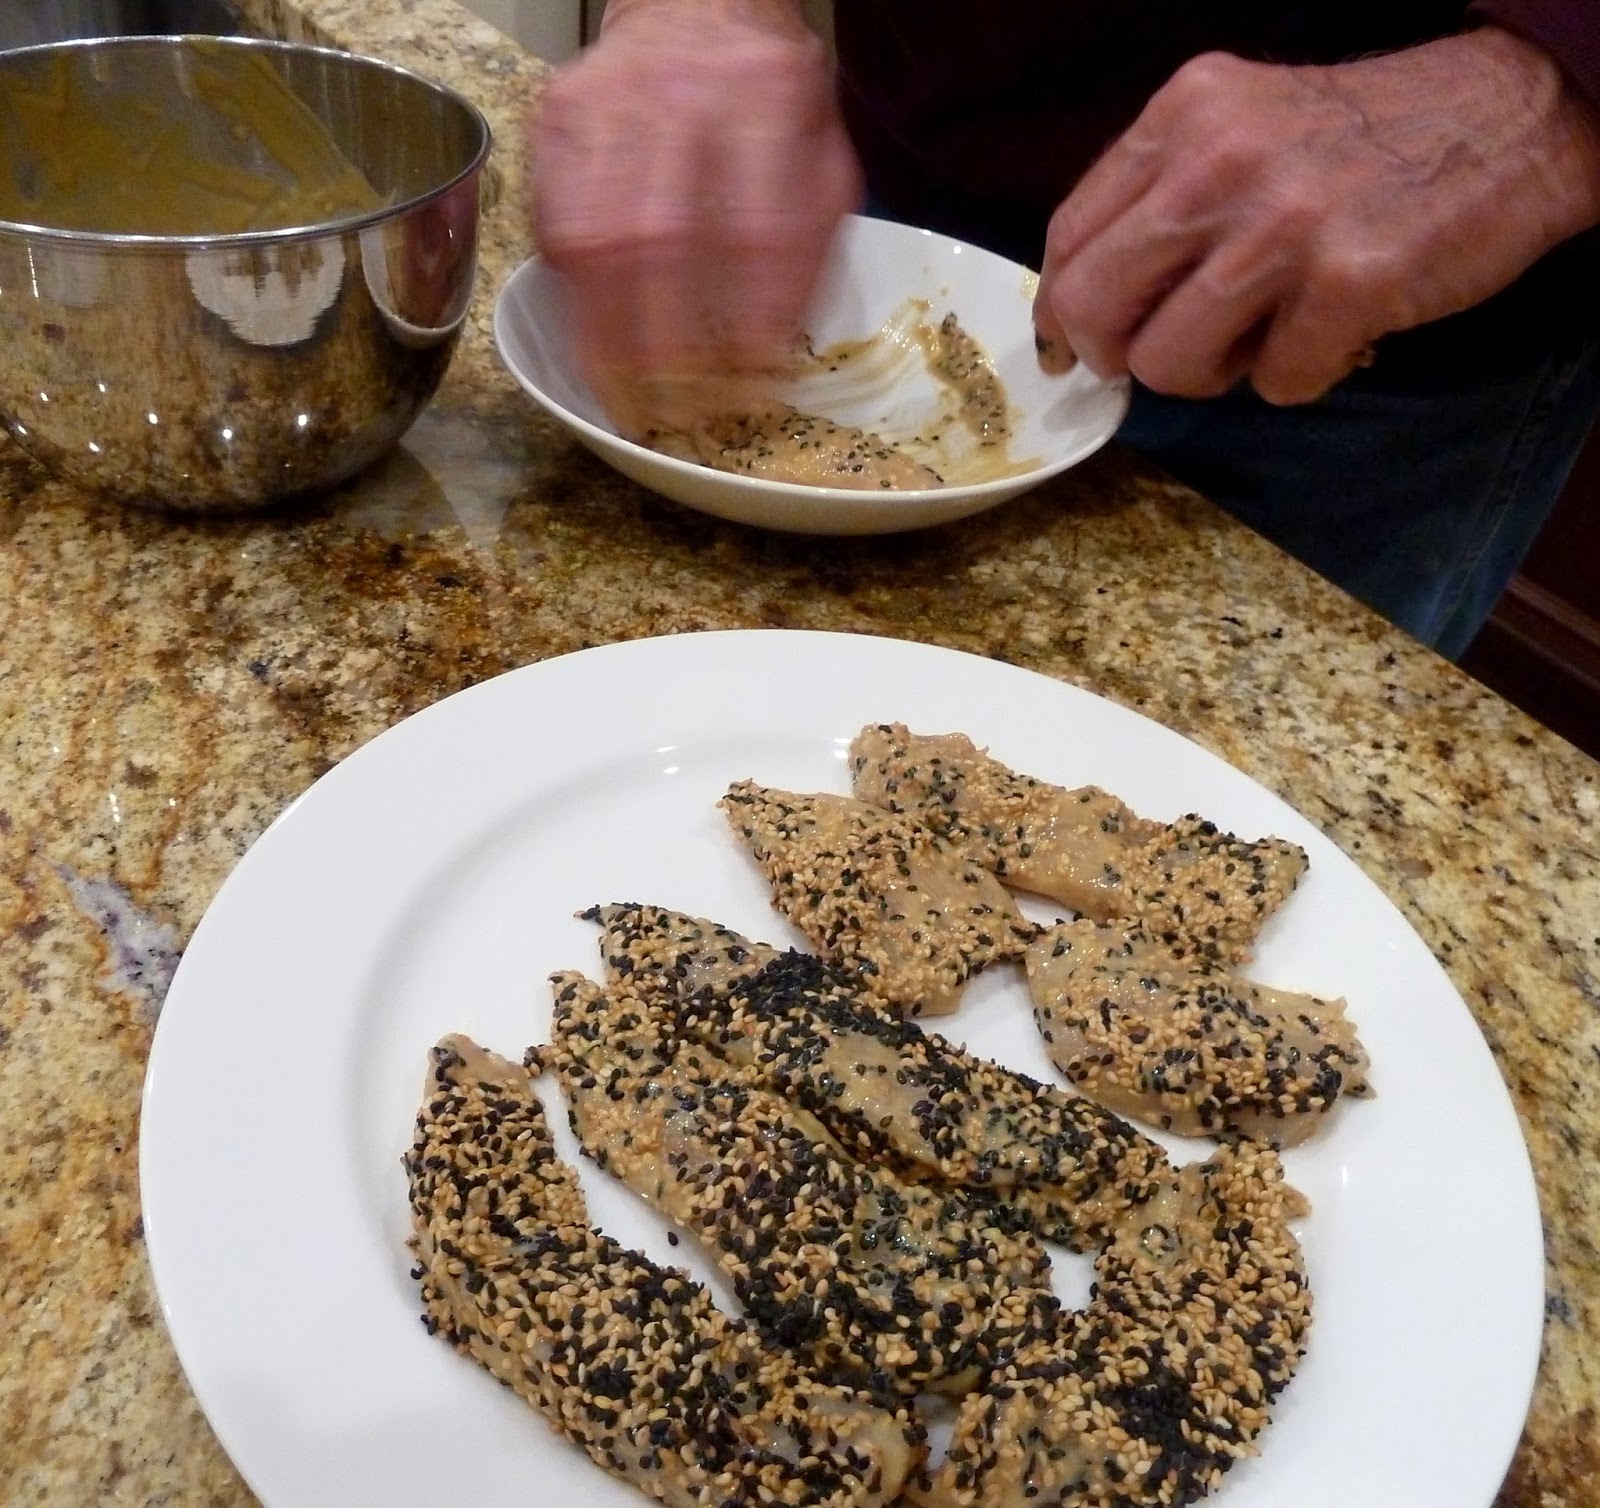
The original recipe called for chicken tenders, but a large boneless skinless chicken breast is just as easy to use - all you have to do is cut it into pieces that are about 1- 1 1/2" in diameter and 3-4" long.  The chicken pieces are marinated in a maple syrup and mustard mix for an hour, then rolled in sesame seeds and cooked in a skillet for just a few minutes.  While the chicken is marinating you can make the vinaigrette and chop the salad ingredients, so all you have to do is assemble and serve the salad while the chicken is done.  Easy and healthy!


printable recipe
Sesame Seed Chicken Salad
Serves 4 as a main dish

For the Dressing:
2 large garlic cloves, minced
1 tablespoon Dijon mustard
½ teaspoon salt
¼ teaspoon sugar
¼ teaspoon pepper
¼ rice wine vinegar
1/3 cup vegetable oil

For the Salad:
½ cup Dijon mustard
1/3 cup pure maple syrup
1- 1/3 lbs chicken tenders, or boneless skinless chicken breasts cut into pieces approximately  1 - 1 ½ “  in diameter and 3-4” long
2/3 cup sesame seeds (preferably a mixture of black and white)
2 tablespoons vegetable oil
2 (5-oz) bags mixed baby greens
½ English cucumber, unpeeled
16 – 20 cherry tomatoes, cut in half
1 cup crumbled feta or goat cheese


For the dressing, whisk all ingredients in a bowl or shake in a jar.

For the chicken, whisk mustard and syrup in a bowl to blend.  Add chicken and marinate 1 hour in the refrigerator.

While the chicken is marinating, cut the cucumber in half lengthwise and use a small spoon to remove the seeds.  Cut crosswise into slices.

After the chicken has marinated, remove from the marinade and shake off any excess.  Place the sesame seeds in a shallow bowl and roll the chicken in the seeds to coat on all sides.  Sprinkle with salt and pepper. 

Heat 1 tablespoon of vegetable oil in a large nonstick skillet over medium-high heat.  Place half the chicken pieces in the skillet and sauté until just cooked through, about 2 minutes per side.  Remove the cooked chicken pieces and repeat with the other tablespoon of oil and remaining chicken pieces.


Toss the lettuce, tomatoes, and cucumber with dressing and serve with the cheese and chicken pieces on top.

Friday, December 13, 2013

Brie & Pomegranate Toasts

Last Year's Post: Cheese Fondue
Two Years Ago:  Cuban Paella

As you know if you follow this blog, I recently discovered an easy way to remove pomegranate seeds (also called arils) from the fruit by cutting the pomegranate open and whacking it (cut side down) with a wooden spoon while holding it over a bowl.  I was so happy about it that I immediately wanted to use pomegranate seeds in everything.  I decided to create an appetizer that's a little special and festive enough for the holiday season but also very simple - just baguette, brie cheese, pomegranate seeds, and a balsamic vinegar reduction.

It's so easy I can't really even call it a recipe - you just simmer down a good quality balsamic vinegar, toast some baguette slices, and melt some Brie on top of the toasts.  Drizzle with a little balsamic reduction and sprinkle with pomegranate seeds and you're done!  It would make a beautiful appetizer for a holiday get-together or cocktail party.  Add a little green color to your serving platter by using parsley or even a few tiny spruce tips to make it look really special.


As you can see. my small baguette made 12 toasts.  It's easy to make more but I would suggest using two small baguettes rather than one large one for ease of holding and eating the toasts.  If you can only find a large baguette, you might want to cut each toast in half.


If you missed the link to a YouTube video showing how to remove the pomegranate seeds the first time I posted it, you can find it here.  The guy does like to hear himself talk, but it's worth it to watch the technique.

If you have leftover balsamic reduction, don't throw it away, it's like liquid gold - use it drizzled over tomatoes, roast chicken, shards of parmesan cheese, or salads.  Just keep it covered in the refrigerator - if it thickens too much, gently re-warm on the stove or in the microwave.  It's delicious!


printable recipe
Brie & Pomegranate Toasts
Makes 12 toasts

Note:  the amount of Brie needed will vary with the size of your baguette.

1 cup good-quality balsamic vinegar
1 small baguette
¾ lb Brie cheese
Seeds of ½ pomegranate
2 tablespoons finely chopped parsley
Additional parsley for garnish


Preheat the oven to 400d.

Bring the balsamic vinegar to a boil in a small saucepan.  Reduce heat to medium-low and simmer for approximately 10 minutes until reduced by one third, watching closely and stirring frequently so the vinegar doesn't burn.  Remove from heat.

Meanwhile, place the Brie cheese in the freezer for 10 minutes to make slicing easier.  Slice the baguette into thin slices on the diagonal and place on a baking sheet.  Bake for 3-4 minutes until lightly toasted, remove from the oven.

Remove the Brie from the freezer; remove the rind and cut cheese into thin slices.  Place the cheese slices on the toasts and put back in the oven for a minute or two until the Brie starts to melt.  Remove the toasts from the oven, drizzle with balsamic reduction, sprinkle with chopped parsley and pomegranate seeds, and place on a platter with additional parsley for garnish.

Serve warm.


Friday, November 16, 2012

Holiday Breakfast Strata


It's fun to make something special for a holiday morning.  This strata (basically a layered baked casserole) is perfect for several reasons: you make it the night before so all you have to do the next morning is bake it, you can scale it up or down for the number of people in your hungry horde, and it's hearty enough to keep the horde satisfied until the big meal later on. Oh, and it makes your house smell great while it's baking. All you need to complete the breakfast is some fruit, coffee and juice.  Think about this recipe for Thanksgiving or Christmas morning, or if you're going to have houseguests over the holiday season or plan to host a brunch.

I'm a big fan of stratas and have tried many over the years.  I like the combination of ingredients in this one - sausage, red bell pepper, asparagus, sun-dried tomatoes and mushrooms - because it's colorful and it tastes great.  But stratas are a lot like pizzas (everyone has their own favorite ingredients) so feel free to vary the specifics to suit the tastes of your group. You can vary the meat by substituting ham or turkey or bacon instead of Italian sausage, you can vary the cheese by substituting cheddar for Gouda, and you can choose any combination of vegetables.  Just be sure to choose at least one or two vegetables with bright colors (peppers, broccoli, etc.) for visual appeal. It's a great way to use up leftover ingredients in your refrigerator too.  I used a combination of shiitake and cremini mushrooms because that's what I had on hand; ditto the half and half combo of hot and sweet Italian turkey sausage.

The basic idea of a strata is to combine a bunch of  tasty ingredients with bread cubes, cheese, and a milk/egg custard.  The custard soaks into the bread overnight and the whole thing becomes solid when baked so it cuts easily. 

A note about mushrooms:  they're mostly water so cooking them in a pan until they release their water and are browned will intensify their flavor significantly.  I often carmelize them in this way prior to putting them a cooked dish to bring out their flavor.  Check out the "before" and "after" pictures below and you'll see how much they shrink as they release water.

Before
After
Don't just cook them until they're soft - continue cooking for a few minutes after all the water has evaporated so they have a chance to brown.  That's where the flavor comes from.  For this recipe I started cooking the mushrooms first to carmelize them prior to putting the other vegetables in for just a few minutes so they wouldn't get too soft.  Remember they'll cook some in the oven also.


While the vegetables are cooking you can shred the cheese, cut up the bread, and mix the eggs, milk and seasonings.


Then you assemble the strata and refrigerate it overnight.  I decided to make a small version since The Lawyer and I were going to have it for dinner (it's equally good for breakfast or dinner).  If you have a bigger crowd you can double the recipe and put it in a 9x13 pan.  Then all you have to do the next day is bake it while you make coffee and get some fruit ready.


Sausage, Asparagus & Wild Mushroom Strata
Serves 6

 Note: this recipe may be doubled and put in a 9x13” pan.

2 tablespoons butter
8 ounces asparagus, trimmed, cut diagonally into 1” pieces
3 green onions, sliced
1/3 cup diced red bell pepper
1/3 cup sun-dried tomatoes, chopped
6-8 ounces wild mushrooms (shiitake or cremini), trimmed and sliced
12 ounces turkey Italian sausage (sweet, hot, or a 50/50 blend), removed from casings
½ loaf sourdough bread, cut into 1” cubes
1 ½ cups shredded Gouda cheese
6 eggs, slightly beaten
1 ¾ cups milk
¼ teaspoon dried thyme, crumbled
¼ teaspoon salt
¼ teaspoon pepper

In a large skillet over medium heat, melt 1 tablespoon butter and add mushrooms.  Cook and stir until the moisture has evaporated and the mushrooms begin to brown, about 5 minutes.  Add the asparagus and red bell pepper and sauté for 2 more minutes.  Put the vegetable mixture in a medium bowl with the green onions and sun-dried tomatoes.

Melt the remaining 1 tablespoon butter in a skillet and add the Italian sausage, breaking it up with a spoon as it cooks until it begins to brown and is no longer pink inside.  Add the sausage to the vegetable bowl.

While the sausage cooks, whisk the eggs and milk with the thyme, salt and pepper.

Spray a 9x9” or 9x11” pan with cooking spray.  Arrange half the bread cubes in the baking dish, then layer half the sausage and vegetable mixture.  Sprinkle with half the shredded cheese.  Add the remaining bread cubes and top with the remaining sausage and vegetables.  Pour the egg mixture evenly over the strata.  Use a fork to press the sausage mixture and bread into the milk mixture until all the bread is moist.  Cover with foil and refrigerate overnight, reserving the remaining cheese.

To bake, preheat the oven to 350 degrees.  Bake uncovered for 60 minutes, then sprinkle with the reserved cheese and bake an additional 5 minutes until the cheese melts.  Let stand 10 minutes before cutting to serve.


Friday, June 22, 2012

Easy and Elegant - Summer Salad with Cheese, Fruit and Nuts


There are some days in every summer where it's so hot you don't even want to think about turning on anything to cook food - not the oven, the cooktop, not even the grill.  You just want a cold drink and a cool, crisp salad.  This salad is for those days.   It's deceptively simple - just four main ingredients plus a vinaigrette - but the beauty is in the simplicity that lets perfect ingredients shine.  The nuts and cheese provide enough protein that it's perfect for a light dinner.

Yes, you could buy one of those salad-kit-in-a-bag meals at the store and be done with it, but I can give you several good reasons why this is better.  First, making your own salad allows you to choose the specific fruits, nuts and cheeses that are your favorites.  Second, your salad will be much fresher than one made in a warehouse sometime last week.  And third, it allows you to use up any leftover nuts or cheese you have in your refrigerator rather than having it go to waste.  (I'm always looking for ways to use up food rather than throwing it away.)

Think about the lettuce you typically get in a salad bag - pale, maybe some pieces are starting to brown.  Now look at the lettuce I found for this salad.  (By the way, it's not all that easy to photograph your own hand.)


Interesting enough, I did find this lettuce at the grocery store, but not in a prepared bag.  Two heads of mini-Bibb lettuce (one green, one red) were sold in a hard plastic shell under the "Deli Express" label.  They were absolutely fresh and delicious and I would highly recommend them if you can find them in your store. 

While we're on the subject of lettuce I wanted to give you a tip that I learned (back in our community garden days) regarding the best way to keep lettuce leaves fresh.  Dunk the whole heads (or leaves) in a sink of very cold tap water and swish them around.  If they just came out of a garden you may have to drain the water and do it again.   At this point if they are whole heads you should cut the cores out to release the leaves. Put the leaves in a salad spinner and spin them around until nearly dry with just a few drops of water on them.


Lay out a really long piece of paper towel on your counter and spread the leaves along its length.


Carefully roll up the entire length of paper towel like a jelly roll.


Then place the whole thing in a gallon ziptop bag, gently squeeze most of the air out without crushing the leaves, and put it in the refrigerator.  The remaining moisture from the lettuce leaves dampens the paper towel, which in turn keeps the lettuce fresh and crisp without being too wet.  Stored in this way, lettuce will keep very fresh for up to a week.

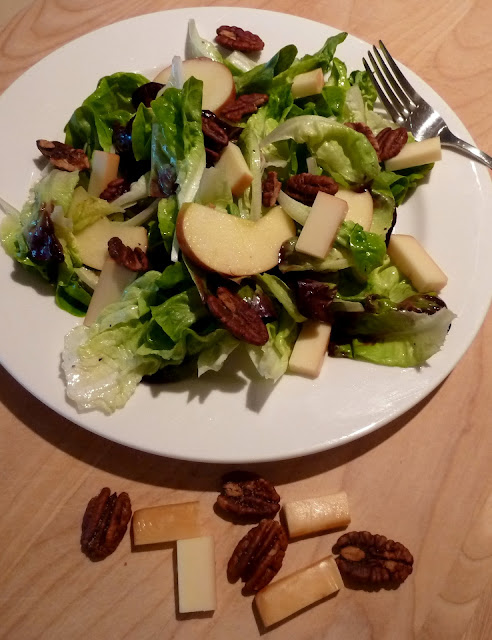
OK, now that I've discussed lettuce probably more than you wanted, on to the other main ingredients - nuts, fruit and cheese.  I used some spiced pecans for this recipe that were a gift from a friend, but plain pecans or walnuts would work equally well.  For the cheese, choose a variety that's relatively firm and full-flavored.  I found a smoked Gruyere that was absolutely delicious.  And for the fruit, you could certainly use whatever fruit is in season during the summer, but apples or pears work equally well.  I like the crisp sweetness of apples so I used a Fuji for this recipe.  Whatever nuts, cheese and fruits you use, make sure they're top quality because they really make the difference in such a simple recipe.


One last thought - I threw a little walnut oil in with the olive oil to add some additional nutty flavor and because I have this beautiful french walnut oil sitting in my refrigerator that looks at me every time I open the door.  Just in case you have oils that stare at you too.


* * click here for a printable recipe * *


Summer Salad with Nuts, Fruit and Cheese
Serves 4

1 large head of Boston or Bibb lettuce (or 2 small heads)
½ lb of good quality firm cheese, such as cheddar, gouda, or gruyere
1 cup shelled walnuts or pecans
2 apples or pears, or other seasonal fresh fruit
1/3 cup olive oil
1 tablespoon lemon juice
1 tablespoon cider vinegar or sherry vinegar
1 small shallot, diced
½ teaspoon salt
¼ teaspoon pepper


Rinse the lettuce in cold water, then drain and spin dry. Wrap in paper towels and chill for several hours before using.

Cut the cheese into bite-sized pieces. Coarsely chop the walnuts or pecans if desired. Core and thin slice the apples or pears.

To make the salad dressing, in a small bowl combine the oil, lemon juice, vinegar, shallot, salt and black pepper. Whisk until well blended.

Place the lettuce, cheese, nuts and fruit in a large serving bowl. Pour over the salad dressing and mix well. Serve immediately.