Showing posts with label almonds. Show all posts

Thursday, April 12, 2018

Oat Nut Bars

Last Year's Post: Slow Cooker Salsa Verde Chicken and Brown Rice Bowls
Two Years Ago:   Brazilian Burrito Bowls

The inspiration for this post started with golf, believe it or not.  I don't golf - I would actually pay money NOT to golf - but The Lawyer does.  He bought a giant box of Kirkland trail mix at Costco quite a while back to use as snacks while golfing, and he recently ran out.  Problem is, summer is coming up quickly and in Phoenix that means hot.  The trail mix contains M&Ms.  Can you say melted chocolate in the golf bag?  I had just watched a PBS show where Ellie Krieger, a noted nutritionist, made these power bars and said they were great for after a workout at the gym because you just throw a frozen one in your gym bag and it'll thaw by the time you're done.  That seemed perfect for golf in the summer.

This is a very healthy recipe with fiber, high-quality protein and natural sweeteners, but it's also delicious.  I made two tweaks to her recipe - I added some coconut, and I used a parchment cradle in the baking dish to make it easier to remove the bars.  All you do is put a piece of parchment in the bottom of the dish, with enough coming up two opposite sides that you can grasp it after baking to lift the bars out as one piece.  That makes it easier to cut them, but you could also cut them in the baking pan and take them out with a spatula if you don't want to do the parchment trick.

The bars are great for an after-school snack, a mid-morning or mid-afternoon boost at work, or after a workout.  And of course, golf.


print
Oat Nut Bars
Makes 12 bars

Note: wrap individual bars in foil or cling wrap, put them all in a gallon bag in the freezer, and take one out as needed.  They thaw in about two hours at room temperature.

1 cup rolled oats (not instant or quick-cooking oats)
¾ cup whole wheat flour
1 teaspoon ground cinnamon
¼ teaspoon salt
½ cup maple syrup
1/3 cup plain, unsweetened applesauce
¼ cup canola or safflower oil
1 large egg
½ cup chopped dried cranberries
½ cup finely chopped walnuts
½ cup finely chopped skin-on almonds
½ cup unsalted sunflower seeds (or finely chopped other nuts)
1/3 cup shredded sweetened coconut, optional

Preheat oven to 350d.  Spray an 8-inch square baking pan with cooking oil spray.  (Tip: cut a piece of parchment paper the width of the bottom of the pan and long enough that the ends go up and over the sides of the pan, forming a cradle.  Place the parchment in the baking pan and spray lightly with cooking spray.  This will help you get the bars out of the pan later.)

Whisk together the oats, whole wheat flour, cinnamon and salt in a medium bowl.

In a larger bowl, lightly beat the egg, then add the maple syrup, applesauce, and oil and whisk until combined.   Stir in the oat mixture, then add the dried cranberries, walnuts, almonds, sunflower seeds and coconut (optional) until evenly incorporated.

Spread the mixture in the pan; bake for about 30 minutes until a toothpick inserted in the center comes out clean.  Allow to cool completely.  If you used a parchment cradle, grasp the sides of the parchment and gently lift the bars out whole before cutting.  If not, cut into 12 equal-sized bars before removing from the pan.

Per bar (without coconut):  250 cal, 15g total fat (2g saturated fat), 15mg chol, 60mg sodium, 26g carb, 3g fiber, 6g protein


Friday, April 28, 2017

Curried Chicken Salad

Last Year's Post: Leek, Bacon and Gruyere Tart
Two Years Ago:  Spanish Asparagus Revuelto

Curried chicken salad was all the rage in the 80's and 90's, but then it went away for a while.  The Lawyer, who I don't think had ever tried it before, had a curried chicken salad sandwich at a restaurant recently and was raving about how good it was so I was inspired to make it this week.  Ina Garten has a classic recipe which I tweaked only slightly, primarily by substituting toasted slivered almonds for the whole cashews that she calls for.  I love cashews, but I wanted to serve the salad in sandwiches and felt the cashews would be too big.  If I made the salad and added pasta shells for a main dish I would probably use cashews instead.  I also cut down on the amount of salt she called for because I find her recipes always have too much salt.  Better to add more later if needed.

There's a reason curried chicken salad was all the rage - it's really that good, not to mention easy.  The creamy curry dressing is offset by the sweetness of the raisins and crunch from celery and nuts for a salad that's just addictive.  Serve it over green for a light lunch, stuff it in multi-grain bread for a sandwich as I did (yes there really is a piece of bread under the salad in the picture above), or add a small-sized pasta such as shells to make it a more substantial main dish salad.  However you serve it, it's the perfect salad for the first picnic of spring.

Just be sure to wait to add the nuts until right before serving so they stay crisp and crunchy.

print
Curried Chicken Salad
Serves 6

Note: the salad can be served over lettuce, or in sandwiches, or small pasta may be added (such as shells) for a more substantial main dish.

3 boneless skinless chicken breasts, baked or poached (or equivalent rotisserie chicken meat)
¾ cup mayonnaise
3 tablespoons dry white wine
2 tablespoons Major Grey’s chutney
1 ½ tablespoons curry powder
½ teaspoon salt
½ cup medium-diced celery (1 large stalk)
2 green onions, which and light green parts thinly sliced
¼ cup raisins
½ cup slivered almonds, toasted


Cut the cooked chicken breasts into approximate ¾” bite-sized pieces.

For the dressing, combine the mayonnaise, wine, chutney, curry powder, and salt in a food processor and process until smooth.  Taste and adjust seasonings.

Combine the chicken with enough dressing to moisten well (you may have some left over; refrigerate for later).  Add the celery, green onions and raising and mix well.  Refrigerate, covered, for a few hours to allow the flavors to blend.


Before serving, taste and adjust seasonings again if needed; add a little more dressing if the salad looks dry.  Top with toasted almonds and serve.

Friday, March 17, 2017

Teriyaki Citrus Chicken Salad

Last Year's Post: Cabbage and Spring Onion Tart
Two Years Ago:  Lemon Chicken Teriyaki Rice Bowl

Did you know that there's a citrus industry in Arizona?  Neither did I until I moved here.  Granted, it's not anywhere near as big as in Florida, but it's wonderful to enjoy fresh lemons, oranges, tangerines and grapefruit for several months each year.  I had the luxury of making this salad using fresh tangerines, but you can make it year-round using readily-available oranges from your local store.  You could probably even get by using fresh orange juice out of a carton, but if you go that route I might suggest starting with a little extra juice and concentrating it down to the same half cup to compensate for the lack of zest strips in the marinade.

Anyway, back to the beginning.  This is a slight twist on your normal teriyaki chicken because it includes citrus flavors in the marinade (orange or tangerine), the salad dressing (lemon), and the salad itself (mandarin oranges).  It's light, refreshing and healthy. Although the chicken needs to marinate for a few hours before cooking, that part can be done in advance or even the day or two before you plan to serve the salad.  You can also make the salad dressing in advance, so meal-time prep becomes a matter of slicing and assembly which makes for a quick weekday dinner.

The soy and honey in the marinade give the chicken a beautiful bronze color after it's cooked.


The sesame seeds and toasted almonds add crunch and the mandarin oranges add sweetness to the salad while a little leftover sauce brings a big pop of flavor.  I think fresh pineapple chunks and/or cucumber slices would also be good and might add them the next time around.  True confession:  I forgot to add the almonds to the salad before I took the picture up top.  The salad was good without them but they added extra crunch so try not to leave them out.

print
Teriyaki Citrus Chicken Salad
Serves 4

Note: the chicken can be marinated and grilled in advance, then refrigerated.  The salad dressing may also be made in advance, so it will take just a few minutes to slice the chicken and assemble the salads.

For the marinade:
1 cup fresh orange or tangerine juice
½ cup low-sodium soy sauce
1/3 cup honey
4 strips orange or tangerine zest (each about 1 ½ by ½ inch)
2 cloves garlic, peeled and gently crushed with the side of a knife
2 green onions, trimmed, white parts gently crushed
2 slices fresh ginger (each ¼ inch thick), peeled and gently crushed
1 cinnamon stick
1 tablespoon toasted sesame oil

For the salad dressing:
2 tablespoons fresh lemon juice
¼ cup extra-virgin olive oil
¼ teaspoon salt

For the salad:
2 boneless skinless chicken breasts
8-10 cups mixed baby lettuces, washed and dried
1 tablespoon toasted sesame seeds
1 (10.5 oz) can mandarin oranges in natural juice, drained
½ cup sliced almonds, toasted
2 green onions, trimmed and sliced

To make the marinade:  place the orange or tangerine juice in a nonreactive saucepan over high heat and bring to a boil.  Let boil until reduced by half.  Add the soy sauce, honey, zest strips, garlic, green onion whites, ginger, cinnamon stick and sesame oil.  Stir, then let boil until slightly thickened, about 6-8 minutes.  Remove the saucepan from the heat and let cool, then remove the solids from the pan using a slotted spoon. 

Remove any excess fat or sinews from the chicken breasts and discard.  Rinse and blot dry.  Gently pound the breasts between two pieces of plastic wrap until they’re an even thickness.  Place in a zip-top bag and pour half of the marinade into the bag, reserving the remaining marinade to use later.  Close the bag and massage the contents to evenly distribute the marinade, then place in the refrigerator for at least one hour and up to 4 hours, turning occasionally.

Meanwhile, make the salad dressing:  combine the lemon juice, olive oil and salt in a small screw-top jar and shake to combine.  Set aside.

To cook the chicken, preheat an outdoor grill or indoor grill pan to medium-high.  Remove the chicken from the bag and discard the marinade.  Arrange the chicken pieces at an angle on the grill grates and cook for 4 minutes.  The outside of the chicken should turn a deep brown in spots from the caramelizing of the sugars in the marinade but shouldn’t burn.  Flip the chicken and cook until the internal temperature reaches 165d, basting each side with some of the marinade (that was reserved earlier) during the last few minutes.  Total cooking time should be roughly 10 minutes depending on the thickness of the chicken.  Remove the chicken and let come to room temperature, then thinly slice at an angle.

To assemble the salads, toss the lettuces lightly with enough salad dressing to just barely coat.  Divide among four plates.  Sprinkle with the sliced green onions, mandarin oranges, and toasted almonds.  Divide the chicken slices between the salads, arranging decoratively on top of the greens.  Spoon some of the leftover marinade on top of the chicken, sprinkle with sesame seeds and serve. 


Saturday, July 25, 2015

Grilled Salmon with Kale and Maple Mustard Vinaigrette

Last Year's Post:  Fresh Cherry Hand Pies
Two Years Ago:   Chicken Curry

If you're one of the people who are still less than enthused about kale even thought you're perfectly aware that it's very good for you, I think I can help.  There are three secrets to making kale taste good:  buy Tuscan kale (also called Lacinato or dinosaur kale), slice it thinly, and add some sweetness to the dish.  Tuscan kale is more tender and less bitter than curly kale (which I think tends to be tough), and slicing it into thin shreds takes care of any chewiness.


 Adding a slight element of sweetness helps to further counter-act the bitterness.  In this recipe, I added dried fruits and freeze-dried corn for texture, taste and sweetness but the real star was the maple mustard vinaigrette.  I've used maple mustard glazes or sauces in the past, but this particular recipe is by far the best I've ever tried.  I think it has something to do with the proportions of the ingredients but also this is the first time I've tried a recipe that includes soy sauce.  Whatever the reason, this will now be my standard go-to vinaigrette for any salad that includes bitter ingredients such as kale or radicchio, it's that good.


The vinaigrette complemented both the salmon and the kale, but the key is to use it sparingly with the kale because the flavors are bold.  Use just enough to moisten the salad - don't drown it in vinaigrette.  Then serve the remainder on the side to drizzle over the salmon.  I found the vinaigrette recipe in "Eating Well" magazine and it had a review from one woman who tried cutting the amount of oil in half to reduce the fat content.  She reported that the result was fantastic but she felt the key was to use walnut oil because it's more flavorful than canola.  I had some pistachio oil in the refrigerator that I wanted to use up so that's what I tried (in the original proportions) and it was fabulous.  Yes, it's a fair amount of oil but it serves four people with some left over for another day.  By the way, walnut oil is completely delicious so it's worth buying - look for it with the other oils in your store.

Freeze-dried corn can typically be found in small bags in the produce section along with other dried fruits and vegetables.  It's a recent discovery for me and I love how it adds sweetness, color and crunch to a variety of recipes.  If you don't feel like buying it, just leave it out and the dish was still be delicious.

All in all I was very pleased with the flavor, presentation and healthy benefits of this meal.  I knew it was a winner when The Lawyer asked if there was more kale to have as a salad the next day.  And by the way, it did make a great lunch salad with just the kale, vinaigrette, a little leftover flaked salmon and a few leftover sliced almonds.

print recipe
Grilled Salmon with Kale and Maple Mustard Vinaigrette

For the vinaigrette:
1/2 c walnut oil or canola oil
1/4 c maple syrup
1/4 c cider vinegar
2 T mustard
1 T soy sauce
1/2 t salt
1/2 t pepper

For the salmon and kale
4 (6 oz) pieces salmon
Olive oil, for brushing salmon
Salt and pepper
1 bunch Tuscan (Lacinato) kale, leaves stripped off steams and thinly sliced
½ cup dried cranberries
¼ cup dried currants or raisins
¼ cup toasted sliced almonds
½ cup freeze-dried corn

Whisk all vinaigrette ingredients together in a small bowl and set aside.

Preheat a grill to medium high.  Brush the salmon with olive oil and sprinkle with salt and pepper.  Place the salmon skin-side-down on the grill and grill for 4 minutes, then flip and grill for 2 ½ minutes more until nicely grill-marked.    Remove from the grill.

Toss the kale, cranberries, and currants with just enough vinaigrette to moisten, then divide among four plates or shallow bowls. Sprinkle with the sliced almonds and dried corn.  Remove the skin from the salmon and place one piece on top of each plate.  Serve, passing the remaining vinaigrette on the side for drizzling over the salmon.


Saturday, February 21, 2015

Baked Pumpkin Spice Granola

Last Year's Post: Wild Mushroom and Gruyere Quiche
Two Years Ago:  Wild Mushroom & Wild Rice Chicken Soup

"Baked pumpkin spice granola" - doesn't that just sound good?  Like it will make your kitchen smell great.  And it's true.

The Lawyer and I like to sprinkle granola over yogurt for breakfast, and it's also fabulous in pancakes to add crunch.  Or, eaten straight out of hand, it makes a delicious mid-afternoon snack.  One time I gave some homemade granola to a friend who didn't particularly like to cook, and she told me later that she had it for dinner every night for a week.  However you eat it, granola is delicious.  This particularly granola is only lightly sweet but has the most wonderful flavor combination where no one flavor overwhelms.  At first you taste the spices, then a hint of coconut comes in, and then the pumpkin comes through.  

This granola is slightly darker than most you'll find at the store, due to the spices, dark brown sugar, maple syrup and pumpkin.  It's about the color of "normal" granola before it's baked, so don't freak out when it turns slightly darker during baking.  Just be sure to stir every ten minutes and it won't turn too dark.

Granola is incredibly easy to make and much less expensive than buying it in the store.  Its a fun little weekend project that you'll appreciate during the following week.  And it makes a great gift, too.


printable recipe
Baked Pumpkin Spice Granola
Yields approximately 5 cups

3 ¾ cups old-fashioned rolled oats
2/3 cup unsweetened coconut
2/3 cup sliced almonds
2 teaspoons ground cinnamon
1 teaspoon pumpkin pie spice*
1/8 teaspoon salt
½ cup pumpkin puree
1/3 cup pure maple syrup
¼ cup plus 2 tablespoons vegetable oil
3 tablespoons dark brown sugar
1 teaspoon vanilla extract

Preheat oven to 325d.

Line two large baking sheets with silicone baking mats or parchment paper.  In a large bowl, toss the oats, coconut, almonds, spices and salt together until well combined.  Set aside.

In a medium bowl, add the pumpkin puree, maple syrup, vegetable oil, brown sugar and vanilla; whisk until smooth.  Pour over dry ingredients and mix until everything is moistened.  Divide evenly between the baking sheets and spread out into a thin layer.

Bake each batch for 40 minutes, stirring every 10-15 minutes.  Allow granola to cool on the baking sheets for 20 minutes.  Cover tightly and store at room temperature.


* Or use ½ teaspoon ground cloves, ¼ teaspoon ground nutmeg, and ¼ teaspoon ground allspice.

Saturday, September 27, 2014

Perfect Apple Crisp

Last Year's Post: Pad Thai
Two Years Ago:  Spicy Homemade Peanut Butter

As I write, the kitchen is filled with the heady aromas of apples and cinnamon - one of the most heavenly smells there are, right up there with fresh bread - the type of smell that reminds you of childhood, of Sunday dinners at Grandma's house, of holidays with a big family gathering.  Why don't we make those kinds of foods more often?  The ones that not only taste delicious, but are so evocative that just one whiff instantly reminds you of other times, places, and beloved people.

I knew I wanted to make a classic apple recipe this fall, and apple crisp seemed the most appropriate.  Easier to make than an apple pie, I actually prefer it to pie because of the crisp, crunchy topping that contrasts so well with the tender apples.  I went on a search to determine what makes the best apple crisp, and found to no one's great surprise that it's all about the apples.  There's a general consensus out there in expert apple-crisp land that you should use firm apples so they don't fall apart and become apple sauce while cooking, and further more you should use a combination of sweet and tart apples for the best flavor.

Rome Beauty, Honey Crisp and Crispin are all easy to find and are good firm sweet apples.  The ever-popular Granny Smith or Jonathan are good firm tart apples.  I used a combination of Honey Crisp and Granny Smith for my apple crisp.


After baking, the apple slices were tender but held together without breaking at all.


There are two other important components to this recipe - cinnamon and nuts.  Use the best quality cinnamon you can find; throw it away and buy a fresh bottle if it's been open on your shelf longer than 6 months.  I always buy my spices at Penzeys for the best selection, freshest spices, and lowest prices.  Don't ever skimp on your spices.

The second point is to put nuts in the crumb topping - this recipe calls for sliced almonds but I think a combination of almonds and pecans would be just as good.  They add a depth of flavor and additional crunch to the topping that puts it over the top.

It's a fun recipe to make with someone else because two pairs of hands make light work of peeling, coring and slicing the apples.  After that, you simply mix the topping and bake.  Apple crisp is wonderful when slightly warm, but if you want to make it in advance you can always warm up the individual serving in the microwave before serving (all the better to melt the ice cream!).


The apple crisp was sweet without being too sweet, and had a light cinnamon note that let the apples be the star (along with that great crunchy topping).  It was truly the perfect recipe in terms of balance and taste.  You can serve it plain, with cream or ice cream, or my latest inspiration - served cold for breakfast with a little Greek yogurt on top. When was the last time you had homemade apple crisp?

printable recipe
Perfect Apple Crisp
Serves 6-8

Note:  Use a combination of sweet and tart apples that stay firm when baked.  Rome Beauty, Honey Crisp, or Crispin are good sweet choices; Granny Smith or Jonathan are good tart choices.

Apple Filling:
6 apples, peeled, cored and thinly sliced (see note above)
1 tablespoon fresh lemon juice
¼ cup granulated sugar
1 tablespoon cornstarch
¼ teaspoon ground cinnamon
¼ teaspoon table salt

Crumb Topping:
2/3 cup packed light brown sugar
½ cup all-purpose flour
½ cup old-fashioned rolled oats (not quick-cooking)
½ cup sliced almonds (or combination of almonds and chopped pecans)
½ teaspoon cinnamon
¼ teaspoon salt
1/3 cup butter, melted

Heavy cream or vanilla ice cream for serving, optional


Preheat oven to 375d.  Spray a 9x9-inch or comparable baking dish with non-stick cooking spray.

In a large bowl or plastic zip-top bag, combine granulated sugar, cornstarch, ¼ teaspoon cinnamon, and ¼ teaspoon salt.  Add apples and lemon juice and toss to coat.  Pile into prepared dish and even out the top with a spoon.

In a large bowl combine all topping ingredients and mix with a fork or your hands until the mixture is fully combined.  Sprinkle mixture evenly over the apples.

Place the baking dish on a rimmed baking sheet and bake until the apples are tender and the topping is golden brown, 45-55 minutes.  Let rest 10 minutes before serving.


Serve warm or at room temperature, topped with cream or ice cream if desired.


Friday, July 19, 2013

Chicken Curry

Last Year's Post: Farm Stand Salad

Indian food has not been one of my favorites, so I have absolutely no idea why I decided to try this recipe in the first place ten years ago.  The reason why I remember how long it's been is because The Lawyer and I were in the process of a corporate move to Louisville, KY.  He had gone ahead to begin work and I stayed for a period of months in a small apartment in Minneapolis which didn't really give me much creative outlet for my cooking obsession.  I spent my spare time dreaming about all the great new recipes we would prepare when I finally arrived in Louisville.  Unfortunately, I decided that we needed to make a brand-new recipe the very day I arrived.  I also decided for some reason that all the boxes need to be unpacked in one weekend.  The two decisions collided, and not in a good way.

By the end of the first day of unpacking boxes we were both exhausted, but I had reached that point where you're so tired that you become unreasonably stubborn.  (Or at least I do.  Well, some would say I'm always unreasonably stubborn and that it's just a matter of degree.)  The Lawyer tried to talk me into going to a restaurant or at least ordering a pizza, but NO - I was going to make this recipe come hell or high water.  It's not hard, but a brand-new recipe is not a great idea for one of those nights. I don't recall most of the actual preparation but even through a haze of exhaustion I clearly remember how great it tasted. 

I always thought of Indian food as being heavy and fiery hot, but this dish is very light and fresh-tasting and has warmth from the spices rather than heat.   If you're new to Indian food this is a good introduction.  And it's fun to make because you can see and smell all the individual spices that go into making the overall complex flavor and can adjust them up or down to your taste the next time.  It's much more interesting and instructive than just buying a jar of curry powder and dumping it in.  My guess is that it was the homemade spice mix that attracted me in the first place.

The one fact you do need to come to grips with is that you need quite a number of spices.  Hopefully you already have many of them in your cupboard.  For the rest, I always recommend Penzeys (your local store or online www.penzeys.com) for the widest variety of fresh and inexpensive spices.  And remember, even after buying several spices this meal will still be cheaper than if you went to a restaurant.


The preparation is really pretty straight forward - coat chicken cubes in your homemade spice mix and brown, then remove.


Add onions, ginger and garlic to the pan and cook, then add some more spices - cardamom, bay leaf and cinnamon. I wrap them in cheesecloth and tie with kitchen string so they're easier to fish out later (you can find cheesecloth in some grocery stores and most kitchen supply stores).


Add tomatoes and the chicken pieces and simmer, then add a little yogurt, raisins and some cilantro.


Garnish with toasted sliced almonds and serve with basmati rice.  Don't skip the almonds - they're an important component for both flavor and crunch.


Not at all hard, but I do recommend trying it some day when you're not feeling unreasonably stubborn.

printable recipe

Chicken Curry
Serves 4-6

2 ½ teaspoons whole coriander seeds
2 teaspoons whole cumin seeds
1/8 teaspoon crushed red pepper flakes
½ teaspoon turmeric
½ teaspoon ground ginger
Pinch of ground cloves
½ teaspoon salt
½ teaspoon freshly ground black pepper
2 boneless skinless chicken breasts, cut into 1 1/2 “cubes
2 tablespoons peanut oil
2 tablespoons fresh ginger, minced
1 large garlic clove, minced
1 large or two medium onions, halved and thinly sliced
2 whole cinnamon sticks, about 3” long
1 bay leaf
3 green cardamom pods
4 cups whole canned tomatoes with juices
1 ½ cups low-sodium chicken broth
¼ cup plain yogurt
¾ cup golden raisins, roughly chopped
½ cup chopped fresh cilantro
Sliced almonds, toasted, for garnish
Hot cooked basmati rice

Special equipment needed: 
spice grinder
cheesecloth and kitchen string, for tying spice bundle

In a dry skillet over medium heat, toast coriander and cumin seeds until fragrant, 1 to 2 minutes.  Transfer to spice grinder, add crushed red pepper flakes, and grind to a powder.  Place in a large zip top bag, and add turmeric, ginger, cloves, salt and black pepper.  Add chicken and toss to coat.

Heat peanut oil in a large pot over medium-high heat.  Add chicken, cooking until browned, 3 to 5 minutes.  Remove chicken and set aside.

Reduce heat and add ginger, garlic and onions.  Cook until softened and browned, 8 to 10 minutes.  Meanwhile, place cinnamon sticks, bay leaf and cardamom pods in a square of cheesecloth and tie with kitchen string.  When the onions are brown add the spice bundle and cook for an additional 10 minutes, making sure the spice bundle is covered with onions.  Add the tomatoes and roughly crush with a potato masher or snip with a kitchen scissors.  Add the chicken stock and browned chicken and raise the heat to medium high.  Cook until the liquid is somewhat reduced, about 15 minutes.  Reduce heat to low and stir in yogurt and raisins.  Cook until warmed through, then add cilantro.  Taste and adjust salt and pepper.

Serve with basmati rice and garnish with toasted almonds.

Friday, January 11, 2013

Balsamic Vinegar Chicken with Almond Peppers

Last year's post:Broccoli, Cabbage and Brussels Sprout Salad with Dijon Vinaigrette

There are two things I need to tell you right off the bat.  First, this recipe is adapted from a Cooking Light recipe, so you know it's healthy.  Second, the recipe is part of their Five Star collection, which means it receives the highest possible rating from reviewers.  You would never guess that it's a Cooking Light recipe from the presentation and taste, but it'll certainly help you keep on track for a healthy 2013.

Almond peppers is a dish that's common in Italy featuring the interesting combination of vinegar, raisins and almonds in addition to the peppers for a sweet-and-sour, crunchy and flavorful dish.  In this recipe it's paired with a crispy Parmesan-breaded chicken cutlet for a delicious dinner.  I like to serve it with brown rice to continue the healthy theme.

So what's a chicken cutlet as opposed to a chicken breast?  It's simply a thinner piece of chicken breast.  You can sometimes find chicken cutlets in the poultry section, or it's easy to make your own by taking a large chicken breast and cutting it in half horizontally.  Chicken breasts are so big these days that a chicken cutlet is plenty to eat and it cooks faster and more evenly than a thick breast.

Eight years ago I resolved to change my lifestyle and become more healthy.  I knew I had to change my eating habits but I also didn't want to deprive myself of delicious, interesting foods.  My goal for the last eight years has been to find great recipes that also fit into a healthy lifestyle. That's how I found this recipe, which remains one of my favorites.

I'm happy to tell you that I lost weight and continue to lead a healthy lifestyle today.  Even better, I learned to crave fresh fruits and vegetables along the way!  If I have to change my usual dietary habits due to a trip, for example, I can hardly wait to get back home and eat my fruits and veggies.  Sick, but true.

click here for a printable recipe

Balsamic Vinegar Chicken with Almond Peppers
Serves 4

1large sweet red pepper
1 large sweet green pepper
1 tablespoon olive oil
1/3 cup raisins
¼ cup balsamic vinegar
1 ½ teaspoons sugar
¼ teaspoon salt
1/8 teaspoon pepper
¼ cup slivered almonds, toasted
4 chicken cutlets or two large chicken breasts, cut in half horizontally
3 tablespoons fine dry breadcrumbs
3 tablespoons grated Parmesan cheese (or shredded Parmesan, chopped)
¼ cup all-purpose flour
2 egg whites, lightly beaten
1 tablespoon olive oil
2 tablespoons balsamic vinegar
2 tablespoons water

Core and seed peppers; cut into 2 ½ x 1” strips.  Heat 1 tablespoon oil in a large nonstick skillet over medium heat.  Add pepper strips; sauté 8 minutes.  Add raisins; sauté 1 minute.  Add ¼ cup vinegar and next 3 ingredients; cook 1 minute.  Remove from heat; stir in almonds.  Set aside and keep warm.

Combine breadcrumbs and cheese in a shallow dish.  Place flour in a shallow dish.  Dredge each piec of chicken in flour, dip in egg whites, and dredge in breadcrumb mixture.

Heat 1 tablespoon olive oil in a large skillet over medium heat.  Add chicken and cook 3 minutes on each side or until golden and done.  Remove from the pan and keep warm.

Add two tablespoons vinegar and water to the skillet the chicken was cooked in, stirring with a wooden spoon to deglaze.  To serve, spoon sauce over chicken and pepper mixture.

Friday, June 1, 2012

Pesto Pasta with Edamame, Spinach and Almonds

Edamame is a relatively new favorite of mine.  Since it's a really healthy food I was looking for new ways to eat more and came across a recipe that pairs it with pasta.  I was even more intrigued when I realized the recipe has only six ingredients (not counting salt and pepper) and that three of them are superfoods.  Amazing!  Almonds and spinach are well-known superfoods, but you may not know that edamame (soybeans) are high in calcium, soy, protein and fiber while low in calories.  The high protein content is one of the reasons this recipe is very satisfying and filling even though it's vegetarian.  How can I count the number of good things about this recipe?  It's healthy, fast, delicious, beautiful, vegetarian (or not), light, versatile, unusual, elegant and easy. 

It also taught me a new technique for preparing almonds - not chopped, not sliced, not slivered - but cracked.  The resulting coarse pieces vary in size and shape and have a nice crunchy texture that greatly adds to the overall dish.  The recipe actually called for crushed almonds but I really didn't know how to crush them so I made up my own technique which I think more closely resembles cracked rather than crushed.  Basically take a whammer (meat mallet or other heavy object) and lightly hit one almond at a time.  If you try to hit a bunch at the same time they end up all over the kitchen.  Trust me.


I used the opportunity to go to the farmer's market and found some wonderful krinkly-leaf  spinach that also added to the overall crunchiness of the dish because it's thicker than baby spinach and therefore didn't wilt.  I'm usually a fan of baby spinach but for this dish I liked the texture of the slightly thicker spinach.  Your call either way.


The versatility comes in with regard to temperature - you can serve this pasta warm, room temperature, or cold which makes it great for get-togethers, picnics or weeknights.  Just note that if you choose to refrigerate it, add a little olive oil to moisten before serving.  The other way it's versatile is that it's vegetarian but you could easily add some chicken (or any leftover meat) if you have people who Really Want Meat.

* * click here for a printable recipe * *

Pesto Pasta with Edamame, Spinach and Almonds
Serves 4 to 6

8 ounces spaghetti
2/3 cup pesto
8 ounces spinach
2 cups frozen edamame, prepared according to directions
Juice from 2 lemons plus additional fresh lemon wedges for serving
¾ cup whole almonds
Salt and pepper

Coarsely crack the almonds by placing on a cutting board and using a meat mallet (or other heavy tool) to lightly pound one almond at a time until it cracks into several pieces. (Trying to crack more than one at a time results in almonds all over your kitchen.) Lightly toast in a dry skillet or oven until fragrant and set aside.

If baby spinach is used, not further chopping or tearing is needed. If using regular spinach, tear the larger leaves into two or more bite-sized pieces.

Cook spaghetti according to package directions, then drain. In a large bowl, stir together the spaghetti and pesto until thoroughly combined, then add the spinach, edamame, and juice of two lemons and toss well.

Season to taste with salt and pepper. Serve garnished with cracked almonds and lemon wedges for squeezing at the table.

May be served warm, room temperature or cold. If the pasta has been refrigerated, toss with a small amount of olive oil to moisten before serving.

Friday, May 25, 2012

Scandinavian Muesli

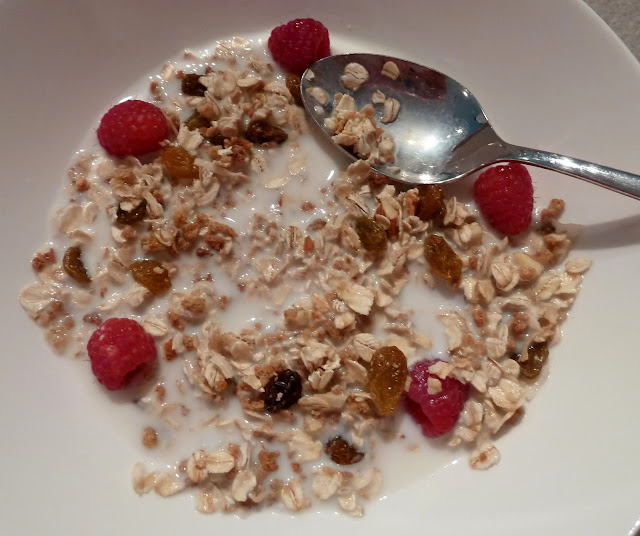
Muesli (mew-slee) is a Swiss-German breakfast cereal.  Although I grew up in a very Scandinavian part of the country and had heard of muesli, I had never actually tried it until we were at a buffet breakfast in St. Petersburg, Russia and there it was.  Maybe that's because we were close to Scandinavia?  Anyway, the Lawyer likes it so I decided to give it a try. I thought muesli would either be like oatmeal since it has rolled oats, or like granola since it has nuts and fruits.  Actually it's like a cross between the two that's served cold with yogurt or milk. 

At this particular restaurant the muesli was mixed into yogurt to soften overnight, which is traditional.  It reminded me of a summer version of oatmeal because the texture was similar but it was cool and creamy rather than hot. (It would be really good on a warm summer morning.)

mixed with yogurt

 I really like it, and especially like the fact that you can mix it up the night before.  I also like that it's very healthy with whole grains, the cholesterol-fighting properties of oats, calcium-rich dairy, probiotics (good bacteria) in the yogurt, and some protein. 

Speaking of Russia, if you ever have the opportunity to go I highly recommend it.  St. Petersburg is very beautiful and looks like a European city, while Moscow has those great funky buildings that look like Johnny Depp and Tim Burton might have designed them for an Alice in Wonderland movie.


Back to Muesli - I like this particular recipe because the grains, almonds and coconut are toasted to give them a little additional crispy texture and nutty flavor, and  I also like the touch of sweetness and cinnamon.  Even when mixed into yogurt the night before, the muesli will retain some crunchiness due to the nuts. You can easily double the recipe - although it states that it will keep in the refrigerator for up to two weeks, you could freeze some for later. It's a really easy and healthy way to start your day.

* * click here for a printable recipe * *

Scandinavian Muesli
8 servings, about ½ cup each

Note: you can substitute any combination of chopped dried fruit for the raisins and can add fresh fruit just before serving. Walnuts can be substituted for almonds. You can also eat the muesli with yogurt or milk mixed in right before serving rather than the night before. The texture will be different – try it both ways and see which you prefer.


2 cups old-fashioned or quick-cooking (not instant) rolled oats
2/3 cup rye flakes, wheat flakes, or whole grain nugget cereal
1/3 cup coarsely chopped almonds
2 tablespoons flaked coconut (sweetened or unsweetened)
½ cup raisins
2 tablespoons honey
½ teaspoon vanilla extract
Pinch of cinnamon


Preheat oven to 350d. Cover a large baking sheet with aluminum foil and spray with cooking spray. Spread oats and rye flakes (or wheat flakes or nugget cereal) on the baking sheet and bake for 10 minutes. Stir in the almonds and bake for an additional 5 minutes, then stir in the coconut and bake for a final 5 minutes. Remove the baking sheet from the oven and turn it off.

Microwave the honey for 10 seconds, then stir in the vanilla and cinnamon. Drizzle over the muesli and stir very well to coat.  Return the muesli to the turned-off warm oven and let cool completely, about 2 hours.  Add the raisins and stir again. 

Cover and refrigerate for up to two weeks.

To serve: combine with low-fat yogurt or milk (twice as much yogurt or milk as muesli) and refrigerate, covered, overnight.

Friday, March 9, 2012

Spinach Salad with Spicy Orange Dressing


The Lawyer and I over-endulged a little last weekend so it was time to even the scales with a nice light healthy dinner.  Although this spinach salad is light in calories and fat, it's loaded with vitamins and anti-oxidants.  It has such big, bold flavors and crunchy textures that it's very satisfying as a vegetarian entree, but you can amp up the protein if you want by adding some cooked crumbled bacon, grilled chicken or shrimp, or whatever.  We chose to add a little bacon since we had some in the freezer.  With a piece of crusty bread on the side it was a filling dinner.

We happen to like spicy foods, but I was reminded that not everyone shares our tastes when I was at a bridal shower recently and one of the participants pronounced a small tea sandwich as "too spicy" because it had black olive tapenade and feta cheese.  She didn't even get as far as the peppadew garnish. ( I thought it was the best sandwich out of the lot.)  Oh well, everyone's tastes are different.  This salad is spicy but not overly so, and you can control the amount of heat by varying the amount of red pepper sauce (or leave it out entirely).  You can also leave out the red jalapeno - I liked the way it looked a a garnish but I would certainly fine slice or mince it if you intend to eat it.


There are two ingredients in this recipe that you might not be familiar with - daikon sprouts and jicama.  Daikon sprouts are like alfalfa sprouts except they're from Japanese daikon radishes, so they have a slightly spicy radish-y flavor.  I found them in the produce section next to the alfalfa sprouts.  They're worth searching out because they go so beautifully in this salad but if you can't find them you can substitute alfalfa sprouts or bean sprouts.

Jicama is the other interesting ingredient.  Pronounced hi-ka-ma, it's the tuberous root of a native Mexican vine also called the Mexican Turnip.  It's not going to win any beauty contests anytime soon.


Jicama is typically peeled, cut up and eaten raw.  It has a crisp white interior (better-looking than the exterior) and a slightly sweet and starchy flavor somewhat reminiscent of a potato or an apple.


Along with the carrots and almonds, it adds great crunch to the salad in addition to a subtle sweetness. It can be found in the produce section near parsnips and turnips.  (Just tell your kids it's a fruit.)


Spinach Salad with Spicy Orange Dressing
Serves 4

1 cup orange juice
1 teaspoon honey
2 teaspoons sesame oil
1 tablespoon soy sauce
2 tablespoons rice wine vinegar
1 teaspoon hot red pepper sauce (optional)
1 shallot, chopped
2 teaspoons grated fresh ginger
6 cups washed baby spinach
1/3 cup julienned carrot
1/3 cup julienned jicama
1/3 cup daikon sprouts
1/3 cup sliced almonds, toasted
2 tablespoons mixture of black sesame seeds and white sesame seeds
Half a red jalapeno for garnish (optional)


For the dressing, cook the orange juice in a saucepan over medium heat until syrupy and reduced to approximately 3 tablespoons, about 15 minutes. Combine with the honey, sesame oil, soy sauce, vinegar, and hot sauce in a blender. Add the shallot and ginger and process until smooth. Store in the refrigerator.

For the salad, mix the spinach, daikon sprouts, carrot and jicama in a large bowl. Add the dressing and toss to coat well. Garnish with almonds, sesame seeds and red jalapeno (if using).


Optional: add crumbled cooked bacon, cooked sliced chicken or pork, or cooked shrimp