Showing posts with label Asian. Show all posts

Sunday, July 21, 2019

Cold Chile Noodles


A bowl of cold, spicy noodles with a pile of crunchy vegetables is just the ticket for a hot summer day, don't you think?  And very healthy to boot.  This recipe is extremely simple to make and can varied according to whatever crunchy vegetables you happen to have on hand, although the red cabbage is really nice.  If you really like spice, add a sliced jalapeno or Fresno chile.  And of course some rotisserie chicken or leftover roast pork would be a nice addition for a more substantial bowl, but we really like it as a vegetarian meal.  The herbs play an important part in terms of freshness and taste, and it's best to use a combo - I used cilantro, mint, basil and dill.  Try to use at least two or three of your favorites.

Tip: if it's a really hot day, refrigerate the pasta, chile oil and serving bowls in advance and take them out right before serving.  That's a trick that fancy restaurants sometimes use with salad bowls to make the salad seem really cold and crisp.  It's a fun surprise compared to your usual bowl of pasta and sauce.

print
Cold Chile Noodles
Serves 4

For the noodles:
½ cup canola oil
1 tablespoon fennel seed
1 tablespoon red pepper flakes
2 garlic cloves, grated
1 lb spaghetti
2 tablespoon rice wine vinegar
Salt and pepper

For the vegetables:
½ head red cabbage, thinly sliced
Salt and pepper
1 tablespoon lemon zest
¼ cup fresh lemon juice
2 tablespoons olive oil
4 green onions, thinly sliced
4-6 radishes, thinly sliced
1 cup loosely packed chopped fresh herbs – any combination of cilantro, dill, basil, mint, parsley
½ cup coarsely chopped or crushed peanuts


Heat the oil, fennel seeds, red pepper flakes and garlic in a small saucepan over the lowest heat possible.  Cook, stirring frequently, until you start to see the garlic and spices frizzle in the oil, 5-8 minutes.  Keep cooking at the lowest heat setting until the spices are toasted, another few minutes, but don’t let the garlic get too brown.  Remove from the heat.

Meanwhile, cook the pasta according to package directions; drain and rinse in cold water.  Drain again, then place in a large bowl and toss with a small amount of canola oil to prevent sticking.  If not using right away, the pasta can be put in the refrigerator until ready to serve.

Place the cabbage in a medium bowl and toss with the lemon zest and juice.  Season with salt and pepper and toss with the 2 tablespoons of olive oil.

When ready to serve, toss the pasta with the vinegar and season with salt and pepper.  Add just enough chile oil to coat and toss again.  Divide between shallow bowls and top with cabbage, green onions, radishes, herbs and peanuts.  Pass any additional chile oil at the table.


Sunday, April 21, 2019

Slow Cooker Honey Garlic Chicken


Whenever I find boneless skinless chicken thighs on sale I always think of the slow cooker because they become wonderfully tender and don't dry out with the long slow heat.  I'm normally not a big fan of sweetness in savory foods but I decided to try this recipe anyway and was surprised at how very delicious it is. It's only slightly sweet and slightly garlic (mellow garlic, not harsh) with a very flavorful Asian sauce infusing that delicious, fall-apart tender chicken.

Served with white or brown rice and some sugar snap peas it makes a great Asian bowl dinner.  Maybe an egg roll to start?  This would be perfect for the next time you'll be busy in the afternoon and want a hot, nutritious and delicious dinner waiting when you get home.

print
Slow Cooker Honey Garlic Chicken
Serves 4-6

1 package  (5-6) boneless skinless chicken thighs
½ cup low sodium soy sauce
½ cup honey
2 tablespoons hoisin sauce
1 tablespoon rice wine vinegar
1 teaspoon toasted sesame oil
1 teaspoon fresh ginger, grated
4 cloves garlic, minced
2 green onions, sliced thin, white and green parts divided
Sesame seeds for garnish (optional)


Trim any extra fat off the chicken thighs and place in the bottom of a slow cooker.  

In a medium bowl, whisk together the soy sauce, honey, hoisin, vinegar, sesame oil, ginger, garlic, and the white parts of the green onions.  Pour evenly over the chicken.


Cover and cook on low for 6 hours.  Serve garnished with green onions and optional sesame seeds.

Saturday, January 23, 2016

Sesame Salmon en Papillote

Last Year's Post:  Eggplant and Rice Parmigiana
Two Years Ago:   Lobster and Shrimp Gratin

Cooking something "en papillote" (pronounced en pa-pee-oh) is French for cooking "in parchment" - basically cooking in a paper pouch to seal in moisture.  It's a great way to cook delicate fish because it seals in the moisture so the fish doesn't dry out, and at the same time it becomes infused with the flavors of the sauce.  I've previously posted recipes for swordfish en papillote (with an Italian twist) and sea bass en papillote (with a Mediterranean theme) so I thought this Asian salmon would be a good complement.   

It's not only flavorful, it's a very healthy dinner as well.  I modified a recipe that I found online to include spinach for nutrition and color, mushrooms for flavor, and sesame seeds for crunch and because they look great.  A mix of white and black seeds is especially attractive - you can find black sesame seeds at Asian markets and at Penzeys - but all white seeds would work also.  Tip: you can usually find a large container of toasted white sesame seeds in the Asian section of your grocery store for much less than a small bottle in the spice aisle.

The recipe is really easy once you get the parchment paper technique down.  Basically you just take a big piece of paper, fold it in half, and cut it in a folded semi-circle with one end slightly more pointy than the other.  Open it up, pile the ingredients on one side of the fold, and close the other side over the top.  Then you start make tight little overlapping folds to ensure the packet is sealed.  Or, you could just use aluminum foil and crimp the edges which is easier, but not as traditional or pretty.  If you plan to serve the packets at the table, parchment is definitely the way to go.


Sometime I remove the contents from the packets before serving, depending on my mood and the contents of the packet.  If there's going to be a lot of cutting involved it tends to be easier to take them out of the paper although it's less dramatic and fun.   Either way, it's a fast, easy and delicious meal that's very healthy.


print
Sesame Salmon en Papillote
Serves 4

For the sauce:
Zest of ½ orange
1 tablespoon fresh orange juice
1 teaspoon peeled minced fresh ginger
3 tablespoons soy sauce
2 teaspoons rice vinegar
2 teaspoons toasted sesame oil
1 teaspoon honey

10-12 leaves baby spinach per packet, about ½ bag of baby spinach
1 red bell pepper, seeded and thinly sliced
7 ounces shiitake mushrooms, cleaned, stemmed and thinly sliced
4 (6 ounce) salmon fillets, skinned
Freshly ground black pepper
¼ cup toasted white or black sesame seeds, or a mix
1/3 cup green onions, thinly sliced on the diagonal
Parchment paper (or aluminum foil)

Preheat oven to 425d.

Combine all sauce ingredients in a small bowl and whisk until blended; set aside.

Cut 4 large (approximately 16” by 12”) sheets of parchment paper.  (If you don’t have parchment paper, foil works just as well but definitely transfer the contents out of the foil before serving.) Fold each sheet in half. Place the fold on the bottom edge nearest you. Starting at the right side, cut a large semi-circle with the fold as the spine and one end more pointed then the other.  Open the paper and place ¼ of the spinach leaves, red bell pepper and shiitake mushrooms in a pile on one side, near the fold.  Moisten with one tablespoon of the sauce.  Place a salmon fillet on top; season with black pepper and additional tablespoon of marinade.  Sprinkle the top of the salmon with sesame seeds.

Fold the other half of the paper over the fish. Starting at the flatter end of the semicircle (not the pointy end), fold 1-2 inches of the edge inwards. Work your way around the circle making a series of tight, overlapping folds to enclose the fish. When you reach the pointy edge, fold the last pleat several times and wrap it under the pouch.  Repeat with the other three packets.

Place the packets on a baking sheet and bake for 11-12 minutes, depending on thickness.


Transfer the packets to plates and cut open.  Garnish with green onions prior to serving.  Alternatively, transfer the package contents to a plate and garnish prior to serving.  Serve any remaining sauce on the side.

Friday, January 15, 2016

Shrimp and Bacon Ramen

Last Year's Post:  Chicken Pho
Two Years Ago:   Italian Sausage Soup

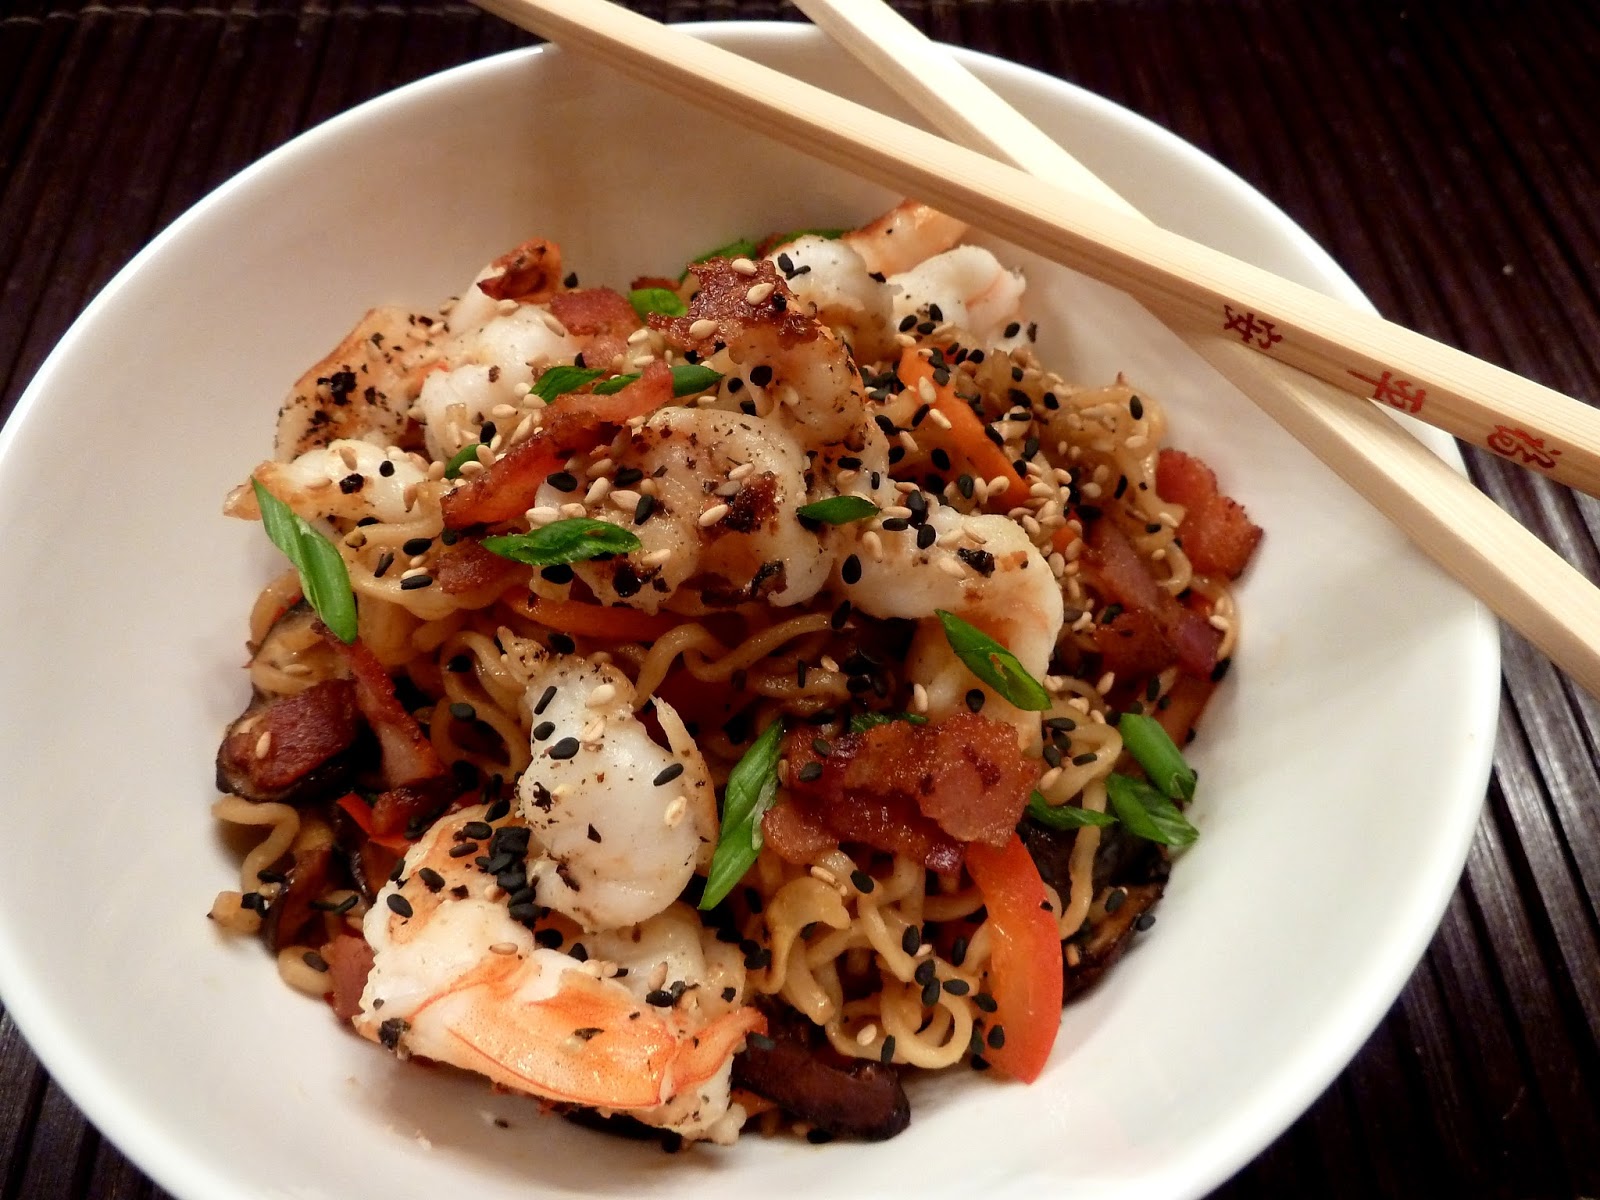
I love ramen noodles because I love all things pasta, but ramen has the additional benefit of all those fun curls.  Plus, it's cheap, easy to cook, and a perfect blank canvas for nearly any sauce and ingredients.  This particular recipe is sort of an American-Asian mashup of ingredients much like you'd find at a good food truck - good old American bacon pairs up with the typical Asian flavors of soy sauce, sesame oil, shiitake mushrooms, red bell pepper and shrimp for an absolutely delicious result.  Of course, if you want to make it a little lighter you could leave out the bacon but it really added that little extra something.  I adapted it from a recipe that called for a lot of special Asian ingredients and substituted readily-available ingredients instead.

I love my serrated grater for making the thinnest carrot strips, but if you don't have one (hint:  Bed, Bath and Beyond) just cut them as thin as you can.  The benefit to having long thin strips is that after they're briefly sauteed they soften a little and start to mimic the noodles in shape and twirl-ability.


Start by doing all your prep, of course, including the shrimp - peel and devein them, take off the tail shells, then cut them through the back all the way down to (but not through) the tail to butterfly them open.  That does two things:  it allows them to cook faster and more evenly, plus they curl into the coolest shapes as they cook.  Very fancy.


When everything is ready, cook the bacon while you're cooking the ramen noodles.  Use half the bacon fat to cook the shrimp and vegetables, then use the other half to briefly fry the noodles to make them a little crispy.  Toss everything with the sauce until it's absorbed, and you're done - very fast and easy.  And again, if you don't want to include the bacon, just use a little peanut oil instead.  You could also skip the step of frying the noodles to cut down on fat and calories - the noodles will just be a little softer.


I would put this up against your favorite food truck food any day, plus you get to eat it piping hot at home whenever you want.


print recipe
Shrimp and Bacon Ramen
Serves 4

For the sauce:
1/3 cup soy sauce
1 tablespoon rice wine vinegar
1 ½ teaspoons toasted sesame oil

For the ramen:
4 (3 ounce) packages ramen noodles
1 teaspoon toasted sesame oil
4 strips of bacon, cut crosswise into 1/2-inch pieces
12-14 ounces large shrimp (about 4 per person), peeled and deveined, tails removed
4 green onions, thinly sliced
1 red bell pepper, thinly sliced
1 carrot, peeled and cut into matchsticks (or julienned)
1 tablespoon peanut or olive oil
6 ounces shiitake mushrooms, cleaned, stems removed, and sliced
Toasted sesame seeds for garnish, optional


For the sauce, whisk all ingredients together in a small bowl and set aside.

Cut each shrimp in half lengthwise almost to the tail end (but not cut in half completely). 

For the noodles:  bring a large pot of salted water to a boil.  Cook the noodles until just barely cooked according to package directions (they will cook more later).  Drain and rinse with cold water.  Using a kitchen shears, cut the noodles into approximately 8-inch lengths.  Toss with 1 teaspoon sesame oil to prevent sticking. Set aside.

Cook the bacon in a large skillet over medium heat until crisp and brown, then transfer to a paper towel-lined plate.  Remove and reserve half of the bacon drippings in a small bowl for later.  Re-heat the remaining bacon drippings over medium heat, then add the shrimp to the pan and sprinkle with salt and pepper.  Sauté, turning occasionally, until the shrimp are curled and cooked through, about 4 minutes.  Remove to a plate.

Add a tablespoon of oil to the same pan and place over medium heat.  Add the mushrooms and sauté for 2-3 minutes, stirring occasionally.  Add the red pepper and carrots and sauté for additional minute or two, then add the green onions and sauté for 30 seconds.  Remove to a large bowl.

Add the remaining bacon fat to the pan and heat to medium-high.  Add the noodles and cook, stirring minimally, until the noodles are crispy and charred in places, about 3 minutes.

Add the noodles to the bowl with the mushrooms, green onions, red pepper, and carrots.  Add the sauce and toss again.  Divide among bowls, then top with shrimp and bacon.  Garnish with sesame seeds, optional.


Friday, September 20, 2013

Pad Thai

Last Year's Post: Pork with Fennel and Caper Sauce
Two Years Ago: Salmon with Balsamic Sauce

Pad Thai is one of the most popular Thai dishes in America, which is why you'll find it on virtually every Thai restaurant menu.  It's a stir-fried noodle dish made with cooked egg, bean sprouts and a chopped peanut garnish. The protein can be shrimp, chicken, or tofu for a vegetarian version. In its best form it has bright fresh flavor and a variety of textures ranging from the tender noodles to crunchy bean sprouts and peanuts.  Unfortunately, quality can vary and in its worst form it's often mushy and overly sweet. I recently had a Pad Thai encounter of the worst kind so I resolved to find a recipe for my ideal version.  I discovered that many Pad Thai recipes contain tamarind which is an unusual ingredient that's both sweet and sour, plus dried shrimp (yeck).  I was therefore really happy to find a recipe from a cookbook author who has traveled extensively in Thailand.  She found a simpler and very authentic recipe she convinced the local chef in southern Thailand to give her that contains rice vinegar and lime juice instead of tamarind and no dried shrimp.  Yay!

This is an easy recipe to make but as with any stir fried dish, you should do the chopping before you start to cook because the cooking goes fast.


You might notice the recipe calls for cooking the rice noodles less than the original package may state; that's because you finish cooking the noodles with the other ingredients and the sauce.  You want to let them soak in hot water until flexible but still very firm.


As I mentioned, the protein can be chicken, shrimp, and combination of the two, or firm tofu if you want to go vegetarian.  We've been having a lot of shrimp recipes lately (the big Costco bag o'shrimp) so I decided to go with just chicken.  Regarding the spice level, I would call the recipe medium-spicy as written.  By "medium-spicy" I mean you'll notice the spiciness but it's not really hot.  Your lips will be tingling a little by the time you're done but you won't have to stop eating because of the spiciness.  If in doubt, start with a lesser amount of jalapeno and have more available at the table for people to add to their tastes.

The recipe also calls for white pepper, which is common in Asian cuisine.  I just happened to have some on hand but I wouldn't recommend going out and buying it just for the 1/8 teaspoon the recipe needs.  It has a slightly different flavor than black pepper but you'll never notice it in that small amount.

One last thought - don't worry if you don't have a wok, this recipe works just fine in a large skillet.


printable recipe
Pad Thai
Serves 2-3

Note:  As written, this recipe is moderately spicy.  You can adjust the spiciness by increasing or decreasing the amount of jalapeno you use.

6 ounces Pad Thai rice noodles
1 boneless skinless chicken breast and/or 10-12 medium shelled and deveined shrimp
1 ½ tablespoons soy sauce
3 garlic cloves, minced
1 fresh red or green jalapeno, finely sliced
1 teaspoon grated fresh ginger
4 green onions, sliced (white parts separated from green)
1 egg
2 cups fresh bean sprouts
1/3 cup dry roasted peanuts, chopped
2-3 tablespoons vegetable oil
Lime wedges for serving
2 grated radishes, optional garnish

Pad Thai Sauce:
1/3 cup chicken stock
3 tablespoons rice vinegar or white vinegar
1 tablespoon fresh lime juice
3 tablespoons brown sugar
2 tablespoons fish sauce
1 tablespoon soy sauce
¼ teaspoon cayenne pepper
1/8 teaspoon white pepper

Chop chicken into bite-sized pieces; toss with 1 ½ tablespoons soy sauce in a bowl and set aside.

Combine sauce ingredients together in a small bowl, stirring to dissolve sugar.  Set aside.

Bring a large pot of water to a boil.  Remove from the heat and add rice noodles.  Cover and allow the noodles to soak approximately 8 minutes until flexible but still firm and undercooked.  Drain and rinse with cold water.  Set aside.

Heat a wok or large frying pan over medium-high heat.  Add the oil and swirl to coat the pan, then add the garlic, jalapeno, ginger, and the white parts of the green onion (reserve the green tops for later).  Stir fry one minute.

Add the marinated chicken and stir fry until cooked through, about 3-4 minutes.  If using shrimp, cook for approximately 2-3 minutes until they turn pink.

Push ingredients to the side of the pan and crack an egg into the center, then stir fry quickly to scramble.  Add the noodles plus 3-4 tablespoons of the sauce.  Using two utensils, lift and turn the noodles with the other ingredients.  Continue this way, adding more sauce every minute or two, until all the sauce has been added (4-5 minutes).

Fold in the bean sprouts.  Portion out to individual plates and add a lime wedge on the side.  Top with remaining green onions, peanuts, and optional shredded radishes.


Friday, March 29, 2013

Asian Roast Pork with Broccoli Slaw and Pasta


I recently spent a wonderful relaxing weekend in the sun with three girlfriends and we made this recipe together. It's actually considered a salad and can be served either warm or at room temperature. It's very light and  healthy although it's full of flavor - a perfect spring dish.  Although it came out great that weekend, I re-created it for this post back at home instead of using that experience for the visuals.  The reason has to do with what I call "full-bore blogger mode", which is what a food blogger is in when they're creating a blog recipe.  It goes something like this.

Dining with a Food Blogger
1.  Expect that the entire process of making the dish will be interrupted repeatedly for photo ops.
2.  You may be pressed into service as a hand model for action shots (see The Lawyer below for an example).
3.  When the recipe is done, the blogger will carefully and painstakingly plate and garnish one serving, then disappear to whatever part of the house has the best light for pictures (for example, the bathroom - bathrooms have great light).  You, on the other hand, are left to your own devices to plate your food.
4.  Particularly if other props are involved, the blogger could be gone for several minutes at which time the food may or may not still be hot.
5.  As you eat, you'll discuss the recipe.  Generic comments like "it tastes good" are nowhere near adequate.  You're expected to comment on the colors, visual appeal, plating, balance of flavors and textures, overall flavor profile, and what (if anything) should be changed.
6.  You may be interrupted as you eat if the blogger is particularly struck by how your plate looks and needs a picture.
7.  After you're finished, don't be surprised if you're left with a kitchen of dirty dishes as the blogger dashes off to the computer to check out all the visuals.

OK, that might be slightly exaggerated, but not much.  Now you know why the only person I regularly subject to blog recipes is the The Lawyer.  All I can say is that he's a very patient man.  Certainly I didn't want to do that to my friends, whose sole goal for the weekend was to relax and lay in the sun.

Not that this is a difficult recipe at all.   The hardest part is figuring out how to grate a carrot without grating your fingernails or knuckles in the process.  (If you can find a bag of shredded carrots at your store, go for it.)


Basically you make an Asian barbecue sauce out of hoisin sauce, soy sauce, ginger and garlic, then rub some of it on a pork tenderloin and roast it in the oven, saving the rest of the sauce to serve over the finished dish.

The Lawyer as a hand model
While the pork roasts, you briefly blanch some broccoli slaw and toss it with the carrots, cilantro and a little sesame oil.  (If you don't like cilantro, just leave it out.)


Then you cook some pasta and toss that with sesame oil also.  All that's left is the plating.  And the photography, of course.


printable recipe


Asian Roast Pork with Broccoli Slaw and Pasta
Serves 4

For the sauce:
1 ¼ cups hoisin sauce
5 tablespoons soy sauce
3 tablespoons rice wine or dry white wine
2 ½ tablespoons chopped garlic
2 tablespoons fresh ginger, chopped

1 pork tenderloin, approximately 1 lb
6 oz broccoli slaw
1 ½ cups carrots, grated or shredded
¼ cup chopped cilantro
½ lb spaghetti, broken in half
2 teaspoons toasted sesame oil, divided
Salt and pepper


For the sauce:  mix all ingredients with ¾ cup water in a small saucepan and bring to a boil; reduce heat and simmer until thickened, approximately 5 minutes.  Let cool.

Preheat oven to 350d.  Line a roasting pan with foil.

Put the tenderloin in the roasting pan; spread 1/3 of sauce over all surfaces.  Roast 25-35 minutes, until the internal temperature is 140d (temperature will continue to rise as the meat rests to the eventual target of 145d).  Remove and let cool slightly.

Reheat the remaining sauce to a simmer.

Bring water to a boil in a large pot; add broccoli slaw and cook 30 seconds.  Using a strainer, remove vegetables (do not dump the hot water) and refresh in cold water, then drain again.  In a medium bowl, toss the broccoli slaw, carrots and cilantro with 1 teaspoon sesame oil.  Season with salt and pepper to taste.

Reheat the water and cook the spaghetti according to directions.  Drain and toss with the remaining 1 teaspoon sesame oil.

Cut the pork across the grain into thin slices.  Arrange pasta on each plate, top with carrot/broccoli slaw mixture and some pork slices.  Drizzle some sauce over the mixture and serve the remaining sauce on the side.


Friday, July 6, 2012

Grilled Chicken, Mushroom and Bok Choy Kebabs


This is a great summer recipe for a grilled meal that's healthy and very satisfying.  If you're not familiar with bok choy (also known as Chinese cabbage), it's a crunchy vegetable with a white stalk and leafy green tops and it's a good source of vitamin A.  The taste reminds me of a cross between celery and cabbage.  It's available in a full-sized mature version and also as baby bok choy.  I prefer baby bok choy because it can be cooked whole or in halves and looks more interesting than the full-sized variety.  (Plus I think baby vegetables are cute.)  Watch for baby bok choy at your local grocer or farmers market.  If you can't find it, full-sized boy choy can be substituted - just chop it into manageable pieces and then blanch and skewer as per the recipe.


In this particular recipe, the crunchy and slightly bitter bok choy contrasts beautifully with meaty cremini mushrooms and chicken thighs that have been marinated in a very flavorful Asian sauce.  The marinade is absolutely fabulous but be sure to use low sodium soy sauce if you're trying to watch your salt intake.  (Hot tip of the day - Trader Joe's soy sauce actually has less sodium the the low-sodium versions I've found in other stores.)

We've all seen pictures of really pretty kebabs that alternate ingredients on the same skewer such as chicken, onion, peppers, etc.  The only problem is that the ingredients need different cooking times so you can end up with some either undercooked or overcooked.  If you put each type of ingredient on a different skewer you avoid the problem.  For example, in this recipe we put the bok choy, mushrooms, and chicken pieces each on their own skewers as you can see in the top photo.  The bok choy are cut in half and blanched, then the  leaves are folded back when skewered so they don't flop all over and burn on the grill.

both sides of the bok choy skewers

The marinade needs to be cooked and cooled plus the chicken needs to marinate for at least 3 hours, so plan to start this recipe in the morning or the night before you plan to grill.

The good news about kebabs is tht they don't take long to cook, which is really good if you live somewhere that's hot right now (approximateloy 100% of the country).  I've said before that The Lawyer likes to grill so much that he doesn't complain about temperatures (high or low) but even he has been checking the shade before grilling lately.  Yikes.  Time to buy investment property on The New Mediterranean (aka Lake Superior).

* * click here for a printable recipe * *

Chicken, Mushroom and Bok Choy Kebabs
Serves 6

3 large garlic cloves
½ reduced-sodium soy sauce
1/3 cup dry sherry
¼ cup packed brown sugar
1 tablespoon finely grated peeled ginger
2 teaspoons toasted Asian sesame oil
1.5 lbs skinless boneless chicken thighs, cut into 2” pieces
1 lb baby bok choy (5 to 6 heads)
½ lb. cremini mushrooms, stems trimmed flush with caps
½ cup vegetable oil
hot cooked white or brown rice

Equipment:
14 (12 inch) wooden skewers, soaked in water 30 minutes


Boil soy sauce, sherry and brown sugar in a small saucepan over medium heat, stirring occasionally, until reduced to about 2/3 cup, 5 to 7 minutes. Meanwhile, mince and mash garlic to a paste with a pinch of salt using the tines of a fork. When the sauce is reduced, stir in garlic paste, ginger and sesame oil, then cool to room temperature.

Pour half of marinade into a large sealable bag and chill the remainder for basting. Add chicken to bag and marinate, chilled, turning the bag occasionally, at least 3 hours.

Prepare grill for direct-heat cooking over medium-high heat.

Meanwhile, halve bok choy lengthwise and blanch in a large pot of boiling salted water until crisp-tender, about 1 minute. Immediately transfer to an ice bath to stop cooking. Pat bok choy very dry, then, bending leaves, thread 3 or 4 halves (through the bulb and leaves) onto each of 3 or 4 skewers.

Toss mushrooms with vegetable oil. Thread mushrooms (through sides) and chicken onto separate skewers. Discard remaining marinade.

Grill the chicken approximately 3 minutes, basting occasionally, then flip and grill another 3 minutes. Meanwhile, grill the mushrooms approximately 2 minutes per side, basting on both sides. Grill the bok choy for about 90 seconds on the cut side only, just long enough to create grill marks.
Serve with hot cooked rice.