Friday, June 17, 2016

Tomatillo Salsa Verde

Last Year's Post:  Farro and Kale Salad
Two Years Ago:   Breakfast Sandwiches with Canadian Bacon, Chipotle Cheddar and Guacamole

Tomatillo salsa is great with shrimp, fish, chicken, pork, and eggs (think huevos rancheros).  It's a great sauce for tacos, fajitas, quesadillas and enchiladas.  Roasting the tomatillos and jalapenos gives them a wonderful deep flavor, much like my favorite red tomato salsa.  This recipe only takes a few minutes to make, and the salsa freezes beautifully for later.


If you're not familiar with tomatillos, they look like this on the inside.


The outer husk is papery and loose, but the inner fruit should be firm to the touch. Remove the papery outer husk and rinse the tomatillos to get rid of the sticky stuff before roasting.  Or I should say, charring.  You really do want the charred parts - they add great flavor.


After that, it's just a simple matter of blending everything and letting it sit to develop the flavors.  If you've ever had New Mexican cuisine at a restaurant,  they ask you whether you want red sauce, green sauce, or "Christmas" (both red and green).  Next time you make enchiladas, try them Christmas style - you'll be amazed at how good they taste.

print recipe
Tomatillo Salsa Verde
Makes 2 cups

1 pound tomatillos, husked and rinsed
2 to 4 jalapenos, to taste, stemmed, cut in half lengthwise and seeded
¼ cup chopped white or yellow onion, soaked for 5 minutes in cold water, drained and rinsed
1 garlic clove, peeled and halved
½ cup coarsely chopped cilantro
Salt to taste


Heat broiler, positioning a rack at highest setting under the heat.  Cover a baking sheet with foil and place tomatillos on top, stem side down.  Add jalapeno halves to the pan, skin side up.  Broil 2-5 minutes until some tomatillos and jalapenos are well charred.  Remove the jalapenos as they are charred, and turn the tomatillos over.  Continue to broil, turning tomatillos and removing jalapenos and tomatillos as they are done.

Transfer the tomatillos, jalapenos, and any accumulated juice to a blender.  Add onion, garlic, cilantro and ¼ cup water and blend to a coarse puree.  Transfer to a bowl and thin as desired with water.  Taste and adjust salt.  Set aside for at least 30 minutes before serving to allow the flavors to develop.

The salsa may be placed in jars with tight-fitting lids and frozen for several months.  Thaw overnight before using. 


Friday, June 10, 2016

Slow Cooker Buffalo Chicken Sliders

Last Year's Post: Mini Shrimp Tacos
Two Years Ago:  Grilled Lobster Cobb Salad


I really like the idea of cooking buffalo chicken sliders in a slow cooker, because you can make a double batch for a party with very little work (and without heating up your house if it's summer).  For some reason buffalo chicken sliders seem like party food to me, how about you?  They would be perfect for a summer party outdoors with some cold beer, for example.  You could serve them along side some little burger sliders for the beef eaters and everyone would be happy.

Several of the recipes I found called for ranch dressing and blue cheese crumbles, which I thought was interesting enough that I included it here.  The result has a slightly lighter taste overall (which I liked) than if you use straight blue cheese dressing, but it's totally up to you either way.

The recipe is incredibly easy - just season some boneless skinless chicken thighs and throw them in the slow cooker with some hot sauce.  When they're done, they are so tender that you can just shred them right in the pot.


Assemble the sliders and offer pickle and jalapeno slices on the side for those who are so inclined.  Be sure to have plenty of napkins on hand - these little babies are messy unless you shove the entire slider in your mouth all at once, which would be interesting to watch.


One last note:  the exact number of sliders you can make depends on the size of your rolls and how high you pile them.  My rolls were about 3" across and I didn't go too wild piling on the chicken, which is how I arrived at the calculation of 12 sliders.

print recipe
Slow Cooker Buffalo Chicken Sliders
Makes approximately 12 sliders depending on the size of the buns

1 ½ pounds boneless skinless chicken thighs
Kosher salt and freshly ground black pepper
1 teaspoon paprika
1/8 teaspoon cayenne
1 ¼ cups hot sauce, such as Frank’s Red Hot
12 small slider rolls
Ranch dressing and blue cheese crumbles (or blue cheese dressing)
Tomato slices (from 3-4 small tomatoes)
Green leaf lettuce
Pickle slices, optional
Jalapeno slices, optional


Sprinkle the chicken with salt, pepper, paprika and cayenne and place in a slow cooker.  Pour in the hot sauce.  Cover and cook on low for 8 hours or high for 4 hours.

Shred the chicken with two forks right in the slow cooker.

Brush the cut side of the buns with olive oil and place under a broiler for a few seconds until browned, watching closely so they don’t burn.


To assemble the sandwiches, place a piece of lettuce on the bottom half of each bun, followed by a tomato slice and some shredded chicken.  Top with ranch dressing and blue cheese crumbles.  Serve with pickles and jalapeno slices on the side for those who want to add them.

Friday, June 3, 2016

Blackberry Hoisin Ginger Pork Tenderloin

Last Year's Post: Red-on-Red Chicken Salad
Two Years Ago:  Chicken Gaston Gerard

Pork tenderloin is one of the most popular cuts of pork because it's so tender and doesn't dry out, plus it's so easy to cook. It pairs particularly well with fruit-based sauces.  Although blackberry preserves are the main ingredient in this sauce, it's not as sweet as you would think due to the hoisin sauce, ginger and vinegar.  The taste is complex and delicious even though it's very easy to make.


Speaking of ginger, have you discovered food tubes?  They make life so much easier.  I currently have four in my refrigerator - anchovy paste, grated ginger, wasabi paste and lemongrass paste.  I usually have a tube of tomato paste also.  No more tedious grating of ginger and throwing the rest away, or opening a can of tomato paste and using one tablespoon and tossing the rest.  Or worse yet, dealing with a tin of oily little fish.  You use exactly what you need and the rest keeps fresh for months.  You'll find the veggie/herb tubes like ginger and lemongrass in the produce section of your store near the herbs.  The anchovy paste will be next to the tins of anchovies, the wasabi paste will be in the Asian section, and the tomato paste tubes will be next to cans of tomato paste.  Try one, they're great!


Anyway, back to the pork tenderloin - this was a very easy, delicious and healthy dinner.  I served it with couscous and French green beans and felt that it was totally company-worthy.  We had leftovers so we thin-sliced the pork and served it over salad greens with a drizzle of the sauce and some fresh blackberries the next day and it was equally great cold.


One last note:  careful with the hot pan when it comes out of the oven!  I once burned my hand badly when I turned around for a second and grabbed the handle out of habit.  Put a towel or a mitt over the handle to remind yourself.

print recipe
Blackberry Hoisin Ginger Pork Tenderloin
Serves 4

1 tablespoon butter
2 cloves garlic, minced
1 teaspoon freshly grated ginger
¼ teaspoon red pepper flakes
½ cup blackberry preserves
¼ cup hoisin sauce
2 tablespoons red wine vinegar
¼ teaspoon salt
¼ teaspoon pepper
1 (1 ¼ pound) pork tenderloin
1 tablespoon olive oil
Salt and freshly ground black pepper
Sliced green onions, for garnish (optional)

To prepare the sauce, melt butter in a small saucepan over medium heat.  Add garlic, ginger and red pepper flakes and sauté for 30 seconds.  Stir in blackberry preserves, hoisin sauce, red wine vinegar, salt and pepper.  Taste and adjust seasonings if needed.  Remove about ½ cup for glazing the pork and set aside the saucepan with the remainder.

Preheat oven to 425d.

While the oven preheats, heat olive oil in a large oven-safe sauté pan over medium-high heat.  Sprinkle the pork on all sides with salt and pepper.  Carefully add the pork tenderloin to the pan and sear on all four sides for 1-2 minutes per side to brown.  Brush with some of the glaze and place the pan in the oven for 10-15 minutes.  Brush with the glaze again and return to the oven for an additional 5-10 minutes until the internal temperature is 140d.  Remove and let rest for 10 minutes.

While the pork is resting, re-heat the sauce.  Slice the pork thinly and drizzle with the sauce.  Garnish with optional green onions and pass the remaining sauce separately at the table.


Saturday, May 28, 2016

The Best Crisp Waffles

Last Year's Post: Crab Fried Rice
Two Years Ago:   Grilled Salmon and Pineapple with Avocado Dressing

I should say right up front that I have definite opinions about good and bad waffles.  Bad waffles are what you too often find at buffet brunches - pale, doughy and heavy.  Bleh.  Good waffles, on the other hand, are airy, brown and crisp, at least in my world.  The Lawyer is renowned for his waffle-making skills in the family to the point that every time his father sees us he asks "where are the waffles?"

There are two secrets:  the recipe itself, and the cooking technique.  Many years ago I ran across a fussy recipe from America's Test Kitchen that promised light, crisp waffles (yes they were) but it involved whipping egg whites and a master class in folding ingredients just to the right degree which no sane person can (or should) do early in the morning, even fortified with coffee.

The recipe posted below for buttermilk waffles is from Martha Stewart and is quite a bit easier and just as good.   I just adapted the recipe to include The Lawyer's waffle-cooking-perfection technique, which is to turn the waffle iron to the highest setting, wait until the red light goes out, put in the batter, and wait until the green light comes on.  Simple, but effective.  As you can see above the waffles come out deeply golden, light and perfectly crisp.  Keep them warm on a rack in the oven rather than stacking them, which will steam the crispness out.

And here's one more tip for amazing waffles - Jiffy Corn Muffin Mix.  Say what?  Yes, that ubiquitous little box that's been around for a hundred years,  It's on a lower shelf in every grocery store and costs about $.25.  Follow the directions on the side for waffles and cook the same way as described above - they make crisp waffles with a very appealing crunch from the cornmeal.  They are The Lawyer's father's favorite.  (Actually, it makes great pancakes too.)


Waffles are a great breakfast for a holiday weekend with the family.  Add real maple syrup, some sausage, juice and good coffee and you're good to go.

print recipe
Buttermilk Waffles
Serves 4

2 cups all-purpose flour (spooned and leveled)
2 tablespoons sugar
2 teaspoons baking powder
1 teaspoon baking soda
½ teaspoon salt
2 cups low-fat buttermilk
½ cup (1 stick) unsalted butter, melted
2 large eggs
Vegetable oil, for waffle iron

Preheat oven to 275d; set a rack on a baking sheet and place in oven.

In a medium bowl, whisk together flour, sugar, baking powder, baking soda, and salt; set aside.  In a large bowl, whisk together buttermilk, butter, and eggs; add flour mixture and mix just until batter is combined.

Heat waffle iron according to manufacturer’s directions on highest heat; brush with oil.  Pour batter onto iron, close, and cook according to directions (until the light turns green).  The waffles should be dark golden and crisp.  Remove and place on rack in oven to keep warm while making the remaining waffles.

Friday, May 20, 2016

Cold Pasta Salad with Smoked Salmon, Peas and Asparagus

Last Year's Post:  Melon ribbon Bowls
Two Years Ago:   Edamame Spread

Cold pasta salads are ideal warm weather food because you can do the cooking in the morning (or night before) so you don't have to heat up the kitchen that evening.  This one is light (sour cream, no mayo) and healthy with the salmon and veggies, and herbs and lemon rind add bright notes to the overall flavor profile.  One pot does the work of cooking asparagus, peas and pasta so clean-up is fast.

Look for relatively slender fresh asparagus in the market for the best flavor and texture, and make sure you don't overcook it - it should be crisp-tender, not soft.  Taste a piece shortly before you think it should be done to make sure.

The key to this salad is the quality of the veggies and salmon - buy the best and freshest that you can find and it will be excellent.


print recipe
Cold Pasta Salad with Smoked Salmon, Peas and Asparagus
Serves 4

½ bunch slender asparagus, trimmed
½ cup frozen peas
1/2 shallot, minced
1 cup sour cream
2 tablespoons milk
1 tablespoon Champagne vinegar or white wine vinegar
1 tablespoon finely grated lemon zest
1 tablespoon chopped fresh dill leaves
1/4 teaspoon salt
1/4 teaspoon freshly ground black pepper
6 ounces orchiette or bowtie pasta
6 ounces chopped or flaked smoked salmon
1/4 cup chopped chives
Dill sprigs, garnish
Cucumber slices and lemon wedges, optional garnishes

Bring a large pot of water to a boil.

Cut the tips off the asparagus stems, and then cut the stems into 1” pieces.  Drop the asparagus stems and the peas in the boiling water for 3 minutes, then add the asparagus tips and boil for an additional 30 seconds.  Remove the vegetables from the water using a spider (strainer) and immediately drop in a bowl of ice water to stop the cooking process.  (Do not discard the boiling water.) Drain the vegetables, pat dry, and set aside.

In a medium bowl, whisk together the sour cream, milk, vinegar, lemon zest, dill, salt, and pepper. Add the shallots and whisk to combine.

In the same pot of boiling water, cook the pasta until al dente (add some salt to the water if desired). Drain and rinse with cold running water. Drain again well. Toss with the sauce, peas, asparagus and salmon. Adjust the seasoning to taste. Cover with plastic wrap and refrigerate until chilled, about 2 hours.


Before serving, toss with the chives. Garnish with dill sprigs and optional cucumber slices and lemon wedges and serve.


Friday, May 13, 2016

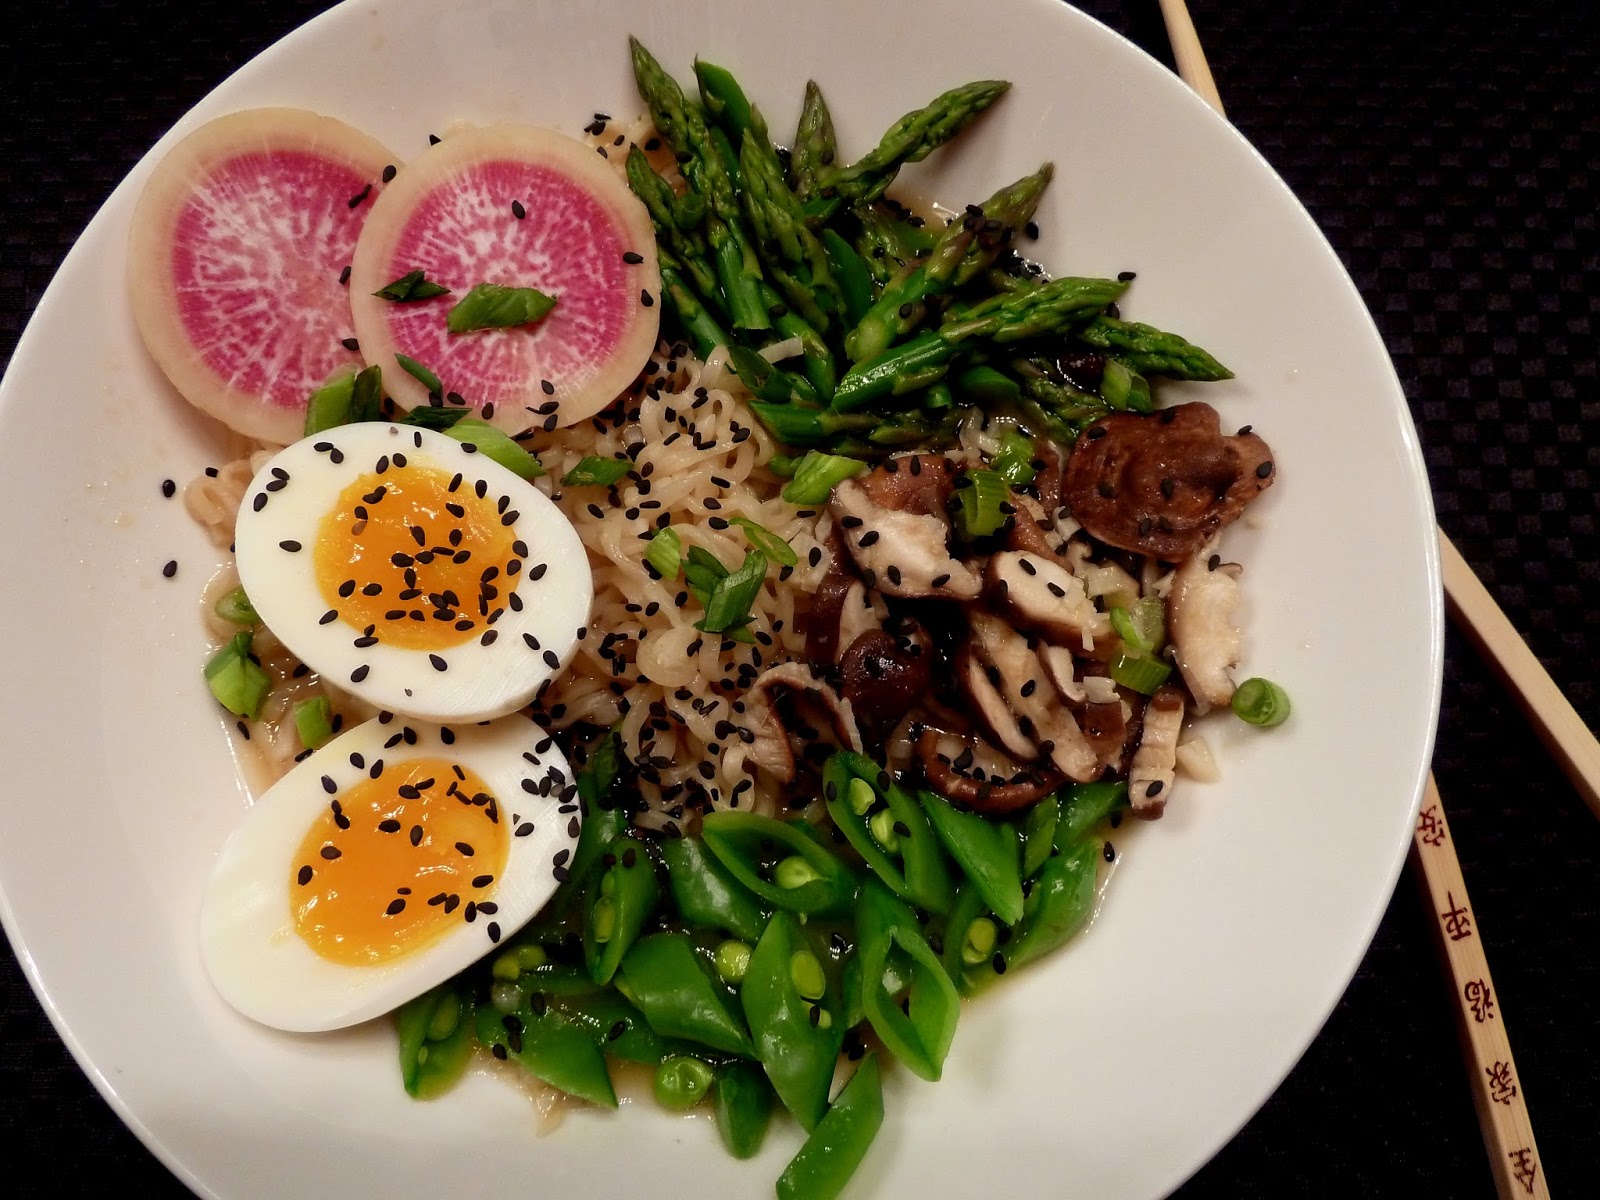
Spring Vegetable Ramen

Last Year's Post:  Chicken with Shallots
Two Years Ago:   Pan-Seared Tuna with Capers and Red Wine Sauce

If you're looking for a light, healthy entree to counter-balance a heavy food episode or just want to cut down a little, give this recipe a try.  The broth is warming and fragrant with garlic, ginger and sesame, and the miso adds a deep umami flavor.  (You can usually find white miso - the mildest variety, near tofu at well-stocked supermarkets.  If you can't find it, the broth will be good anyway.)  The vegetables add nutrition and crunch,and the egg is great protein.  You could always add or substitute some shredded chicken for the egg if you want a more substantial meal.

I love the black sesame seeds for drama, but toasted white sesame seeds would work just as well.  And I couldn't resist adding the watermelon radish simply because I found one at the grocery store.  They're not all that easy to find but very pretty.  Funny story:  I thought the radish would stump the cashier for sure, but she just kept right on going and never missed a beat.  When I told her I thought it was going to stump her, she said "I've been a cashier for 25 years so I don't get stumped easily".  The woman in back of me said she'd never heard of a watermelon radish and the cashier told her it was also known as a shallot.  Not quite!  Shallots are mild onions, watermelon radishes are radishes.  Oh
well.


I've been reading a fair amount about how to hard-boil eggs lately because I've had trouble with the shells sticking and ripping up the whites.  Turns out the best tip is to boil the water first, then gently lower in the eggs.  Cook 6 minutes for soft-boiled (runny yolk) or 8 minutes for hard-boiled (hard yolk), then immediately place in an ice bath to stop the cooking process.  Works really well - the shells don't stick at all.

Spring Vegetable Ramen
Serves 4

4 eggs
1 bunch slender asparagus, trimmed
6 ounces sugar snap peas, trimmed
2 tablespoons toasted sesame oil, divided
1 bunch green onions, sliced, white and green parts separated
4 cloves garlic, minced
1 tablespoon grated fresh ginger
2 cups water
2 cups chicken broth
3 tablespoons white miso
1 ½ tablespoons reduced-sodium soy sauce
4 ounces fresh shiitake mushrooms, stemmed and sliced
2 (3 ounce) packages ramen noodle soup, seasoning packets discarded
Black or white sesame seeds, for garnish (optional)
Sliced watermelon radish, for garnish (optional)

Hard-cook the eggs:  fill a saucepan with enough water to cover the eggs and bring to a boil, then gently lower the eggs into the water.  Reduce heat, cover, and let simmer for 8 minutes.  Remove the eggs and immediately place in a bowl filled with ice water to stop the cooking process.  When completely cool, remove and pat dry.  Shell the eggs and cut in half.

Cut the tips off the asparagus, then cut the spears into 1” lengths.  Bring a large pot of water to a boil and add the asparagus spears.  Let boil for 1 minute, then add the asparagus tips and the sugar snap peas.  Boil an additional 30 seconds, then remove all with a slotted spoon and place in an ice water bath (save the water and keep it hot).  When cool, remove the vegetables from the water and pat dry.  Slice the sugar snap peas diagonally into 3-4 pieces each.  Set aside.

In a large saucepan, heat 1 tablespoon oil over medium heat.  Add green onion whites, garlic and ginger and cook, stirring, until fragrant, about 1 minute.  Add water, chicken broth, miso, soy sauce and the remaining 1 tablespoon oil, bring to a rolling simmer.  Add the mushrooms and simmer for 3 to 5 minutes.

Meanwhile, place the ramen noodles in the boiling water left from cooking the vegetables.  Cook, stirring occasionally, for 3 minutes until soft.  Drain.

To serve, divide the ramen noodles between wide shallow bowls.  Ladle in the broth mixture and mushrooms, then top with asparagus and sugar snap peas.  Garnish each bowl with 2 eggs halves, sesame seeds and watermelon radish slices.  Top with green onion tops and serve.


Saturday, May 7, 2016

Persian Grilled Chicken with Saffron

Last Year's Post:  Toasted Couscous Salad
Two Years Ago:   Flax Seed Crackers

This is hands-down my all-time favorite grilled chicken recipe.  It's slightly adapted from Steve Raichlen, the BBQ Guru, and he states "this will be one of the quickest, easiest and most delectable recipes you will ever prepare".  He's not kidding, either.  The yogurt helps the chicken stay moist while the lemon, onion and saffron give it the most heavenly flavor.  Just be aware that the chicken needs to marinate overnight, so plan ahead.  After that it's really fast so it would make a good weeknight meal.

Because of the yogurt, the marinade is unusually thick but that's a good thing.  In addition to wonderful flavor, the saffron gives the chicken a beautiful yellow color.


If you haven't purchased saffron before you need to know that it's expensive, but you don't need much.  And it's SO worth it.  Do give this recipe a try - you won't be disappointed.  One last thought - I want to try this recipe for chicken as the base for an exotic chicken salad sandwich with toasted almonds, currants, and a light lemon dressing in pitas.  I bet it would be a knockout, so make some extra chicken and give it a try.  (I wasn't smart enough this time.)

print recipe
Persian Grilled Chicken with Saffron
Serves 6-8

Note that the chicken marinates overnight so be sure to plan ahead.

½ teaspoon saffron
1 ½ cups plain yogurt
½ cup fresh lemon juice
1 onion, finely chopped (about 2 cups)
2 teaspoons kosher salt
1 teaspoon freshly ground black pepper
3 pounds boneless skinless chicken breast, cut into 1½“cubes

For the basting mixture:
1 tablespoon fresh lemon juice
¼ teaspoon saffron
3 tablespoons butter

Lemon wedges, for serving, optional


For the chicken:  place the saffron in a mortar and pestle and pulverize to a powder.  Transfer the saffron to a gallon zip-top plastic bag and add one tablespoon of warm water.  Massage the water and saffron together, then let stand for 5 minutes.  Add the yogurt, lemon juice, onion, salt, and pepper and massage the bag again to mix everything together.  Add the chicken cubes and seal the bag, then massage again to coat the chicken evenly.  Place in the refrigerator overnight.

Preheat a grill to medium-high. 

Prepare the basting mixture: pulverize the saffron as described above.  Gently warm the lemon juice in a small saucepan, add the saffron and let stand off the heat for five minutes.  Add the butter and gently warm the mixture until the butter melts.

Grill the chicken about 4-5 minutes, basting with the butter mixture, then turn over and grill for 2-3 minutes more while basting until the chicken is cooked through.

Serve with optional lemon wedges.