Friday, August 26, 2016

Coconut Curry Rice

Last Year's Post:  Summer Harvest Quiche
Two Years Ago:   Balsamic Chicken Watermelon Salad

I don't remember where I found this recipe, but I was on a coconut jag at the time and had vague visions of Chinese fried rice with shredded coconut in it, mostly because the name was "coconut fried rice".  Maybe that doesn't sound all that great to you but not to worry, I was totally off base anyway.  Sometimes being wrong turns out to be a good thing.

The coconut in this case comes in the form of coconut milk used to cook the brown rice, which imparts a hint of coconut to the finished dish.  Combined with mild curry powder, the overall flavor profile is much more Malaysian or Indian than Chinese.  The flavors are complex yet delicate.  (I thought about adding some spiciness to the dish but finally decided against it because I was afraid it would overpower the coconut or curry.)  You could make the flavors more bold by adding more coconut milk or curry powder, and you could certainly serve hot sauce on the side, but we very much liked it as is.  (The Lawyer:  "Have we had this before?  This is really good!")

You can go vegetarian by using tofu, or add thinly sliced chicken or pork for meat people - directions are included for both. I used some thin-sliced pork chops I found on sale at the store.  Compared to the original recipe, I cut down slightly on the amount of rice and meat and amped up the veggies which I do with pretty much any recipe.


Note that the recipe calls for making the rice in advance and chilling it, which helps the rice to brown in the pan.  If you don't have the time, skip the chilling step and just go straight from cooking the rice to cooking everything else.  It will still turn out fine.

print recipe
Coconut Curry Rice
Serves 4-6

Note:  If you are using chicken or pork instead of tofu, skip the tofu instructions and vice versa.


1 block extra-firm tofu plus 2 tablespoons soy sauce
-or-
6-8 ounces raw chicken or pork cut into thin bite-sized slices

1 ¼ cups uncooked brown rice
1 can regular coconut milk
1 tablespoon coconut oil or canola oil
1 medium onion, chopped
1 medium red pepper, chopped
10-12 sugar snap peas, trimmed and sliced diagonally into ½” pieces
 3 cloves garlic, minced
2 teaspoons grated ginger
2 teaspoons curry powder
½ cup frozen peas
2 teaspoons soy sauce
1 cup roasted cashews


Rinse the rice and drain.  Combine 1¼ cups coconut milk with 1¼ cups water to make 2½ cups total liquid.  Place the rice in a medium saucepan with the liquids and bring to a boil over high heat.  Reduce heat to low, cover and simmer for 30-35 minutes until the liquid is absorbed.  Cool and place in the refrigerator for several hours.

(For the tofu:  Preheat oven to 325d.  Drain and press the tofu.  Chop into cubes and toss in a bowl with the soy sauce.  Let marinate for 10 minutes until the soy sauce is absorbed.  Spread the cubes on a lightly greased baking sheet and baked for 45 minutes, flipping midway.  Remove and set aside.)

Heat a large non-stick pan over medium heat and add the oil.  (For the chicken or pork:  add the meat to the pan and sauté for 3-4 minutes, stirring occasionally, until cooked through.  Remove and set aside.)
Add the onions to the pan and sauté for 2-3 minutes, then add the red pepper and sugar snaps and continue to sauté for 2 minutes more.  Add the garlic, ginger, and curry powder and sauté for 30-60 seconds until fragrant.  Add the rice and peas and mix to combine, then let cook undisturbed for 1-2 minutes to develop a crispy crust on the bottom.  Add the soy sauce and tofu, chicken or pork and stir again, scraping the bottom, then continue to cook for a minute or two until thoroughly heated through.

Serve hot topped with roasted cashews.


Friday, August 19, 2016

Mexican Chicken Pasta

Last Year's Post:  Roasted Tomato Californian
Two Years Ago:   Chicken Gyros

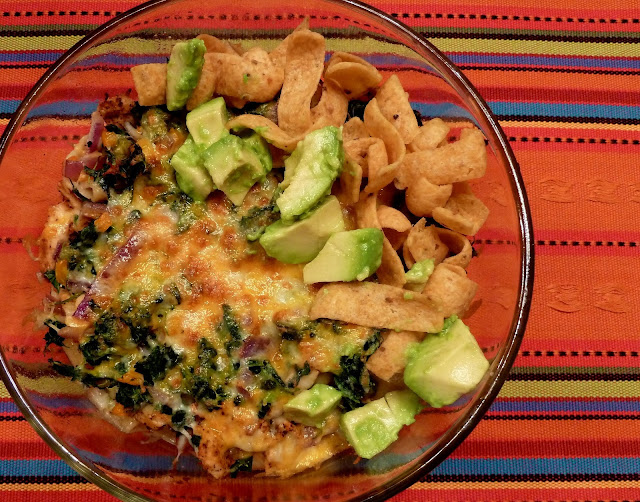
I had some rotisserie chicken left over recently and was craving comfort food, so I decided to make a Mexican pasta mash-up.  As written, it's very kid-friendly assuming you use a mild salsa but you could easily make it spicier by using a hotter salsa or adding jalapenos.  Next time I'll try using cooked Mexican chorizo in place of the rotisserie chicken because I love spicy chorizo.  The chili powder gives it flavor without heat, but you could also substitute a spicier Mexican seasoning blend of your choice.


The spinach adds great nutrition that kids probably won't even notice.  Oddly, my favorite part was the corn chip garnish - the crunch and salt were great complements to the soft pasta and creamy cheese.  Of course, chips are my all-time favorite food so that might have something to do with it.

Depending on how many people you're feeding, this is a great recipe to divide between two baking dishes and freeze one for later.  It's perfect comfort food while being a little different than your typical Italian baked pasta dish.

print recipe
Mexican Chicken Pasta
Serves 6

Note: this recipe can be made more or less spicy based on the type of salsa used.  Adding jalapenos or substituting Mexican chorizo for chicken would also make it spicier. 

10-12 ounces rotisserie chicken, shredded
1 teaspoon garlic powder
1 teaspoon chili powder
2 teaspoons canola oil
½ onion, chopped
½ cup red or green bell pepper, chopped
3 ounce can mild chopped chiles, drained
1 (10 ounce) package frozen chopped spinach, thawed and squeezed dry
Non-stick cooking spray
2 cups salsa
16 ounces rigatoni or ziti pasta, cooked to al dente according to package directions
6 ounces shredded Mexican cheese blend
½ cup cherry tomatoes, quartered (optional)
1 avocado, peeled and chopped, tossed with a little lemon juice (optional)
Corn chips or baked tortilla chips (optional, but the crunch factor is very good)


Preheat oven to 350d.

In a medium bowl, combine the chicken, garlic powder and chili powder until the spices are evenly distributed.  Set aside.

In a medium skillet, heat the oil over medium heat.  Add the onion and bell pepper and cook for 4-5 minutes until tender, stirring occasionally.  Stir in the spinach and chopped chiles.

Coat two (2-quart) or one (4-quart) baking dishes with cooking spray.  Spread half of the salsa on the bottom, then top with half the pasta, half the chicken, and half of the vegetable mixture.  Pour half of the remaining salsa over the vegetables and top with half of the cheese.  Repeat layering with the remaining pasta, chicken, vegetables and salsa (not cheese).

Bake, covered, for 30 to 35 minutes until heated through.  Uncover and sprinkle with the remaining cheese and place under the broiler for a few minutes to melt and brown the cheese, watching closely.  Let stand for five minutes before serving.  If desired, garnish with cherry tomatoes, avocado, and/or corn chips.


 If you used two baking dishes, the second dish may be covered and frozen.  Thaw overnight and continue with baking directions.

Friday, August 12, 2016

Spanish Omelet

Last year's post:  Cold Sesame Noodles with Cucumber
Two Years Ago:   Empanadas with Chicken, Corn and Zucchini

Although most people in the United States think of omelets as breakfast food, the Spanish omelet (or Spanish tortilla, not to be confused with Mexican tortillas) is a happy hour or dinner entree.  This omelet is one of the most common tapas items, found all over Spain.  A Spanish omelet closely resembles a frittata because it's cooked in a pan and then cut into wedges to serve.  Although it's typically fried in a fair amount of olive oil, then flipped and fried on the other side, this recipe is a lighter and simpler version.  It uses only the fat from the chorizo, and there's no flipping involved - it bakes in the oven, which makes it puff up beautifully.  It makes an easy, fast and delicious dinner.

One of my good friends in college spent a year studying in Spain.  When she returned, she made a traditional Spanish omelet for her buddies so we could try it out.  She fried potato slices and onions in a lot of olive oil, then added the eggs and let the bottom cook until brown.  She put an inverted plate over the frying pan with her hand on top, flipped the pan over so the omelet was on the plate, then slid the omelet back into the pan to brown the other side.  Impressive, but a little scary unless you don't care about your kitchen, which we didn't because we were in a college apartment, after all.

Anyway, as I mentioned this recipe has chorizo in addition to the potatoes, which really revs up the flavor. Make sure you buy Spanish chorizo - not Mexican chorizo - and take the paper casing off before slicing. If you do happen to buy Mexican chorizo by mistake (or can't find Spanish chorizo), just cook it and crumble it like Italian sausage and use it that way.  It'll taste a little different but will still be very good.

Shallots (a mild onion) are added to a parsley salad that goes on top of the omelet when served.  The lemon, shallots and parsley lend bright and tart notes that balance the omelet beautifully.


A brief discussion about pans - this recipe calls for a 7 or 8" nonstick ovenproof pan (or a larger pan if you're going to double the recipe to serve four).  I bought a cast iron skillet a few years ago to make cornbread, and it works perfectly for this recipe.  If you don't have one, consider buying one - they're cheap and they last forever.  Properly seasoned and cared for, they become perfectly non-stick.  All you have to do after making something is to rinse the pan with hot water (not soap) and scrub with a brush, then dry thoroughly and wipe with a drop of cooking oil.  I had absolutely no issue with taking the entire omelet out of the pan in one piece.  (Just don't use cooking spray, it becomes gummy and sticky and hard to remove.)

Spanish omelets are traditionally served either warm or at room temperature, so they're very versatile for parties (cut in small pieces) or family members who come home at different times.

printable recipe
Spanish Omelet
Serves 2

1 red potato, about 3-4” in diameter, scrubbed and cut into chunks
4 eggs
Salt and pepper
4 ounces Spanish chorizo, paper casing removed and sliced
2 sprigs fresh rosemary, leaves picked
1 shallot, peeled and very finely sliced
1 lemon, juiced
2 tablespoons olive oil
1 bunch fresh flat-leaf parsley, leaves picked

Preheat the oven to 500 degrees.

Put the potato chunks in a pan of boiling salted water and simmer until just cooked through but not falling apart, approximately 8 – 10 minutes.  Drain in a colander.  Beat the eggs with a fork in a mixing bowl, season with salt and pepper, and set aside.  Put the sliced shallot in a medium bowl with the lemon juice, some salt and pepper and the olive oil.  Stir and set aside for the shallots to soften while you make the omelet.

Heat a 7 or 8” nonstick (or cast iron) ovenproof frying pan over medium-high heat.  Add the chorizo slices and potatoes and cook until everything is lightly golden, 3-4 minutes.  Remove from the pan with a slotted spoon and set aside.  Sprinkle the rosemary leaves into the pan, then immediately pour on the egg mixture.  Add the chorizo and potatoes on top, spreading out evenly.  Place the pan in the preheated oven and bake until the omelet is puffed and golden, about 8 – 10 minutes.

Remove the omelet from the pan and cut into pieces.  Add the parsley to the shallots and toss to coat.  Serve the omelet with some of the parsley salad on top.

The omelet may be served warm or at room temperature.


Friday, August 5, 2016

Savory Kale and Corn Galette

Last Year's Post:  Spanish Shrimp
Two Years Ago:   Goat Cheese and Chorizo Rolls

A galette is just a fancy term for a free-form (or rustic) tart that's easier to make and prettier than a pie.  The most common type is a sweet galette (think plums, apples, etc.) for dessert but I'm not all that big on sweets (gasp) so my thoughts tend to go in the savory direction for a light vegetarian entree, especially this time of the year with all that beautiful produce in the markets.


In its savory version, a galette is lighter than a quiche because it doesn't contain the milk-and-egg custard; its all about the veggies.  It makes an elegant and impressive vegetarian dinner served with a big crisp green salad and a nice bottle of wine.  I made all manner of changes to the original recipe, which is one of the advantages of a galette - use what you have on hand or is fresh at the market.  I found beautiful kale, thyme and corn at the market, plus I had sun-dried tomatoes and Manchego cheese on hand, so that's what I used.

You could also use zucchini or other vegetables, other fresh herbs, and other cheeses equally well.  The one substitution I wouldn't recommend is fresh tomatoes, especially beefsteak tomatoes, because they're watery and can easily make your galette soggy.  If you really want to use fresh tomatoes, either slice and salt them for 30 minutes or so to draw out some moisture, or roast them which gets rid of most of the moisture and also intensifies the flavor.  Or if you really want that fresh tomato flavor, think about putting them in your side salad instead.


The result was amazingly delicious - the sweet corn and sun-dried tomatoes contrasted beautifully with the earthy kale, and the Manchego cheese added richness.  But the star of the show was the crust.  Normally, you want a pie crust to be tender and flaky for sweet foods, but this particular crust is light and crisp - almost a cross between a pie crust and a cracker.  It's because there's less butter (fat) than in a normal pie crust, which is another bonus.  It was very easy to work with and the whole project was fun, although you should know it took about 2 hours for prep work, cooking the filling, chilling the dough, rolling the dough, assembling the galette and baking it - maybe not a work-night project unless you do some of the prep in advance.  You can make the galette a few hours in advance if you're having company because it's equally good warm or at room temperature, but I wouldn't make it the day before - the crust loses some crispness over time.  I added some sesame seeds to the edge of the crust for a little extra texture and taste, but you could also use coarse black pepper, or sea salt, or a mix of seeds equally well.

I can't emphasize enough how good this was, and I really hope you'll try it.


print recipe
Savory Kale and Corn Galette
Serves 4; to serve more, double the recipe and make two galettes

For the dough:
1 cup all-purpose flour
¼ cup (1/2 stick) cold unsalted butter, cut into ½” pieces
½ teaspoon salt
1 egg
1/8 cup cold water

For the filling:
1 tablespoon olive oil
¼ medium onion, chopped
1 large clove garlic, minced or grated
1 bunch Tuscan kale, de-stemmed and chopped
1 ear of corn, shucked (or 1 ½ cups frozen corn)
1 teaspoon minced fresh thyme
3 oil-packed sun-dried tomatoes, drained and finely chopped
3 oz crumbled feta or goat cheese, or 3 oz small cubes of any firm white cheese such as Monterey Jack
¼ teaspoon salt
Freshly ground black pepper, to taste
Sesame seeds, for garnish (optional)

In a food processor, pulse the flour, butter and salt a few times until crumbly.  In a small bowl, whisk the egg with a fork.  Put half the egg in a slightly larger bowl (reserving the remainder for brushing) and add the ice water.  Whisk again to combine.

Add the egg and water to the food processor and pulse until the dough comes together more or less.  Turn out on a floured surface and bring together with your hands to form a ball.  Flatten into a disk and wrap in plastic wrap.  Refrigerate for 30-45 minutes.

While the dough chills, make the filling.  Heat a large skillet over medium heat.   Add oil and onions and cook for 2 minutes, stirring.  Add garlic and cook 1 additional minute until fragrant.  Add kale and corn and cook until the kale is softened and wilted, 3-4 minutes.  Season with salt and pepper and set aside to cool for 20 minutes or so.  When cool, stir in the thyme, sun-dried tomatoes and cheese.

Line a baking pan with parchment paper and preheat the oven to 375d. 

On a floured surface, roll the dough to a circle approximately 11” in diameter.  Gently fold into quarters and place on the parchment paper, then unfold.  Place the filling mixture in the center of the dough, then spread evenly leaving  1 ½ “ of dough uncovered around the outer edge.  Fold the edges over the filling and brush the edges with the remaining beaten egg.  Sprinkle with sesame seeds, optional.

Bake for about 35 minutes until the crust is golden.  Serve warm or at room temperature.