Friday, February 28, 2014

Chicken Parmesan with Oven-Roasted Tomato Sauce


 Last Year's Post:  Orange-Pecan Salmon with Three Pea Salad
Two Years Ago:    Perfect Lasagna

You can probably already tell this is not your typical chicken parmesan.   When I tell you that the recipe comes from Cooking Light magazine and has fewer calories, fat grams and sodium than regular chicken parm you may be tempted to quit reading because it can't be any good, right?......but that would be a big mistake.  Because you're right, this isn't your normal chicken parmesan, it's way better.

The chicken is tender and moist, with a crunchy coating of panko crumbs, parmesan and garlic.  The sauce is filled with the bright fresh sweetness of roasted tomatoes, shallot and more garlic.  The whole thing is topped with melted creamy mozzarella and fresh basil, served alongside hot spaghetti.  The flavors are much brighter and fresher than normal chicken parmesan, and the contrast of textures from crunchy to juicy to creamy is particularly appealing.

There are a couple of secrets to making it healthier.  The first is to use chicken cutlets rather than a whole chicken breast.  The chicken cutlets are smaller but still completely satisfying and filling.  It's easy to make your own cutlets by cutting a chicken breast in half horizontally.


The next secret is to use a light mayo and parmesan coating on the chicken prior to dredging in toasted panko crumbs and oven-roasting the chicken, which keeps the chicken moist on the inside and crunchy on the outside without the fat and calories of frying.


The final secret is the oven-roasted tomato sauce, which has fewer calories and sodium than marinara sauce and actually tastes much better.  You can make it any time of the year with regular cherry tomatoes from the grocery store - they taste fabulous after being oven-roasted to bring out their flavor and sweetness.


This recipe looked so pretty I just had to try it.  I was so impressed by the flavor that I kept telling The Lawyer "I just can't believe how good this is" the entire time we were eating.  I think you'll be impressed too.


printable recipe
Chicken Parmesan with Oven-Roasted Tomato Sauce
Serves 4

1 lb cherry tomatoes, halved
2 tablespoons olive oil, divided
1 shallot, sliced
4 garlic cloves, thinly sliced
¼ cup low-sodium chicken broth
¼ cup dry white wine
1 teaspoon fresh thyme
½ teaspoon kosher salt
¼ teaspoon freshly ground black pepper
½ cup panko bread crumbs
2 (8 oz) boneless skinless chicken breast halves
3 tablespoons light mayonnaise
1.5 oz Parmesan cheese, grated and divided (about 6 tablespoons)
1 teaspoon garlic powder
Cooking spray
2 ounces fresh mozzarella cheese, very thinly sliced
¼ cup fresh basil leaves
Hot cooked spaghetti

Special equipment:  wire rack

Preheat oven to 375d.

Combine tomatoes and 1 tablespoon oil in a bowl; toss.  Arrange tomato mixture in a single layer on a large shallow broiler pan; bake at 375d for 35 minutes or until lightly browned.  Remove and set aside.

Increase oven temperature to 425d.

Heat 1 tablespoon oil in a medium skillet over medium heat.  Add shallot; cook five minutes.  Add garlic; cook one minute.  Add tomatoes, stock, wine, thyme, salt and pepper; cook 4 minutes or until liquid almost evaporates.   Set aside.

Place panko crumbs in a large skillet; cook over medium heat 3 minutes or until toasted, stirring frequently.  Cut each chicken breast in half horizontally to form 4 cutlets.  Combine mayonnaise and half of Parmesan in a small bowl.  Spread mayonnaise mixture evenly over both sides of cutlets.

Combine panko, garlic powder, and remaining half of Parmesan in a shallow bowl or plate, and dredge cutlets in the panko mixture.  Place cutlets on a wire rack coated with cooking spray.  Place rack on a baking sheet.  Bake at 425d for 15 minutes.

Top each cutlet with 2 tablespoons tomato mixture; top tomato mixture evenly with mozzarella cheese.  Broil 3 minutes (watching closely) until cheese is bubbly.  Sprinkle with basil and serve with remaining tomato mixture and hot cooked spaghetti.

Friday, February 21, 2014

Power Muffins

Last Year's Post: Sloppy Joes for Grownups
Two Years Ago:  Very Lemon Chicken and Fruited Couscous

Everybody likes muffins, and you might even be fooled into thinking that they're better for you than, say, a breakfast sandwich when faced with the choice at your favorite coffee shop.  But the culprits in muffins are calories and fat, even if the name sounds healthy.  For example, a Dunkin' Donuts Honey Bran Raisin Muffin has 500 calories and 14 grams of fat.

This recipe is different - packed with carrots, apples, flax seed and oat bran, it's good for you and delicious. Think of it as a healthy version of a Morning Glory muffin. Really, how can anything be bad when it starts with fresh foods like this?


When made in a medium size (remember medium-sized food?) each muffin has about 220 calories, 9 fat grams, 5 grams of protein and a bunch of great vitamins and minerals, especially potassium and vitamin A.  One muffin makes a healthy breakfast with some yogurt, or a perfect mid-morning or after-school snack for kids. It's filling but not heavy, moist and flavorful with the heady scent of cinnamon, cloves and nutmeg.  If you need an energy boost after a hard workout this would be a good choice to keep you on track and energized.  One recipe makes about 16 muffins which keep perfectly in the freezer so it's easy to grab one on the go.

The recipe calls for peeled and cored apples, which has always caused me some trauma because apples are so round.  My grandmother was one of those people who could peel an apple with a paring knife in one long continuous peel, but then again she had apple trees in her back yard and made zillions of apple pies in her lifetime.  I not only can't peel an apple that way, I really don't want to learn so I have my own peculiar way of peeling apples.  I start by cutting the apple down the middle and then each half again to make four quarters using a big chef's knife.  Then I switch to a smaller knife to cut out the core part from each quarter and cut each quarter yet again into two pieces.  I lay each piece on its nice flat side and use the small knife to cut the peel off.  It's probably more time-consuming, but I'm not going to cut myself and it works.


After peeling and shredding the apples and carrots, it's really just a matter of measuring, mixing and baking.  I sprinkled some coarse sugar on the top for a little crunch and sparkle, but that's up to you.  One last thought - you can find ground flax seed and oat bran at your local health food store.


printable recipe
Power Muffins
Makes approximately 16 medium muffins

Note:  Each muffin has about 220 calories, 9 grams of fat, 35 carbohydrate grams and 5 grams of protein.  They’re nutrient-packed and a particularly good source of potassium and vitamin A along with other vitamins and minerals.


1 ½ cups all-purpose flour
¾ cup ground flax seed
¾ cup oat bran
1 cup brown sugar
2 teaspoons baking soda
1 teaspoon baking powder
1 teaspoon salt
2 teaspoons cinnamon
¼ teaspoon ground cloves
1/8 teaspoon ground nutmeg
¾ cup skim milk
2 tablespoons vegetable oil
2 eggs, beaten
1 teaspoon vanilla extract
2 cups shredded carrots
½ cup raisins
2 apples, peeled, cored and shredded
1 cup chopped toasted pecans or walnuts
Sparkling (coarse) sugar, optional

Preheat oven to 350d.  Grease muffin pan or line with paper muffin liners.

In a large bowl, mix together flour, flax seed, oat bran, brown sugar, baking soda, baking powder, salt, cinnamon, cloves and nutmeg.  Add the milk, eggs, vanilla and oil and mix until blended.  Stir in the carrots, apples, raisins and nuts.  Fill prepared muffin cups ¾ full, or paper liners to just under the top of the paper.  Sprinkle the tops with sparkling sugar, optional.


Bake at 350d for 22-25 minutes until a toothpick inserted into the center of a muffin comes out clean.  Cool before removing from the pan.

Friday, February 14, 2014

Wild Mushroom and Gruyere Quiche

Last Year's Post:  Wild Mushroom & Wild Rice Chicken Soup
Two Years Ago:   Turnovers

Quiche is very versatile in terms of working well for brunch, lunch or dinner.  The only issue with quiche is getting it out of the dish neatly, even after it rests for a while. (And those of you who know me know I am ALL about neatness.) I have two suggestions for how to get around that issue.  The first is to make individual little quiches, which was my solution for years.  It does, however, require a little more work and some specialized pans that are available in gourmet kitchen stores.


Although I called that a solution, it's really more an avoidance of the original problem.  There is basically only one solution for neatly cutting a whole quiche - make it in advance and refrigerate it, then cut and reheat. If you've ever wondered how restaurants serve such nice neat slices, that's their secret. (The same thing works for pies and lasagna.)

Here's the difference between cutting a slice after the quiche rests for 30 minutes out of the oven (top) and the next day (bottom).


If you don't care whether your slices are perfect or you can't wait because your wild mushroom quiche smells that good or you really like the gooey cheesiness of it all, by all means dig in.  If you're having company for brunch and want it to look really pretty, make it in advance.  The other bonus is that you won't have to worry about any extra liquid in the dish.

OK, so enough about technique.  I chose this particular quiche because I really like the starring role the wild mushrooms play with nutty Gruyere cheese as the perfect complement.  They're left in chunks and browned until they're deeply flavorful and earthy, and there's lots of them.  I used oyster mushrooms, creminis, and shiitakes but you can use all of one or two types if you want.


After cleaning and trimming the stems, cut them into chunks and saute (the mushrooms shrink quite a bit as they lose their liquid). Sauteing until browned is the secret to great flavor.


The mushrooms have such deeply earthy flavor that the quiche makes a very satisfying dinner paired with a fresh green salad and crusty bread.  One other note - the recipe calls for a 9" deep dish pie pan, but a regular 9" pan will also work as long as your crust didn't slip down the side when it was first baked.  Just make sure the pan isn't full to the very top of the crust before baking or it may leak a bit as it bakes and puffs.

printable recipe
Wild Mushroom and Gruyere Quiche
Serves 6-8

 Note:  For the most perfect slices, bake the quiche a day in advance and refrigerate.  Cut slices and reheat.

2 tablespoons (1/4 stick) butter
2/3 cups chopped shallot (about 3 medium)
12 to 14 ounces assorted wild mushrooms (such as shiitake, oyster, cremini)
1 homemade or refrigerated pie crust
3 large eggs
2/3 cup half and half
1/3 cup milk
½ teaspoon salt
½ teaspoon black pepper
1 tablespoon chopped fresh thyme
1 ½ cups (packed) coarsely grated Gruyere cheese (about 5 ounces), divided

Wipe mushrooms with a clean damp cloth to remove dirt.  Remove shiitake stems completely and slice the ends off the stems of other mushrooms.  Cut mushrooms in half or quarters depending on their size and shape to create pieces of ½ - ¾” in size. 

Melt butter in a large heavy skillet over medium-high heat.  Add shallots; sauté until beginning to soften, about 2 minutes.  Add mushrooms; sprinkle with salt and pepper and sauté until mushrooms have released their liquid, are tender and beginning to brown, about 9-10 minutes.  Set aside to cool.

Preheat oven to 450d.  Press the pie crust firmly onto the bottom and sides of a 9” deep-dish glass pie plate.  Bake until light golden brown, pressing on sides of crust with back of spoon if crust begins to slide down sides of dish, about 12-13 minutes.  Remove to cool slightly.  Reduce oven temperature to 325d.

Whisk eggs, half and half, milk, ½ teaspoon salt, ½ teaspoon pepper and thyme in a large bowl to blen.  Stir in 1 cup of grated Gruyere.  Place the sautéed mushrooms in the pie crust and pour the filling over the mushrooms.  Sprinkle the remaining ½ cup cheese over the top.


Bake until the quiche is puffed, golden brown, and just set in the center, about 45 minutes.  Cool 30 minutes before serving.

Friday, February 7, 2014

Sesame Seed Chicken Salad


Last Year's Post: Linguini alla Puttanesca
Two Years Ago:  Chicken, Gruyere and Fig in Puff Pastry

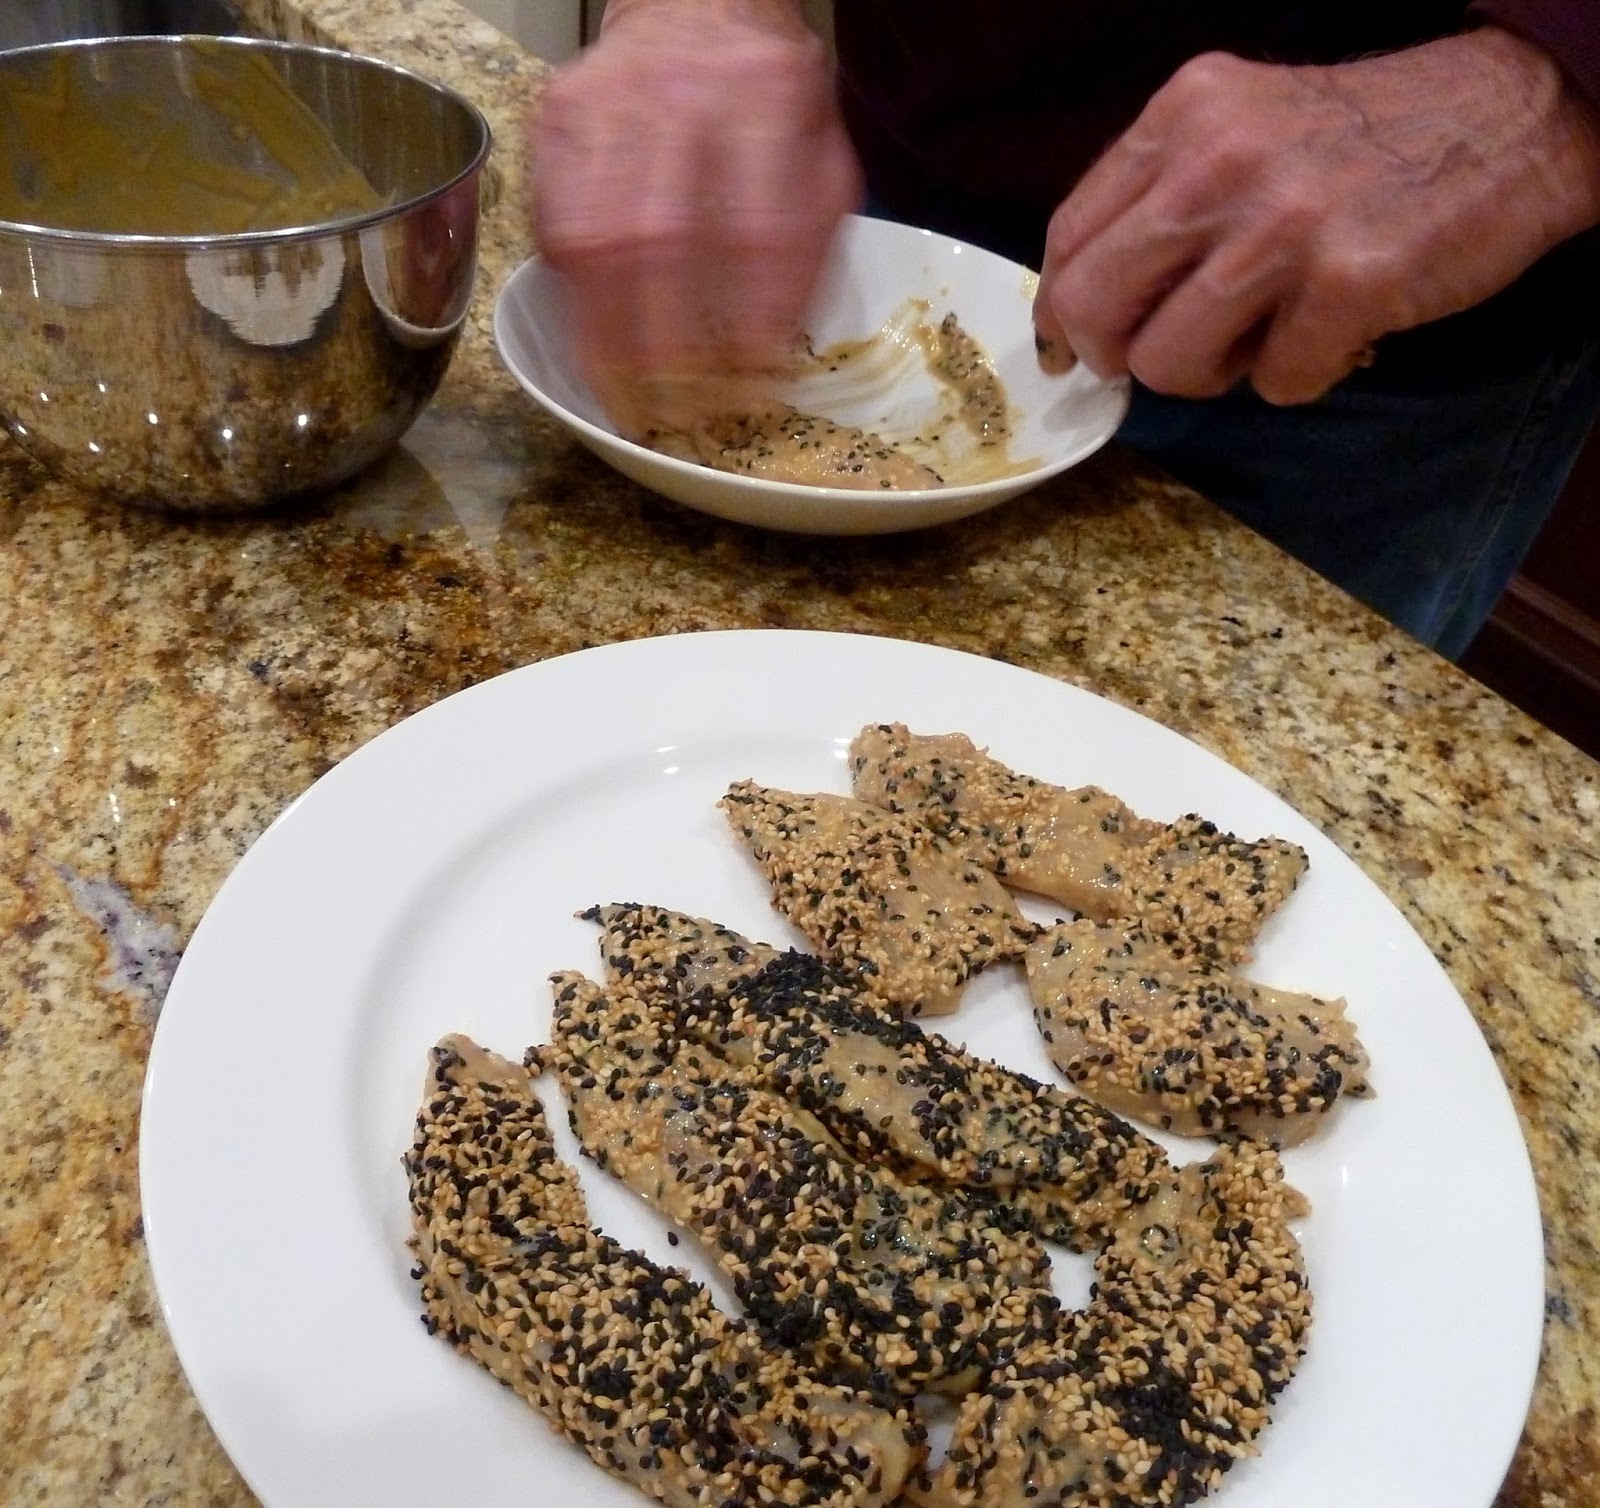
Salads are a great addition to your weekly dinner rotation during the summer of course, but also during the winter because they're a light and healthy change of pace from heavier winter foods .  The thing that's interesting about this chicken salad is the maple syrup/mustard and sesame seed coating on the chicken, which gives it great crunch and flavor.  It almost tastes deep-fried although it's not.  A combination of black and white sesame seeds is particularly dramatic, but all white seeds would be just as good if you don't want to buy black sesame seeds.  If you're interested, you can buy black sesame seeds at my favorite spice store, Penzeys, here or at your local Penzeys if you're lucky enough to have one in your city.

I also found some great multi-colored cherry tomatoes at my local natural foods store that add color to the salad.


Adding color to your food whenever possible makes it much more visually appealing.  In addition to the tomatoes, chicken and lettuce, the salad contains cucumber and cheese.  I prefer to use English cucumbers (the long thin cucumbers wrapped in plastic wrap) because they have a thinner skin and fewer seeds than regular cucumbers, plus I don't like the waxy coating they (whoever they are) put on regular cucumbers.


The original recipe called for chicken tenders, but a large boneless skinless chicken breast is just as easy to use - all you have to do is cut it into pieces that are about 1- 1 1/2" in diameter and 3-4" long.  The chicken pieces are marinated in a maple syrup and mustard mix for an hour, then rolled in sesame seeds and cooked in a skillet for just a few minutes.  While the chicken is marinating you can make the vinaigrette and chop the salad ingredients, so all you have to do is assemble and serve the salad while the chicken is done.  Easy and healthy!


printable recipe
Sesame Seed Chicken Salad
Serves 4 as a main dish

For the Dressing:
2 large garlic cloves, minced
1 tablespoon Dijon mustard
½ teaspoon salt
¼ teaspoon sugar
¼ teaspoon pepper
¼ rice wine vinegar
1/3 cup vegetable oil

For the Salad:
½ cup Dijon mustard
1/3 cup pure maple syrup
1- 1/3 lbs chicken tenders, or boneless skinless chicken breasts cut into pieces approximately  1 - 1 ½ “  in diameter and 3-4” long
2/3 cup sesame seeds (preferably a mixture of black and white)
2 tablespoons vegetable oil
2 (5-oz) bags mixed baby greens
½ English cucumber, unpeeled
16 – 20 cherry tomatoes, cut in half
1 cup crumbled feta or goat cheese


For the dressing, whisk all ingredients in a bowl or shake in a jar.

For the chicken, whisk mustard and syrup in a bowl to blend.  Add chicken and marinate 1 hour in the refrigerator.

While the chicken is marinating, cut the cucumber in half lengthwise and use a small spoon to remove the seeds.  Cut crosswise into slices.

After the chicken has marinated, remove from the marinade and shake off any excess.  Place the sesame seeds in a shallow bowl and roll the chicken in the seeds to coat on all sides.  Sprinkle with salt and pepper. 

Heat 1 tablespoon of vegetable oil in a large nonstick skillet over medium-high heat.  Place half the chicken pieces in the skillet and sauté until just cooked through, about 2 minutes per side.  Remove the cooked chicken pieces and repeat with the other tablespoon of oil and remaining chicken pieces.


Toss the lettuce, tomatoes, and cucumber with dressing and serve with the cheese and chicken pieces on top.