Friday, June 29, 2012

Strawberry-Basil Lemonade


Ahhh, summer. Time for 4th of July picnics and family reunions.  This recipe for strawberry-basil lemonade is just a little different and will suit everyone from kids to adults (turn it into an adult beverage with the addition of a little vodka) plus the color is so pretty.

I made this recipe for The Lawyer's parents' 70th (!) anniversary party this past weekend.  (The guys at the party were busy checking out the bikinis by the pool that you can see in the background.)  It makes about 3 quarts of lemonade so you'll need a pitcher to accommodate.  I found this one at Crate and Barrel -  especially love the shape (reminds me of Kool-Aid commercials from way back) and the fact that it's plastic so it's lightweight and unbreakable.  It's hard to tell high-quality plastic ware from glass these days until you pick it up.
 
I received the original recipe from my friend Terry (part of our Gourmet Club along with her husband, Hiram).  I think she had it at a friend's house and wanted to pass it along.  Thanks Terry!

Terry and Hiram

When I made the recipe I had really fresh, very fragrant basil straight from the farmer's market that morning.  I mean fresh enough that you could smell it all over the kitchen.  That may be why I thought the basil flavor was a little strong and reduced it in the version below.  The original recipe called for 3/4 cup tightly packed basil leaves and I reduced it to 1/4 cup.  Just something to keep in mind if you try it.  You can even leave the basil out entirely if it doesn't appeal to you and just serve it as Strawberry Lemonade. 

I also found strawberries at the farmers market (yeah!!!! farmers markets).  The stand that I stopped at was selling 1.5 lb (more or less) containers, which was exactly what I needed.  The berries in the photo below weren't even the most perfect ones, which I saved for the garnish.  Beautiful and delicious.


You cook the strawberries in simple syrup (sugar and water) to extract their flavor and color.  Why does hot water make broccoli greener but make strawberries lose their color?  Who knows.  Anyway, the color and flavor of the strawberries goes into the syrup to make a pretty red syrup.  Then you add the basil which imparts flavor but not color (don't ask) and strain the whole thing.  The syrup is cooled and added to fresh lemon juice and cold water to taste, which is great - you can make the lemonade as tart or sweet as you want.  Just note that it takes an hour or two to chill the syrup and lemon juice so you want to start this process at least few hours before serving.

Have a great holiday week and enjoy summer!


* * click here for a printable recipe * *

Strawberry-Basil Lemonade
Makes about 12 cups


1.5 cups granulated sugar
1 cup water
1.5 lbs strawberries, divided
¼ cup packed basil leaves
2 cups fresh lemon juice, chilled (8-9 juicy lemons)
8 cups cold water
Vodka (optional)
Additional basil leaves for garnish (optional)


Gently wash the strawberries. Hull the berries and slice ½” thick. Set aside ½ cup for garnish.


Place the sugar and 1 cup water in a medium saucepan over high heat and stir until the sugar dissolves and the mixture comes to a boil. Add the 1 cup of strawberries, reduce heat to low, and simmer until the strawberries have softened, about 10 minutes.


Remove from the heat, add the basil leaves, and stir. Cool for about 45 minutes, then strain through a fine-mesh strainer set over a medium bowl; discard the solids. Cover the syrup and refrigerate until chilled.

When ready to serve the lemonade, combine 2 cups of chilled lemon juice with 8 cups of cold water and 1.5 cups of strawberry-basil syrup in a 3-quart pitcher and stir to combine. Taste and add additional syrup as needed.


To serve: add ice and reserved strawberries (and optional basil leaves or vodka) to serving glasses and pour lemonade over.


Friday, June 22, 2012

Easy and Elegant - Summer Salad with Cheese, Fruit and Nuts


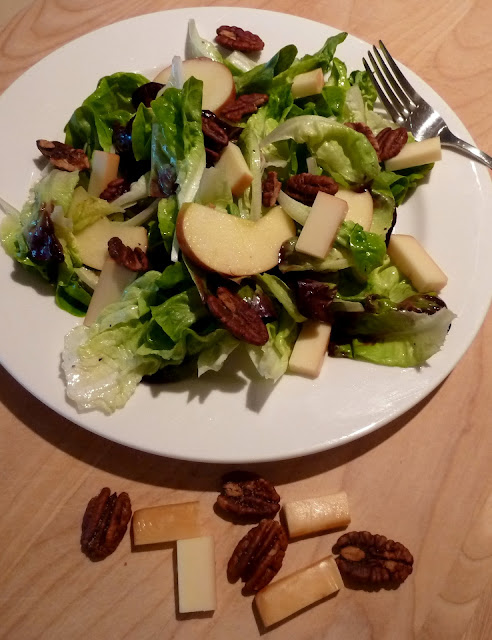
There are some days in every summer where it's so hot you don't even want to think about turning on anything to cook food - not the oven, the cooktop, not even the grill.  You just want a cold drink and a cool, crisp salad.  This salad is for those days.   It's deceptively simple - just four main ingredients plus a vinaigrette - but the beauty is in the simplicity that lets perfect ingredients shine.  The nuts and cheese provide enough protein that it's perfect for a light dinner.

Yes, you could buy one of those salad-kit-in-a-bag meals at the store and be done with it, but I can give you several good reasons why this is better.  First, making your own salad allows you to choose the specific fruits, nuts and cheeses that are your favorites.  Second, your salad will be much fresher than one made in a warehouse sometime last week.  And third, it allows you to use up any leftover nuts or cheese you have in your refrigerator rather than having it go to waste.  (I'm always looking for ways to use up food rather than throwing it away.)

Think about the lettuce you typically get in a salad bag - pale, maybe some pieces are starting to brown.  Now look at the lettuce I found for this salad.  (By the way, it's not all that easy to photograph your own hand.)


Interesting enough, I did find this lettuce at the grocery store, but not in a prepared bag.  Two heads of mini-Bibb lettuce (one green, one red) were sold in a hard plastic shell under the "Deli Express" label.  They were absolutely fresh and delicious and I would highly recommend them if you can find them in your store. 

While we're on the subject of lettuce I wanted to give you a tip that I learned (back in our community garden days) regarding the best way to keep lettuce leaves fresh.  Dunk the whole heads (or leaves) in a sink of very cold tap water and swish them around.  If they just came out of a garden you may have to drain the water and do it again.   At this point if they are whole heads you should cut the cores out to release the leaves. Put the leaves in a salad spinner and spin them around until nearly dry with just a few drops of water on them.


Lay out a really long piece of paper towel on your counter and spread the leaves along its length.


Carefully roll up the entire length of paper towel like a jelly roll.


Then place the whole thing in a gallon ziptop bag, gently squeeze most of the air out without crushing the leaves, and put it in the refrigerator.  The remaining moisture from the lettuce leaves dampens the paper towel, which in turn keeps the lettuce fresh and crisp without being too wet.  Stored in this way, lettuce will keep very fresh for up to a week.

OK, now that I've discussed lettuce probably more than you wanted, on to the other main ingredients - nuts, fruit and cheese.  I used some spiced pecans for this recipe that were a gift from a friend, but plain pecans or walnuts would work equally well.  For the cheese, choose a variety that's relatively firm and full-flavored.  I found a smoked Gruyere that was absolutely delicious.  And for the fruit, you could certainly use whatever fruit is in season during the summer, but apples or pears work equally well.  I like the crisp sweetness of apples so I used a Fuji for this recipe.  Whatever nuts, cheese and fruits you use, make sure they're top quality because they really make the difference in such a simple recipe.


One last thought - I threw a little walnut oil in with the olive oil to add some additional nutty flavor and because I have this beautiful french walnut oil sitting in my refrigerator that looks at me every time I open the door.  Just in case you have oils that stare at you too.


* * click here for a printable recipe * *


Summer Salad with Nuts, Fruit and Cheese
Serves 4

1 large head of Boston or Bibb lettuce (or 2 small heads)
½ lb of good quality firm cheese, such as cheddar, gouda, or gruyere
1 cup shelled walnuts or pecans
2 apples or pears, or other seasonal fresh fruit
1/3 cup olive oil
1 tablespoon lemon juice
1 tablespoon cider vinegar or sherry vinegar
1 small shallot, diced
½ teaspoon salt
¼ teaspoon pepper


Rinse the lettuce in cold water, then drain and spin dry. Wrap in paper towels and chill for several hours before using.

Cut the cheese into bite-sized pieces. Coarsely chop the walnuts or pecans if desired. Core and thin slice the apples or pears.

To make the salad dressing, in a small bowl combine the oil, lemon juice, vinegar, shallot, salt and black pepper. Whisk until well blended.

Place the lettuce, cheese, nuts and fruit in a large serving bowl. Pour over the salad dressing and mix well. Serve immediately.


Friday, June 15, 2012

Hoisin Burgers with Wasabi Slaw


Tired of making the same burgers time after time?  This burger features hoisin sauce mixed in with the meat as well as in a glaze.  If you're not familiar with hoisin sauce, it's basically an Asian barbecue sauce that you can find in the Asian aisle of your grocery store.  The glaze also has soy sauce and vinegar for extra tang.  The burgers are grilled with swiss cheese and served with fresh cucumbers as a topping. 

To complement the burgers I found a recipe for wasabi coleslaw that I thought would be great.  Wasabi is the Japanese equivalent of a hot mustard or horseradish.  The coleslaw does go very well with the burgers, but then I had the inspiration to put the coleslaw on the burger and that made it perfect.


Where I grew up we definitely did not put coleslaw on sandwiches of any type whatsoever.  But one time I was riding from an airport to a sales meeting with two business associates - Steve (from Virginia) and Dave (from Texas).  They're both big barbecue fans and spent the entire one hour trip in serious discussions regarding pork versus beef, pulled versus chopped, and sauces - tomato, vinegar, or mustard-based.  The one thing both of them agreed on was that the coleslaw goes on the barbecue sandwich, not on the side.  I thought that was odd, not having grown up in a state where barbecue is close to a religion.  When we stopped for lunch they convinced me to try a pulled pork sandwich with coleslaw on top, and I was hooked.  The creamy, crunchy coleslaw contrasted perfectly with the rich meat and smoky sauce to make a whole greater than the sum of its parts.

So, that's my inspiration for putting the wasabi slaw on the hoisin burger.  The punch of the wasabi along with the creamy, crunchy slaw is a great offset to the rich meat and smoky-sweet hoisin.  Try it yourself and see - this is definitely not your same old burger!

A note on the meat - you can  make these either with ground beef or ground turkey (or even chicken).  I like to make burgers that are about a quarter pound or slightly larger but you can make yours any size you want, just adjust the other ingredients accordingly if you use more meat.

* * click here for a printable recipe * *


Hoisin Burgers with Wasabi Slaw
Serves 3-4 depending on burger size

For the burgers:
1 lb ground beef or ground turkey
5 T hoisin sauce, divided
4 green onions, chopped
Salt and pepper
1T soy sauce
1T rice wine vinegar
4 slices swiss cheese
12 slices of cucumber
Wasabi mayonnaise (see below)
4 sesame hamburger buns

For the wasabi slaw:
1 T wasabi powder
2 T water
½ cup mayonnaise
1 tsp fresh ginger
1 garlic clove, minced
2 cups coleslaw mix
Salt and pepper


To make the burgers:
Mix 2 tablespoons of hoisin sauce and the green onions into the ground beef or turkey. Season with salt and pepper and form into 3-4 patties, depending on the size you like. In a small bowl, mix together 3 tablespoons of hoisin with the soy sauce and vinegar.

Prepare a grill for medium direct heat.

Grill the burgers approximately 3-4 minutes per side, brushing liberally with the glaze on both sides. Top with swiss cheese slices and let melt, then remove from the grill.

Serve on sesame buns and top with three cucumber slices each. Finish each sandwich with a little wasabi mayonnaise or the wasabi coleslaw and the top of the bun.

To make wasabi slaw:
In a small bowl, mix together wasabi powder and water to form a paste. Add mayonnaise, ginger and garlic and stir until well combined.

Place coleslaw mix in a medium bowl and add enough wasabi mayonnaise to lightly coat. Toss well, season with salt and pepper, then serve on the side or on top of the hoisin burgers.

Note: extra wasabi mayonnaise can be used on the burger buns if desired.

Friday, June 8, 2012

Grilled Shrimp Greek Salad


Panzanella is a classic Italian salad made with bread and tomatoes.  The toasted bread soaks up the wonderful tomato juices and adds a nice texture and flavor contrast to the fresh tomatoes.  This recipe puts a Greek twist on the classic by substituting grilled pita for the bread and adding feta, cherry tomatoes, cucumbers, red onions, bell peppers and grilled shrimp to the mix.  The result is a fresh, vibrant, colorful salad that comes together in minutes and is as healthy as it is delicious.

Don't like shrimp?  Substitute chicken or leave it out entirely for a fabulous Greek vegetarian salad or side dish. 

This dish is a great example of the Mediterranean Diet advociated by doctors (including the Mayo Clinic) as part of a healthy lifestyle. The Mediterranean Diet is based on fruits and vegetables as a mainstay.  Seafood and poultry are preferred protein sources and olive oil substitutes for butter.  Following the basics of a Mediterranean Diet helps maintain heart health as well as overall health and weight when combined with regular exercise and a dose of red wine.  (Really. It actually says that on the Mayo website.).

Anyway, all anyone really needs to know is that this salad tastes great and is a perfect dish for summer.  After all, it's grilled! 

The Lawyer likes to grill so much that he's been know to go outside and grill when it's snowing.....or when it's 20d below zero.....or when it's 110d in the shade.  (He does bird calls to the doves while the food cooks.)  The problem with winter grilling is if you use a charcoal grill and happen to have a little spark flare-up it can be tough on the outer layer of your parka.  One of those life lessons, I guess. 


* * click here for a printable recipe * *

 Grilled Shrimp Greek Salad
Serves 4 (main course)

4 tablespoons fresh lemon juice
4 tablespoons olive oil plus additional for brushing
2 teaspoons dried oregano
1 garlic clove, minced
1 pint cherry tomatoes, halved
½ English cucumber, cut into ½” pieces
½ small red onion, thinly sliced
1 lb large (20 to 24 per lb) peeled and deveined shrimp
2 (8-inch) pita breads
1 yellow bell pepper, sides cut off and remainder discarded
6 oz feta cheese, cut into 1/2” cubes
Salt and pepper
6 (8-inch) bamboo skewers, soaked in water 30 minutes


Whisk together 2 tablespoons lemon juice, half the oregano and half the garlic in a large bowl or zip top bag. Stir in the shrimp until well coated and marinate at room temperature 10 minutes. (Note: do not marinate the shrimp for longer times or the lemon will begin to “cook” the shrimp.)

Prepare grill for cooking.

Whisk together 2 tablespoons lemon juice, 3 tablespoons olive oil, half of oregano, half of garlic, and salt and pepper to taste in a large bowl. Gently stir tomatoes, cucumber, and onion into dressing and let stand at room temperature while grilling.

Add the remaining tablespoon of oil to the shrimp and toss to coat. Thread 4 shrimp on each skewer without crowding. Season with salt and pepper.


Lightly brush pitas and bell pepper on both sides with some oil and season with salt and pepper. Grill pitas 5 to 6 inches over glowing coals until browned and slightly crisp, about 2 minutes per side, then transfer to a rack or plate. Pitas will continue to crisp as they cool.

Grill the bell pepper just until softened, about 1.5 minutes per side. Grill the shrimp until just cooked through, about 2 minutes per side.

Break the pitas into bite-sized pieces and coarsely chop the bell pepper. Remove the shrimp from skewers and gently stir into the tomato mixture with pitas, bell pepper, feta, and salt and pepper to taste.


Friday, June 1, 2012

Pesto Pasta with Edamame, Spinach and Almonds

Edamame is a relatively new favorite of mine.  Since it's a really healthy food I was looking for new ways to eat more and came across a recipe that pairs it with pasta.  I was even more intrigued when I realized the recipe has only six ingredients (not counting salt and pepper) and that three of them are superfoods.  Amazing!  Almonds and spinach are well-known superfoods, but you may not know that edamame (soybeans) are high in calcium, soy, protein and fiber while low in calories.  The high protein content is one of the reasons this recipe is very satisfying and filling even though it's vegetarian.  How can I count the number of good things about this recipe?  It's healthy, fast, delicious, beautiful, vegetarian (or not), light, versatile, unusual, elegant and easy. 

It also taught me a new technique for preparing almonds - not chopped, not sliced, not slivered - but cracked.  The resulting coarse pieces vary in size and shape and have a nice crunchy texture that greatly adds to the overall dish.  The recipe actually called for crushed almonds but I really didn't know how to crush them so I made up my own technique which I think more closely resembles cracked rather than crushed.  Basically take a whammer (meat mallet or other heavy object) and lightly hit one almond at a time.  If you try to hit a bunch at the same time they end up all over the kitchen.  Trust me.


I used the opportunity to go to the farmer's market and found some wonderful krinkly-leaf  spinach that also added to the overall crunchiness of the dish because it's thicker than baby spinach and therefore didn't wilt.  I'm usually a fan of baby spinach but for this dish I liked the texture of the slightly thicker spinach.  Your call either way.


The versatility comes in with regard to temperature - you can serve this pasta warm, room temperature, or cold which makes it great for get-togethers, picnics or weeknights.  Just note that if you choose to refrigerate it, add a little olive oil to moisten before serving.  The other way it's versatile is that it's vegetarian but you could easily add some chicken (or any leftover meat) if you have people who Really Want Meat.

* * click here for a printable recipe * *

Pesto Pasta with Edamame, Spinach and Almonds
Serves 4 to 6

8 ounces spaghetti
2/3 cup pesto
8 ounces spinach
2 cups frozen edamame, prepared according to directions
Juice from 2 lemons plus additional fresh lemon wedges for serving
¾ cup whole almonds
Salt and pepper

Coarsely crack the almonds by placing on a cutting board and using a meat mallet (or other heavy tool) to lightly pound one almond at a time until it cracks into several pieces. (Trying to crack more than one at a time results in almonds all over your kitchen.) Lightly toast in a dry skillet or oven until fragrant and set aside.

If baby spinach is used, not further chopping or tearing is needed. If using regular spinach, tear the larger leaves into two or more bite-sized pieces.

Cook spaghetti according to package directions, then drain. In a large bowl, stir together the spaghetti and pesto until thoroughly combined, then add the spinach, edamame, and juice of two lemons and toss well.

Season to taste with salt and pepper. Serve garnished with cracked almonds and lemon wedges for squeezing at the table.

May be served warm, room temperature or cold. If the pasta has been refrigerated, toss with a small amount of olive oil to moisten before serving.