Showing posts with label vegetarian main dish. Show all posts

Sunday, January 5, 2020

Baked Garlicky Mushrooms, Cherry Tomatoes and Cheese


If you're looking for a meatless meal, this is a great (and easy) choice that bakes in one pan if you don't count the mashed potatoes or polenta.  The key is to choose fresh portobello mushrooms that are big enough to hold the cheese when you scoop out the gills.  Depending on their size, you'll need one, two, or even three per person.  They're rich and meaty with melted cheese, plus the tomatoes, herbs and onions add flavor and the potatoes (or polenta) add creaminess.  All in all it's a very satisfying and cozy fall or winter dinner.

print

Baked Garlicky Mushrooms, Cherry Tomatoes and Cheese
Serves 2
4 cloves of garlic
2 tablespoons fresh thyme leaves (picked off the stems but not chopped) or sage leaves
8 oz cherry tomatoes
1 cup frozen pearl onions (no need to thaw)
3-4 medium to large portobello mushrooms (1 large or 2 medium per person)
1 T shredded Cheddar or Gruyere cheese per mushroom (3-4 tablespoons total)
1 T olive oil
1 T good-quality red wine vinegar
Salt and pepper
Hot mashed potatoes or polenta, for serving


Preheat the oven to 400ºF.

Peel and very finely slice the garlic. Halve the cherry tomatoes.

Wipe the mushrooms. Trim the stems and scoop out the gills with a small spoon.

Place the tomatoes and pearl onions in a 8” x 10” baking pan (or whatever size fits the mushrooms snugly) and drizzle with 1 tablespoon each of olive oil and red wine vinegar. Add 1 tablespoon thyme or sage leaves, a pinch of salt and black pepper and toss together.

Pick out 9-12 perfect garlic slices (3 per mushroom) and save for later, then place the mushrooms stalk side up on the top. Bake uncovered for 10 minutes.

Remove the pan from the oven, crumble the cheese into the mushroom cups and sprinkle over the reserved garlic and remaining thyme or sage leaves, saving a few for garnish.

Return to the oven for 15 more minutes, or until the cheese is melted and golden.  Spoon the onions and tomatoes over hot mashed potatoes or polenta, spooning any remaining pan juices over the top.  Top with the mushrooms and sprinkle with reserved herbs.


Friday, November 23, 2018

French Lentil, Pear and Walnut Salad


If you're going to survive the holiday season relatively unscathed, you need to balance all the Halloween candy, Thanksgiving pie and Christmas cookies with some lighter meals.  This vegetarian main dish salad fits the bill perfectly while still being very satisfying with its mix of flavors and textures.  I think crunch is important in a vegetarian dish to make it feel substantial, and here the crunch comes from the walnuts and pomegranate seeds.  The French lentils are also firm while tender at the same time.

If you're not familiar with French lentils, they're a small dark green variety that you'll also see called lentils le puy or lentils du puy.  They retain their shape and firmness after cooking unlike other lentils that break down into mush.  They're my favorite type of lentils for all recipes except soups or other dishes where you actually want the lentils to break down.

The baby greens (kale, arugula or spinach) add freshness and a little bitterness, and the balsamic mustard vinaigrette ties everything together.

My local natural foods store actually carries small tubs of fresh pomegranate seeds, and I think I remember that Trader Joe's does as well.  If not, and you can't find a pomegranate, dried cranberries will work just as well.  I just like the look of the pomegranate seeds - they're like little jewels.

Last note - if you can find mild French feta, try it.  I much prefer it to the tangier and saltier traditional feta cheese.

print

French Lentil, Pear and Walnut Salad
Serves 4

For the Vinaigrette:
¾ cup extra-virgin olive oil
¼ cup balsamic vinegar
1 teaspoon Dijon mustard
¼ teaspoon salt
1/8 teaspoon freshly ground pepper

For the salad:
1 cup French lentils (lentils du puy), uncooked
2 teaspoons fresh thyme leaves, chopped
1 firm pear, thinly sliced
½ cup chopped toasted walnuts
½ cup feta, crumbled
4 cups baby greens (baby kale, arugula, spinach, etc.)
1/3 cup pomegranate seeds (or dried cranberries)
  

To make the vinaigrette, combine all ingredients in a small jar and shake well. Set aside.

Cook the lentils according to package directions; drain and place in a bowl to cool.  Just before serving, add the fresh thyme leaves and just enough vinaigrette to coat lightly (you'll probably have some left over).  Add the baby greens and toss gently to combine.

Divide the lentils and greens among shallow bowls and top with pear slices, walnuts, feta and pomegranate seeds.

Thursday, January 25, 2018

Spinach and Ricotta Cannelloni

Last Year's Post: Porchetta
Two Years Ago:   Sesame Salmon en Papillote

I gave myself a challenge recently to make cannelloni from scratch - cooking the spinach, making the ricotta, and using fresh pasta sheets.  I found fresh pasta sheets at my local upscale grocer, or you can often find them in Italian markets.  The other alternative if you don't want to make your own pasta is to use no-boil lasagna noodles (Barilla brand has a texture closest to delicate fresh pasta).  Why not use cannelloni or manicotta tubes out of a box?  Because they're thick and chewy and nothing like delicate fresh pasta.

Anyway, it was an interesting afternoon project but I wouldn't try it on a week night.  I started by making the filling which involved making fresh homemade ricotta, which only took about 90 minutes.  If you can find high-quality fresh ricotta locally (try the Italian markets) you could skip this step, but it was really easy.  Just don't use the chalky watery stuff from the grocery store.  Then I cooked mature spinach leaves rather than baby spinach because they have more flavor and don't cook down into a slimy mess like baby spinach tends to.


After making the filling, I briefly cooked the pasta sheets and assembled the cannelloni, then made the bechamel sauce.  Finally the bechamel, marinara, cannelloni and parmesan all went into the baking dish and then into the oven. (I used two smaller baking dishes rather than one large one because I wanted to freeze half for later.)


The end product was a very delicate and tender pasta with a beautiful soft filling.  The dish definitely tasted like something you'd get at a restaurant.  If you enjoy really good Italian food or like a challenge, this is a fun recipe to try.  And if you already make your own pasta, this would be a great addition to your recipe collection.


print
Spinach and Ricotta Cannelloni
Serves 4

1 pound mature spinach leaves
7 ounces fresh ricotta cheese
1 large egg, lightly beaten
12 tablespoons grated Parmigiano-Reggiano cheese, divided
Kosher salt
Pinch freshly grated nutmeg
8 pieces of fresh pasta (approx 4” x 5”) or 8 no-boil lasagna noodles (preferably Barilla)
1 tablespoon unsalted butter
3 cups marinara or simple tomato sauce

For the béchamel sauce
2 tablespoons unsalted butter
3 tablespoons all-purpose flour
2 cups whole milk, slightly warm or at room temperature
Pinch of ground nutmeg
Pinch of pepper
Kosher salt

Preheat oven to 425d.

Wash spinach well, discard stems, and cook covered over medium heat in a large pot for about 10 minutes, using only the water remaining on the leaves after washing.  Stir occasionally.  Drain well in a fine-mesh strainer, then place in a clean kitchen towel and squeeze out as much water as possible.  Finely chop the spinach and place in a medium bowl.  Add the ricotta, egg, 8 tablespoons grated parmesan, salt and nutmeg.  Mix well to combine.

If using fresh pasta sheets, cook for 1 minute in boiling salted water; if using no-boil lasagna noodles, cook for 2 minutes or until flexible.  For either type of pasta, drain and immediately submerge in cold water; let sit for a few minutes, then remove and let dry on a clean kitchen towel in a single layer.  If necessary, cut the pasta sheets to the right size.

Meanwhile, make the béchamel sauce:  melt butter in a saucepan over low heat.  With a wire whisk, whisk flour into the melted butter.  Continue cooking over low heat, whisking continuously, for 2-3 minutes.  Slowly pour in the milk while whisking continuously to prevent lumps. (If a few lumps form, continue whisking and they should dissolve.)  Season with nutmeg, pepper, and 1/2 teaspoon salt.  Raise the heat to medium and continue whisking until the mixture thickens, about 5-7 minutes.  Taste and adjust seasonings; remove from the heat, cover and keep warm.

Place a spoonful of filling across one of the short ends of each pasta sheet and roll up to form a tube.   Spray a baking dish (big enough to hold the cannelloni in a single layer) with non-stick spray.  Spoon one ladle of béchamel into the dish and spread evenly over the bottom, then add a ladle of marinara or tomato sauce.  Place the cannelloni in the baking dish, cover with the remaining marinara and béchamel and then sprinkle with the remaining 4 tablespoons of parmesan.  Dot the top with the tablespoon of unsalted butter.
                                                                                                                             
Bake until golden brown, about 15 – 20 minutes.


Friday, December 15, 2017

Sheet Pan Pasta with Broccoli

Lat Year's Post: Spiced Pecans
Two Years Ago:  Sugar Snap Pea Salad

This is an innovative alternative to the traditional baked pasta with broccoli and cheese, that uses a sheet pan to roast the broccoli and then crisp up the pasta and topping while warming the ricotta.  The whole thing goes very fast since you boil the pasta while the broccoli roasts and broiling at the end takes only a few minutes, making it much faster than a baked pasta.  Another time-saver would be to buy pre-cut broccoli florets, at which point this whole meal could be made in about 40 minutes.


The recipe is slightly adapted from one by Melissa Clark of the New York Times. She emphasized that since this is such a simple recipe with few ingredients, the quality of each ingredient really matters.  In particular, she suggested going to a cheese shop to buy the best quality artisan ricotta you can find rather than the typical supermarket tub.  And this would also be a great recipe to use a really fun pasta shape - just be sure the pasta is approximately the same size as the broccoli for ease of eating.

As for my adaptations - I cut down on the amount of broccoli to 2 pounds (she called for 2.5 pounds) and you can see it's still plenty of broccoli - and 10 ounces of pasta rather than 12 ounces.  With the adaptations, this still makes 4 generous servings.  If you use her 2.5 pounds of broccoli and 12 ounces of pasta I would say it would serve 6 and hopefully you have a big sheet pan to boot.

Be sure to use your best quality olive oil to drizzle over the finished dish, squeeze on some lemon juice and shower with freshly ground black pepper.


print
Sheet Pan Broccoli Pasta
Serves 4

2 pounds broccoli, cut into bite-sized florets
2 tablespoons extra-virgin olive oil, more as needed
¾ teaspoon kosher salt, more as needed
½ teaspoon red pepper flakes, or to taste
10 ounces medium-sized pasta such as rigatoni, or similar-sized other shapes
1/3 cup grated Parmesan cheese
1/3 cup panko bread crumbs
1 tablespoon finely grated lemon zest
½ teaspoon freshly ground black pepper, more as needed
12 ounces best quality, whole milk ricotta
Fresh lemon juice, for serving

Heat oven to 425d.

On a rimmed baking sheet, toss together broccoli, oil, ¾ teaspoon salt and the red pepper flakes.  Roast until tender and browned at the edges, 18 to 25 minutes, tossing halfway through.  Remove from the oven and set the oven to broil.

Meanwhile, bring a large pot of salted water to boil.  Cook pasta according the package directions; drain.

In a small bowl, stir together Parmesan, panko, lemon zest, a pinch of salt and the black pepper.


Toss cooked pasta with broccoli on baking sheet.  Season with salt and pepper, then dollop with ricotta.  Sprinkle with the Parmesan mix, drizzle generously with oil, and broil until topping is crisped and golden, 2-3 minutes.  Watch closely so the topping doesn’t burn.  Place portions in individual shallow bowls, then sprinkle with lemon juice, drizzle with a little additional olive oil, and shower with coarse black pepper before serving.

Friday, December 1, 2017

Fall Wild Rice Salad with Persimmon

Last Year's Post:  Wheatberry Salad
Two Years Ago:    Turkey Farro Salad with Candied Chickpeas

I found the inspiration for this recipe a year ago and sent it to my vegetarian friend Nikki, but never got around to trying it.  Then this year, I bought several persimmons as decorations for the Thanksgiving table and decided to find out more about them, since I've never actually tasted one.  (Why didn't we ever have persimmons when we were growing up?)  Several sources described their taste as a cross between apricot and honey, which I would agree with when I tried one. They're available October through February. There are also two kinds of persimmon - Fuyu and Hachiya.  Fuyu are more common and are perfectly edible and sweet even when hard.  The Hachiya are very astringent until they ripen to a squishy gel-like consistency, which didn't sound too attractive to me.  This is what Fuyu persimmons look like.


Anyway, after we tried the raw persimmon on Thanksgiving, I wanted to use them in a dish and remembered this recipe.  The original recipe included cooked beans (as well as wild rice), which I eliminated.  I used a new technique to char sliced Brussels sprouts rather than steaming individual leaves, and was please with the smoky yet firm results.  And I added some Gruyere cheese for protein and taste since I eliminated the beans.  Of course, you could substitute blue cheese or goat cheese (or any other cheese, for that matter) if you prefer.

There are a number of steps and ingredients, so my suggestion is to cook the wild rice, Brussels sprouts and squash in advance.  Then it's just a matter of making the vinaigrette and tossing everything together at the last minute.


The result is a truly beautiful and  spectacular fall or winter salad, full of complex flavors and textures.  It could accompany a roast pork, chicken or turkey, and would be the star centerpiece of a vegetarian feast.  It's perfect for a buffet table since it's served at room temperature. Accompanied by  crusty bread and a glass of wine, it was a very satisfying and sophisticated dinner.

print
Fall Wild Rice Salad with Persimmon
Serves 4 as an entree, 6-8 as a side dish 

1 cup uncooked wild rice
6-7 Brussels sprouts, thinly sliced
Extra virgin olive oil
Salt and pepper 2 cups cubed butternut squash (bite-sized cubes)
1/2 small red onion, thinly sliced
1 cup dried cranberries, rehydrated in hot water and drained
2 fresh small Fuyu persimmon, quartered and thinly sliced
1 cup baby arugula
1/3 cup flat-leaf parsley leaves
½ cup Gruyere, cut into small cubes (or blue cheese or goat cheese crumbles)

Vinaigrette:
3/4 cup extra virgin olive oil
2 tablespoons red wine vinegar
2 tablespoons balsamic vinegar
1-2 teaspoons grainy mustard
2 tablespoons minced fresh herbs such as lemon thyme, chervil, or marjoram
Salt and pepper

Garnish:
1 cup toasted walnuts or pecans, chopped
1/3 cup pomegranate seeds (optional)


Cook the wild rice according to package directions.  When done, drain and place in a large bowl.  Set aside.

Preheat the oven to broil.  In a medium bowl, toss the sliced Brussels sprouts with a tablespoon or so of olive oil, then sprinkle with salt and pepper.  Spread in a single layer on a baking sheet and place in the center of the oven for 3 minutes.  Stir, then broil for an additional 2-3 minutes until lightly charred on the edges, watching closely so they don’t burn.  Remove and let cool.  Turn the oven down to 400d.

 In a medium bowl, toss the squash cubes with a tablespoon or so of olive oil and sprinkle with salt and pepper. Transfer to a baking sheet and roast until tender, turning halfway through, 15 to 20 minutes. Remove and let cool.

To make the vinaigrette, whisk the olive oil, red wine vinegar, balsamic vinegar, mustard, and herbs together in a bowl. Add salt and pepper to taste.

In a bowl, combine all the salad ingredients except the walnuts and pomegranate seeds. Mix in the vinaigrette, then taste and adjust seasonings. Sprinkle the walnuts (and pomegranate seeds, if using) over the top of the salad and serve.


Friday, October 20, 2017

Winter Squash Agrodolce

Last Year's Post:  Mahogany Chicken with Smoky Lime Sweet Potatoes
Two Years Ago:   Grain Bowls with Halloumi Cheese

"Agrodolce" is an Italian term for sweet and sour, a classic sauce in many cuisines.  It's often used for vegetables and fish, and is perfect for an unusual twist on your typical baked fall squash dish.  You can use any winter squash as long as you can peel it which pretty much eliminates acorn squash.  (I guess you could cut an acorn squash in half and get rid of the seeds, then cut and bake slices without peeling.  That would work just fine as long as your guests are up for cutting the peels off.) 

Butternut squash works well.  I used a kabocha squash just because I hadn't tried one before, and found it difficult to peel.  I finally ended up cutting it in half and cleaning out the seeds, then cutting the slices and peeling each individual slice with a small knife.  Good thing The Lawyer was around to help.  Next time I'll use a butternut.


This would make a great side dish with a roast pork or chicken, and of course would be an elegant addition to a holiday table.  I also like it very much as part of a vegetarian winter salad with fresh greens, toasted pecans, chopped apple and some crumbled blue cheese.


print
Winter Squash Agrodolce
Yield: 4-6 servings

1 medium butternut or kabocha squash, peeled, seeds removed, cut into 1" wedges
2 tablespoons olive oil
Kosher salt, freshly ground pepper
3/4 cup red wine vinegar
1/4 cup honey
2 tablespoons golden raisins, chopped
Pinch of crushed red pepper flakes


Preheat oven to 400°F. Place squash on a large rimmed baking sheet. Drizzle with oil; season with salt and pepper.  Toss to coat evenly. Roast, turning once until golden brown and tender, 30–35 minutes.

Meanwhile, bring vinegar, honey, raisins, red pepper flakes, and a pinch of salt to a boil in a small saucepan over medium heat. Reduce heat and simmer for 8–10 minutes.

Brush half of warm agrodolce over warm squash. Transfer to a platter.  Just before serving, spoon the remaining agrodolce over the squash.


Do ahead
Dish can be made 3 hours ahead. Store tightly wrapped at room temperature.


Saturday, September 24, 2016

Korean Rice Bowls

Last Year's Post:  Healthy Baked Apples
Two Years Ago:   Squash Ravioli with Sage Brown Butter Sauce

Korean rice bowls with mixed vegetables are also called Bibimbap, which is fun to say  (BEE-beem-bop) but I figured most people wouldn't know what it meant, plus this recipe isn't completely authentic Bibimbap because I substituted hard-cooked eggs for the runny-egg-thing that manages to find its way onto everything these days.  If you like runny eggs, go for it.  (Some Bibimbap recipes actually use raw eggs that are mixed with the rest of the ingredients, ugh.)

The only unusual ingredient in the recipe is Gochujang hot pepper paste, which is a staple in Korean cooking.  You'll find it at your local Asian market.  It's pretty spicy so you only use a small amount, but it adds wonderful flavor and a little heat to the roasted squash.  If you can't find it or don't want to buy it just for this recipe, don't worry - just substitute harissa or sambal olelek or another hot sauce instead.  After all, it's just one component in the sauce for the squash, which in turn is just one part of the rice bowl.


The squash roasts along side the shiitake mushrooms for depth of flavor, then everything gets assembled on top of the rice.  Lime juice, soy sauce and more hot sauce are added at everyone's discretion so your own bowl can be as mild or hot as you like.  And very healthy!


print
Korean Rice Bowls
Serves 4

1 teaspoon Gochujang (Korean hot pepper paste) or sambal oelek, plus more for the table
2 teaspoons soy sauce
2 tablespoons vegetable oil, divided
2 teaspoons sesame seeds
2 cups peeled butternut squash, cut into bite-sized pieces
Sea salt
7 ounces shiitake mushrooms, stemmed, caps cut in half if large
2 tablespoons soy sauce plus more for the table
2 cups frozen edamame, cooked according to package directions
5 cups hot cooked white or brown rice
4 radishes, trimmed and sliced
2 cups Napa cabbage, thinly sliced
4 hard-boiled eggs, peeled and sliced
Black or white sesame seeds, for garnish
Lime wedges, for garnish
Thinly sliced green onions, for garnish


Preheat oven to 425 degrees.  Whisk Gochujang, 2 teaspoons soy sauce, 1 tablespoon vegetable oil, and sesame seeds in a medium bowl.  Add squash and toss to coat.  Spread in a single layer on one half of a large rimmed baking sheet.  In a second bowl, mix the shiitake mushrooms, remaining 1 tablespoon vegetable oil, and 2 tablespoons soy sauce.  Spread in a single layer on the other half of the baking sheet.  Roast for 15 minutes until the mushrooms are juicy and slightly shrunken, then remove them from the baking sheet and place it back in the oven until the squash is tender and browned on the edges, about 5 more minutes.  Sprinkle both with salt.

To serve, divide the rice between 4 bowls.  Top with squash, mushrooms, edamame, radishes, cabbage, and sliced egg.  Garnish with sesame seeds, lime wedges and green onions.  Serve, passing soy sauce and Gochujang (or sambal oelek) at the table.


Friday, August 5, 2016

Savory Kale and Corn Galette

Last Year's Post:  Spanish Shrimp
Two Years Ago:   Goat Cheese and Chorizo Rolls

A galette is just a fancy term for a free-form (or rustic) tart that's easier to make and prettier than a pie.  The most common type is a sweet galette (think plums, apples, etc.) for dessert but I'm not all that big on sweets (gasp) so my thoughts tend to go in the savory direction for a light vegetarian entree, especially this time of the year with all that beautiful produce in the markets.


In its savory version, a galette is lighter than a quiche because it doesn't contain the milk-and-egg custard; its all about the veggies.  It makes an elegant and impressive vegetarian dinner served with a big crisp green salad and a nice bottle of wine.  I made all manner of changes to the original recipe, which is one of the advantages of a galette - use what you have on hand or is fresh at the market.  I found beautiful kale, thyme and corn at the market, plus I had sun-dried tomatoes and Manchego cheese on hand, so that's what I used.

You could also use zucchini or other vegetables, other fresh herbs, and other cheeses equally well.  The one substitution I wouldn't recommend is fresh tomatoes, especially beefsteak tomatoes, because they're watery and can easily make your galette soggy.  If you really want to use fresh tomatoes, either slice and salt them for 30 minutes or so to draw out some moisture, or roast them which gets rid of most of the moisture and also intensifies the flavor.  Or if you really want that fresh tomato flavor, think about putting them in your side salad instead.


The result was amazingly delicious - the sweet corn and sun-dried tomatoes contrasted beautifully with the earthy kale, and the Manchego cheese added richness.  But the star of the show was the crust.  Normally, you want a pie crust to be tender and flaky for sweet foods, but this particular crust is light and crisp - almost a cross between a pie crust and a cracker.  It's because there's less butter (fat) than in a normal pie crust, which is another bonus.  It was very easy to work with and the whole project was fun, although you should know it took about 2 hours for prep work, cooking the filling, chilling the dough, rolling the dough, assembling the galette and baking it - maybe not a work-night project unless you do some of the prep in advance.  You can make the galette a few hours in advance if you're having company because it's equally good warm or at room temperature, but I wouldn't make it the day before - the crust loses some crispness over time.  I added some sesame seeds to the edge of the crust for a little extra texture and taste, but you could also use coarse black pepper, or sea salt, or a mix of seeds equally well.

I can't emphasize enough how good this was, and I really hope you'll try it.


print recipe
Savory Kale and Corn Galette
Serves 4; to serve more, double the recipe and make two galettes

For the dough:
1 cup all-purpose flour
¼ cup (1/2 stick) cold unsalted butter, cut into ½” pieces
½ teaspoon salt
1 egg
1/8 cup cold water

For the filling:
1 tablespoon olive oil
¼ medium onion, chopped
1 large clove garlic, minced or grated
1 bunch Tuscan kale, de-stemmed and chopped
1 ear of corn, shucked (or 1 ½ cups frozen corn)
1 teaspoon minced fresh thyme
3 oil-packed sun-dried tomatoes, drained and finely chopped
3 oz crumbled feta or goat cheese, or 3 oz small cubes of any firm white cheese such as Monterey Jack
¼ teaspoon salt
Freshly ground black pepper, to taste
Sesame seeds, for garnish (optional)

In a food processor, pulse the flour, butter and salt a few times until crumbly.  In a small bowl, whisk the egg with a fork.  Put half the egg in a slightly larger bowl (reserving the remainder for brushing) and add the ice water.  Whisk again to combine.

Add the egg and water to the food processor and pulse until the dough comes together more or less.  Turn out on a floured surface and bring together with your hands to form a ball.  Flatten into a disk and wrap in plastic wrap.  Refrigerate for 30-45 minutes.

While the dough chills, make the filling.  Heat a large skillet over medium heat.   Add oil and onions and cook for 2 minutes, stirring.  Add garlic and cook 1 additional minute until fragrant.  Add kale and corn and cook until the kale is softened and wilted, 3-4 minutes.  Season with salt and pepper and set aside to cool for 20 minutes or so.  When cool, stir in the thyme, sun-dried tomatoes and cheese.

Line a baking pan with parchment paper and preheat the oven to 375d. 

On a floured surface, roll the dough to a circle approximately 11” in diameter.  Gently fold into quarters and place on the parchment paper, then unfold.  Place the filling mixture in the center of the dough, then spread evenly leaving  1 ½ “ of dough uncovered around the outer edge.  Fold the edges over the filling and brush the edges with the remaining beaten egg.  Sprinkle with sesame seeds, optional.

Bake for about 35 minutes until the crust is golden.  Serve warm or at room temperature.

Saturday, February 27, 2016

Roasted Carrots with Herbs

Last Year's Post: Baked Pumpkin Spice Granola
Two Years Ago:  Power Muffins

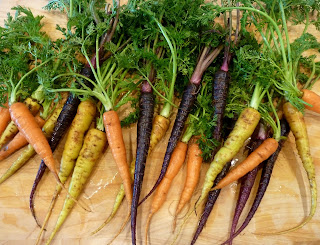
I think carrots are one of the most taken-for-granted vegetables you can find, and I would have included myself in that camp until recently.  I mean, raw carrots are everywhere, particularly those little cut-up mini carrots that show up in everyone's lunches.  And cooked carrots?  Meh.  My memories of cooked carrots include chunks of carrot cooked to death with potatoes and pot roast until everything tastes like carrots.  Or even worse, chunks of carrots that are boiled or steamed until mushy, then tossed with some heavy sweet and sticky sauce (the better to cover up the taste, probably).


And then I discovered the wonders of roasting vegetables, and particularly carrots.  As they roast the sugars are caramelized and intensified, so the result is a fork-tender and sweet vegetable without the cloying sweet sauce.  They're not only pretty, but truly delicious and of course very good for you.  I've come across a couple of roasted carrot recipes lately that add large amount of butter and one that even adds Brie cheese if you can imagine, but I think simpler is better - a little olive oil, salt, and fresh herbs.

Rainbow-colored carrots are the prettiest and they're becoming easier to find - I've seen them at upscale grocers, natural food stores and farmers markets.  Smaller carrots are more cute because you can leave them whole, but this technique works equally well for larger carrots that are cut up.


One of the biggest benefits to roasted carrots is that they taste equally good hot or at room temperature, so they're perfect for a buffet (think about a big platter of carrots next to your ham and scalloped potatoes at Easter).  They're also great as a side dish next to roast beef, chicken, pork or lamb - just throw them in the oven as the meat rests and gets carved.

Or, as we had them today, they're a great centerpiece for a vegetarian meal with winter greens, a few pieces of good cheese and some toasted nuts.  We had somewhat over-indulged at a weekend breakfast so this was the perfect balance for dinner.


print
Roasted Carrots with Herbs
Serves 4-6

2 lbs carrots (small to medium size is preferable)
2 tablespoons extra-virgin olive oil
1 tsp coarse salt
2 tablespoons chopped fresh herbs, such as chives, thyme, parsley, or a mix


Wash and peel the carrots, leaving about ½” of green tops.  If small, leave whole, and if larger cut in half lengthwise and crosswise.

Heat oven to 450d.

In a large bowl, toss the carrots with oil, salt and half the herbs.  Spread in a single layer on a parchment-lined baking sheet.  Roast, shaking the pan once, about 25 minutes until the carrots are fork-tender.  Turn the oven to broil for a minute or two to brown the tops, watching closely so the carrots don’t burn.  Remove and sprinkle with the remaining herbs. 

Serve hot or at room temperature.