Showing posts with label snack. Show all posts

Friday, April 6, 2018

Crispy Roasted Chickpeas

Last Year's Post: Salmon Orzo Salad with Lemon and Pea Pods
Two Years Ago:  Manchego Cheese Quesadilla with Pepper Jam

Just because there aren't enough controversies going on in the world at the moment, allow me to add another: how to roast chickpeas.  I recently realized that there are a bunch of recipes out there with the goal of producing a nice, crisp snack, but they all vary - add olive oil before or after roasting?  how long to roast?  add spices before or after roasting?  etc. etc.

For my initial attempt which was to be a garnish on a middle eastern salad, I used the compromise approach of putting the olive oil and spices on the chickpeas midway through roasting, and I roasted them for 50 minutes as specified in the recipe.  The result was hard, crunchy chickpeas with burnt spices.  Yum.

So, I decided to get scientific and compared roasting with and without oil and for various time periods (both without spices, I learned that lesson already).  I also wanted to check on how crisp they were the next day, because one recipe suggested they lose crispness within hours.  I divided one can of chickpeas (which contained 240 chickpeas, by the way) into two camps:  add oil before roasting, and add oil after.


 For each of those two groups, I roasted equal amounts for 20, 30, 40 and 50 minutes respectively.  The results are shown below - the chickpeas roasted with oil are on the bottom, and the ones roasted without are on the top.  From left to right, you can see the results after 20, 30 40 and 50 minutes.


Surprisingly, the addition of oil or not before roasting made no discernible difference in taste or texture.  The chickpeas roasted for 20 minutes changed texture slightly, but I wouldn't call them crisp.  And the ones roasted for 50 minutes were too dark and had a slightly burnt taste.  Both groups roasted for 30 and 40 minutes were crisp, although my personal preference leaned more toward the 30 minute batch.

So, then I added olive and salt to the 30 and 40 minute batches even if they had olive oil before roasting, because it's necessary to make spices stick.  All four tasted great.  And finally, I left them out overnight to test their texture in the morning, and all four remained crisp.  Success!


Having said all that, these crispy chickpeas are a great and healthy snack, and a wonderful garnish for all sorts of other dishes - salads and soups in particular.  You can change the flavor profile by changing the spices to suit any type of cuisine.  Have fun!

print
Crispy Roasted Chickpeas
Makes about 1 cup

1 (15 ounce) can chickpeas
1 tablespoon olive oil
Salt and pepper
1-2 teaspoons spices or finely chopped herbs such as chili powder, cumin, smoked paprika, rosemary, thyme, curry powder, etc.


Preheat oven to 400d.

Thoroughly rinse and drain the chickpeas, then spread out on a clean dishtowel and pat dry.  Remove any loose chickpea skins.  Spread the chickpeas in a single layer on a baking sheet.  Roast in the oven for approximately 30-35 minutes until light golden, stirring the chickpeas or shaking the pan every 10 minutes.  Remove from the oven and drizzle with the olive oil, then add salt, pepper and your desired seasonings to taste.  Stir with a spoon to coat evenly, then let cool in a single layer.  When completely cool, store in an airtight container. 

Friday, July 22, 2016

Healthy White Bean Dip

Last Year's Post:  Chicken Quinoa Salad with Nectarine Vinaigrette
Two Years Ago:   Fresh Cherry Hand Pies

It's easy to buy a can of bean dip, but it's loaded with fat and preservatives.  This is a healthy alternative that's very quick to make and can be customized to your preference.  Serve with cut-up veggies and whole wheat crackers for a very healthy snack.

Cannellini beans are creamy and mild, perfect for a dip that everyone will like.  It's a nice change from hummus but with the same creamy consistency and protein.You can add more cilantro, garlic, or lemon to your preference, or substitute parsley for the cilantro for you cilantro-haters out there.    Sprinkle the top of the dip with paprika or your favorite spice blend for added flavor.


print recipe
Healthy White Bean Dip
Makes about 2 cups

1 (15 ounce) can cannellini beans, rinsed and drained (or equivalent cooked dried beans)
1/4 cup chopped fresh cilantro (not packed)
1 small clove garlic, minced
3 tablespoons olive oil
½ large lemon, juiced
Salt and pepper to taste

Combine all ingredients except salt and pepper in a food processor and process until smooth.  If necessary, add a small amount of water until your desired consistency is reached.  Taste and season with salt and pepper.  Add more cilantro or lemon if desired.

May be made 2-3 days in advance and stored, covered, in the refrigerator.


Friday, July 18, 2014

Fresh Cherry Hand Pies

Last Year's Post: Chicken Curry
Two Years Ago:  Grilled Cheese with Pesto, Spinach and Avocado

It's still fresh cherry season so I wanted to post one more way to use them besides chicken with fresh cherry salsa, or wild rice salad.  I've always been a fan of hand pies because although normal people probably view them as individual desserts, I view them as breakfast pastries.  Since I do eat breakfast and typically don't eat dessert, that line of reasoning puts them squarely in my wheelhouse.  (That line of reasoning also could be called the height of rationalization, but we won't mention that part.)


Although stemming and pitting fresh cherries takes a few minutes, I actually find it sort of soothing.  While I was pitting the cherries I thought about the giant community garden The Lawyer and I used to rent on a yearly basis and how much work it was, but how much it taught me to respect fresh and beautiful fruits and vegetables in all their forms.  (Growing up as a city kid I took it for granted that produce just magically appeared in the grocery store without any thought regarding the process up to that point.) I thought about the fact that some grower in Washington state went to all the work not only to grow these gorgeous cherries for me (well, along with a few other people I'm sure) but took the time and effort to become organically certified.  Taking the time and effort to use these fresh cherries is one way of honoring the grower and the fruit.  (Gag, did I really say that?  Too much pitting time, obviously.)

Anyway, the process thereafter is simplified by using premade pie crusts.  (If you have strong feelings about homemade pie crusts, by all means have at it.)  There are a few refrigerator chilling interludes, however, so you might want to think about when to start the hand pies if you want them for breakfast.  I would suggest assembling them the day prior, then covering and refrigerating them overnight.  Then all you have to do is bake them the next morning.

First you make the cherry filling.


Then you roll each pie crust out to make it slightly larger, cut the crusts into four wedges each, and assemble the hand pies (there's a 30 minute refrigerator stop in there also).


After assembling, they sit in the refrigerator 10 more minutes before brushing with egg, sprinkling with sugar, and baking.  After assembly you could either refrigerator or freeze the hand pies to bake later.


They're not too sweet and the whole cherries in the filling make them special.


printable recipe
Cherry Hand Pies
Makes 8


4 cups pitted fresh cherries (from 1 ¼ lb whole cherries)
½ cup sugar
Kosher salt
1 tablespoon cornstarch
Juice of ½ lemon
2 refrigerated pie crusts, thawed according to directions
1 large egg yolk
Parchment paper
Coarse (sparkling) sugar for garnish, optional


In a medium saucepan over medium heat, combine cherries, sugar and a pinch of salt.  Cook, stirring often, until sugar dissolved and liquid begins to simmer, about 8 minutes.  Remove a few spoonfuls of liquid and place in a small bowl, then whisk in cornstarch and lemon juice.  Pour cornstarch mixture back in saucepan and continue cooking and stirring until thickened, about 8 minutes more.  Pour into a heat-proof bowl and let stand until cool, about 1 hour. (Note: the filling may be made a day in advance and refrigerated covered until ready to use.)

On a lightly floured surface, unroll pie dough and roll out to a 14” round; repeat with remaining dough.  Quarter each round to make 8 equal wedges total.  Stack wedges between sheets of parchment paper and refrigerate at least 30 minutes.

Preheat oven to 375d.

Arrange 1 wedge of dough on a work surface next to a small bowl of water.  Spoon ¼ cup of cherry filling (drained of most juices) into the center of the wedge, leaving a 1 ½ inch border all around.  Run a damp finger around the border, then carefully fold dough in half, lining up edges and pressing gently to seal.  Crimp edges with a fork, then transfer to a parchment paper-lined rimmed baking sheet.  Repeat with remaining wedges and filling.  Transfer baking sheet to refrigerator; chill about 10 minutes.

Beat egg yolk with 1 tablespoon water.  Brush pies with the egg mixture, then make two ¾” slits in each.  Sprinkle pies with coarse sugar and bake until golden brown, 20 to 25 minutes.  Let stand at least 10 minutes before serving.


Note: after brushing with egg mixture and sprinkling with sugar, the assembled pies may be refrigerated or frozen prior to baking.  Baking time may need to be increased slightly. If frozen, thawing before baking tends to produce more even browning.  

Friday, May 2, 2014

Flax Seed Crackers

Last Year's Post: Venetian Shrimp and Scallops
Two Years Ago:  Chicken Salad with Fruits and Peppadews

I have to smile.  Whenever I make something readily available in a store, I always see my mother giving me that concerned "where-did-I-go-wrong" look and asking me "Why would you ever make something you can simply buy at the store?"  Because it's more interesting and much cheaper than buying a box of crackers at the store.  Because I will customize the recipe and make it mine. And because it's a fun project for a rainy or snowy day to do with someone else, maybe even a child.  The more children get involved in cooking, the more foods they're willing to try.

Have you ever thought of making crackers?  It's really easy and they keep fresh in a zip top bag for weeks.  This particular version has flax seeds which we all know are really good for you, but you could use literally any seeds you want. The flax seeds have a nutty taste and crunchy texture.


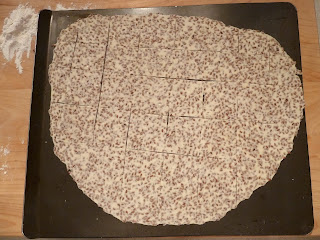
Sesame and poppy seeds are also a great combination.  Besides varying the seeds, you can add a topping of coarse salt or not.  You can also create big, dramatic broken crackers like a restaurant, or you can score the dough to make smaller rectangles or squares - I made one batch of each to show you the difference.  Choices, choices.


The key is to roll the dough as thin and as evenly as possible to make the crispiest crackers.  Although you could bake both batches in the oven at once and rotate them between the upper and lower thirds of the oven halfway through, I've found that never works very well in practice which is why I prefer baking each batch separately in the middle of the oven.


unscored batch

unscored batch after baking

scored into squares
after baking
However you decide to make your crackers, it's a fun and delicious little project.

printable recipe
Flax Seed Crackers
Makes approximately 40 – 60 crackers depending on size

Note: flax seeds are available in health food stores and some grocery store bulk aisles

½ cup flax seeds
1 ½ cups all purpose flour
½ teaspoon baking powder
½ teaspoon salt
4 teaspoons butter, softened
½ cup low-fat milk
Coarse kosher or sea salt for garnish, optional

Preheat oven to 350d with the rack in the middle of the oven.

Put flax seeds, flour, baking powder, salt and butter into a large bowl.  Using a hand or stand mixer, mix on low until the butter resembles coarse meal.  (Alternately, mix by hand.)  Add the milk and mix until dough comes together.  Set the mixer aside and use your (clean!) hands  to completely incorporate all the flour and seeds (this just takes a few seconds, you’re not kneading the dough) and form into a ball.  Wrap the dough in plastic wrap and chill for 10 minutes.

Divide the dough in half and return one half to the refrigerator.  On a lightly floured work surface, roll out the piece of dough to a rough rectangle as thin as possible without tearing, about 1/16-in thick.  (If you own a pasta machine you can use it to roll the dough.  Lightly flour the pasta roller and flatten the dough until it will pass through the first setting.  Go to the highest number your roller will allow without tearing the dough.  Cut in half to fit your baking sheet if necessary.)

Optional:  sprinkle the dough lightly with coarse salt and roll over lightly with the rolling pin to adhere the salt to the dough.  Transfer to a large baking sheet.  If desired, score the dough into square or rectangular cracker shapes.    Bake for 20 – 25 minutes until crisp and golden.  Remove and let cool before breaking apart.


Repeat with the other portion of dough.

Friday, March 7, 2014

Sausage Rolls with Mustard Cheese Dipping Sauce

Last Year's Post: Hibachi Shrimp (or Chicken or Beef or Lobster)
Two Years Ago:  Spinach Salad with Spicy Orange Dressing

Sausage rolls are a popular snack food in England, the original home of pub food.  They're all meaty/savory on the inside and crispy on the outside.  Served with a warm mustard cheese sauce, they just scream for a good craft beer.  You could make it a meal by adding some cut-up raw vegetables and soft pretzels (like we did) to dip in the sauce along with the sausage rolls - sort of like the beer version of fondue.  Or, serve these at your next party and watch them disappear - your beer-loving friends will go crazy.  Definitely double the recipe for a party.

The best part is that they're incredibly easy to make.  Make sure you buy pre-cooked sausages so you don't have to worry about whether they're cooked through or not, plus they're less greasy. Italian sausages are particularly good because they have a nice amount of spice that balances the cheese sauce, but use any flavor that appeals to you. I would think sun-dried tomato, garlic, or spinach varieties would also be good. Cut the puff pastry strips the same width as your sausage pieces so you can see the sausages when they're rolled up.  If the pastry looks a little too wide after you're done rolling, just trim it with a knife or kitchen scissors.  And finally, the cayenne pepper gives the cheese sauce a nice little kick but if you don't like spice just leave it out and the sauce will still be great.

Besides being easy to make, the other advantage for a party is that you can make them in advance and keep them refrigerated and covered with plastic wrap on their baking sheet.  All you have to do when the party starts is just bake them and make the cheese sauce (or make that in advance too, and simply reheat).


Dip, pop in mouth, sip beer, repeat.


printable recipe
Sausage Rolls with Mustard Cheese Dipping Sauce
Makes 16 appetizer rolls

Note:  raw vegetables and soft pretzels are also an excellent addition to serve with the cheese sauce.

For the sausage rolls:
1 sheet puff pastry, thawed
All-purpose flour
4 pre-cooked chicken or turkey sausages (such as Aidells), Italian style or your favorite flavor
1 egg, beaten
Salt and pepper

For the cheese mustard dipping sauce:
¼ cup amber or dark beer
¼ cup Dijon mustard
2 tablespoons unsalted butter
1/8 teaspoon cayenne pepper, optional
3 ½ ounces Cheddar cheese, grated (1 ½ cups)


Roll the puff pastry out on a floured surface to a rectangle of about 12” x 14”.  Place the shorter side closest to you, then trim the edges so they’re straight and cut the pastry in half crosswise into two equal pieces. Cut each piece into six long strips for a total of twelve strips and season with a little salt and pepper.  Brush the bottom edge of each strip with a little beaten egg and reserve the remaining egg for later.

Cut each sausage into three equal pieces.  Place a sausage piece on the top of a strip (away from the beaten egg) and roll up to enclose (the pastry should overlap somewhat).  Place seam side down on a baking sheet lined with parchment paper.  Repeat with the remaining sausages and pastry strips.  Put the sausage rolls in the refrigerator for at least 20 minutes to harden.

Preheat the oven to 400d.

After 20 minutes remove the sausage rolls from the refrigerator and score the tops twice with a sharp knife.  Brush each roll all over with the rest of the beaten egg (taking care not to get the egg on the edges or on the sausage or this may prevent puffing in the oven).  Bake in the oven for 25-30 minutes, until golden-brown and puffed.  Remove and let cool for 5 minutes or so before serving.

While the sausage rolls are baking, combine all sauce ingredients except the cheese in a small saucepan over medium heat.  Gradually whisk in the cheese, continuing to cook until smooth and all the cheese is melted – about 5 minutes.

Serve the warm sausage rolls with warm cheese sauce on the side.

Friday, February 21, 2014

Power Muffins

Last Year's Post: Sloppy Joes for Grownups
Two Years Ago:  Very Lemon Chicken and Fruited Couscous

Everybody likes muffins, and you might even be fooled into thinking that they're better for you than, say, a breakfast sandwich when faced with the choice at your favorite coffee shop.  But the culprits in muffins are calories and fat, even if the name sounds healthy.  For example, a Dunkin' Donuts Honey Bran Raisin Muffin has 500 calories and 14 grams of fat.

This recipe is different - packed with carrots, apples, flax seed and oat bran, it's good for you and delicious. Think of it as a healthy version of a Morning Glory muffin. Really, how can anything be bad when it starts with fresh foods like this?


When made in a medium size (remember medium-sized food?) each muffin has about 220 calories, 9 fat grams, 5 grams of protein and a bunch of great vitamins and minerals, especially potassium and vitamin A.  One muffin makes a healthy breakfast with some yogurt, or a perfect mid-morning or after-school snack for kids. It's filling but not heavy, moist and flavorful with the heady scent of cinnamon, cloves and nutmeg.  If you need an energy boost after a hard workout this would be a good choice to keep you on track and energized.  One recipe makes about 16 muffins which keep perfectly in the freezer so it's easy to grab one on the go.

The recipe calls for peeled and cored apples, which has always caused me some trauma because apples are so round.  My grandmother was one of those people who could peel an apple with a paring knife in one long continuous peel, but then again she had apple trees in her back yard and made zillions of apple pies in her lifetime.  I not only can't peel an apple that way, I really don't want to learn so I have my own peculiar way of peeling apples.  I start by cutting the apple down the middle and then each half again to make four quarters using a big chef's knife.  Then I switch to a smaller knife to cut out the core part from each quarter and cut each quarter yet again into two pieces.  I lay each piece on its nice flat side and use the small knife to cut the peel off.  It's probably more time-consuming, but I'm not going to cut myself and it works.


After peeling and shredding the apples and carrots, it's really just a matter of measuring, mixing and baking.  I sprinkled some coarse sugar on the top for a little crunch and sparkle, but that's up to you.  One last thought - you can find ground flax seed and oat bran at your local health food store.


printable recipe
Power Muffins
Makes approximately 16 medium muffins

Note:  Each muffin has about 220 calories, 9 grams of fat, 35 carbohydrate grams and 5 grams of protein.  They’re nutrient-packed and a particularly good source of potassium and vitamin A along with other vitamins and minerals.


1 ½ cups all-purpose flour
¾ cup ground flax seed
¾ cup oat bran
1 cup brown sugar
2 teaspoons baking soda
1 teaspoon baking powder
1 teaspoon salt
2 teaspoons cinnamon
¼ teaspoon ground cloves
1/8 teaspoon ground nutmeg
¾ cup skim milk
2 tablespoons vegetable oil
2 eggs, beaten
1 teaspoon vanilla extract
2 cups shredded carrots
½ cup raisins
2 apples, peeled, cored and shredded
1 cup chopped toasted pecans or walnuts
Sparkling (coarse) sugar, optional

Preheat oven to 350d.  Grease muffin pan or line with paper muffin liners.

In a large bowl, mix together flour, flax seed, oat bran, brown sugar, baking soda, baking powder, salt, cinnamon, cloves and nutmeg.  Add the milk, eggs, vanilla and oil and mix until blended.  Stir in the carrots, apples, raisins and nuts.  Fill prepared muffin cups ¾ full, or paper liners to just under the top of the paper.  Sprinkle the tops with sparkling sugar, optional.


Bake at 350d for 22-25 minutes until a toothpick inserted into the center of a muffin comes out clean.  Cool before removing from the pan.

Friday, February 17, 2012

Turnovers


Turnovers are incredibly easy to make - they only have three ingredients so how hard can it be, right?  It's mainly just a bit of assembly.  The hardest part is deciding where to categorize the recipe in my plethora of three ring recipe binders - are they a snack, sandwich, breakfast, or dessert?  The answer is "yes", which isn't particularly helpful when trying to figure out where the recipe is.  If I was insanely organized I would probably create an alphabetized index of my hundreds and hundreds of recipes so I could cross-reference by keyword, but that's too much even for me. 

I just noticed that I've done two posts in a row using puff pastry.  Well, at least they're dramatically different recipes and puff pastry is still a magic ingredient - really easy to use but it looks really complicated.  You can put literally any filling in a turnover - savory or sweet - to suite your tastes.  For this post I did half chocolate and half apple turnovers.  I'm thinking of trying cheese, arugula and prosciutto turnovers in the near future.  Any type of jam works exceptionally well also - I recently saw something about cream cheese and blackberry jam that sounded enticing for a turnover filling.  And how about lemon curd?  I love lemon. The only thing to watch is that the filling isn't extremely liquid or it will end up running out of the turnovers and all over your oven.

The other dimension you can vary is the size.  The chocolate turnovers were small using 4" squares of puff pastry.  The apple turnovers were more what you would call a "normal" turnover size using 6" squares of puff pastry.  It all depends on what you intend to use them for - the chocolate turnovers were treats for The Lawyer's office and the apple turnovers were breakfast.


 The other good news is that you can make these ahead and refrigerate or freeze them, then just throw them in the oven when you want them.  Yum!

* * click here for a printable recipe* *


Turnovers
makes 18 small or 8 large turnovers

1 (17-1/4 oz) package puff pastry sheets
1 egg, beaten
Filling: 4 oz finely chopped semisweet chocolate, or 18 teaspoons of jam or lemon curd, or apple filling (below)


Adjust oven racks to the upper and lower middle positions and heat the oven to 425 degrees.

Working with one sheet at a time on a lightly floured work surface, roll the puff pastry sheet lightly and trim to a 12” square. Cut evenly into nine 4” squares or four 6” squares, depending on your preference.  Working with one square of dough at a time, place a portion of filling (chocolate or 1 teaspoon of jam or lemon curd) on the lower corner, brush two edges of the dough with beaten egg, and fold the dough in half diagonally to form a turnover. 


Place each turnover on a parchment-lined cookie sheet, spacing them about 2 inches apart. Place in the freezer for 20 minutes to harden, then brush the dough tops with the egg wash and pierce the top of each with a small knife.


Bake until golden brown, switching and rotating cookie sheets halfway through baking to ensure even browning, about 15 minutes. Cool the turnovers on a wire cooling rack. May serve warm or cold.


Apple filling:
2 Granny Smith apples, peeled, cored and sliced
1 tablespoon butter
½ cup brown sugar
½ teaspoon cinnamon
1-1/2 teaspoons cornstarch

Melt the butter in a medium skillet over medium heat. Add the apples and stir for about 2 minutes. Add the brown sugar and cinnamon and cook, stirring, for 2 more minutes. Stir together the cornstarch and ½ tablespoon water. Pour into the skillet, mix well, and cook for 1 more minute until thickened. Remove from the heat to cool. When adding to the pastry sheets, drain the apples slightly so the turnovers won’t have too much liquid.